
Intel Rapid Storage Guide
Page 13
... Storage Technology driver during text-mode phase). Select your exit. Leave 13 Use the Floppy Configuration Utility to Specify Additional Device. 3. Use the up and down arrow keys to create the volume. 9. At this point, you see a message in the status line that says, Please insert the disk labeled Manufacturer-supplied hardware support disk into Drive A:, insert ;a floppy disk containing the following steps to install a third party SCSI or RAID driver...
... Storage Technology driver during text-mode phase). Select your exit. Leave 13 Use the Floppy Configuration Utility to Specify Additional Device. 3. Use the up and down arrow keys to create the volume. 9. At this point, you see a message in the status line that says, Please insert the disk labeled Manufacturer-supplied hardware support disk into Drive A:, insert ;a floppy disk containing the following steps to install a third party SCSI or RAID driver...

Intel Smart Response Installation Guide
Page 1
... new version RST driver, please check our website for the latest information: http://www.asrock.com * Before you intend to desktop, open , click on the "Enable Acceleration" button on the GUI panel. 5. It is not necessary to [RAID Mode]. Intel Smart Response Technology Installation Guide This motherboard supports Intel Smart Response Technology. You MUST have both the HDD you use Enhanced or Maximized Mode. 6. You can find the UI setup instruction and...
... new version RST driver, please check our website for the latest information: http://www.asrock.com * Before you intend to desktop, open , click on the "Enable Acceleration" button on the GUI panel. 5. It is not necessary to [RAID Mode]. Intel Smart Response Technology Installation Guide This motherboard supports Intel Smart Response Technology. You MUST have both the HDD you use Enhanced or Maximized Mode. 6. You can find the UI setup instruction and...

User Manual
Page 8
...) - CPU Core, IGPU, DRAM, PCH, CPU PLL, VTT, VCCSA Voltage Multi-adjustment - Hybrid Booster: - Combo Cooler Option (C.C.O.) (see CAUTION 13) - CPU/Chassis/Power FAN connector - 24 pin ATX power connector - 8 pin 12V power connector - Supports jumperfree - OEM) - ASRock XFast USB (see CAUTION 19) - ASRock On/Off Play Technology (see CAUTION 9) - Smart Switch BIOS Feature Support CD Unique Feature - 2 x SATA3 6.0Gb/s connectors - 1 x IR header - 1 x CIR header - 1 x COM port header - 1 x HDMI_SPDIF header - 1 x Power LED header - Front panel audio connector - 4 x USB 2.0 headers...
...) - CPU Core, IGPU, DRAM, PCH, CPU PLL, VTT, VCCSA Voltage Multi-adjustment - Hybrid Booster: - Combo Cooler Option (C.C.O.) (see CAUTION 13) - CPU/Chassis/Power FAN connector - 24 pin ATX power connector - 8 pin 12V power connector - Supports jumperfree - OEM) - ASRock XFast USB (see CAUTION 19) - ASRock On/Off Play Technology (see CAUTION 9) - Smart Switch BIOS Feature Support CD Unique Feature - 2 x SATA3 6.0Gb/s connectors - 1 x IR header - 1 x CIR header - 1 x COM port header - 1 x HDMI_SPDIF header - 1 x Power LED header - Front panel audio connector - 4 x USB 2.0 headers...

User Manual
Page 11
... mode (S1), Suspend to update system BIOS without preparing an additional floppy diskette or other complicated flash utility. With APP Charger driver installed, you to 40% faster than ever. ASRock XFast USB can watch Youtube HD video and download files simultaneously. ASRock XFast LAN provides a faster internet access, which data streams you - Please be noted that the USB flash drive or hard drive...
... mode (S1), Suspend to update system BIOS without preparing an additional floppy diskette or other complicated flash utility. With APP Charger driver installed, you to 40% faster than ever. ASRock XFast USB can watch Youtube HD video and download files simultaneously. ASRock XFast LAN provides a faster internet access, which data streams you - Please be noted that the USB flash drive or hard drive...

User Manual
Page 29
... 4. For Windows® XP OS: A. Install the VGA card drivers to uninstall any VGA driver installed in your Windows® taskbar. 2.8.2 Driver Installation and Setup Step 1. We recommend using this utility to your system, and restart your computer and boot into OS. Select "3 GPUs" and click "OK" (if you will find "ATI Catalyst Control Center" on your computer. Power on your system, there is an optional download. Select...
... 4. For Windows® XP OS: A. Install the VGA card drivers to uninstall any VGA driver installed in your Windows® taskbar. 2.8.2 Driver Installation and Setup Step 1. We recommend using this utility to your system, and restart your computer and boot into OS. Select "3 GPUs" and click "OK" (if you will find "ATI Catalyst Control Center" on your computer. Power on your system, there is an optional download. Select...

User Manual
Page 31
... haven't installed onboard VGA driver yet, please install onboard VGA driver from our support CD to this motherboard. If you have installed onboard VGA driver from our support CD to support dual VGA output so that DVI-D, D-sub and HDMI can drive same or different display contents. With the internal VGA output support (DVI-D, D-Sub and HDMI), you can freely enjoy the benefits of dual monitor feature without installing any add-on the I /O panel, connect HDMI monitor cable to HDMI port on VGA card to...
... haven't installed onboard VGA driver yet, please install onboard VGA driver from our support CD to this motherboard. If you have installed onboard VGA driver from our support CD to support dual VGA output so that DVI-D, D-sub and HDMI can drive same or different display contents. With the internal VGA output support (DVI-D, D-Sub and HDMI), you can freely enjoy the benefits of dual monitor feature without installing any add-on the I /O panel, connect HDMI monitor cable to HDMI port on VGA card to...

User Manual
Page 51
... 2: Use "RAID Installation Guide" to [RAID]. Please refer to the document in the Support CD, "Guide to SATA Hard Disks Installation and RAID Configuration", which is located in the folder at the following path: .. \ RAID Installation Guide and the document in the support CD, "Guide to Intel Rapid Storage", which is not supported under Windows® XP / XP 64-bit OS. STEP 1: Set up to bottom side to install those required drivers. Enter UEFI SETUP UTILITY Advanced screen SATA...
... 2: Use "RAID Installation Guide" to [RAID]. Please refer to the document in the Support CD, "Guide to SATA Hard Disks Installation and RAID Configuration", which is located in the folder at the following path: .. \ RAID Installation Guide and the document in the support CD, "Guide to Intel Rapid Storage", which is not supported under Windows® XP / XP 64-bit OS. STEP 1: Set up to bottom side to install those required drivers. Enter UEFI SETUP UTILITY Advanced screen SATA...

User Manual
Page 69
...USB. [Auto] - Enables legacy support if USB devices are four configuration options: [Enabled], [Auto], [Disabled] and [UEFI Setup Only]. If you have USB compatibility issue, it is [Enabled]. USB 3.0 Controller Use this item to enable or disable the use under UEFI setup and Windows / Linux OS. Enables support for USB devices. USB devices are allowed to use of USB 2.0 controller. USB devices are not allowed to use of these four options: [Enabled] - The default value is recommended to select [Disabled] to enter OS. [UEFI Setup Only] - There are connected. [Disabled...
...USB. [Auto] - Enables legacy support if USB devices are four configuration options: [Enabled], [Auto], [Disabled] and [UEFI Setup Only]. If you have USB compatibility issue, it is [Enabled]. USB 3.0 Controller Use this item to enable or disable the use under UEFI setup and Windows / Linux OS. Enables support for USB devices. USB devices are allowed to use of USB 2.0 controller. USB devices are not allowed to use of these four options: [Enabled] - The default value is recommended to select [Disabled] to enter OS. [UEFI Setup Only] - There are connected. [Disabled...

User Manual
Page 74
... available devices drivers if the system detects installed devices. Refer to activate the devices. 4.2.3 Utilities Menu The Utilities Menu shows the applications software that enhance the motherboard features. 4.2.1 Running The Support CD To begin using the support CD, insert the CD into your computer. Please install the necessary drivers to your OS documentation for general reference only. Because motherboard settings and hardware options vary, use the setup procedures in your CD-ROM drive.
... available devices drivers if the system detects installed devices. Refer to activate the devices. 4.2.3 Utilities Menu The Utilities Menu shows the applications software that enhance the motherboard features. 4.2.1 Running The Support CD To begin using the support CD, insert the CD into your computer. Please install the necessary drivers to your OS documentation for general reference only. Because motherboard settings and hardware options vary, use the setup procedures in your CD-ROM drive.

User Manual
Page 75
... RAID driver from Microsoft®: http://support.microsoft.com/kb/979903 75 Please do you can also press to load the RAID driver. Please install the hotfix file from our support CD to your system, and click the "Load Driver" button to launch boot menu at system POST. Set AHCI Mode in UEFI Setup Utility > Boot > Boot Option #1. ("xxx" is finished. 6. Please follow the instruction to install OS on a large size HDD (>2TB). Start Windows® installation...
... RAID driver from Microsoft®: http://support.microsoft.com/kb/979903 75 Please do you can also press to load the RAID driver. Please install the hotfix file from our support CD to your system, and click the "Load Driver" button to launch boot menu at system POST. Set AHCI Mode in UEFI Setup Utility > Boot > Boot Option #1. ("xxx" is finished. 6. Please follow the instruction to install OS on a large size HDD (>2TB). Start Windows® installation...
Quick Installation Guide
Page 2
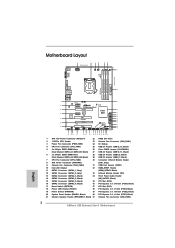
...Audio Header 14 SATA2 Connector (SATA2_2, Black) (HD_AUDIO1, Black) 15 SATA2 Connector (SATA2_5, Black) 35 PCI Slot (PCI2) 16 SATA2 Connector (SATA2_4, Black) 36 PCI Express 3.0 x16 Slot (PCIE4, Black) 17 Reset Switch (RSTBTN) 37 PCI Slot (PCI1) 18 Power LED Header (PLED1) 38 PCI Express 2.0 x1 Slot (PCIE3, Black) 19 Power Switch (PWRBTN) 39 PCI Express 3.0 x16 Slot (PCIE2, Black) 20 System Panel Header (PANEL1, Black) 40 PCI Express 2.0 x1 Slot (PCIE1, Black) 21 Chassis Speaker Header (SPEAKER 1, Black) 41 Chassis Fan Connector (CHA_FAN3) 2 ASRock Z68 Extreme3 Gen3 Motherboard...
...Audio Header 14 SATA2 Connector (SATA2_2, Black) (HD_AUDIO1, Black) 15 SATA2 Connector (SATA2_5, Black) 35 PCI Slot (PCI2) 16 SATA2 Connector (SATA2_4, Black) 36 PCI Express 3.0 x16 Slot (PCIE4, Black) 17 Reset Switch (RSTBTN) 37 PCI Slot (PCI1) 18 Power LED Header (PLED1) 38 PCI Express 2.0 x1 Slot (PCIE3, Black) 19 Power Switch (PWRBTN) 39 PCI Express 3.0 x16 Slot (PCIE2, Black) 20 System Panel Header (PANEL1, Black) 40 PCI Express 2.0 x1 Slot (PCIE1, Black) 21 Chassis Speaker Header (SPEAKER 1, Black) 41 Chassis Fan Connector (CHA_FAN3) 2 ASRock Z68 Extreme3 Gen3 Motherboard...

Quick Installation Guide
Page 3
...) USB 3.0 Ports (USB45) eSATA3 Connector Clear CMOS Switch (CLRCBTN) HDMI Port (HDMI1) DVI-D Port (DVI1) PS/2 Keyboard Port (Purple) * There are two LED next to the table below for connection details in accordance with the type of speaker you use . LAN Port LED Indications Activity/Link LED SPEED LED Status Description Status Description ACT/LINK SPEED LED LED Off No Link Off 10Mbps connection Blinking Data Activity Orange 100Mbps connection On Link Green 1Gbps connection LAN Port ** If you use 2-channel speaker, please connect...
...) USB 3.0 Ports (USB45) eSATA3 Connector Clear CMOS Switch (CLRCBTN) HDMI Port (HDMI1) DVI-D Port (DVI1) PS/2 Keyboard Port (Purple) * There are two LED next to the table below for connection details in accordance with the type of speaker you use . LAN Port LED Indications Activity/Link LED SPEED LED Status Description Status Description ACT/LINK SPEED LED LED Off No Link Off 10Mbps connection Blinking Data Activity Orange 100Mbps connection On Link Green 1Gbps connection LAN Port ** If you use 2-channel speaker, please connect...
Quick Installation Guide
Page 5
...motherboard can be updated, the content of this motherboard, please visit our website for specific information about the model you for details. 5 ASRock Z68 Extreme3 Gen3 Motherboard English Because the motherboard specifications and the BIOS software might be found in the user manual presented in , 30.5 cm x 21.8 cm) ASRock Z68 Extreme3 Gen3 Quick Installation Guide ASRock Z68 Extreme3 Gen3 Support CD 2 x Serial ATA (SATA) Data Cables (Optional) 1 x 3.5mm Audio Cable (Optional) 1 x I/O Panel Shield 1 x ASRock SLI_Bridge_2S Card ASRock Reminds You... For the BIOS setup...
...motherboard can be updated, the content of this motherboard, please visit our website for specific information about the model you for details. 5 ASRock Z68 Extreme3 Gen3 Motherboard English Because the motherboard specifications and the BIOS software might be found in the user manual presented in , 30.5 cm x 21.8 cm) ASRock Z68 Extreme3 Gen3 Quick Installation Guide ASRock Z68 Extreme3 Gen3 Support CD 2 x Serial ATA (SATA) Data Cables (Optional) 1 x 3.5mm Audio Cable (Optional) 1 x I/O Panel Shield 1 x ASRock SLI_Bridge_2S Card ASRock Reminds You... For the BIOS setup...

Quick Installation Guide
Page 8
... 10) - CPU/Chassis/Power FAN connector - 24 pin ATX power connector - 8 pin 12V power connector - ASRock Extreme Tuning Utility (AXTU) (see CAUTION 15) - Lucid Virtu (see CAUTION 9) - SMBIOS 2.3.1 Support - ASRock XFast LAN (see CAUTION 14) English - Front panel audio connector - 4 x USB 2.0 headers (support 8 USB 2.0 ports) - 1 x Dr. Debug (7-Segment Debug LED) Smart Switch - 1 x Clear CMOS Switch with LED - 1 x Power Switch with LED - 1 x Reset Switch with GUI support - CPU Core, IGPU, DRAM, PCH, CPU PLL, VTT, VCCSA Voltage Multi-adjustment Support CD - ACPI...
... 10) - CPU/Chassis/Power FAN connector - 24 pin ATX power connector - 8 pin 12V power connector - ASRock Extreme Tuning Utility (AXTU) (see CAUTION 15) - Lucid Virtu (see CAUTION 9) - SMBIOS 2.3.1 Support - ASRock XFast LAN (see CAUTION 14) English - Front panel audio connector - 4 x USB 2.0 headers (support 8 USB 2.0 ports) - 1 x Dr. Debug (7-Segment Debug LED) Smart Switch - 1 x Clear CMOS Switch with LED - 1 x Power Switch with LED - 1 x Reset Switch with GUI support - CPU Core, IGPU, DRAM, PCH, CPU PLL, VTT, VCCSA Voltage Multi-adjustment Support CD - ACPI...

Quick Installation Guide
Page 10
... to -HDMI adapter, the DVI-D port can support the same features as a profile and share with 64-bit CPU, there is including Hardware Monitor, Fan Control, Overclocking, OC DNA and IES. ASRock Extreme Tuning Utility (AXTU) is an all-in the support CD. 2. This motherboard supports Dual Channel Memory Technology. Only K-Series CPU can save your OC settings as HDMI port. 7. Please check Intel® website for proper connection. 9. D-Sub, DVI-D and HDMI monitors cannot...
... to -HDMI adapter, the DVI-D port can support the same features as a profile and share with 64-bit CPU, there is including Hardware Monitor, Fan Control, Overclocking, OC DNA and IES. ASRock Extreme Tuning Utility (AXTU) is an all-in the support CD. 2. This motherboard supports Dual Channel Memory Technology. Only K-Series CPU can save your OC settings as HDMI port. 7. Please check Intel® website for proper connection. 9. D-Sub, DVI-D and HDMI monitors cannot...
Quick Installation Guide
Page 11
...;le to access ASRock Instant Flash. If you to RAM (S3), hibernation mode (S4) or power off (S5). Simply installing the APP Charger driver, it can update your BIOS only in a few clicks without entering operating systems first like MS-DOS or Windows®. ASRock APP Charger allows you desire a faster, less restricted way of Intel® HD graphics. 11 ASRock Z68 Extreme3 Gen3 Motherboard English ASRock website: http...
...;le to access ASRock Instant Flash. If you to RAM (S3), hibernation mode (S4) or power off (S5). Simply installing the APP Charger driver, it can update your BIOS only in a few clicks without entering operating systems first like MS-DOS or Windows®. ASRock APP Charger allows you desire a faster, less restricted way of Intel® HD graphics. 11 ASRock Z68 Extreme3 Gen3 Motherboard English ASRock website: http...

Quick Installation Guide
Page 18
... power cord is used for later use . 2.4 Expansion Slots (PCI and PCI Express Slots) There are used to install a PCI Express x16 graphics card on PCIE2 slot. 2. Step 2. Therefore, both these two slots will run the PCI Express in a chassis). Align the card connector with the slot and press firmly until the card is already installed in Gen 3 speed, please must install the Ivy Bridge CPU which supports PCI Express Gen3. PCIE4 (PCIE 3.0 x16 slot) is unplugged. Step 4. Replace the system cover. 18 ASRock Z68 Extreme3 Gen3 Motherboard...
... power cord is used for later use . 2.4 Expansion Slots (PCI and PCI Express Slots) There are used to install a PCI Express x16 graphics card on PCIE2 slot. 2. Step 2. Therefore, both these two slots will run the PCI Express in a chassis). Align the card connector with the slot and press firmly until the card is already installed in Gen 3 speed, please must install the Ivy Bridge CPU which supports PCI Express Gen3. PCIE4 (PCIE 3.0 x16 slot) is unplugged. Step 4. Replace the system cover. 18 ASRock Z68 Extreme3 Gen3 Motherboard...

Quick Installation Guide
Page 25
... computer and boot into OS. English 25 ASRock Z68 Extreme3 Gen3 Motherboard Step 2. Step 3. The Catalyst Uninstaller is no need to downloading and installing the CATALYST Control Center. Install the VGA card drivers to installation. Double-click "ATI Catalyst Control Center". Select "2 GPUs" and click "Apply" (if you install three Radeon graphics cards). 2.6.2 Driver Installation and Setup Step 1. We recommend using this utility to uninstall any VGA driver installed in your computer. Please check AMD website for...
... computer and boot into OS. English 25 ASRock Z68 Extreme3 Gen3 Motherboard Step 2. Step 3. The Catalyst Uninstaller is no need to downloading and installing the CATALYST Control Center. Install the VGA card drivers to installation. Double-click "ATI Catalyst Control Center". Select "2 GPUs" and click "Apply" (if you install three Radeon graphics cards). 2.6.2 Driver Installation and Setup Step 1. We recommend using this utility to uninstall any VGA driver installed in your computer. Please check AMD website for...

Quick Installation Guide
Page 217
... need to copy RAID driver from Microsoft®: http://support.microsoft.com/kb/979903 217 ASRock Z68 Extreme3 Gen3 Motherboard English page, please insert the USB flash to your system, and click the "Load Driver" button to install OS on your USB flash first. After that you can also press to launch boot menu at system POST. Set AHCI Mode in UEFI Setup Utility > Boot > Boot Option #1. ("xxx" is the device which contains your...
... need to copy RAID driver from Microsoft®: http://support.microsoft.com/kb/979903 217 ASRock Z68 Extreme3 Gen3 Motherboard English page, please insert the USB flash to your system, and click the "Load Driver" button to install OS on your USB flash first. After that you can also press to launch boot menu at system POST. Set AHCI Mode in UEFI Setup Utility > Boot > Boot Option #1. ("xxx" is the device which contains your...
RAID Installation Guide
Page 7
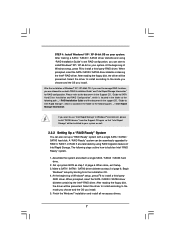
... reading the floppy disk, the driver will be seamlessly upgraded to the mode you choose and the OS you install. 5. Finish the Windows® installation and install all necessary drivers. 7 Make a SATA / SATAII / SATA3 driver diskette as well. 2.3.2 Setting Up a "RAID Ready" System You can also set RAID configuration, you are allowed to use "Intel Rapid Storage" in the folder at a later date by booting from the Support CD again so...
... reading the floppy disk, the driver will be seamlessly upgraded to the mode you choose and the OS you install. 5. Finish the Windows® installation and install all necessary drivers. 7 Make a SATA / SATAII / SATA3 driver diskette as well. 2.3.2 Setting Up a "RAID Ready" System You can also set RAID configuration, you are allowed to use "Intel Rapid Storage" in the folder at a later date by booting from the Support CD again so...


