

User Manual
Page 6
... 1 and 2 contains the introduction of this motherboard, please visit our website for purchasing ASRock Z170 Pro4 motherboard, a reliable motherboard produced under ASRock's consistently stringent quality control. ASRock website http://www.asrock.com. 1.1 Package Contents • ASRock Z170 Pro4 Motherboard (ATX Form Factor) • ASRock Z170 Pro4 Quick Installation Guide • ASRock Z170 Pro4 Support CD • 2 x Serial ATA (SATA) Data Cables (Optional) • 1 x I/O Panel Shield...
... 1 and 2 contains the introduction of this motherboard, please visit our website for purchasing ASRock Z170 Pro4 motherboard, a reliable motherboard produced under ASRock's consistently stringent quality control. ASRock website http://www.asrock.com. 1.1 Package Contents • ASRock Z170 Pro4 Motherboard (ATX Form Factor) • ASRock Z170 Pro4 Quick Installation Guide • ASRock Z170 Pro4 Support CD • 2 x Serial ATA (SATA) Data Cables (Optional) • 1 x I/O Panel Shield...

User Manual
Page 8
resolution up to 4K x 2K (4096x2304) @ 24Hz • Supports DVI-D with max. Z170 Pro4 • Dual graphics output: Support DVI-D and HDMI ports by independent display controllers • Supports HDMI with max. resolution up to 1920x1200 @ 60Hz ... Caps LAN • Gigabit LAN 10/100/1000 Mb/s • Giga PHY Intel® I219V • Supports Wake-On-LAN • Supports Lightning/ESD Protection (ASRock Full Spike Protection) • Supports Energy Efficient Ethernet 802.3az • Supports PXE Rear Panel I/O • 1 x PS/2 Mouse/Keyboard Port • 1 x DVI-D Port •...
resolution up to 4K x 2K (4096x2304) @ 24Hz • Supports DVI-D with max. Z170 Pro4 • Dual graphics output: Support DVI-D and HDMI ports by independent display controllers • Supports HDMI with max. resolution up to 1920x1200 @ 60Hz ... Caps LAN • Gigabit LAN 10/100/1000 Mb/s • Giga PHY Intel® I219V • Supports Wake-On-LAN • Supports Lightning/ESD Protection (ASRock Full Spike Protection) • Supports Energy Efficient Ethernet 802.3az • Supports PXE Rear Panel I/O • 1 x PS/2 Mouse/Keyboard Port • 1 x DVI-D Port •...
User Manual
Page 10
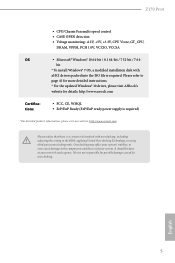
... WHQL • ErP/EuP Ready (ErP/EuP ready power supply is required) * For detailed product information, please visit our website: http://www.asrock.com Please realize that there is required. English 5 bit * To install Windows® 7 OS, a modified installation disk with xHCI drivers packed ...possible damage caused by overclocking. Please refer to the components and devices of your own risk and expense. It should be done at your system. Z170 Pro4 • CPU/Chassis Fan multi-speed control • CASE OPEN detection • Voltage monitoring: +12V, +5V, +3.3V, CPU Vcore, ...
... WHQL • ErP/EuP Ready (ErP/EuP ready power supply is required) * For detailed product information, please visit our website: http://www.asrock.com Please realize that there is required. English 5 bit * To install Windows® 7 OS, a modified installation disk with xHCI drivers packed ...possible damage caused by overclocking. Please refer to the components and devices of your own risk and expense. It should be done at your system. Z170 Pro4 • CPU/Chassis Fan multi-speed control • CASE OPEN detection • Voltage monitoring: +12V, +5V, +3.3V, CPU Vcore, ...

User Manual
Page 11
... Bottom: CTR BASS Top: LINE IN Center: FRONT Bottom: MIC IN USB 3.0 T: USB3 B: USB4 USB 3.0 T: USB5 B: USB6 Top: RJ-45 PCIE_PWR1 CPU_FAN1 USB3_7_8 CHA_FAN3 PCIE1 Z170 Pro4 PCIE2 PCI Express 3.0 Ultra M.2 PCIe Gen3 x4 CT5 CT4 CT3 CT2 CT1 M2_1 1 Front USB 3.0 HD_AUDIO1 1 PCIE3 PCIE4 RoHS CLRMOS1 1 Intel...
... Bottom: CTR BASS Top: LINE IN Center: FRONT Bottom: MIC IN USB 3.0 T: USB3 B: USB4 USB 3.0 T: USB5 B: USB6 Top: RJ-45 PCIE_PWR1 CPU_FAN1 USB3_7_8 CHA_FAN3 PCIE1 Z170 Pro4 PCIE2 PCI Express 3.0 Ultra M.2 PCIe Gen3 x4 CT5 CT4 CT3 CT2 CT1 M2_1 1 Front USB 3.0 HD_AUDIO1 1 PCIE3 PCIE4 RoHS CLRMOS1 1 Intel...

User Manual
Page 14
... "2CH", "4CH", "6CH", or "8CH" and then you need to connect a front panel audio cable to the table below for the LAN port LED indications. Z170 Pro4 * There are allowed to select "Realtek HDA Primary output" to use the Rear Speaker, Central/Bass, and Front Speaker, or select "Realtek HDA Audio 2nd...
... "2CH", "4CH", "6CH", or "8CH" and then you need to connect a front panel audio cable to the table below for the LAN port LED indications. Z170 Pro4 * There are allowed to select "Realtek HDA Primary output" to use the Rear Speaker, Central/Bass, and Front Speaker, or select "Realtek HDA Audio 2nd...

User Manual
Page 16
Unplug all power cables before installing the CPU. 1 A B 2 11 English Otherwise, the CPU will be seriously damaged. 2. Z170 Pro4 2.1 Installing the CPU 1. Do not force to insert the CPU into the socket, please check if the PnP cap is on the socket, if the CPU surface is found. Before you insert the 1151-Pin CPU into the socket if above situation is unclean, or if there are any bent pins in the socket.
Unplug all power cables before installing the CPU. 1 A B 2 11 English Otherwise, the CPU will be seriously damaged. 2. Z170 Pro4 2.1 Installing the CPU 1. Do not force to insert the CPU into the socket, please check if the PnP cap is on the socket, if the CPU surface is found. Before you insert the 1151-Pin CPU into the socket if above situation is unclean, or if there are any bent pins in the socket.
User Manual
Page 18
Z170 Pro4 Please save and replace the cover if the processor is removed. The cover must be placed if you wish to return the motherboard for after service. 13 English
Z170 Pro4 Please save and replace the cover if the processor is removed. The cover must be placed if you wish to return the motherboard for after service. 13 English
User Manual
Page 20
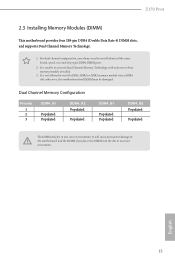
... Configuration Priority 1 2 3 DDR4_A1 Populated Populated DDR4_A2 Populated Populated DDR4_B1 Populated Populated DDR4_B2 Populated Populated The DIMM only fits in one or three memory module installed. 3. Z170 Pro4 2.3 Installing Memory Modules (DIMM) This motherboard provides four 288-pin DDR4 (Double Data Rate 4) DIMM slots, and supports Dual Channel Memory Technology. 1. It is unable...
... Configuration Priority 1 2 3 DDR4_A1 Populated Populated DDR4_A2 Populated Populated DDR4_B1 Populated Populated DDR4_B2 Populated Populated The DIMM only fits in one or three memory module installed. 3. Z170 Pro4 2.3 Installing Memory Modules (DIMM) This motherboard provides four 288-pin DDR4 (Double Data Rate 4) DIMM slots, and supports Dual Channel Memory Technology. 1. It is unable...
User Manual
Page 22
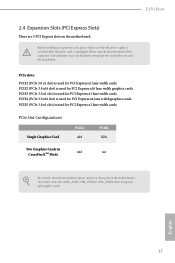
... for the card before you start the installation. Before installing an expansion card, please make necessary hardware settings for PCI Express x1 lane width cards. Z170 Pro4 2.4 Expansion Slots (PCI Express Slots) There are 5 PCI Express slots on the motherboard. PCIe slots: PCIE1 (PCIe 3.0 x1 slot) is unplugged. PCIe Slot Configurations Single...
... for the card before you start the installation. Before installing an expansion card, please make necessary hardware settings for PCI Express x1 lane width cards. Z170 Pro4 2.4 Expansion Slots (PCI Express Slots) There are 5 PCI Express slots on the motherboard. PCIe slots: PCIE1 (PCIe 3.0 x1 slot) is unplugged. PCIe Slot Configurations Single...
User Manual
Page 24
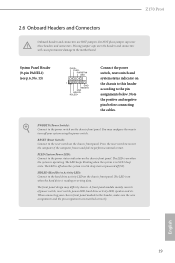
... headers and connectors will cause permanent damage to the pin assignments below. RESET (Reset Switch): Connect to the power switch on the chassis front panel. Z170 Pro4 2.6 Onboard Headers and Connectors Onboard headers and connectors are matched correctly. PWRBTN (Power Switch): Connect to the reset switch on the chassis front panel. The...
... headers and connectors will cause permanent damage to the pin assignments below. RESET (Reset Switch): Connect to the power switch on the chassis front panel. Z170 Pro4 2.6 Onboard Headers and Connectors Onboard headers and connectors are matched correctly. PWRBTN (Power Switch): Connect to the reset switch on the chassis front panel. The...

User Manual
Page 26
Z170 Pro4 USB 3.0 Header (19-pin USB3_7_8) (see p.6, No. 24) GND PRESENCE# MIC_RET OUT_RET 1 OUT2_L J_SENSE OUT2_R MIC2_R MIC2_L This header is one header on the chassis ...
Z170 Pro4 USB 3.0 Header (19-pin USB3_7_8) (see p.6, No. 24) GND PRESENCE# MIC_RET OUT_RET 1 OUT2_L J_SENSE OUT2_R MIC2_R MIC2_L This header is one header on the chassis ...
User Manual
Page 28
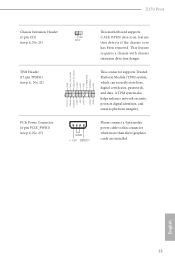
.... A TPM system also helps enhance network security, protects digital identities, and ensures platform integrity. English 23 This feature requires a chassis with chassis intrusion detection design. Z170 Pro4 Chassis Intrusion Header (2-pin CI1) (see p.6, No. 27) GND +12V DETECT Please connect a 4 pin molex power cable to this connector when more than three graphics...
.... A TPM system also helps enhance network security, protects digital identities, and ensures platform integrity. English 23 This feature requires a chassis with chassis intrusion detection design. Z170 Pro4 Chassis Intrusion Header (2-pin CI1) (see p.6, No. 27) GND +12V DETECT Please connect a 4 pin molex power cable to this connector when more than three graphics...

User Manual
Page 30
Z170 Pro4 Step 3 Connect a VGA cable or a DVI cable to the monitor connector or the DVI connector of the graphics card that is inserted to PCIE2 slot. 25 English
Z170 Pro4 Step 3 Connect a VGA cable or a DVI cable to the monitor connector or the DVI connector of the graphics card that is inserted to PCIE2 slot. 25 English

User Manual
Page 32
Z170 Pro4 2.8 M.2_SSD (NGFF) Module Installation Guide The M.2, also known as the Next Generation Form Factor (NGFF), is a small size and versatile card edge connector that if ...
Z170 Pro4 2.8 M.2_SSD (NGFF) Module Installation Guide The M.2, also known as the Next Generation Form Factor (NGFF), is a small size and versatile card edge connector that if ...

User Manual
Page 34
... TM8PS4128GMC105 TM8PS4256GMC105 TM4PS4256GMC105 TS256GMTS400 TS512GMTS800 TS512GMTS600 For the latest updates of M.2_SSD (NFGG) module support list, please visit our website for details: http://www.asrock.com English 29 Z170 Pro4 E D NUT2 NUT1 Step 6 Tighten the screw with a screwdriver to secure the module into place. Please do not overtighten the screw as this might...
... TM8PS4128GMC105 TM8PS4256GMC105 TM4PS4256GMC105 TS256GMTS400 TS512GMTS800 TS512GMTS600 For the latest updates of M.2_SSD (NFGG) module support list, please visit our website for details: http://www.asrock.com English 29 Z170 Pro4 E D NUT2 NUT1 Step 6 Tighten the screw with a screwdriver to secure the module into place. Please do not overtighten the screw as this might...
User Manual
Page 36
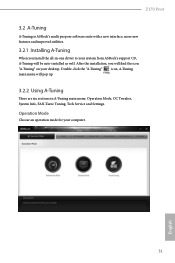
... CD, A-Tuning will be auto-installed as well. Double-click the "A-Tuning" icon, A-Tuning main menu will find the icon "A-Tuning" on your desktop. Z170 Pro4 3.2 A-Tuning A-Tuning is ASRock's multi purpose software suite with a new interface, more new features and improved utilities. 3.2.1 Installing A-Tuning When you will pop up. 3.2.2 Using A-Tuning There...
... CD, A-Tuning will be auto-installed as well. Double-click the "A-Tuning" icon, A-Tuning main menu will find the icon "A-Tuning" on your desktop. Z170 Pro4 3.2 A-Tuning A-Tuning is ASRock's multi purpose software suite with a new interface, more new features and improved utilities. 3.2.1 Installing A-Tuning When you will pop up. 3.2.2 Using A-Tuning There...

User Manual
Page 38
Tech Service Contact Tech Service if you have problems with details of the problem. 33 English Z170 Pro4 FAN-Tastic Tuning Configure up to the next speed level when the assigned temperature is met. Please leave your contact information along with your computer. The fans will automatically shift to five different fan speeds using the graph.
Tech Service Contact Tech Service if you have problems with details of the problem. 33 English Z170 Pro4 FAN-Tastic Tuning Configure up to the next speed level when the assigned temperature is met. Please leave your contact information along with your computer. The fans will automatically shift to five different fan speeds using the graph.
User Manual
Page 40
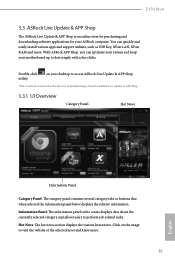
on the image to perform job-related tasks. Z170 Pro4 3.3 ASRock Live Update & APP Shop The ASRock Live Update & APP Shop is an online store for purchasing and downloading software applications for your motherboard up to download apps from the ASRock Live Update & APP Shop. 3.3.1 UI Overview Category Panel... Panel: The category panel contains several category tabs or buttons that when selected the information panel below displays the relative information. With ASRock APP Shop, you can quickly and easily install various apps and support utilities, such as USB Key, XFast LAN, XFast RAM ...
on the image to perform job-related tasks. Z170 Pro4 3.3 ASRock Live Update & APP Shop The ASRock Live Update & APP Shop is an online store for purchasing and downloading software applications for your motherboard up to download apps from the ASRock Live Update & APP Shop. 3.3.1 UI Overview Category Panel... Panel: The category panel contains several category tabs or buttons that when selected the information panel below displays the relative information. With ASRock APP Shop, you can quickly and easily install various apps and support utilities, such as USB Key, XFast LAN, XFast RAM ...

User Manual
Page 42
English To uninstall it, simply click on the upper right corner. Step 4 When installation completes, you want to install the app, click on the red icon to start downloading. Z170 Pro4 Step 3 If you can find the green "Installed" icon appears on the trash can icon . *The trash icon may not appear for certain apps. 37
English To uninstall it, simply click on the upper right corner. Step 4 When installation completes, you want to install the app, click on the red icon to start downloading. Z170 Pro4 Step 3 If you can find the green "Installed" icon appears on the trash can icon . *The trash icon may not appear for certain apps. 37

User Manual
Page 44
Click on Step 2 to see more items you will see a list of recommended or critical updates for the BIOS or drivers. Step 3 Click Update to start the update process. 39 English Step 1 Please check the item information before update. Please update them all soon. Click to select one or more details. Z170 Pro4 3.3.3 BIOS & Drivers Installing BIOS or Drivers When the "BIOS & Drivers" tab is selected, you want to update.
Click on Step 2 to see more items you will see a list of recommended or critical updates for the BIOS or drivers. Step 3 Click Update to start the update process. 39 English Step 1 Please check the item information before update. Please update them all soon. Click to select one or more details. Z170 Pro4 3.3.3 BIOS & Drivers Installing BIOS or Drivers When the "BIOS & Drivers" tab is selected, you want to update.


