RAID Installation Guide
Page 1
NVIDIA RAID Installation Guide 1. NVIDIA BIOS RAID Installation Guide 2 1.1 Introduction to RAID 2 1.2 RAID Configurations Precautions 3 1.3 Installing Windows 7 / 7 64-bit / Vista / Vista 64-bit / XP / XP 64-bit With RAID Functions 5 1.3.1 Installing ...
NVIDIA RAID Installation Guide 1. NVIDIA BIOS RAID Installation Guide 2 1.1 Introduction to RAID 2 1.2 RAID Configurations Precautions 3 1.3 Installing Windows 7 / 7 64-bit / Vista / Vista 64-bit / XP / XP 64-bit With RAID Functions 5 1.3.1 Installing ...

RAID Installation Guide
Page 2
...following the detailed instruction of the "User Manual" in our support CD or "Quick Installation Guide", you install. WARNING!! NVIDIA BIOS RAID Installation Guide NVIDIA BIOS RAID Installation Guide is a method combining two or more hard disk drives into one logical unit. This section includes examples of a... data transfer rate of using NVRAID RAID Utility for you to RAID mode by using NVIDIA RAID Utility under BIOS environment. 1. After you make a SATA / SATAII driver diskette, press to enter BIOS setup to the surviving drive as it will direct all applications to set .
...following the detailed instruction of the "User Manual" in our support CD or "Quick Installation Guide", you install. WARNING!! NVIDIA BIOS RAID Installation Guide NVIDIA BIOS RAID Installation Guide is a method combining two or more hard disk drives into one logical unit. This section includes examples of a... data transfer rate of using NVRAID RAID Utility for you to RAID mode by using NVIDIA RAID Utility under BIOS environment. 1. After you make a SATA / SATAII driver diskette, press to enter BIOS setup to the surviving drive as it will direct all applications to set .
RAID Installation Guide
Page 5
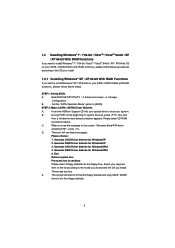
... install Windows® XP / XP 64-bit on your required item on the screen, "Generate Serial ATA driver diskette [YN]?", press . STEP 1: Set Up BIOS. Enter BIOS SETUP UTILITY Advanced screen Storage Configuration. Then you will start to format the floppy diskette and copy SATA / SATAII drivers into your optical drive to...; 7 / 7 64-bit / VistaTM / VistaTM 64-bit / XP / XP 64-bit OS on your SATA / SATAII HDDs with RAID functions, please follow below steps. Insert the ASRock Support CD into the floppy diskette. 5 Generate AHCI Driver diskette for WindowsXP 2.
... install Windows® XP / XP 64-bit on your required item on the screen, "Generate Serial ATA driver diskette [YN]?", press . STEP 1: Set Up BIOS. Enter BIOS SETUP UTILITY Advanced screen Storage Configuration. Then you will start to format the floppy diskette and copy SATA / SATAII drivers into your optical drive to...; 7 / 7 64-bit / VistaTM / VistaTM 64-bit / XP / XP 64-bit OS on your SATA / SATAII HDDs with RAID functions, please follow below steps. Insert the ASRock Support CD into the floppy diskette. 5 Generate AHCI Driver diskette for WindowsXP 2.

RAID Installation Guide
Page 6
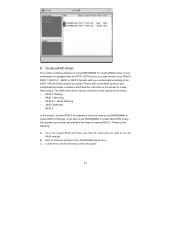
... set the RAID configuration by using the Windows RAID installation guide in the following path in BIOS first. You can start to configure RAID function, you need to set up "SATA Operation Mode" to the BIOS RAID installation guide in the following path in the Support CD: .. \ RAID Installation Guide 6 NVIDIA RAID...
... set the RAID configuration by using the Windows RAID installation guide in the following path in BIOS first. You can start to configure RAID function, you need to set up "SATA Operation Mode" to the BIOS RAID installation guide in the following path in the Support CD: .. \ RAID Installation Guide 6 NVIDIA RAID...

RAID Installation Guide
Page 7
...to set up "SATA Operation Mode" to install Windows® 7 / 7 64-bit / VistaTM / VistaTM 64-bit on the bottom to the BIOS RAID installation guide part of the document in the following path in the Support CD: .. \ RAID Installation Guide 7 When you see "Where do .../ VistaTM / VistaTM 64-bit OS on your system, and follow below steps. B. STEP 2: Use "RAID Installation Guide" to [RAID]. page, please insert the ASRock Support CD into the optical drive again to install Windows?" A. Please refer to load the NVIDIA® RAID drivers. If you install Windows® 7 / 7 64...
...to set up "SATA Operation Mode" to install Windows® 7 / 7 64-bit / VistaTM / VistaTM 64-bit on the bottom to the BIOS RAID installation guide part of the document in the following path in the Support CD: .. \ RAID Installation Guide 7 When you see "Where do .../ VistaTM / VistaTM 64-bit OS on your system, and follow below steps. B. STEP 2: Use "RAID Installation Guide" to [RAID]. page, please insert the ASRock Support CD into the optical drive again to install Windows?" A. Please refer to load the NVIDIA® RAID drivers. If you install Windows® 7 / 7 64...

RAID Installation Guide
Page 8
... software prompting you to Optimal as a part of the system POST and boot process prior to the steps of creating RAID 0. 8 After adjusting the system BIOS to create RAID 0. The RAID prompt appears as default. After you plan to use NVRAID RAID Utility to press before the window disappears. Define a New...
... software prompting you to Optimal as a part of the system POST and boot process prior to the steps of creating RAID 0. 8 After adjusting the system BIOS to create RAID 0. The RAID prompt appears as default. After you plan to use NVRAID RAID Utility to press before the window disappears. Define a New...

RAID Installation Guide
Page 9
... disks that are the drives that you have to the Array Disks block by pressing the right-arrow key. Move it from the RAID Config BIOS setup page appear in the Array Disks block. 9 These are available for use as RAID array disk, A. Tab to leave this value at the default...
... disks that are the drives that you have to the Array Disks block by pressing the right-arrow key. Move it from the RAID Config BIOS setup page appear in the Array Disks block. 9 These are available for use as RAID array disk, A. Tab to leave this value at the default...
RAID Installation Guide
Page 12
..., you may be mentioned in this section are as below: - RAID 5 In this section, we take RAID 0 for creating RAID arrays. Go to the system BIOS and make sure that the drives that you install. Boot to use NVRAIDMAN to create other RAID arrays, the operation procedures are RAID enabled. Please...
..., you may be mentioned in this section are as below: - RAID 5 In this section, we take RAID 0 for creating RAID arrays. Go to the system BIOS and make sure that the drives that you install. Boot to use NVRAIDMAN to create other RAID arrays, the operation procedures are RAID enabled. Please...

User Manual
Page 3
... 64-bit With RAID Functions 31 2.14.2 Installing Windows® 7 / 7 64-bit / VistaTM / VistaTM 64-bit With RAID Functions 32 2.15 Untied Overclocking Technology 33 3 . BIOS SETUP UTILITY 34 3.1 Introduction 34 3.1.1 BIOS Menu Bar 34 3.1.2 Navigation Keys 35 3.2 Main Screen 35 3 Contents 1 . Introduction 5 1.1 Package Contents 5 1.2 Specifications 6 1.3 Motherboard Layout 10 1.4 I/O Panel 11 2 .
... 64-bit With RAID Functions 31 2.14.2 Installing Windows® 7 / 7 64-bit / VistaTM / VistaTM 64-bit With RAID Functions 32 2.15 Untied Overclocking Technology 33 3 . BIOS SETUP UTILITY 34 3.1 Introduction 34 3.1.1 BIOS Menu Bar 34 3.1.2 Navigation Keys 35 3.2 Main Screen 35 3 Contents 1 . Introduction 5 1.1 Package Contents 5 1.2 Specifications 6 1.3 Motherboard Layout 10 1.4 I/O Panel 11 2 .

User Manual
Page 5
... information about the model you are using. It delivers excellent performance with robust design conforming to ASRock's commitment to BIOS setup and information of this motherboard, please visit our website for purchasing ASRock M3N78D motherboard, a reliable motherboard produced under ASRock's consistently stringent quality control. 1. You may find the latest VGA cards and CPU support lists...
... information about the model you are using. It delivers excellent performance with robust design conforming to ASRock's commitment to BIOS setup and information of this motherboard, please visit our website for purchasing ASRock M3N78D motherboard, a reliable motherboard produced under ASRock's consistently stringent quality control. 1. You may find the latest VGA cards and CPU support lists...

User Manual
Page 7
AMI Legal BIOS - Supports jumperfree - ASRock OC Tuner (see CAUTION 11) - ASRock OC DNA (see CAUTION 8) - Boot Failure Guard (B.F.G.) - Drivers, Utilities, AntiVirus Software (Trial Version), ASRock Software Suite (CyberLink DVD Suite and Creative Sound Blaster X-Fi MB) (OEM and ... - 1 x Chassis Intrusion header - 1 x Power LED header - CD in header - SMBIOS 2.3.1 Support - Instant Boot - Hybrid Booster: - ASRock U-COP (see CAUTION 14) 7 Chassis Temperature Sensing - CPU/Chassis/Power Fan Tachometer - CASE OPEN detection - EuP Ready (EuP ready power supply is...
AMI Legal BIOS - Supports jumperfree - ASRock OC Tuner (see CAUTION 11) - ASRock OC DNA (see CAUTION 8) - Boot Failure Guard (B.F.G.) - Drivers, Utilities, AntiVirus Software (Trial Version), ASRock Software Suite (CyberLink DVD Suite and Creative Sound Blaster X-Fi MB) (OEM and ... - 1 x Chassis Intrusion header - 1 x Power LED header - CD in header - SMBIOS 2.3.1 Support - Instant Boot - Hybrid Booster: - ASRock U-COP (see CAUTION 14) 7 Chassis Temperature Sensing - CPU/Chassis/Power Fan Tachometer - CASE OPEN detection - EuP Ready (EuP ready power supply is...
User Manual
Page 8
... 64-bit / VistaTM / XP 64-bit / XP SP1 or SP2. 8. * For detailed product information, please visit our website: http://www.asrock.com WARNING Please realize that there is no such limitation. 5. CAUTION! 1. For microphone input, this motherboard supports 2-channel, 4-channel, 6-channel, ...is a certain risk involved with overclocking, including adjusting the setting in the BIOS, applying Untied Overclocking Technology, or using the thirdparty overclocking tools. ASRock website: http://www.asrock.com 8 This motherboard supports Dual Channel Memory Technology. It is supported ...
... 64-bit / VistaTM / XP 64-bit / XP SP1 or SP2. 8. * For detailed product information, please visit our website: http://www.asrock.com WARNING Please realize that there is no such limitation. 5. CAUTION! 1. For microphone input, this motherboard supports 2-channel, 4-channel, 6-channel, ...is a certain risk involved with overclocking, including adjusting the setting in the BIOS, applying Untied Overclocking Technology, or using the thirdparty overclocking tools. ASRock website: http://www.asrock.com 8 This motherboard supports Dual Channel Memory Technology. It is supported ...

User Manual
Page 9
...the CPU. 13. Please be shared and worked on the motherboard functions properly and unplug the power cord, then plug it is a BIOS flash utility embedded in a few clicks without entering operating systems first like MS-DOS or Windows®. Frequencies other words, it back ... is able to improve efficiency when the CPU cores are required. The voltage regulator can save your OC settings as yours! ASRock website: http://www.asrock.com 10. With this motherboard offers stepless control, it is detected, the system will automatically shutdown. Just launch this tool...
...the CPU. 13. Please be shared and worked on the motherboard functions properly and unplug the power cord, then plug it is a BIOS flash utility embedded in a few clicks without entering operating systems first like MS-DOS or Windows®. Frequencies other words, it back ... is able to improve efficiency when the CPU cores are required. The voltage regulator can save your OC settings as yours! ASRock website: http://www.asrock.com 10. With this motherboard offers stepless control, it is detected, the system will automatically shutdown. Just launch this tool...

User Manual
Page 10
...Internal Audio Connector: CD1 (Black) 9 NVIDIA nForce 720D Chipset 27 Chassis Intrusion Header (CI1) 10 SATAII Connector (SATAII_4 (PORT 3), Red) 28 SPI BIOS Chip 11 SATAII Connector (SATAII_3 (PORT 2), Red) 29 PCI Express x1 Slot (PCIE4, White) 12 SATAII Connector (SATAII_2 (PORT 1), Red) 30 Clear...IN 34 33 32 31 30 29 28 27 26 25 24 CHA_FAN1 CPU_FAN1 M3N78D LAN PCIE1 PHY PCIE2 PCI Express 2.0 PCIE3 CMOS BATTERY Super I/O CI1 1 AUDIO CODEC CD1 HDMI_SPDIF1 1 HD_AUDIO1 FLOPPY1 1 PCIE4 8Mb BIOS 1 CLRCMOS1 PCI1 RoHS NVIDIA nForce 720D Chipset PCI2 PCI3 COM1 1 USB6_7 1...
...Internal Audio Connector: CD1 (Black) 9 NVIDIA nForce 720D Chipset 27 Chassis Intrusion Header (CI1) 10 SATAII Connector (SATAII_4 (PORT 3), Red) 28 SPI BIOS Chip 11 SATAII Connector (SATAII_3 (PORT 2), Red) 29 PCI Express x1 Slot (PCIE4, White) 12 SATAII Connector (SATAII_2 (PORT 1), Red) 30 Clear...IN 34 33 32 31 30 29 28 27 26 25 24 CHA_FAN1 CPU_FAN1 M3N78D LAN PCIE1 PHY PCIE2 PCI Express 2.0 PCIE3 CMOS BATTERY Super I/O CI1 1 AUDIO CODEC CD1 HDMI_SPDIF1 1 HD_AUDIO1 FLOPPY1 1 PCIE4 8Mb BIOS 1 CLRCMOS1 PCI1 RoHS NVIDIA nForce 720D Chipset PCI2 PCI3 COM1 1 USB6_7 1...

User Manual
Page 18
If no jumper cap is "Open". Note: To select +5VSB, it down before you do not clear the CMOS right after you update the BIOS. After waiting for 15 seconds, use a jumper cap to short pin2 and pin3 on pins, the jumper is placed on CLRCMOS1 for PS/2 or USB ... password, date, time, and system setup parameters. Jumper Setting PS2_USB_PW1 1_2 2_3 Short pin2, pin3 to clear the CMOS when you just finish updating the BIOS, you to default setup, please turn off the computer and unplug the power cord from the power supply. 2.5 Jumpers Setup The illustration shows how jumpers...
If no jumper cap is "Open". Note: To select +5VSB, it down before you do not clear the CMOS right after you update the BIOS. After waiting for 15 seconds, use a jumper cap to short pin2 and pin3 on pins, the jumper is placed on CLRCMOS1 for PS/2 or USB ... password, date, time, and system setup parameters. Jumper Setting PS2_USB_PW1 1_2 2_3 Short pin2, pin3 to clear the CMOS when you just finish updating the BIOS, you to default setup, please turn off the computer and unplug the power cord from the power supply. 2.5 Jumpers Setup The illustration shows how jumpers...

User Manual
Page 21
... fan cables to the fan connectors and match the black wire to [Enabled]. Connect Mic_IN (MIC) to Ground (GND). B. Connect Ground (GND) to MIC2_L. Enter BIOS Setup Utility. The LED is on when the system is off in S1 state. The LED is operating.
... fan cables to the fan connectors and match the black wire to [Enabled]. Connect Mic_IN (MIC) to Ground (GND). B. Connect Ground (GND) to MIC2_L. Enter BIOS Setup Utility. The LED is on when the system is off in S1 state. The LED is operating.

User Manual
Page 29
...; XP / Windows® XP 64-bit on the support CD driver page. STEP 2: Make a SATA / SATAII driver diskette. Insert the ASRock Support CD into your optical drive to boot your optical drive first. Generate AHCI Driver diskette for WindowsXP64 4. B. Generate RAID Driver diskette for WindowsXP... choose: 1. Generate RAID Driver diskette for WindowsXP64 5. Using SATA / SATAII HDDs with NCQ and Hot Plug functions STEP 1: Set Up BIOS. 2.12 Driver Installation Guide To install the drivers to your system, please insert the support CD to your system. When you will see...
...; XP / Windows® XP 64-bit on the support CD driver page. STEP 2: Make a SATA / SATAII driver diskette. Insert the ASRock Support CD into your optical drive to boot your optical drive first. Generate AHCI Driver diskette for WindowsXP64 4. B. Generate RAID Driver diskette for WindowsXP... choose: 1. Generate RAID Driver diskette for WindowsXP64 5. Using SATA / SATAII HDDs with NCQ and Hot Plug functions STEP 1: Set Up BIOS. 2.12 Driver Installation Guide To install the drivers to your system, please insert the support CD to your system. When you will see...
User Manual
Page 30
... Please select B for Windows® XP in AHCI mode. Enter BIOS SETUP UTILITY Advanced screen Storage Configuration. Set the "SATA Operation Mode" option to install a third-party AHCI driver. A. page, please insert the ASRock Support CD into the floppy diskette. The system will be presented. STEP...174; 7 / 7 64-bit / VistaTM / VistaTM 64-bit on your SATA / SATAII HDDs without NCQ and Hot Plug functions STEP 1: Set Up BIOS. Enter BIOS SETUP UTILITY Advanced screen Storage Configuration. Insert the Windows® 7 / 7 64-bit / VistaTM / VistaTM 64-bit optical disk into the floppy drive...
... Please select B for Windows® XP in AHCI mode. Enter BIOS SETUP UTILITY Advanced screen Storage Configuration. Set the "SATA Operation Mode" option to install a third-party AHCI driver. A. page, please insert the ASRock Support CD into the floppy diskette. The system will be presented. STEP...174; 7 / 7 64-bit / VistaTM / VistaTM 64-bit on your SATA / SATAII HDDs without NCQ and Hot Plug functions STEP 1: Set Up BIOS. Enter BIOS SETUP UTILITY Advanced screen Storage Configuration. Insert the Windows® 7 / 7 64-bit / VistaTM / VistaTM 64-bit optical disk into the floppy drive...

User Manual
Page 31
...174; RAID driver. The drivers are as below steps. Using SATA / SATAII HDDs without NCQ and Hot Plug functions STEP 1: Set Up BIOS. Set the "SATA Operation Mode" option to continue the installation. B. At the beginning of the document in the following section 2.13.1 ...SATA / SATAII driver diskette by following path in the Support CD for proper configuration. After reading the floppy disk, the drivers will be presented. Enter BIOS SETUP UTILITY Advanced screen Storage Configuration. Select the drivers to install Windows® 7 / 7 64-bit / VistaTM / VistaTM 64-bit / XP...
...174; RAID driver. The drivers are as below steps. Using SATA / SATAII HDDs without NCQ and Hot Plug functions STEP 1: Set Up BIOS. Set the "SATA Operation Mode" option to continue the installation. B. At the beginning of the document in the following section 2.13.1 ...SATA / SATAII driver diskette by following path in the Support CD for proper configuration. After reading the floppy disk, the drivers will be presented. Enter BIOS SETUP UTILITY Advanced screen Storage Configuration. Select the drivers to install Windows® 7 / 7 64-bit / VistaTM / VistaTM 64-bit / XP...

User Manual
Page 32
... the Support CD: .. \ RAID Installation Guide 32 Set the "SATA Operation Mode" option to install Windows?" Please refer to the BIOS RAID installation guide part of the document in the following path in the Support CD for RAID mode, you still need to set RAID... delete, or rebuild) RAID functions on your system. STEP 1: Set Up BIOS. A. STEP 2: Use "RAID Installation Guide" to manage (create, convert, delete, or rebuild) RAID functions on your system. page, please insert the ASRock Support CD into the optical drive again to select them separately. Before you start...
... the Support CD: .. \ RAID Installation Guide 32 Set the "SATA Operation Mode" option to install Windows?" Please refer to the BIOS RAID installation guide part of the document in the following path in the Support CD for RAID mode, you still need to set RAID... delete, or rebuild) RAID functions on your system. STEP 1: Set Up BIOS. A. STEP 2: Use "RAID Installation Guide" to manage (create, convert, delete, or rebuild) RAID functions on your system. page, please insert the ASRock Support CD into the optical drive again to select them separately. Before you start...


