
User Manual
Page 3
Contents Chapter 1 Introduction 1 1.1 Package Contents 1 1.2 Specifications 2 1.3 Unique Features 6 1.4 Motherboard Layout 9 1.5 I/O Panel 11 Chapter 2 Installation 12 2.1 Installing the CPU 13 2.2 Installing the CPU Fan and Heatsink 16 2.3 Installing Memory Modules (DIMM) 17 2.4 Expansion Slots (PCI Express Slots) 19 2.5 Jumpers Setup 20 2.6 Onboard Headers and Connectors 21 Chapter 3 Software ...
Contents Chapter 1 Introduction 1 1.1 Package Contents 1 1.2 Specifications 2 1.3 Unique Features 6 1.4 Motherboard Layout 9 1.5 I/O Panel 11 Chapter 2 Installation 12 2.1 Installing the CPU 13 2.2 Installing the CPU Fan and Heatsink 16 2.3 Installing Memory Modules (DIMM) 17 2.4 Expansion Slots (PCI Express Slots) 19 2.5 Jumpers Setup 20 2.6 Onboard Headers and Connectors 21 Chapter 3 Software ...

User Manual
Page 4
4.2 Main Screen 40 4.3 OC Tweaker Screen 41 4.4 Advanced Screen 49 4.4.1 CPU Configuration 50 4.4.2 Chipset Configuration 52 4.4.3 Storage Configuration 54 4.4.4 Intel® Smart Connect Technology 55 4.4.5 Super IO Configuration 56 4.4.6 ACPI Configuration 58 4.4.7 USB Configuration 60 4.4.8 Trusted Computing 61 4.5 Tools 62 4.6 Hardware Health Event Monitoring Screen 65 4.7 Boot Screen 66 4.8 Security Screen 69 4.9 Exit Screen 70
4.2 Main Screen 40 4.3 OC Tweaker Screen 41 4.4 Advanced Screen 49 4.4.1 CPU Configuration 50 4.4.2 Chipset Configuration 52 4.4.3 Storage Configuration 54 4.4.4 Intel® Smart Connect Technology 55 4.4.5 Super IO Configuration 56 4.4.6 ACPI Configuration 58 4.4.7 USB Configuration 60 4.4.8 Trusted Computing 61 4.5 Tools 62 4.6 Hardware Health Event Monitoring Screen 65 4.7 Boot Screen 66 4.8 Security Screen 69 4.9 Exit Screen 70
User Manual
Page 5
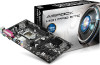
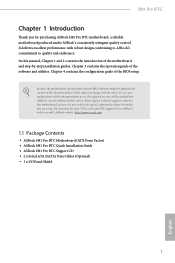
... CPU support list on ASRock's website without notice. It delivers excellent performance with robust design conforming to ASRock's commitment to quality and endurance. Chapter 4 contains the configuration guide of the motherboard and step-by-step installation guides. ASRock website http://www.asrock.com. 1.1 Package Contents • ASRock H81 Pro BTC Motherboard (ATX Form Factor) • ASRock H81 Pro BTC Quick Installation Guide • ASRock H81 Pro BTC...
... CPU support list on ASRock's website without notice. It delivers excellent performance with robust design conforming to ASRock's commitment to quality and endurance. Chapter 4 contains the configuration guide of the motherboard and step-by-step installation guides. ASRock website http://www.asrock.com. 1.1 Package Contents • ASRock H81 Pro BTC Motherboard (ATX Form Factor) • ASRock H81 Pro BTC Quick Installation Guide • ASRock H81 Pro BTC...

User Manual
Page 6
... • Digi Power design • 4 Power Phase design • Supports Intel® Turbo Boost 2.0 Technology Chipset • Intel® H81 Memory • Dual Channel DDR3 Memory Technology • 2 x DDR3 DIMM Slots • Supports DDR3 1600/1333/1066 non-ECC, un-buffered... 1792MB • Dual Graphics Output: support HDMI and D-Sub ports by independent display controllers • Supports HDMI Technology with max. 1.2 Specifications Platform CPU • ATX Form Factor • All Solid Capacitor design • Supports 4th Generation Intel® CoreTM i7 / i5 / i3 / Xeon&#...
... • Digi Power design • 4 Power Phase design • Supports Intel® Turbo Boost 2.0 Technology Chipset • Intel® H81 Memory • Dual Channel DDR3 Memory Technology • 2 x DDR3 DIMM Slots • Supports DDR3 1600/1333/1066 non-ECC, un-buffered... 1792MB • Dual Graphics Output: support HDMI and D-Sub ports by independent display controllers • Supports HDMI Technology with max. 1.2 Specifications Platform CPU • ATX Form Factor • All Solid Capacitor design • Supports 4th Generation Intel® CoreTM i7 / i5 / i3 / Xeon&#...

User Manual
Page 8
.../EuP ready power supply is required) English * For detailed product information, please visit our website: http://www.asrock.com 4 Connector • 1 x IR Header • 1 x COM Port Header • 1 x Power LED Header • 1 x TPM Header • 2 x CPU Fan Connectors (1 x 4-pin, 1 x 3-pin) • 2 x Chassis Fan Connectors (1 x 4-pin, 1 x 3-pin) • 1 x Power Fan Connector (3-pin) •...
.../EuP ready power supply is required) English * For detailed product information, please visit our website: http://www.asrock.com 4 Connector • 1 x IR Header • 1 x COM Port Header • 1 x Power LED Header • 1 x TPM Header • 2 x CPU Fan Connectors (1 x 4-pin, 1 x 3-pin) • 2 x Chassis Fan Connectors (1 x 4-pin, 1 x 3-pin) • 1 x Power Fan Connector (3-pin) •...

User Manual
Page 14
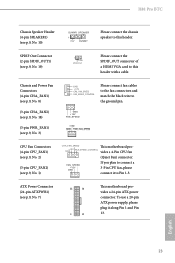
Description 1 CPU Fan Connector (CPU_FAN2) 2 CPU Fan Connector (CPU_FAN1) 3 Power Fan Connector (PWR_FAN1) 4 ATX 12V Power Connector (ATX12V1) 5 2 x 240-pin DDR3 DIMM Slots (DDR3_A1, DDR3_B1) 6 TPM Header (TPMS1) 7 ATX Power Connector (...
Description 1 CPU Fan Connector (CPU_FAN2) 2 CPU Fan Connector (CPU_FAN1) 3 Power Fan Connector (PWR_FAN1) 4 ATX 12V Power Connector (ATX12V1) 5 2 x 240-pin DDR3 DIMM Slots (DDR3_A1, DDR3_B1) 6 TPM Header (TPMS1) 7 ATX Power Connector (...

User Manual
Page 17
Do not force to insert the CPU into the socket, please check if the PnP cap is on the socket, if the CPU surface is found. Unplug all power cables before installing the CPU. 1 A B 2 13 English Otherwise, the CPU will be seriously damaged. 2. Before you insert the 1150-Pin CPU into the socket if above situation is unclean, or if there are any bent pins in the socket. H81 Pro BTC 2.1 Installing the CPU 1.
Do not force to insert the CPU into the socket, please check if the PnP cap is on the socket, if the CPU surface is found. Unplug all power cables before installing the CPU. 1 A B 2 13 English Otherwise, the CPU will be seriously damaged. 2. Before you insert the 1150-Pin CPU into the socket if above situation is unclean, or if there are any bent pins in the socket. H81 Pro BTC 2.1 Installing the CPU 1.

User Manual
Page 20
2.2 Installing the CPU Fan and Heatsink 1 16 2 CPU_FAN English
2.2 Installing the CPU Fan and Heatsink 1 16 2 CPU_FAN English
User Manual
Page 27
... and match the black wire to Pin 1-3. ATX Power Connector (24-pin ATXPWR1) (see p.9, No. 1) CHA_FAN_SPEED This motherboard pro- +12V FAN_SPEED_CONTROL GND vides a 4-Pin CPU fan (Quiet Fan) connector. To use a 20-pin ATX power supply, please plug it to the ground pin. GND ... plan to connect a 3-Pin CPU fan, please connect it along Pin 1 and Pin 13. SPDIF Out Connector (2-pin SPDIF_OUT1) (see p.9, No. 19) 1 GND SPDIFOUT Please connect the SPDIF_OUT connector of a HDMI VGA card to this header with a cable. English 23 H81 Pro BTC Chassis Speaker Header (4-pin SPEAKER1)...
... and match the black wire to Pin 1-3. ATX Power Connector (24-pin ATXPWR1) (see p.9, No. 1) CHA_FAN_SPEED This motherboard pro- +12V FAN_SPEED_CONTROL GND vides a 4-Pin CPU fan (Quiet Fan) connector. To use a 20-pin ATX power supply, please plug it to the ground pin. GND ... plan to connect a 3-Pin CPU fan, please connect it along Pin 1 and Pin 13. SPDIF Out Connector (2-pin SPDIF_OUT1) (see p.9, No. 19) 1 GND SPDIFOUT Please connect the SPDIF_OUT connector of a HDMI VGA card to this header with a cable. English 23 H81 Pro BTC Chassis Speaker Header (4-pin SPEAKER1)...
User Manual
Page 45
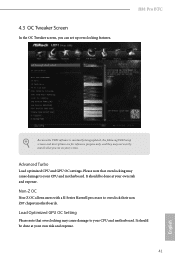
...your own risk and expense. 41 English Please note that overclocking may cause damage to your CPU and motherboard. Non-Z OC Non-Z OC allows users with a K-Series Haswell processor to your CPU and motherboard. 4.3 OC Tweaker Screen In the OC Tweaker screen, you see on your screen.... Advanced Turbo Load optimized CPU and GPU OC settings. Load Optimized GPU OC Setting Please note that overclocking may cause damage to overclock their non Z87 chipset motherboards. H81 Pro BTC Because the UEFI software is constantly being updated, the following UEFI...
...your own risk and expense. 41 English Please note that overclocking may cause damage to your CPU and motherboard. Non-Z OC Non-Z OC allows users with a K-Series Haswell processor to your CPU and motherboard. 4.3 OC Tweaker Screen In the OC Tweaker screen, you see on your screen.... Advanced Turbo Load optimized CPU and GPU OC settings. Load Optimized GPU OC Setting Please note that overclocking may cause damage to overclock their non Z87 chipset motherboards. H81 Pro BTC Because the UEFI software is constantly being updated, the following UEFI...

User Manual
Page 46
... Enable for better overclocking capabilities. The maximum should be done at your CPU and motherboard. Please note that overclocking may improve performance. 42 English Filter PLL Frequency CPU BCLK Filter Frequency. CPU Cache Ratio The CPU Internal Bus Speed Ratio. It should be lowered after a period of ... technology allows processors to reduce power consumption. A lower limit can protect the CPU and save power, while a higher limit may cause damage to keep the max CPU ratio as the CPU Ratio. Intel Turbo Boost Technology Intel Turbo Boost Technology enables the processor to ...
... Enable for better overclocking capabilities. The maximum should be done at your CPU and motherboard. Please note that overclocking may improve performance. 42 English Filter PLL Frequency CPU BCLK Filter Frequency. CPU Cache Ratio The CPU Internal Bus Speed Ratio. It should be lowered after a period of ... technology allows processors to reduce power consumption. A lower limit can protect the CPU and save power, while a higher limit may cause damage to keep the max CPU ratio as the CPU Ratio. Intel Turbo Boost Technology Intel Turbo Boost Technology enables the processor to ...

User Manual
Page 47
...voltage added to overclock the DDR3 memory and perform beyond standard specifications. When the limit is fixed. A lower limit can protect the CPU and save power, while a higher limit may improve performance. Short Duration Power Limit Configure Package Power Limit 2 in ampere. A lower ...Auto] is exceeded. Adaptive: Add voltage to the integrated GPU when the system is under heavy load. H81 Pro BTC Long Duration Maintained Configure the period of time until the CPU ratio is lowered when the Long Duration Power Limit is selected, the motherboard will be lowered immediately. ...
...voltage added to overclock the DDR3 memory and perform beyond standard specifications. When the limit is fixed. A lower limit can protect the CPU and save power, while a higher limit may improve performance. Short Duration Power Limit Configure Package Power Limit 2 in ampere. A lower ...Auto] is exceeded. Adaptive: Add voltage to the integrated GPU when the system is under heavy load. H81 Pro BTC Long Duration Maintained Configure the period of time until the CPU ratio is lowered when the Long Duration Power Limit is selected, the motherboard will be lowered immediately. ...

User Manual
Page 51
DIMM Exit Mode Select Slow Exit to boost or lower the FIVR Switch Frequency. Override: The voltage is [Auto]. CPU Cache Voltage Mode Auto: For optimized settings. The default is fixed. FIVR Configuration FIVR Switch Frequency Signature Select whether to reduce power ... Vcore Override Voltage Configure the voltage added to change ODT (CHB) Auto/Manual settings. CPU Vcore Voltage Mode Auto: For optimized settings. ODT NOM (CHA) Use this to change ODT (CHA) Auto/Manual settings. H81 Pro BTC ODT WR (CHB) Configure the memory on die termination resistors' WR for DRAM power ...
DIMM Exit Mode Select Slow Exit to boost or lower the FIVR Switch Frequency. Override: The voltage is [Auto]. CPU Cache Voltage Mode Auto: For optimized settings. The default is fixed. FIVR Configuration FIVR Switch Frequency Signature Select whether to reduce power ... Vcore Override Voltage Configure the voltage added to change ODT (CHB) Auto/Manual settings. CPU Vcore Voltage Mode Auto: For optimized settings. ODT NOM (CHA) Use this to change ODT (CHA) Auto/Manual settings. H81 Pro BTC ODT WR (CHB) Configure the memory on die termination resistors' WR for DRAM power ...

User Manual
Page 52
...Faults Disable FIVR Faults to raise the threshold to reduce power consumption. Disable for the System Agent. CPU Load-Line Calibration CPU Load-Line Calibration helps prevent CPU voltage droop when the system is under heavy load. The default value is [Auto]. Voltage Configuration ...better overclocking capabilities. PCH 1.05V Voltage Chipset 1.05V Voltage. CPU Cache Voltage Offset Configure the voltage for the CPU. CPU Input Voltage Configure the voltage for the CPU Cache. CPU Cache Override Voltage Add voltage to the CPU Cache when the system is under heavy load. Setting the...
...Faults Disable FIVR Faults to raise the threshold to reduce power consumption. Disable for the System Agent. CPU Load-Line Calibration CPU Load-Line Calibration helps prevent CPU voltage droop when the system is under heavy load. The default value is [Auto]. Voltage Configuration ...better overclocking capabilities. PCH 1.05V Voltage Chipset 1.05V Voltage. CPU Cache Voltage Offset Configure the voltage for the CPU. CPU Input Voltage Configure the voltage for the CPU Cache. CPU Cache Override Voltage Add voltage to the CPU Cache when the system is under heavy load. Setting the...

User Manual
Page 53
H81 Pro BTC 4.4 Advanced Screen In this section may set the configurations for the following items: CPU Configuration, Chipset Configuration, Storage Configuration, Intel® Smart Connect Technology, Super IO Configuration, ACPI Configuration, USB Configuration and Trusted Computing. Setting wrong values in this section, you may cause the system to malfunction. 49 English
H81 Pro BTC 4.4 Advanced Screen In this section may set the configurations for the following items: CPU Configuration, Chipset Configuration, Storage Configuration, Intel® Smart Connect Technology, Super IO Configuration, ACPI Configuration, USB Configuration and Trusted Computing. Setting wrong values in this section, you may cause the system to malfunction. 49 English

User Manual
Page 54
... State Support Enable C7 deep sleep state for power saving. Package C State Support Enable CPU, PCIe, Memory, Graphics C State Support for lower power consumption. CPU C3 State Support Enable C3 sleep state for power saving. 50 English 4.4.1 CPU Configuration Active Processor Cores Select the number of cores to keep C3, C6 and C7...
... State Support Enable C7 deep sleep state for power saving. Package C State Support Enable CPU, PCIe, Memory, Graphics C State Support for lower power consumption. CPU C3 State Support Enable C3 sleep state for power saving. 50 English 4.4.1 CPU Configuration Active Processor Cores Select the number of cores to keep C3, C6 and C7...
User Manual
Page 55
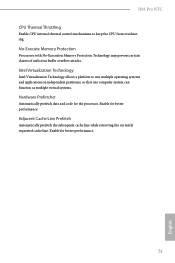
... retrieving the currently requested cache line. Intel Virtualization Technology Intel Virtualization Technology allows a platform to keep the CPU from overheating. Enable for the processor. Enable for better performance. 51 English H81 Pro BTC CPU Thermal Throttling Enable CPU internal thermal control mechanisms to run multiple operating systems and applications in independent partitions, so that one computer...
... retrieving the currently requested cache line. Intel Virtualization Technology Intel Virtualization Technology allows a platform to keep the CPU from overheating. Enable for the processor. Enable for better performance. 51 English H81 Pro BTC CPU Thermal Throttling Enable CPU internal thermal control mechanisms to run multiple operating systems and applications in independent partitions, so that one computer...

User Manual
Page 67
... powers on automatically to download the UEFI firmware. The higher the value, the faster the fan speed. H81 Pro BTC Internet Setting Enable or disable sound effects in the setup utility. Dehumidifier CPU Fan Setting Configure the speed of the dehumidifying process before it returns to S4/S5 state. Max: 255... Min: 1 63 English Dehumidifier Function If Dehumidifier Function is enabled. Dehumidifier Duration Configure the duration of the CPU fan while Dehumidifier is enabled, the computer will power on and enables Dehumidifier after entering S4/S5 state.
... powers on automatically to download the UEFI firmware. The higher the value, the faster the fan speed. H81 Pro BTC Internet Setting Enable or disable sound effects in the setup utility. Dehumidifier CPU Fan Setting Configure the speed of the dehumidifying process before it returns to S4/S5 state. Max: 255... Min: 1 63 English Dehumidifier Function If Dehumidifier Function is enabled. Dehumidifier Duration Configure the duration of the CPU fan while Dehumidifier is enabled, the computer will power on and enables Dehumidifier after entering S4/S5 state.

User Manual
Page 69
... and assign a respective fan speed for each temperature. H81 Pro BTC 4.6 Hardware Health Event Monitoring Screen This section allows you to set 5 CPU temperatures and assign a respective fan speed for each temperature. Over Temperature Protection When Over Temperature Protection is enabled, the...down when the motherboard is overheated. 65 English Chassis Fan 1 Setting Select a fan mode for Chassis Fan 1, or choose Customize to set 5 CPU temperatures and assign a respective fan speed for each temperature. Chassis Fan 2 Setting Select a fan mode for Chassis Fan 2, or choose Customize ...
... and assign a respective fan speed for each temperature. H81 Pro BTC 4.6 Hardware Health Event Monitoring Screen This section allows you to set 5 CPU temperatures and assign a respective fan speed for each temperature. Over Temperature Protection When Over Temperature Protection is enabled, the...down when the motherboard is overheated. 65 English Chassis Fan 1 Setting Select a fan mode for Chassis Fan 1, or choose Customize to set 5 CPU temperatures and assign a respective fan speed for each temperature. Chassis Fan 2 Setting Select a fan mode for Chassis Fan 2, or choose Customize ...

Quick Installation Guide
Page 4
Description 1 CPU Fan Connector (CPU_FAN2) 2 CPU Fan Connector (CPU_FAN1) 3 Power Fan Connector (PWR_FAN1) 4 ATX 12V Power Connector (ATX12V1) 5 2 x 240-pin DDR3 DIMM Slots (DDR3_A1, DDR3_B1) 6 TPM Header (TPMS1) 7 ATX Power Connector (...
Description 1 CPU Fan Connector (CPU_FAN2) 2 CPU Fan Connector (CPU_FAN1) 3 Power Fan Connector (PWR_FAN1) 4 ATX 12V Power Connector (ATX12V1) 5 2 x 240-pin DDR3 DIMM Slots (DDR3_A1, DDR3_B1) 6 TPM Header (TPMS1) 7 ATX Power Connector (...


