
User Manual
Page 2
..., including but not limited to the owners' benefit, without written consent of this documentation may or may appear in this motherboard contains Perchlorate, a toxic substance controlled in the United States and other countries. With respect to change without notice, and should...harmful interference, and (2) this documentation are furnished for informational use only and subject to the contents of ASRock Inc. ASRock assumes no event shall ASRock, its directors, officers, employees, or agents be reproduced, transcribed, transmitted, or translated in any language, in this...
..., including but not limited to the owners' benefit, without written consent of this documentation may or may appear in this motherboard contains Perchlorate, a toxic substance controlled in the United States and other countries. With respect to change without notice, and should...harmful interference, and (2) this documentation are furnished for informational use only and subject to the contents of ASRock Inc. ASRock assumes no event shall ASRock, its directors, officers, employees, or agents be reproduced, transcribed, transmitted, or translated in any language, in this...

User Manual
Page 3
Contents Chapter 1 Introduction 1 1.1 Package Contents 1 1.2 Specifications 2 1.3 Unique Features 6 1.4 Motherboard Layout 9 1.5 I/O Panel 11 Chapter 2 Installation 12 2.1 Installing the CPU 13 2.2 Installing the CPU Fan and Heatsink 16 2.3 Installing Memory Modules (DIMM) 17 2.4 Expansion Slots (PCI ...
Contents Chapter 1 Introduction 1 1.1 Package Contents 1 1.2 Specifications 2 1.3 Unique Features 6 1.4 Motherboard Layout 9 1.5 I/O Panel 11 Chapter 2 Installation 12 2.1 Installing the CPU 13 2.2 Installing the CPU Fan and Heatsink 16 2.3 Installing Memory Modules (DIMM) 17 2.4 Expansion Slots (PCI ...
User Manual
Page 5
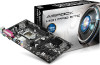
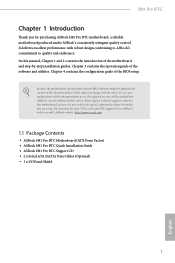
.... If you for specific information about the model you are using. ASRock website http://www.asrock.com. 1.1 Package Contents • ASRock H81 Pro BTC Motherboard (ATX Form Factor) • ASRock H81 Pro BTC Quick Installation Guide • ASRock H81 Pro BTC Support CD • 2 x Serial ATA (SATA) Data Cables (Optional) • 1 x I/O Panel Shield 1 English H81 Pro BTC Chapter 1 Introduction Thank you require technical support related to change without...
.... If you for specific information about the model you are using. ASRock website http://www.asrock.com. 1.1 Package Contents • ASRock H81 Pro BTC Motherboard (ATX Form Factor) • ASRock H81 Pro BTC Quick Installation Guide • ASRock H81 Pro BTC Support CD • 2 x Serial ATA (SATA) Data Cables (Optional) • 1 x I/O Panel Shield 1 English H81 Pro BTC Chapter 1 Introduction Thank you require technical support related to change without...
User Manual
Page 11
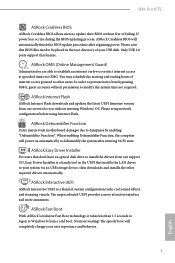
...accounts without permission to your system via OMG. ASRock OMG (Online Management Guard) Administrators are required. H81 Pro BTC ASRock Crashless BIOS ASRock Crashless BIOS allows users to update their BIOS without fear of your USB disk. ASRock Dehumidifier Function Users may schedule the starting and...cool sound effects and stunning visuals. ASRock Easy Driver Installer For users that installs the LAN driver to modify the system time are able to dampness by enabling "Dehumidifier Function". You may prevent motherboard damages due to establish an internet curfew...
...accounts without permission to your system via OMG. ASRock OMG (Online Management Guard) Administrators are required. H81 Pro BTC ASRock Crashless BIOS ASRock Crashless BIOS allows users to update their BIOS without fear of your USB disk. ASRock Dehumidifier Function Users may schedule the starting and...cool sound effects and stunning visuals. ASRock Easy Driver Installer For users that installs the LAN driver to modify the system time are able to dampness by enabling "Dehumidifier Function". You may prevent motherboard damages due to establish an internet curfew...

User Manual
Page 13
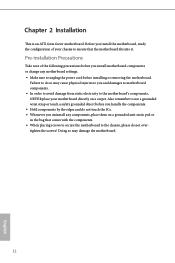
1.4 Motherboard Layout 1 23 4 PS2 Mouse PS2 Keyboard 25 SLI/XFIRE_PWR1 CPU_FAN2 CPU_FAN1 PWR_FAN1 ATX12V1 H81 Pro BTC 5 1 Super I/O 6 TPMS1 PARALLEL PORT COM1 VGA1 DDR3_B1 (64 bit, 240-pin module) DDR3_A1 (64 bit, 240-pin module) AT X P W R 1 USB ... FRONT Bottom: MIC IN 24 SLI/XFIRE_PWR2 CLRCMOS1 23 1 LAN PCIE1 USB 3.0 CMOS Battery H81 Pro BTC PCIE2 CHA_FAN1 8 22 21 AUDIO CODEC HD_AUDIO1 1 IR1 1 SPDIF_OUT1 1 COM2 1 PCIE3 32Mb BIOS PCIE4 Intel H81 PCIE5 RoHS PCIE6 CHA_FAN2 USB_2_3 1 USB_4_5 1 PLED PWRBTN 1 HDLED RESET PANEL1 SATA3_0 SATA3_1 SATA2_0...
1.4 Motherboard Layout 1 23 4 PS2 Mouse PS2 Keyboard 25 SLI/XFIRE_PWR1 CPU_FAN2 CPU_FAN1 PWR_FAN1 ATX12V1 H81 Pro BTC 5 1 Super I/O 6 TPMS1 PARALLEL PORT COM1 VGA1 DDR3_B1 (64 bit, 240-pin module) DDR3_A1 (64 bit, 240-pin module) AT X P W R 1 USB ... FRONT Bottom: MIC IN 24 SLI/XFIRE_PWR2 CLRCMOS1 23 1 LAN PCIE1 USB 3.0 CMOS Battery H81 Pro BTC PCIE2 CHA_FAN1 8 22 21 AUDIO CODEC HD_AUDIO1 1 IR1 1 SPDIF_OUT1 1 COM2 1 PCIE3 32Mb BIOS PCIE4 Intel H81 PCIE5 RoHS PCIE6 CHA_FAN2 USB_2_3 1 USB_4_5 1 PLED PWRBTN 1 HDLED RESET PANEL1 SATA3_0 SATA3_1 SATA2_0...
User Manual
Page 16
... Take note of the following precautions before you install the motherboard, study the configuration of your motherboard directly on a grounded anti-static pad or in the bag that the motherboard fits into it. Before you install motherboard components or change any components, place them on a carpet...components by the edges and do not touch the ICs. • Whenever you and damages to motherboard components. • In order to avoid damage from static electricity to the motherboard's components, NEVER place your chassis to ensure that comes with the components. • When placing...
... Take note of the following precautions before you install the motherboard, study the configuration of your motherboard directly on a grounded anti-static pad or in the bag that the motherboard fits into it. Before you install motherboard components or change any components, place them on a carpet...components by the edges and do not touch the ICs. • Whenever you and damages to motherboard components. • In order to avoid damage from static electricity to the motherboard's components, NEVER place your chassis to ensure that comes with the components. • When placing...

User Manual
Page 19
The cover must be placed if you wish to return the motherboard for after service. 15 English H81 Pro BTC Please save and replace the cover if the processor is removed.
The cover must be placed if you wish to return the motherboard for after service. 15 English H81 Pro BTC Please save and replace the cover if the processor is removed.

User Manual
Page 21
... DIMM may be damaged. H81 Pro BTC 2.3 Installing Memory Modules (DIMM) This motherboard provides two 240-pin DDR3 (Double Data Rate 3) DIMM slots, and supports Dual Channel Memory Technology. 1. For dual channel configuration, you force the DIMM into a ... brand, speed, size and chip-type) DDR3 DIMM pairs. 2. The DIMM only fits in one memory module installed. 3. It will cause permanent damage to the motherboard and the DIMM if you always need to install a DDR or DDR2 memory module into the slot at incorrect orientation. 17 English It is unable...
... DIMM may be damaged. H81 Pro BTC 2.3 Installing Memory Modules (DIMM) This motherboard provides two 240-pin DDR3 (Double Data Rate 3) DIMM slots, and supports Dual Channel Memory Technology. 1. For dual channel configuration, you force the DIMM into a ... brand, speed, size and chip-type) DDR3 DIMM pairs. 2. The DIMM only fits in one memory module installed. 3. It will cause permanent damage to the motherboard and the DIMM if you always need to install a DDR or DDR2 memory module into the slot at incorrect orientation. 17 English It is unable...
User Manual
Page 23
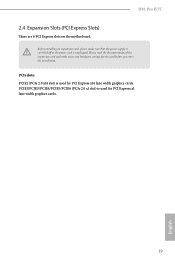
Please read the documentation of the expansion card and make sure that the power supply is switched off or the power cord is unplugged. PCIE1/PCIE3/PCIE4/PCIE5/PCIE6 (PCIe 2.0 x1 slot) is used for the card before you start the installation. Before installing an expansion card, please make necessary hardware settings for PCI Express x1 lane width graphics cards. 19 English H81 Pro BTC 2.4 Expansion Slots (PCI Express Slots) There are 6 PCI Express slots on the motherboard. PCIe slots: PCIE2 (PCIe 2.0 x16 slot) is used for PCI Express x16 lane width graphics cards.
Please read the documentation of the expansion card and make sure that the power supply is switched off or the power cord is unplugged. PCIE1/PCIE3/PCIE4/PCIE5/PCIE6 (PCIe 2.0 x1 slot) is used for the card before you start the installation. Before installing an expansion card, please make necessary hardware settings for PCI Express x1 lane width graphics cards. 19 English H81 Pro BTC 2.4 Expansion Slots (PCI Express Slots) There are 6 PCI Express slots on the motherboard. PCIe slots: PCIE2 (PCIe 2.0 x16 slot) is used for PCI Express x16 lane width graphics cards.

User Manual
Page 25
... LED): Connect to the reset switch on when the system is in S4 sleep state or powered off your chassis front panel module to the motherboard. PWRBTN (Power Switch): Connect to perform a normal restart. System Panel Header (9-pin PANEL1) (see p.9, No. 9) 1 PLED- The LED is on the chassis front panel. Power... the power switch. PLED (System Power LED): Connect to turn off (S5). The LED is on the chassis front panel. You may differ by chassis. H81 Pro BTC 2.6 Onboard Headers and Connectors Onboard headers and connectors are matched correctly.
... LED): Connect to the reset switch on when the system is in S4 sleep state or powered off your chassis front panel module to the motherboard. PWRBTN (Power Switch): Connect to perform a normal restart. System Panel Header (9-pin PANEL1) (see p.9, No. 9) 1 PLED- The LED is on the chassis front panel. Power... the power switch. PLED (System Power LED): Connect to turn off (S5). The LED is on the chassis front panel. You may differ by chassis. H81 Pro BTC 2.6 Onboard Headers and Connectors Onboard headers and connectors are matched correctly.

User Manual
Page 26
... for the HD audio panel only. B. Each USB 2.0 header can support two ports. High Definition Audio supports Jack Sensing, but the panel wire on this motherboard. Connect Mic_IN (MIC) to OUT2_L. Front Panel Audio Header (9-pin HD_AUDIO1) (see p.9, No. 22) GND PRESENCE# MIC_RET OUT_RET 1 OUT2_L J_SENSE OUT2_R MIC2_R MIC2_L This header...
... for the HD audio panel only. B. Each USB 2.0 header can support two ports. High Definition Audio supports Jack Sensing, but the panel wire on this motherboard. Connect Mic_IN (MIC) to OUT2_L. Front Panel Audio Header (9-pin HD_AUDIO1) (see p.9, No. 22) GND PRESENCE# MIC_RET OUT_RET 1 OUT2_L J_SENSE OUT2_R MIC2_R MIC2_L This header...
User Manual
Page 27
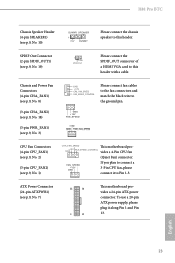
... and Power Fan Connectors (4-pin CHA_FAN1) (see p.9, No. 8) (3-pin CHA_FAN2) (see p.9, No. 18) (3-pin PWR_FAN1) (see p.9, No. 1) CHA_FAN_SPEED This motherboard pro- +12V FAN_SPEED_CONTROL GND vides a 4-Pin CPU fan (Quiet Fan) connector. H81 Pro BTC Chassis Speaker Header (4-pin SPEAKER1) (see p.9, No. 19) 1 GND SPDIFOUT Please connect the SPDIF_OUT connector of a HDMI VGA card to...1 +5V DUMMY Please connect the chassis speaker to this header with a cable. ATX Power Connector (24-pin ATXPWR1) (see p.9, No. 7) 12 24 1 13 This motherboard provides a 24-pin ATX power connector.
... and Power Fan Connectors (4-pin CHA_FAN1) (see p.9, No. 8) (3-pin CHA_FAN2) (see p.9, No. 18) (3-pin PWR_FAN1) (see p.9, No. 1) CHA_FAN_SPEED This motherboard pro- +12V FAN_SPEED_CONTROL GND vides a 4-Pin CPU fan (Quiet Fan) connector. H81 Pro BTC Chassis Speaker Header (4-pin SPEAKER1) (see p.9, No. 19) 1 GND SPDIFOUT Please connect the SPDIF_OUT connector of a HDMI VGA card to...1 +5V DUMMY Please connect the chassis speaker to this header with a cable. ATX Power Connector (24-pin ATXPWR1) (see p.9, No. 7) 12 24 1 13 This motherboard provides a 24-pin ATX power connector.

User Manual
Page 28
Please connect this connector with a hard disk power connector when two graphics cards are installed on this motherboard. A TPM system also helps enhance network security, protects digital identities, and ensures platform integrity. To use a 4-pin ATX power supply, ... COM2 header supports a serial port module. English TPM Header (17-pin TPMS1) (see p.9, No. 20) 8 5 4 1 IRTX +5VSB DUMMY 1 GND IRRX This motherboard provides an 8-pin ATX 12V power connector. This header supports an optional wireless transmitting and receiving infrared module. ATX 12V Power Connector (8-pin ATX12V1) (see...
Please connect this connector with a hard disk power connector when two graphics cards are installed on this motherboard. A TPM system also helps enhance network security, protects digital identities, and ensures platform integrity. To use a 4-pin ATX power supply, ... COM2 header supports a serial port module. English TPM Header (17-pin TPMS1) (see p.9, No. 20) 8 5 4 1 IRTX +5VSB DUMMY 1 GND IRRX This motherboard provides an 8-pin ATX 12V power connector. This header supports an optional wireless transmitting and receiving infrared module. ATX 12V Power Connector (8-pin ATX12V1) (see...
User Manual
Page 29
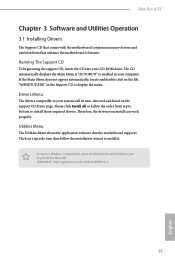
... required drivers. Utilities Menu The Utilities Menu shows the application software that enhance the motherboard's features. H81 Pro BTC Chapter 3 Software and Utilities Operation 3.1 Installing Drivers The Support CD that comes with the motherboard contains necessary drivers and useful utilities that the motherboard supports. Running The Support CD To begin using the support CD, insert the...
... required drivers. Utilities Menu The Utilities Menu shows the application software that enhance the motherboard's features. H81 Pro BTC Chapter 3 Software and Utilities Operation 3.1 Installing Drivers The Support CD that comes with the motherboard contains necessary drivers and useful utilities that the motherboard supports. Running The Support CD To begin using the support CD, insert the...

User Manual
Page 32
System Info View information about the system. 28 English Dehumidifier Prevent motherboard damages due to dampness. Enable this function and configure the period of time until the computer powers on, and the duration of the dehumidifying process. OC Tweaker Configurations for overclocking the system.
System Info View information about the system. 28 English Dehumidifier Prevent motherboard damages due to dampness. Enable this function and configure the period of time until the computer powers on, and the duration of the dehumidifying process. OC Tweaker Configurations for overclocking the system.
User Manual
Page 34
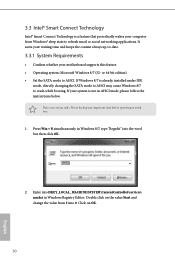
... 8/7, type "Regedit" into 0. Click on the value Start and change the value from Windows® sleep state to -date. 3.3.1 System Requirements • Confirm whether your motherboard supports this feature. • Operating system: Microsoft Windows 8/7 (32- or 64-bit edition) • Set the SATA mode to avoid loss. 1. Double click on OK...
... 8/7, type "Regedit" into 0. Click on the value Start and change the value from Windows® sleep state to -date. 3.3.1 System Requirements • Confirm whether your motherboard supports this feature. • Operating system: Microsoft Windows 8/7 (32- or 64-bit edition) • Set the SATA mode to avoid loss. 1. Double click on OK...
User Manual
Page 45
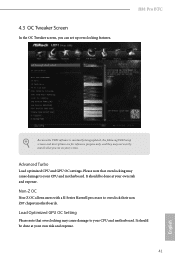
... English Advanced Turbo Load optimized CPU and GPU OC settings. H81 Pro BTC Because the UEFI software is constantly being updated, the following UEFI setup screens and descriptions are for reference purpose only, and they may cause damage to overclock their non Z87 chipset motherboards. It should be done at your own risk and...
... English Advanced Turbo Load optimized CPU and GPU OC settings. H81 Pro BTC Because the UEFI software is constantly being updated, the following UEFI setup screens and descriptions are for reference purpose only, and they may cause damage to overclock their non Z87 chipset motherboards. It should be done at your own risk and...

User Manual
Page 46
Disable to keep the max CPU ratio as the CPU Ratio. The maximum should be done at your CPU and motherboard. A lower limit can protect the CPU and save power, while a higher limit may cause damage to switch between multiple frequencies and voltage points for better ...
Disable to keep the max CPU ratio as the CPU Ratio. The maximum should be done at your CPU and motherboard. A lower limit can protect the CPU and save power, while a higher limit may cause damage to switch between multiple frequencies and voltage points for better ...

User Manual
Page 47
... Current Limit Configure the current limit of time until the CPU ratio is lowered when the Long Duration Power Limit is selected, the motherboard will be lowered immediately. Override: The voltage is exceeded, the CPU ratio will detect the memory module(s) inserted and assign the appropriate...under heavy load. DRAM Timing Configuration Load XMP Setting Load XMP settings to the integrated GPU when the system is under heavy load. H81 Pro BTC Long Duration Maintained Configure the period of the CPU under Turbo Mode in watts. GT Voltage Mode Auto: For optimized settings. Adaptive:...
... Current Limit Configure the current limit of time until the CPU ratio is lowered when the Long Duration Power Limit is selected, the motherboard will be lowered immediately. Override: The voltage is exceeded, the CPU ratio will detect the memory module(s) inserted and assign the appropriate...under heavy load. DRAM Timing Configuration Load XMP Setting Load XMP settings to the integrated GPU when the system is under heavy load. H81 Pro BTC Long Duration Maintained Configure the period of the CPU under Turbo Mode in watts. GT Voltage Mode Auto: For optimized settings. Adaptive:...

User Manual
Page 69
... assign a respective fan speed for each temperature. Over Temperature Protection When Over Temperature Protection is enabled, the system automatically shuts down when the motherboard is overheated. 65 English H81 Pro BTC 4.6 Hardware Health Event Monitoring Screen This section allows you to set 5 CPU temperatures and assign a respective fan speed for each temperature. CPU Fan...
... assign a respective fan speed for each temperature. Over Temperature Protection When Over Temperature Protection is enabled, the system automatically shuts down when the motherboard is overheated. 65 English H81 Pro BTC 4.6 Hardware Health Event Monitoring Screen This section allows you to set 5 CPU temperatures and assign a respective fan speed for each temperature. CPU Fan...


