
Intel Rapid Storage Guide
Page 12
... in the system BIOS, a RAID volume must be created, and the F6 installation method must be used to load the Intel® Rapid Storage Technology driver during POST, press Ctrl and i at the same time to enter the option ROM user interface. 2.
... in the system BIOS, a RAID volume must be created, and the F6 installation method must be used to load the Intel® Rapid Storage Technology driver during POST, press Ctrl and i at the same time to enter the option ROM user interface. 2.

Intel Rapid Storage Guide
Page 13
... of available SCSI adapters. At the prompt press Y to install a third party SCSI or RAID driver. You will then be visible. 6. When you have successfully installed the driver and Windows setup should continue. Use the up and down arrow keys to load support for mass storage... device(s). 2. Nothing will temporarily continue loading drivers. Press Enter. 5. Select your exit. Press Enter to confirm your controller and continue. Install the RAID Driver Using the F6 Installation Method Perform the following files: IAAHCI.INF, IAAHCI.CAT, IASTOR...
... of available SCSI adapters. At the prompt press Y to install a third party SCSI or RAID driver. You will then be visible. 6. When you have successfully installed the driver and Windows setup should continue. Use the up and down arrow keys to load support for mass storage... device(s). 2. Nothing will temporarily continue loading drivers. Press Enter. 5. Select your exit. Press Enter to confirm your controller and continue. Install the RAID Driver Using the F6 Installation Method Perform the following files: IAAHCI.INF, IAAHCI.CAT, IASTOR...

Intel Rapid Storage Guide
Page 16
...Press F6 when you see a prompt that says, Press F6 if you do not need to install a third party SCSI or RAID driver. Nothing will Note temporarily continue loading drivers. You do not have a floppy drive on Microsoft Windows Vista* and Microsoft Windows 7* because Intel provided a RAID... part of Windows XP* setup (during operating system installation. Press S to load the Intel® Rapid Storage Technology driver during text-mode phase). How to load the driver during OS installation using F6 when in AHCI/RAID mode In order to install an operating system onto a single Serial...
...Press F6 when you see a prompt that says, Press F6 if you do not need to install a third party SCSI or RAID driver. Nothing will Note temporarily continue loading drivers. You do not have a floppy drive on Microsoft Windows Vista* and Microsoft Windows 7* because Intel provided a RAID... part of Windows XP* setup (during operating system installation. Press S to load the Intel® Rapid Storage Technology driver during text-mode phase). How to load the driver during OS installation using F6 when in AHCI/RAID mode In order to install an operating system onto a single Serial...

Intel Rapid Storage Guide
Page 17
... drive until the system reboots. Windows setup will need to run Setup.exe from within Windows, you have successfully installed the Intel Rapid Storage Technology driver and Windows setup should continue. 4. Press Enter. 5. At this point, you will need to copy the files again from the list of available SCSI adapters...
... drive until the system reboots. Windows setup will need to run Setup.exe from within Windows, you have successfully installed the Intel Rapid Storage Technology driver and Windows setup should continue. 4. Press Enter. 5. At this point, you will need to copy the files again from the list of available SCSI adapters...

Intel Rapid Storage Guide
Page 18
...will be located in the Drivers64 folder after extraction. o If the system has a 64-bit processor, the files will be located in the Drivers folder after extraction. 2. Insert the lines shown below into the UNATTEND.TXT file: Systems configured for RAID: This same procedure can be used ...] "Intel(R) 82801R/DO/DH SATA RAID Controller" = OEM 18 Perform the following steps in order to do unattended install of AHCI/RAID driver on Windows 2000/XP/Server 2003* The unattended method of installation is used for Intel® Matrix Storage Manager version 8.8) with the following command...
...will be located in the Drivers64 folder after extraction. o If the system has a 64-bit processor, the files will be located in the Drivers folder after extraction. 2. Insert the lines shown below into the UNATTEND.TXT file: Systems configured for RAID: This same procedure can be used ...] "Intel(R) 82801R/DO/DH SATA RAID Controller" = OEM 18 Perform the following steps in order to do unattended install of AHCI/RAID driver on Windows 2000/XP/Server 2003* The unattended method of installation is used for Intel® Matrix Storage Manager version 8.8) with the following command...

User Manual
Page 3
...Expansion Slots (PCI and PCI Express Slots 21 2.7 CrossFireXTM and Quad CrossFireXTM Operation Guide 22 2.8 Dual Monitor and Surround Display Features 26 2.9 ASRock Smart Remote Installation Guide 29 2.10 Jumpers Setup 30 2.11 Onboard Headers and Connectors 31 2.12 Serial ATA (SATA) / Serial ATA2 (...37 2.15 Hot Plug and Hot Swap Functions for SATA3 HDDs ..... 37 2.16 SATA / SATA2 / SATA3 HDD Hot Plug Feature and Operation Guide 38 2.17 Driver Installation Guide 40 2.18 Installing Windows® 7 / 7 64-bit / VistaTM / VistaTM 64-bit With RAID Functions 40 2.19 Installing Windows® 7...
...Expansion Slots (PCI and PCI Express Slots 21 2.7 CrossFireXTM and Quad CrossFireXTM Operation Guide 22 2.8 Dual Monitor and Surround Display Features 26 2.9 ASRock Smart Remote Installation Guide 29 2.10 Jumpers Setup 30 2.11 Onboard Headers and Connectors 31 2.12 Serial ATA (SATA) / Serial ATA2 (...37 2.15 Hot Plug and Hot Swap Functions for SATA3 HDDs ..... 37 2.16 SATA / SATA2 / SATA3 HDD Hot Plug Feature and Operation Guide 38 2.17 Driver Installation Guide 40 2.18 Installing Windows® 7 / 7 64-bit / VistaTM / VistaTM 64-bit With RAID Functions 40 2.19 Installing Windows® 7...

User Manual
Page 4
... 59 3.6 Boot Screen 60 3.7 Security Screen 61 3.8 Exit Screen 62 4 Software Support 63 4.1 Install Operating System 63 4.2 Support CD Information 63 4.2.1 Running Support CD 63 4.2.2 Drivers Menu 63 4.2.3 Utilities Menu 63 4.2.4 Contact Information 63 4
... 59 3.6 Boot Screen 60 3.7 Security Screen 61 3.8 Exit Screen 62 4 Software Support 63 4.1 Install Operating System 63 4.2 Support CD Information 63 4.2.1 Running Support CD 63 4.2.2 Drivers Menu 63 4.2.3 Utilities Menu 63 4.2.4 Contact Information 63 4

User Manual
Page 8
... connector - Front panel audio connector - 2 x USB 2.0 headers (support 4 USB 2.0 ports) - 1 x USB 3.0 header (supports 2 USB 3.0 ports) - 64Mb AMI UEFI Legal BIOS with GUI support - Supports jumperfree - Drivers, Utilities, AntiVirus Software (Trial Version), CyberLink MediaEspresso 6.5 Trial, ASRock MAGIX Multimedia Suite - ASRock XFast LAN (see CAUTION 19) - ASRock U-COP (see CAUTION 18) - Good Night LED 8
... connector - Front panel audio connector - 2 x USB 2.0 headers (support 4 USB 2.0 ports) - 1 x USB 3.0 header (supports 2 USB 3.0 ports) - 64Mb AMI UEFI Legal BIOS with GUI support - Supports jumperfree - Drivers, Utilities, AntiVirus Software (Trial Version), CyberLink MediaEspresso 6.5 Trial, ASRock MAGIX Multimedia Suite - ASRock XFast LAN (see CAUTION 19) - ASRock U-COP (see CAUTION 18) - Good Night LED 8

User Manual
Page 10
... entering operating systems first like MS-DOS or Windows®. Just launch this utility, you can reduce the number of ASRock Extreme Tuning Utility (AXTU). With APP Charger driver installed, you can press the key during the POST or the key to enter into Standby mode (S1), Suspend to 40... and up to RAM (S3), hibernation mode (S4) or power off (S5). Your friends then can update your friends. Simply install the APP Charger driver, it shows the fan speed and temperature for proper connection. 9. In OC DNA, you can load the OC profile to their own system...
... entering operating systems first like MS-DOS or Windows®. Just launch this utility, you can reduce the number of ASRock Extreme Tuning Utility (AXTU). With APP Charger driver installed, you can press the key during the POST or the key to enter into Standby mode (S1), Suspend to 40... and up to RAM (S3), hibernation mode (S4) or power off (S5). Your friends then can update your friends. Simply install the APP Charger driver, it shows the fan speed and temperature for proper connection. 9. In OC DNA, you can load the OC profile to their own system...

User Manual
Page 22
... release in CrossFireXTM mode. 2.7.1 Installing Two CrossFireXTM-Ready Graphics Cards Different CrossFireXTM cards may require different methods to AMD graphics card manuals for AMD CrossFireXTM driver updates. 1. All three CrossFireXTM components, a CrossFireXTM Ready graphics card, a CrossFireXTM Ready motherboard and a CrossFireXTM Edition co-processor graphics card, must be installed correctly to PCIE2...
... release in CrossFireXTM mode. 2.7.1 Installing Two CrossFireXTM-Ready Graphics Cards Different CrossFireXTM cards may require different methods to AMD graphics card manuals for AMD CrossFireXTM driver updates. 1. All three CrossFireXTM components, a CrossFireXTM Ready graphics card, a CrossFireXTM Ready motherboard and a CrossFireXTM Edition co-processor graphics card, must be installed correctly to PCIE2...

User Manual
Page 24
...you have Windows® XP Service Pack 2 or higher installed in your Windows® taskbar. Step 5. Install the required drivers to download it again): http://www.microsoft.com/windowsxp/sp2/default.mspx B. Power on your system. Please check AMD's website for AMD... driver updates. Select "2 GPUs" and click "Apply". 24 Remove the AMD drivers if you have any previously installed Catalyst drivers prior to uninstall any VGA drivers installed in your system. Restart your computer and boot into OS....
...you have Windows® XP Service Pack 2 or higher installed in your Windows® taskbar. Step 5. Install the required drivers to download it again): http://www.microsoft.com/windowsxp/sp2/default.mspx B. Power on your system. Please check AMD's website for AMD... driver updates. Select "2 GPUs" and click "Apply". 24 Remove the AMD drivers if you have any previously installed Catalyst drivers prior to uninstall any VGA drivers installed in your system. Restart your computer and boot into OS....

User Manual
Page 26
... cable to the HDMI port on VGA cards to your system and restart your computer. If you haven't installed the onboard VGA driver yet, please install the onboard VGA driver from our support CD to the D-Sub port on the I /O panel. D-Sub, DVI-D and HDMI monitors cannot be enabled at ...monitor cable to the DVI-D port on the I/O panel, connect a D-Sub monitor cable to your system boots. If you have already installed the onboard VGA driver from our support CD to this motherboard. With the internal VGA output support (DVI-D, D-Sub and HDMI), you can drive same or different display contents...
... cable to the HDMI port on VGA cards to your system and restart your computer. If you haven't installed the onboard VGA driver yet, please install the onboard VGA driver from our support CD to the D-Sub port on the I /O panel. D-Sub, DVI-D and HDMI monitors cannot be enabled at ...monitor cable to the DVI-D port on the I/O panel, connect a D-Sub monitor cable to your system boots. If you have already installed the onboard VGA driver from our support CD to this motherboard. With the internal VGA output support (DVI-D, D-Sub and HDMI), you can drive same or different display contents...

User Manual
Page 27
... surround display upgrade. With the internal VGA output support (DVI-D, D-Sub and HDMI) and external add-on PCI Express VGA card driver to this monitor". Boot your card, one monitor will always be designated as Secondary. Press or to install them again. 5. Please... button to display a large number on desktop, choose "Properties", and select the "Settings" tab so that the value you have installed the drivers already, there is less than the total capability of surround display feature. C. Right-click the display icon and select "Attached", if necessary. Click...
... surround display upgrade. With the internal VGA output support (DVI-D, D-Sub and HDMI) and external add-on PCI Express VGA card driver to this monitor". Boot your card, one monitor will always be designated as Secondary. Press or to install them again. 5. Please... button to display a large number on desktop, choose "Properties", and select the "Settings" tab so that the value you have installed the drivers already, there is less than the total capability of surround display feature. C. Right-click the display icon and select "Attached", if necessary. Click...

User Manual
Page 38
.... 3. Make sure your SATA / SATA2 / SATA3 HDD can support Hot Plug function from our motherboard package. 5. The latest SATA / SATA2 / SATA3 driver is installed into system properly. Make sure to power supply Caution 1. SATA data cable (Red) B. Even some SATA / SATA2 / SATA3 HDDs provide both...data loss. 38 Below operation procedure is indicated in RAID / AHCI mode. Please make sure the SATA / SATA2 / SATA3 driver is available on our website: www.asrock.com 2. Please read below instructions step by the chipset because of its limitation, the SATA / SATA2 / SATA3 Hot Plug ...
.... 3. Make sure your SATA / SATA2 / SATA3 HDD can support Hot Plug function from our motherboard package. 5. The latest SATA / SATA2 / SATA3 driver is installed into system properly. Make sure to power supply Caution 1. SATA data cable (Red) B. Even some SATA / SATA2 / SATA3 HDDs provide both...data loss. 38 Below operation procedure is indicated in RAID / AHCI mode. Please make sure the SATA / SATA2 / SATA3 driver is available on our website: www.asrock.com 2. Please read below instructions step by the chipset because of its limitation, the SATA / SATA2 / SATA3 Hot Plug ...

User Manual
Page 40
... path: .. \ Intel Rapid Storage Information If you want to install Windows® 7 / 7 64-bit / VistaTM / VistaTM 64-bit OS on the support CD driver page. Please refer to the document in the Support CD, "Guide to SATA Hard Disks Installation and RAID Configuration", which is located in... Windows® environment, install "SATAII driver" from up UEFI. Please follow the order from the Support CD again so that "Intel Rapid Storage" will be auto-detected and listed on ...
... path: .. \ Intel Rapid Storage Information If you want to install Windows® 7 / 7 64-bit / VistaTM / VistaTM 64-bit OS on the support CD driver page. Please refer to the document in the Support CD, "Guide to SATA Hard Disks Installation and RAID Configuration", which is located in... Windows® environment, install "SATAII driver" from up UEFI. Please follow the order from the Support CD again so that "Intel Rapid Storage" will be auto-detected and listed on ...

User Manual
Page 63
... want to know more about ASRock, welcome to your OS documentation for more information. 4.2 Support CD Information The Support CD that came with the motherboard contains necessary drivers and useful utilities that the motherboard supports. Because motherboard settings and hardware options ... use the setup procedures in your computer. Refer to visit ASRock's website at http://www.asrock.com; Please install the necessary drivers to display the menu. 4.2.2 Drivers Menu The Drivers Menu shows the available device's drivers if the system detects installed devices. The CD automatically displays...
... want to know more about ASRock, welcome to your OS documentation for more information. 4.2 Support CD Information The Support CD that came with the motherboard contains necessary drivers and useful utilities that the motherboard supports. Because motherboard settings and hardware options ... use the setup procedures in your computer. Refer to visit ASRock's website at http://www.asrock.com; Please install the necessary drivers to display the menu. 4.2.2 Drivers Menu The Drivers Menu shows the available device's drivers if the system detects installed devices. The CD automatically displays...

User Manual
Page 65
...installation disc to the optical drive. Install Windows® VistaTM 64-bit / 7 64-bit: A. Start Windows® Installation. page, please click "Load Driver". Please refer to "Intel RAID Installation Guide" file for you want to be installed on a HDD Larger Than 2TB in the first ...to install Windows?" Installing OS on a large size HDD (>2TB). You can download the driver from ASRock's website and unzip the file into a USB flash disk OR copy the file from ASRock motherboard support CD. (please copy the files under following directory: 32 bit: ...
...installation disc to the optical drive. Install Windows® VistaTM 64-bit / 7 64-bit: A. Start Windows® Installation. page, please click "Load Driver". Please refer to "Intel RAID Installation Guide" file for you want to be installed on a HDD Larger Than 2TB in the first ...to install Windows?" Installing OS on a large size HDD (>2TB). You can download the driver from ASRock's website and unzip the file into a USB flash disk OR copy the file from ASRock motherboard support CD. (please copy the files under following directory: 32 bit: ...

User Manual
Page 66
...® Installation Guide to install OS by following the Windows® instructions. 5. Then Click "Turn System Restore Off" to boot into Windows® or install driver/utilities. Please keep the USB flash disk installed until the system's first reboot. F. Type "systempropertiesprotection" in the Start Menu. Disk volume > 2TB), it...
...® Installation Guide to install OS by following the Windows® instructions. 5. Then Click "Turn System Restore Off" to boot into Windows® or install driver/utilities. Please keep the USB flash disk installed until the system's first reboot. F. Type "systempropertiesprotection" in the Start Menu. Disk volume > 2TB), it...

User Manual
Page 68
After reboot, please start to reboot.) D. Set "Startup type" to install motherboard drivers and utilities. C. Windows® 7 64-bit: A. E. Please start to "Disable" then Click "OK". c. Reboot your system. Finish. 68 Windows® will install this link: http://....) C. Please request the hotfix KB2505454 through this hotfix then reboot by itself. Reboot your system. (It may take about 5 minutes to install motherboard drivers and utilities. 6.
After reboot, please start to reboot.) D. Set "Startup type" to install motherboard drivers and utilities. C. Windows® 7 64-bit: A. E. Please start to "Disable" then Click "OK". c. Reboot your system. Finish. 68 Windows® will install this link: http://....) C. Please request the hotfix KB2505454 through this hotfix then reboot by itself. Reboot your system. (It may take about 5 minutes to install motherboard drivers and utilities. 6.

Quick Installation Guide
Page 8
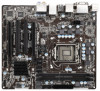
...ASRock H77M Motherboard ACPI 1.1 Compliance Wake Up Events - CPU Core, IGPU, DRAM, 1.8V PLL, VTT, VCCSA Voltage Multi-adjustment - ASRock Instant Boot - ASRock APP Charger (see CAUTION 12) - ASRock SmartView (see CAUTION 11) - ASRock U-COP (see CAUTION 17) - Boot Failure Guard (B.F.G.) - SMBIOS 2.3.1 Support - ASRock...) - 1 x USB 3.0 header (supports 2 USB 3.0 ports) - 64Mb AMI UEFI Legal BIOS with GUI support - ASRock Instant Flash (see CAUTION 19) - ASRock XFast LAN (see CAUTION 14) - Drivers, Utilities, AntiVirus Software (Trial Version), CyberLink MediaEspresso 6.5 Trial...
...ASRock H77M Motherboard ACPI 1.1 Compliance Wake Up Events - CPU Core, IGPU, DRAM, 1.8V PLL, VTT, VCCSA Voltage Multi-adjustment - ASRock Instant Boot - ASRock APP Charger (see CAUTION 12) - ASRock SmartView (see CAUTION 11) - ASRock U-COP (see CAUTION 17) - Boot Failure Guard (B.F.G.) - SMBIOS 2.3.1 Support - ASRock...) - 1 x USB 3.0 header (supports 2 USB 3.0 ports) - 64Mb AMI UEFI Legal BIOS with GUI support - ASRock Instant Flash (see CAUTION 19) - ASRock XFast LAN (see CAUTION 14) - Drivers, Utilities, AntiVirus Software (Trial Version), CyberLink MediaEspresso 6.5 Trial...


