User Manual
Page 5
...occur, the updated version will be subject to the "User Manual" in our support CD for purchasing ASRock H61M motherboard, a reliable motherboard produced under ASRock's consistently stringent quality control. For the BIOS setup, please refer to change without further notice. It ...delivers excellent performance with robust design conforming to ASRock's commitment to set the BIOS option in , 24.4 cm x 21.8 cm) ASRock H61M Quick Installation Guide ASRock H61M Support CD 2 x Serial ATA (SATA) Data Cables (Optional) 1 x I/O Panel Shield ASRock Reminds You... Chapter 3 and 4 contain the...
...occur, the updated version will be subject to the "User Manual" in our support CD for purchasing ASRock H61M motherboard, a reliable motherboard produced under ASRock's consistently stringent quality control. For the BIOS setup, please refer to change without further notice. It ...delivers excellent performance with robust design conforming to ASRock's commitment to set the BIOS option in , 24.4 cm x 21.8 cm) ASRock H61M Quick Installation Guide ASRock H61M Support CD 2 x Serial ATA (SATA) Data Cables (Optional) 1 x I/O Panel Shield ASRock Reminds You... Chapter 3 and 4 contain the...

Quick Installation Guide
Page 1
... companies, and are furnished for informational use only and subject to the owners' benefit, without written consent of ASRock Inc. All rights reserved. 1 ASRock H61M Motherboard English Operation is subject to the following two conditions: (1) this device may not cause harmful interference, and (2)...the purchaser for identification or explanation and to change without notice, and should not be constructed as a commitment by ASRock. Copyright Notice: No part of this installation guide may be liable for any indirect, special, incidental, or consequential damages (including...
... companies, and are furnished for informational use only and subject to the owners' benefit, without written consent of ASRock Inc. All rights reserved. 1 ASRock H61M Motherboard English Operation is subject to the following two conditions: (1) this device may not cause harmful interference, and (2)...the purchaser for identification or explanation and to change without notice, and should not be constructed as a commitment by ASRock. Copyright Notice: No part of this installation guide may be liable for any indirect, special, incidental, or consequential damages (including...
Quick Installation Guide
Page 2
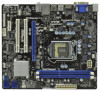
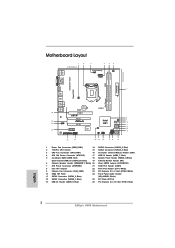
... 2.0 T: USB4 Top: B: USB5 RJ-45 Top: LINE IN Center: FRONT Bottom: MIC IN 26 25 24 LAN PHY HD_AUDIO1 1 PCI Express 2.0 RoHS CMOS Battery PCIE1 H61M PCI1 PCI2 23 AUDIO CODEC 1 LPT1 PCIE2 COM1 1 Super I/O Dual Channel DX10.1 CHA_FAN1 Intel H61 32Mb BIOS SATA2_0 1 CLRCMOS1 IR1 1 PANEL1 PLED PWRBTN 1 HDLED RESET..., Blue) (HD_AUDIO1, White) 12 SATA2 Connector (SATA2_1, Blue) 25 PCI Slots (PCI1-2) 13 USB 2.0 Header (USB8_9, Blue) 26 PCI Express 2.0 x16 Slot (PCIE1, Blue) English 2 ASRock H61M Motherboard
... 2.0 T: USB4 Top: B: USB5 RJ-45 Top: LINE IN Center: FRONT Bottom: MIC IN 26 25 24 LAN PHY HD_AUDIO1 1 PCI Express 2.0 RoHS CMOS Battery PCIE1 H61M PCI1 PCI2 23 AUDIO CODEC 1 LPT1 PCIE2 COM1 1 Super I/O Dual Channel DX10.1 CHA_FAN1 Intel H61 32Mb BIOS SATA2_0 1 CLRCMOS1 IR1 1 PANEL1 PLED PWRBTN 1 HDLED RESET..., Blue) (HD_AUDIO1, White) 12 SATA2 Connector (SATA2_1, Blue) 25 PCI Slots (PCI1-2) 13 USB 2.0 Header (USB8_9, Blue) 26 PCI Express 2.0 x16 Slot (PCIE1, Blue) English 2 ASRock H61M Motherboard

Quick Installation Guide
Page 3
... find "Mixer" tool on the system tray. Set "Speaker Configuration" to the table below steps for the LAN port LED indications. English 3 ASRock H61M Motherboard I/O Panel 1 2 3 4 5 6 12 11 10 1 PS/2 Mouse Port (Green) 2 VGA/D-Sub Port * 3 LAN RJ-45 Port 4 Line In (Light Blue) ** 5 Front Speaker (Lime) 6 Microphone (Pink...
... find "Mixer" tool on the system tray. Set "Speaker Configuration" to the table below steps for the LAN port LED indications. English 3 ASRock H61M Motherboard I/O Panel 1 2 3 4 5 6 12 11 10 1 PS/2 Mouse Port (Green) 2 VGA/D-Sub Port * 3 LAN RJ-45 Port 4 Line In (Light Blue) ** 5 Front Speaker (Lime) 6 Microphone (Pink...
Quick Installation Guide
Page 4
... without notice. It delivers excellent performance with robust design conforming to ASRock's commitment to the "User Manual" in , 24.4 cm x 21.8 cm) ASRock H61M Quick Installation Guide ASRock H61M Support CD 2 x Serial ATA (SATA) Data Cables (Optional) 1 x I/O Panel Shield ASRock Reminds You... Because the motherboard specifications and the BIOS software might be updated, the...
... without notice. It delivers excellent performance with robust design conforming to ASRock's commitment to the "User Manual" in , 24.4 cm x 21.8 cm) ASRock H61M Quick Installation Guide ASRock H61M Support CD 2 x Serial ATA (SATA) Data Cables (Optional) 1 x I/O Panel Shield ASRock Reminds You... Because the motherboard specifications and the BIOS software might be updated, the...

Quick Installation Guide
Page 5
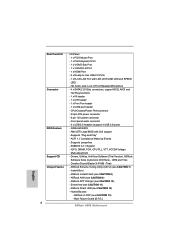
... 4) - Supports 2nd Generation Intel® CoreTM i7 / i5 / i3 in , 24.4 cm x 21.8 cm - Intel® HD Graphics 2000/3000 - Supports Wake-On-LAN English 5 ASRock H61M Motherboard 1.2 Specifications Platform CPU Chipset Memory Expansion Slot Graphics Audio LAN -
... 4) - Supports 2nd Generation Intel® CoreTM i7 / i5 / i3 in , 24.4 cm x 21.8 cm - Intel® HD Graphics 2000/3000 - Supports Wake-On-LAN English 5 ASRock H61M Motherboard 1.2 Specifications Platform CPU Chipset Memory Expansion Slot Graphics Audio LAN -
Quick Installation Guide
Page 6
Drivers, Utilities, AntiVirus Software (Trial Version), ASRock Software Suite (CyberLink DVD Suite - ASRock XFast USB (see CAUTION 8) - Boot Failure Guard (B.F.G.) ASRock H61M Motherboard HD Audio Jack: Line in/Front Speaker/Microphone - 4 x SATA2 3.0 Gb/s connectors, support NCQ, AHCI and Hot Plug functions - 1 x IR header - 1 x CIR header - 1 x Print Port ...
Drivers, Utilities, AntiVirus Software (Trial Version), ASRock Software Suite (CyberLink DVD Suite - ASRock XFast USB (see CAUTION 8) - Boot Failure Guard (B.F.G.) ASRock H61M Motherboard HD Audio Jack: Line in/Front Speaker/Microphone - 4 x SATA2 3.0 Gb/s connectors, support NCQ, AHCI and Hot Plug functions - 1 x IR header - 1 x CIR header - 1 x Print Port ...

Quick Installation Guide
Page 7
... the setting in the BIOS, applying Untied Overclocking Technology, or using the third-party overclocking tools. Voltage Monitoring: +12V, +5V, +3.3V, CPU Vcore OS - English 7 ASRock H61M Motherboard Chassis Temperature Sensing - Combo Cooler Option (C.C.O.) (see CAUTION 15) * For detailed product information, please visit our website: http://www...
... the setting in the BIOS, applying Untied Overclocking Technology, or using the third-party overclocking tools. Voltage Monitoring: +12V, +5V, +3.3V, CPU Vcore OS - English 7 ASRock H61M Motherboard Chassis Temperature Sensing - Combo Cooler Option (C.C.O.) (see CAUTION 15) * For detailed product information, please visit our website: http://www...

Quick Installation Guide
Page 8
Before you to update system BIOS without entering operating systems first like MS-DOS or Windows®. ASRock website: http://www.asrock.com 8. This convenient BIOS update tool allows you implement Dual Channel Memory Technology, make sure to read the installation guide of output... for you can press key during the POST or press key to BIOS setup menu to use FAT32/16/12 file system. 8 ASRock H61M Motherboard English CAUTION! 1. This motherboard supports Dual Channel Memory Technology. The maximum shared memory size is defined by the chipset vendor and...
Before you to update system BIOS without entering operating systems first like MS-DOS or Windows®. ASRock website: http://www.asrock.com 8. This convenient BIOS update tool allows you implement Dual Channel Memory Technology, make sure to read the installation guide of output... for you can press key during the POST or press key to BIOS setup menu to use FAT32/16/12 file system. 8 ASRock H61M Motherboard English CAUTION! 1. This motherboard supports Dual Channel Memory Technology. The maximum shared memory size is defined by the chipset vendor and...
Quick Installation Guide
Page 9
...charging experience than before. ASRock AIWI utility introduces a new way of ficial website or ASRock software support CD to RAM (S3), hibernation mode (S4) or power off (S5). ASRock APP Charger. With APP Charger driver installed, you can be used. 9 ASRock H61M Motherboard English To experience ... remember to spray thermal grease between the CPU and the heatsink when you have to install the ASRock AIWI utility either from ASRock of PC gaming operation. 9. ASRock APP Charger allows you keep in touch with the SmartView utility that combines your most up to control...
...charging experience than before. ASRock AIWI utility introduces a new way of ficial website or ASRock software support CD to RAM (S3), hibernation mode (S4) or power off (S5). ASRock APP Charger. With APP Charger driver installed, you can be used. 9 ASRock H61M Motherboard English To experience ... remember to spray thermal grease between the CPU and the heatsink when you have to install the ASRock AIWI utility either from ASRock of PC gaming operation. 9. ASRock APP Charger allows you keep in touch with the SmartView utility that combines your most up to control...

Quick Installation Guide
Page 10
... standard, an EuP ready motherboard and an EuP ready power supply are required. According to define the power consumption for more details. 10 ASRock H61M Motherboard English 15.
... standard, an EuP ready motherboard and an EuP ready power supply are required. According to define the power consumption for more details. 10 ASRock H61M Motherboard English 15.

Quick Installation Guide
Page 11
... chassis, please do not over-tighten the screws! erboard to static electricity, NEVER place your motherboard directly on the carpet or the like. English 11 ASRock H61M Motherboard When placing screws into the screw holes to insert the CPU into the socket, please check if the CPU surface is unclean or if...
... chassis, please do not over-tighten the screws! erboard to static electricity, NEVER place your motherboard directly on the carpet or the like. English 11 ASRock H61M Motherboard When placing screws into the screw holes to insert the CPU into the socket, please check if the CPU surface is unclean or if...

Quick Installation Guide
Page 12
... 1. Insert the 1155-Pin CPU: Step 3-1. It is recommended to use the cap tab to match the two orientation key notches of the socket. 12 ASRock H61M Motherboard Hold the CPU by depressing down and out on the hook to fully open position at approximately 100 degrees. Step 1-2. Rotate the load plate...
... 1. Insert the 1155-Pin CPU: Step 3-1. It is recommended to use the cap tab to match the two orientation key notches of the socket. 12 ASRock H61M Motherboard Hold the CPU by depressing down and out on the hook to fully open position at approximately 100 degrees. Step 1-2. Rotate the load plate...

Quick Installation Guide
Page 13
... caps with the CPU fan connector on load plate, engage the load lever. 2.2 Installation of the heatsink for Socket LGA 1155/1156 CPU fan. 13 ASRock H61M Motherboard English Step 1. Step 4. Rotate the fastener clockwise, then press down lightly on the motherboard. Connect fan header with thumb to adopt three different CPU...
... caps with the CPU fan connector on load plate, engage the load lever. 2.2 Installation of the heatsink for Socket LGA 1155/1156 CPU fan. 13 ASRock H61M Motherboard English Step 1. Step 4. Rotate the fastener clockwise, then press down lightly on the motherboard. Connect fan header with thumb to adopt three different CPU...

Quick Installation Guide
Page 14
.... 3. Step 2. Firmly insert the DIMM into DDR3 slot;otherwise, this motherboard and DIMM may not work on the slot. Otherwise, it is properly seated. 14 ASRock H61M Motherboard Align a DIMM on the slot such that the notch on the DIMM matches the break on this motherboard. For dual channel configuration, you force...
.... 3. Step 2. Firmly insert the DIMM into DDR3 slot;otherwise, this motherboard and DIMM may not work on the slot. Otherwise, it is properly seated. 14 ASRock H61M Motherboard Align a DIMM on the slot such that the notch on the DIMM matches the break on this motherboard. For dual channel configuration, you force...

Quick Installation Guide
Page 15
... slots on the slot. PCIE2 (PCIE x1 slot; Remove the bracket facing the slot that you start the installation. Step 6. Replace the system cover. 15 ASRock H61M Motherboard English White) is already installed in a chassis). Step 3. 2.4 Expansion Slots (PCI and PCI Express Slots) There are used to install expansion cards that have...
... slots on the slot. PCIE2 (PCIE x1 slot; Remove the bracket facing the slot that you start the installation. Step 6. Replace the system cover. 15 ASRock H61M Motherboard English White) is already installed in a chassis). Step 3. 2.4 Expansion Slots (PCI and PCI Express Slots) There are used to install expansion cards that have...

Quick Installation Guide
Page 16
... CD to support dual VGA output so that DVI-D, D-sub and HDMI can only choose the combination: DVI-D + HDMI, DVI-D + D-Sub, or HDMI + D-Sub. 16 ASRock H61M Motherboard English You can drive same or different display contents. This motherboard also provides independent display controllers for DVI-D, D-Sub and HDMI to your system...
... CD to support dual VGA output so that DVI-D, D-sub and HDMI can only choose the combination: DVI-D + HDMI, DVI-D + D-Sub, or HDMI + D-Sub. 16 ASRock H61M Motherboard English You can drive same or different display contents. This motherboard also provides independent display controllers for DVI-D, D-Sub and HDMI to your system...

Quick Installation Guide
Page 17
... the following steps to page 15 for proper expansion card installation procedures for the second monitor. Boot your card, one , two, three and four. 17 ASRock H61M Motherboard English B. When you do not adjust the UEFI setup, the default value of the system memory. E. F. With the internal VGA output support (DVI-D, D-Sub...
... the following steps to page 15 for proper expansion card installation procedures for the second monitor. Boot your card, one , two, three and four. 17 ASRock H61M Motherboard English B. When you do not adjust the UEFI setup, the default value of the system memory. E. F. With the internal VGA output support (DVI-D, D-Sub...

Quick Installation Guide
Page 18
... of intercepting digital data midstream between the video source, or transmitter - Click the items "This is being transmitted. HDCP Function HDCP function is compatible. 18 ASRock H61M Motherboard English For Windows® 7 / 7 64-bit / VistaTM / VistaTM 64-bit OS: Right click the desktop, choose "Personalize", and select the "Display Settings" tab so...
... of intercepting digital data midstream between the video source, or transmitter - Click the items "This is being transmitted. HDCP Function HDCP function is compatible. 18 ASRock H61M Motherboard English For Windows® 7 / 7 64-bit / VistaTM / VistaTM 64-bit OS: Right click the desktop, choose "Personalize", and select the "Display Settings" tab so...

Quick Installation Guide
Page 19
... assignments are matched correctly. 1 23 45 Step3. GND IRTX IRRX ATX+5VSB Install Multi-Angle CIR Receiver to ASRock website for the motherboard support list: http://www.asrock.com 19 ASRock H61M Motherboard Only one of ASRock Smart Remote. The Multi-Angle CIR Receiver does not support Hot-Plug function. Please refer to the front...
... assignments are matched correctly. 1 23 45 Step3. GND IRTX IRRX ATX+5VSB Install Multi-Angle CIR Receiver to ASRock website for the motherboard support list: http://www.asrock.com 19 ASRock H61M Motherboard Only one of ASRock Smart Remote. The Multi-Angle CIR Receiver does not support Hot-Plug function. Please refer to the front...


