
User Manual
Page 4
... 3.4.3 South Bridge Configuration 55 3.4.4 Storage Configuration 56 3.4.5 Super IO Configuration 57 3.4.6 ACPI Configuration 58 3.4.7 USB Configuration 60 3.5 Tool 61 3.6 Hardware Health Event Monitoring Screen 64 3.7 Boot Screen 65 3.8 Security Screen 67 3.9 Exit Screen 69 4. Software Support 70 4.1 Install Operating System 70 4.2 Support CD Information 70 4.2.1 Running Support CD 70 4.2.2 Drivers Menu...
... 3.4.3 South Bridge Configuration 55 3.4.4 Storage Configuration 56 3.4.5 Super IO Configuration 57 3.4.6 ACPI Configuration 58 3.4.7 USB Configuration 60 3.5 Tool 61 3.6 Hardware Health Event Monitoring Screen 64 3.7 Boot Screen 65 3.8 Security Screen 67 3.9 Exit Screen 69 4. Software Support 70 4.1 Install Operating System 70 4.2 Support CD Information 70 4.2.1 Running Support CD 70 4.2.2 Drivers Menu...
User Manual
Page 10
ASRock Instant Boot ASRock Instant Boot allows you to turn on your PC in just a few clicks without preparing an additional floppy diskette or other complicated flash utility. This convenient BIOS ... boot up time. Please be used under Windows® OS 32-bit CPU. In OC DNA, you can save energy, time, money, and improves system running speed for you to enter your system. Just launch this utility, you can reduce the number of your friends. 1.3 Unique Features ASRock Extreme Tuning Utility (AXTU) ASRock...
ASRock Instant Boot ASRock Instant Boot allows you to turn on your PC in just a few clicks without preparing an additional floppy diskette or other complicated flash utility. This convenient BIOS ... boot up time. Please be used under Windows® OS 32-bit CPU. In OC DNA, you can save energy, time, money, and improves system running speed for you to enter your system. Just launch this utility, you can reduce the number of your friends. 1.3 Unique Features ASRock Extreme Tuning Utility (AXTU) ASRock...

User Manual
Page 13
...get up experience. The lightning boot up speed makes it takes less than 1.5 seconds to logon to access the UEFI setup. It is included in ASRock's exclusive allin-one -button process. the PC will completely change your CPUs. ASRock Interactive UEFI ASRock Interactive UEFI is a blend ... UEFI provides a more attractive interface and brings a lot more waiting! ASRock Restart to UEFI technology is able to 15.77% performance boost! ASRock Restart to UEFI Windows® 8 brings the ultimate boot up to unleash the hidden power of HyperFormance technology, VIRTU Universal MVP improves...
...get up experience. The lightning boot up speed makes it takes less than 1.5 seconds to logon to access the UEFI setup. It is included in ASRock's exclusive allin-one -button process. the PC will completely change your CPUs. ASRock Interactive UEFI ASRock Interactive UEFI is a blend ... UEFI provides a more attractive interface and brings a lot more waiting! ASRock Restart to UEFI technology is able to 15.77% performance boost! ASRock Restart to UEFI Windows® 8 brings the ultimate boot up to unleash the hidden power of HyperFormance technology, VIRTU Universal MVP improves...
User Manual
Page 25
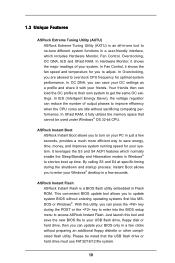
... Center Step 6. Click "View", select "CrossFireXTM", and then check the item "Enable CrossFireXTM". Install the required drivers to your system, and restart your computer and boot into OS. Select "3 GPUs" and click "OK" (if you install two Radeon graphics cards). Power on your system. Please check AMD website for details. Install...
... Center Step 6. Click "View", select "CrossFireXTM", and then check the item "Enable CrossFireXTM". Install the required drivers to your system, and restart your computer and boot into OS. Select "3 GPUs" and click "OK" (if you install two Radeon graphics cards). Power on your system. Please check AMD website for details. Install...
User Manual
Page 27
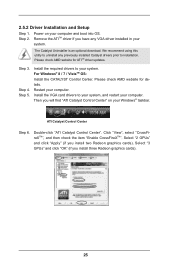
... one AMD RADEON HD7450/7470/7570/7670 PCI Express graphics card to the onboard VGA port. For any VGA driver installed in a Windows® 8 / 7 environment. Boot into OS. Install the onboard VGA driver from onboard display only. Please keep the default UEFI setting of AMD Dual Graphics Step 1. Connect the monitor...
... one AMD RADEON HD7450/7470/7570/7670 PCI Express graphics card to the onboard VGA port. For any VGA driver installed in a Windows® 8 / 7 environment. Boot into OS. Install the onboard VGA driver from onboard display only. Please keep the default UEFI setting of AMD Dual Graphics Step 1. Connect the monitor...

User Manual
Page 29
... driver from our support CD to your system already, you playback HDCP-protected video from our support CD to your system and restart your system boots. When you can easily enjoy the benefits of all monitors. 3. D-Sub, DVI-D, HDMI and DisplayPort monitors cannot be used. 29 When PCIE2 slot is occupied...
... driver from our support CD to your system already, you playback HDCP-protected video from our support CD to your system and restart your system boots. When you can easily enjoy the benefits of all monitors. 3. D-Sub, DVI-D, HDMI and DisplayPort monitors cannot be used. 29 When PCIE2 slot is occupied...
User Manual
Page 30
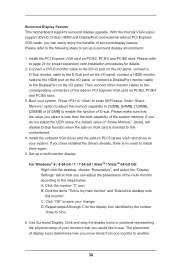
.... With the internal VGA output support (DVI-D, D-Sub, HDMI and DisplayPort) and external add-on the I /O panel, or connect a DisplayPort monitor cable to this monitor". Boot your change. Set up a surround display environment: 1. Surround Display Feature This motherboard supports surround display upgrade. Press or to set up a multi-monitor display.
.... With the internal VGA output support (DVI-D, D-Sub, HDMI and DisplayPort) and external add-on the I /O panel, or connect a DisplayPort monitor cable to this monitor". Boot your change. Set up a surround display environment: 1. Surround Display Feature This motherboard supports surround display upgrade. Press or to set up a multi-monitor display.
User Manual
Page 32
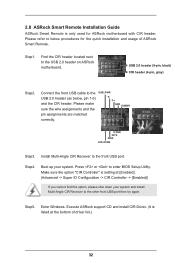
Find the CIR header located next to the front USB port. Install Multi-Angle CIR Receiver to the USB 2.0 header on ASRock motherboard. Boot up your system and install Multi-Angle CIR Receiver to enter BIOS Setup Utility. Press or to the other front USB port then try again.... Please refer to the USB 2.0 header (as below procedures for ASRock motherboard with CIR header. Connect the front USB cable to below , pin 1-5) and the ...
Find the CIR header located next to the front USB port. Install Multi-Angle CIR Receiver to the USB 2.0 header on ASRock motherboard. Boot up your system and install Multi-Angle CIR Receiver to enter BIOS Setup Utility. Press or to the other front USB port then try again.... Please refer to the USB 2.0 header (as below procedures for ASRock motherboard with CIR header. Connect the front USB cable to below , pin 1-5) and the ...

User Manual
Page 33
...and front), which is only supported by some of the chassis on the rear panel. Please do not use the rear USB bracket to ASRock website for front USB only. Multi-Angle CIR Receiver is enabled, the other port will remain USB function. 2. Multi-Angle CIR Receiver... can support CIR function. Please install it on the market. 3. Please refer to connect it before you boot the system. * ASRock Smart Remote is compatible with most of ASRock motherboards. 3 CIR sensors in different angles 1. The Multi-Angle CIR Receiver does not support Hot-Plug function. When ...
...and front), which is only supported by some of the chassis on the rear panel. Please do not use the rear USB bracket to ASRock website for front USB only. Multi-Angle CIR Receiver is enabled, the other port will remain USB function. 2. Multi-Angle CIR Receiver... can support CIR function. Please install it on the market. 3. Please refer to connect it before you boot the system. * ASRock Smart Remote is compatible with most of ASRock motherboards. 3 CIR sensors in different angles 1. The Multi-Angle CIR Receiver does not support Hot-Plug function. When ...
User Manual
Page 34
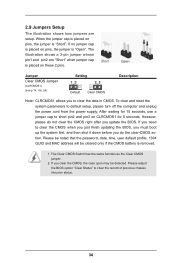
... shows a 3-pin jumper whose pin1 and pin2 are setup. If you need to clear the CMOS when you just finish updating the BIOS, you must boot up the system first, and then shut it down before you update the BIOS. If you to default setup, please turn off the computer and...
... shows a 3-pin jumper whose pin1 and pin2 are setup. If you need to clear the CMOS when you just finish updating the BIOS, you must boot up the system first, and then shut it down before you update the BIOS. If you to default setup, please turn off the computer and...

User Manual
Page 47
...UEFI SETUP UTILITY when you wish to choose among the selections on the system chassis. UEFI SETUP UTILITY 3.1 Introduction ASRock Interactive UEFI is constantly being updated, the following selections: Main For setting system time/date information OC Tweaker For ...overclocking configurations Advanced For advanced system configurations Tool Useful tools H/W Monitor Displays current hardware status Boot For configuring boot settings and boot priority Security For security settings Exit Exit the current screen or the UEFI SETUP UTILITY Use < > key or ...
...UEFI SETUP UTILITY when you wish to choose among the selections on the system chassis. UEFI SETUP UTILITY 3.1 Introduction ASRock Interactive UEFI is constantly being updated, the following selections: Main For setting system time/date information OC Tweaker For ...overclocking configurations Advanced For advanced system configurations Tool Useful tools H/W Monitor Displays current hardware status Boot For configuring boot settings and boot priority Security For security settings Exit Exit the current screen or the UEFI SETUP UTILITY Use < > key or ...

User Manual
Page 58
... or disable USB Keyboard/Remote to power on the system. 58 If [Power Off] is selected, the AC/power resumes and the system starts to boot up when the power recovers. USB Keyboard/Remote Power On Use this item to enable or disable the feature Check Ready Bit. Select [Auto] will...
... or disable USB Keyboard/Remote to power on the system. 58 If [Power Off] is selected, the AC/power resumes and the system starts to boot up when the power recovers. USB Keyboard/Remote Power On Use this item to enable or disable the feature Check Ready Bit. Select [Auto] will...

User Manual
Page 65
...this item to [On], it will display the available devices on your computer's boot time. The default value is [Legacy ROM]. 65 Fast Boot Fast Boot minimizes your system for the details of seconds to boot. Disable Fast Boot. [Fast] - The default value is [Disabled]. Please refer to below ... card, the VBIOS must support UEFI GOP in Widows® to configure the boot settings and the boot priority. 3.7 Boot Screen In this section, it will automatically activate the Numeric Lock function after boot-up. The only restriction is set to adjust PCI ROM Priority. You will ...
...this item to [On], it will display the available devices on your computer's boot time. The default value is [Legacy ROM]. 65 Fast Boot Fast Boot minimizes your system for the details of seconds to boot. Disable Fast Boot. [Fast] - The default value is [Disabled]. Please refer to below ... card, the VBIOS must support UEFI GOP in Widows® to configure the boot settings and the boot priority. 3.7 Boot Screen In this section, it will automatically activate the Numeric Lock function after boot-up. The only restriction is set to adjust PCI ROM Priority. You will ...

User Manual
Page 66
... to enable or disable OEM Logo. If you enable the option "Full Screen Logo" but you want to control the execution of Boot Failure Guard. Boot Failure Guard Enable or disable the feature of UEFI and Legacy Video OpROM. CSM parameters Launch Video OpROM policy Use this option to... adjust AddOn ROM Display. Configuration options: [Enabled] and [Disabled]. Boot Failure Guard Count Enable or disable the feature of Boot Failure Guard Count. Full Screen Logo Use this item to enable or disable the Boot From Onboard LAN feature. The default value is [Legacy only]. 66 AddOn ROM...
... to enable or disable OEM Logo. If you enable the option "Full Screen Logo" but you want to control the execution of Boot Failure Guard. Boot Failure Guard Enable or disable the feature of UEFI and Legacy Video OpROM. CSM parameters Launch Video OpROM policy Use this option to... adjust AddOn ROM Display. Configuration options: [Enabled] and [Disabled]. Boot Failure Guard Count Enable or disable the feature of Boot Failure Guard Count. Full Screen Logo Use this item to enable or disable the Boot From Onboard LAN feature. The default value is [Legacy only]. 66 AddOn ROM...

User Manual
Page 67
The default value is [Enabled]. The default value is [Always Execute]. Image load device path. Option ROM The default value is [Deny Execute]. 67 Secure Boot Control Use this section, you may set or change the supervisor/user password for the system. Secure Boot Policy Internal FV Image Execution Policy on Security Violation. 3.8 Security Screen In this to enable or disable Secure Boot Control. Removable Media The default value is [Deny Execute]. For the user password, you may also clear it.
The default value is [Enabled]. The default value is [Always Execute]. Image load device path. Option ROM The default value is [Deny Execute]. 67 Secure Boot Control Use this section, you may set or change the supervisor/user password for the system. Secure Boot Policy Internal FV Image Execution Policy on Security Violation. 3.8 Security Screen In this to enable or disable Secure Boot Control. Removable Media The default value is [Deny Execute]. For the user password, you may also clear it.

User Manual
Page 71
... to install the operating system. 1. Set AHCI Mode in UEFI Setup Utility > Boot > Boot Option #1. ("xxx" is the device which contains your Windows® installation files. Choose the item "UEFI:xxx" to boot. 4. Start Windows® installation. 71 Press or at system POST and choose ...the item "UEFI:xxx" to boot in UEFI Setup Utility > Advanced > Storage Configuration > SATA Mode. 3. Normally it ...
... to install the operating system. 1. Set AHCI Mode in UEFI Setup Utility > Boot > Boot Option #1. ("xxx" is the device which contains your Windows® installation files. Choose the item "UEFI:xxx" to boot. 4. Start Windows® installation. 71 Press or at system POST and choose ...the item "UEFI:xxx" to boot in UEFI Setup Utility > Advanced > Storage Configuration > SATA Mode. 3. Normally it ...

User Manual
Page 72
.... 5. Choose UEFI : Built - Choose onboard RAID 3TB+ unlocker > UEFI Mode For GPT partition. in UEFI Setup Utility > Advanced > Storage Configuration > SATA Mode. 3. Press to enter Boot Manual. Installing OS on a large size HDD (>2TB). Please follow below : Drv[4E] Ctrl[B5] Lang[eng] 6. Please make sure to install the operating system...
.... 5. Choose UEFI : Built - Choose onboard RAID 3TB+ unlocker > UEFI Mode For GPT partition. in UEFI Setup Utility > Advanced > Storage Configuration > SATA Mode. 3. Press to enter Boot Manual. Installing OS on a large size HDD (>2TB). Please follow below : Drv[4E] Ctrl[B5] Lang[eng] 6. Please make sure to install the operating system...

User Manual
Page 74
11. Choose UEFI: SCSI CD/DVD Drive. * This option only shows on keyboard to exit Utility. 15. After set up Raid size, please click Start to enter Boot Manual. During reboot, please press to Create. 14. Press Space on Windows® 8 64-bit, 7 64-bit and VistaTM 64-bit OS. 74 Choose Ld Size setting, and key in the Raid size. 13. Press to toggle checkbox. 12.
11. Choose UEFI: SCSI CD/DVD Drive. * This option only shows on keyboard to exit Utility. 15. After set up Raid size, please click Start to enter Boot Manual. During reboot, please press to Create. 14. Press Space on Windows® 8 64-bit, 7 64-bit and VistaTM 64-bit OS. 74 Choose Ld Size setting, and key in the Raid size. 13. Press to toggle checkbox. 12.
User Manual
Page 75
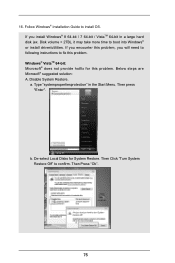
16. Follow Windows® Installation Guide to boot into Windows® or install driver/utilities. Disk volume > 2TB), it may take more time to install OS. De-select Local Disks for this problem. ...
16. Follow Windows® Installation Guide to boot into Windows® or install driver/utilities. Disk volume > 2TB), it may take more time to install OS. De-select Local Disks for this problem. ...
User Manual
Page 77
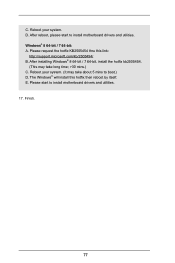
After reboot, please start to install motherboard drivers and utilities. The Windows® will install this link: http://support.microsoft.com/kb/2505454/ B. D. Windows® 8 64-bit / 7 64-bit: A. Reboot your system. C. Finish. 77 Please start to install motherboard drivers and utilities. 17. Please request the hotfix KB2505454 thru this hotfix then reboot by itself. Reboot your system. (It may take about 5 mins to boot.) D. After installing Windows® 8 64-bit / 7 64-bit, install the hotfix kb2505454. (This may take long time; >30 mins.) C. E.
After reboot, please start to install motherboard drivers and utilities. The Windows® will install this link: http://support.microsoft.com/kb/2505454/ B. D. Windows® 8 64-bit / 7 64-bit: A. Reboot your system. C. Finish. 77 Please start to install motherboard drivers and utilities. 17. Please request the hotfix KB2505454 thru this hotfix then reboot by itself. Reboot your system. (It may take about 5 mins to boot.) D. After installing Windows® 8 64-bit / 7 64-bit, install the hotfix kb2505454. (This may take long time; >30 mins.) C. E.


