
User Manual
Page 4
...;guration 39 3.5 Hardware Health Event Monitoring Screen 40 3.6 Boot Screen 41 3.7 Security Screen 42 3.8 Exit Screen 43 4 Software Support 44 4.1 Install Operating System 44 4.2 Support CD Information 44 4.2.1 Running Support CD 44 4.2.2 Drivers Menu 44 4.2.3 Utilities Menu 44 4.2.4 Contact Information 44 4
...;guration 39 3.5 Hardware Health Event Monitoring Screen 40 3.6 Boot Screen 41 3.7 Security Screen 42 3.8 Exit Screen 43 4 Software Support 44 4.1 Install Operating System 44 4.2 Support CD Information 44 4.2.1 Running Support CD 44 4.2.2 Drivers Menu 44 4.2.3 Utilities Menu 44 4.2.4 Contact Information 44 4

User Manual
Page 7
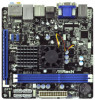
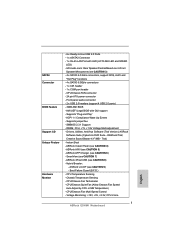
... and SPEED LED) - SMBIOS 2.3.1 Support - Drivers, Utilities, AntiVirus Software (Trial Version), ASRock Software Suite (CyberLink DVD Suite - Supports jumperfree - DRAM, FCH, +1V, +1.8V Voltage Multi-adjustment - Instant Boot - ASRock XFast USB (see CAUTION 5) - CPU Temperature ...Sensing - Boot Failure Guard (B.F.G.) - CPU/Chassis Fan Tachometer - ACPI 1.1 Compliance Wake Up Events - Creative Sound Blaster X-Fi MB - SATA3 Connector BIOS Feature Support CD Unique Feature Hardware Monitor - 6 ...
... and SPEED LED) - SMBIOS 2.3.1 Support - Drivers, Utilities, AntiVirus Software (Trial Version), ASRock Software Suite (CyberLink DVD Suite - Supports jumperfree - DRAM, FCH, +1V, +1.8V Voltage Multi-adjustment - Instant Boot - ASRock XFast USB (see CAUTION 5) - CPU Temperature ...Sensing - Boot Failure Guard (B.F.G.) - CPU/Chassis Fan Tachometer - ACPI 1.1 Compliance Wake Up Events - Creative Sound Blaster X-Fi MB - SATA3 Connector BIOS Feature Support CD Unique Feature Hardware Monitor - 6 ...
User Manual
Page 16
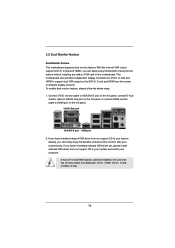
... steps: 1. VGA/D-Sub port VGA/DVI-D port HDMI port 2. If you have installed onboard VGA driver from our support CD to your system already, you haven't installed onboard VGA driver yet, please install onboard VGA driver from our support CD to VGA/D-Sub port on the I /O panel. Connect DVI-D monitor cable to VGA/DVI-D port...
... steps: 1. VGA/D-Sub port VGA/DVI-D port HDMI port 2. If you have installed onboard VGA driver from our support CD to your system already, you haven't installed onboard VGA driver yet, please install onboard VGA driver from our support CD to VGA/D-Sub port on the I /O panel. Connect DVI-D monitor cable to VGA/DVI-D port...
User Manual
Page 26
...HDDs without NCQ function STEP 1: Set up UEFI. Set the option "SATA Mode" to install those required drivers. 2.11 Driver Installation Guide To install the drivers to your system, please insert the support CD to your SATA / SATAII / SATA3 HDDs without RAID functions, please follow below steps. Please follow below ...174; XP / XP 64-bit OS. A. Set the option "SATA Mode" to install Windows® XP / XP 64-bit OS on the support CD driver page. STEP 2: Install Windows® XP / XP 64-bit OS on your system. 26 B. Enter UEFI SETUP UTILITY Advanced screen Storage Configuration....
...HDDs without NCQ function STEP 1: Set up UEFI. Set the option "SATA Mode" to install those required drivers. 2.11 Driver Installation Guide To install the drivers to your system, please insert the support CD to your SATA / SATAII / SATA3 HDDs without RAID functions, please follow below steps. Please follow below ...174; XP / XP 64-bit OS. A. Set the option "SATA Mode" to install Windows® XP / XP 64-bit OS on the support CD driver page. STEP 2: Install Windows® XP / XP 64-bit OS on your system. 26 B. Enter UEFI SETUP UTILITY Advanced screen Storage Configuration....
User Manual
Page 44
... need to contact ASRock or want to activate the devices. 4.2.3 Utilities Menu The Utilities Menu shows the applications software that enhance the motherboard features. 4.2.1 Running The Support CD To begin using the support CD, insert the CD into your computer. Please install the necessary drivers to know more information. 4.2 Support CD Information The Support CD that came...
... need to contact ASRock or want to activate the devices. 4.2.3 Utilities Menu The Utilities Menu shows the applications software that enhance the motherboard features. 4.2.1 Running The Support CD To begin using the support CD, insert the CD into your computer. Please install the necessary drivers to know more information. 4.2 Support CD Information The Support CD that came...
Quick Installation Guide
Page 7
... CAUTION 5) - Supports jumperfree - ASRock AIWI (see CAUTION 9) - CPU/Chassis Fan Multi-Speed Control - DRAM, FCH, +1V, +1.8V Voltage Multi-adjustment - Instant Boot - Voltage Monitoring: +12V, +5V, +3.3V, CPU Vcore English 7 ASRock E350M1 Motherboard Boot Failure Guard (B.F.G.) - Supports "Plug and Play" - Trial) - SmartView (see CAUTION 7) - Drivers, Utilities, AntiVirus Software (Trial Version), ASRock Software Suite (CyberLink DVD...
... CAUTION 5) - Supports jumperfree - ASRock AIWI (see CAUTION 9) - CPU/Chassis Fan Multi-Speed Control - DRAM, FCH, +1V, +1.8V Voltage Multi-adjustment - Instant Boot - Voltage Monitoring: +12V, +5V, +3.3V, CPU Vcore English 7 ASRock E350M1 Motherboard Boot Failure Guard (B.F.G.) - Supports "Plug and Play" - Trial) - SmartView (see CAUTION 7) - Drivers, Utilities, AntiVirus Software (Trial Version), ASRock Software Suite (CyberLink DVD...
Quick Installation Guide
Page 14
D-Sub, DVI-D and HDMI monitors cannot be enabled at the same time. If you have installed onboard VGA driver from our support CD to your system already, you haven't installed onboard VGA driver yet, please install onboard VGA driver from our support CD to your system and restart your system boots. You can freely enjoy the benefits of dual monitor function after your computer. If you can only choose the combination: DVI-D + HDMI, DVI-D + D-Sub, or HDMI + D-Sub. 14 ASRock E350M1 Motherboard English 2.
D-Sub, DVI-D and HDMI monitors cannot be enabled at the same time. If you have installed onboard VGA driver from our support CD to your system already, you haven't installed onboard VGA driver yet, please install onboard VGA driver from our support CD to your system and restart your system boots. You can freely enjoy the benefits of dual monitor function after your computer. If you can only choose the combination: DVI-D + HDMI, DVI-D + D-Sub, or HDMI + D-Sub. 14 ASRock E350M1 Motherboard English 2.
Quick Installation Guide
Page 20
... the option "SATA Mode" to [AHCI]. Set the option "SATA Mode" to [IDE]. Therefore, the drivers you want to install Windows® XP / XP 64-bit OS on the support CD driver page. STEP 2: Install Windows® XP / XP 64-bit OS on your system. 2.9.2 Installing Windows&#.... A. STEP 2: Install Windows® 7 / 7 64-bit / VistaTM / VistaTM 64-bit OS on your system. 20 ASRock E350M1 Motherboard English 2.8 Driver Installation Guide To install the drivers to your system, please insert the support CD to your SATA / SATAII / SATA3 HDDs without RAID functions, please follow below steps.
... the option "SATA Mode" to [AHCI]. Set the option "SATA Mode" to [IDE]. Therefore, the drivers you want to install Windows® XP / XP 64-bit OS on the support CD driver page. STEP 2: Install Windows® XP / XP 64-bit OS on your system. 2.9.2 Installing Windows&#.... A. STEP 2: Install Windows® 7 / 7 64-bit / VistaTM / VistaTM 64-bit OS on your system. 20 ASRock E350M1 Motherboard English 2.8 Driver Installation Guide To install the drivers to your system, please insert the support CD to your SATA / SATAII / SATA3 HDDs without RAID functions, please follow below steps.

Quick Installation Guide
Page 22
otherwise, POST continues with the motherboard contains necessary drivers and useful utilities that will display the Main Menu automatically if "AUTORUN" is enabled in the Support CD. 4. If the Main Menu does not appear automatically, locate and double-click on the motherboard stores BIOS Setup Utility... to enter BIOS Setup utility; It is designed to display the menus. 22 ASRock E350M1 Motherboard English 3. When you to scroll through its test routines. To begin using the Support CD, insert the CD into your computer. The BIOS Setup program is a menu-driven program, which ...
otherwise, POST continues with the motherboard contains necessary drivers and useful utilities that will display the Main Menu automatically if "AUTORUN" is enabled in the Support CD. 4. If the Main Menu does not appear automatically, locate and double-click on the motherboard stores BIOS Setup Utility... to enter BIOS Setup utility; It is designed to display the menus. 22 ASRock E350M1 Motherboard English 3. When you to scroll through its test routines. To begin using the Support CD, insert the CD into your computer. The BIOS Setup program is a menu-driven program, which ...


