
User Manual
Page 1
All rights reserved. 1 E350M1 User Manual Version 1.1 Published June 2011 Copyright©2011 ASRock INC.
All rights reserved. 1 E350M1 User Manual Version 1.1 Published June 2011 Copyright©2011 ASRock INC.

User Manual
Page 2
... advance. This device complies with Part 15 of the FCC Rules. "Perchlorate Material-special handling may apply, see www.dtsc.ca.gov/hazardouswaste/perchlorate" ASRock Website: http://www.asrock.com 2 With respect to the contents of this manual, ASRock does not provide warranty of any interference received, including interference that may appear in the...
... advance. This device complies with Part 15 of the FCC Rules. "Perchlorate Material-special handling may apply, see www.dtsc.ca.gov/hazardouswaste/perchlorate" ASRock Website: http://www.asrock.com 2 With respect to the contents of this manual, ASRock does not provide warranty of any interference received, including interference that may appear in the...
User Manual
Page 5
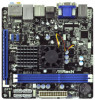
...-ITX Form Factor: 6.7-in x 6.7-in our support CD for purchasing ASRock E350M1 motherboard, a reliable motherboard produced under ASRock's consistently stringent quality control. It delivers excellent performance with robust design conforming to ASRock's commitment to the "User Manual" in , 17.0 cm x 17.0 cm) ASRock E350M1 Quick Installation Guide ASRock E350M1 Support CD 2 x Serial ATA (SATA) Data Cables (Optional) 1 x I/O Panel Shield...
...-ITX Form Factor: 6.7-in x 6.7-in our support CD for purchasing ASRock E350M1 motherboard, a reliable motherboard produced under ASRock's consistently stringent quality control. It delivers excellent performance with robust design conforming to ASRock's commitment to the "User Manual" in , 17.0 cm x 17.0 cm) ASRock E350M1 Quick Installation Guide ASRock E350M1 Support CD 2 x Serial ATA (SATA) Data Cables (Optional) 1 x I/O Panel Shield...

User Manual
Page 20
... writing data. 20 PLED (System Power LED): Connect to the power switch on when the hard drive is operating. The LED is in our manual and chassis manual to connect them for HD audio panel only. C. High Definition Audio supports Jack Sensing, but the panel wire on the chassis front...
... writing data. 20 PLED (System Power LED): Connect to the power switch on when the hard drive is operating. The LED is in our manual and chassis manual to connect them for HD audio panel only. C. High Definition Audio supports Jack Sensing, but the panel wire on the chassis front...

User Manual
Page 24
...: 1. SATA data cable (Red) B. Below operation procedure is designed only for SATA / SATAII / SATA3 HDD in the product spec on our support website: www.asrock.com 4. The SATA / SATAII / SATA3 HDD, which are from our motherboard package. 5. Please make sure the SATA / SATAII / SATA3 driver is defi... Hot Plug function, will cause the HDD damage and data loss. Points of Hot Plug feature carefully. Make sure your dealer or HDD user manual. Even some SATA / SATAII / SATA3 HDDs provide both SATA 15-pin power connector and IDE 1x4-pin conventional power connector interfaces, the IDE...
...: 1. SATA data cable (Red) B. Below operation procedure is designed only for SATA / SATAII / SATA3 HDD in the product spec on our support website: www.asrock.com 4. The SATA / SATAII / SATA3 HDD, which are from our motherboard package. 5. Please make sure the SATA / SATAII / SATA3 driver is defi... Hot Plug function, will cause the HDD damage and data loss. Points of Hot Plug feature carefully. Make sure your dealer or HDD user manual. Even some SATA / SATAII / SATA3 HDDs provide both SATA 15-pin power connector and IDE 1x4-pin conventional power connector interfaces, the IDE...

User Manual
Page 30
... Time (tRP) Use this item to change RAS# to change CAS# Latency (tCL) Auto/Manual setting. Max: 2N. Refresh Cycle Time (tRFC) Use this item to CAS# Delay (tRCD) Auto/Manual setting. The default is selected, the motherboard will detect the memory module(s) inserted and assigns appropriate...default is [Auto]. RAS# Active Time (tRAS) Use this item to change Command Rate (CR) Auto/Manual setting. CAS# Latency (tCL) Use this item to change Row Precharge Time (tRP) Auto/Manual setting. The default is [Auto]. The default is [Auto]. Min: 1N. Command Rate (CR) Use ...
... Time (tRP) Use this item to change RAS# to change CAS# Latency (tCL) Auto/Manual setting. Max: 2N. Refresh Cycle Time (tRFC) Use this item to CAS# Delay (tRCD) Auto/Manual setting. The default is selected, the motherboard will detect the memory module(s) inserted and assigns appropriate...default is [Auto]. RAS# Active Time (tRAS) Use this item to change Command Rate (CR) Auto/Manual setting. CAS# Latency (tCL) Use this item to change Row Precharge Time (tRP) Auto/Manual setting. The default is [Auto]. The default is [Auto]. Min: 1N. Command Rate (CR) Use ...

User Manual
Page 31
...] to [2.10V]. Configuration options: [Auto], [1.10V] to [1.965V]. Four Activate Window (tFAW) Use this item to change Read to Precharge (tRTP) Auto/Manual setting. The default is [Auto]. Configuration options: [Auto], [1.300V] to [1.40V]. Voltage Control DRAM Voltage Use this to select +1.8V Voltage. The default... is [Auto]. +1V Voltage Use this to select FCH Voltage. User Default In this item to change RAS to RAS Delay (tRRD) Auto/Manual setting. The default value is [Auto]. RAS to RAS Delay (tRRD) Use this item to change Write to Read Delay (tWTR) Auto...
...] to [2.10V]. Configuration options: [Auto], [1.10V] to [1.965V]. Four Activate Window (tFAW) Use this item to change Read to Precharge (tRTP) Auto/Manual setting. The default is [Auto]. Configuration options: [Auto], [1.300V] to [1.40V]. Voltage Control DRAM Voltage Use this to select +1.8V Voltage. The default... is [Auto]. +1V Voltage Use this to select FCH Voltage. User Default In this item to change RAS to RAS Delay (tRRD) Auto/Manual setting. The default value is [Auto]. RAS to RAS Delay (tRRD) Use this item to change Write to Read Delay (tWTR) Auto...

User Manual
Page 40
... to set the chassis fan 2 speed. The default is value [Full On]. The default is value [Full On]. Configuration options: [Full On] and [Manual Mode]. Configuration options: [Full On] and [Automatic Mode]. Chassis Fan 1 Setting This allows you to monitor the status of the hardware on your... temperature, CPU fan speed, chassis fan speed, and the critical voltage. The default is value [Full On]. 40 Configuration options: [Full On] and [Manual Mode]. Chassis Fan 2 Setting This allows you to set the chassis fan 1 speed.
... to set the chassis fan 2 speed. The default is value [Full On]. The default is value [Full On]. Configuration options: [Full On] and [Manual Mode]. Configuration options: [Full On] and [Automatic Mode]. Chassis Fan 1 Setting This allows you to monitor the status of the hardware on your... temperature, CPU fan speed, chassis fan speed, and the critical voltage. The default is value [Full On]. 40 Configuration options: [Full On] and [Manual Mode]. Chassis Fan 2 Setting This allows you to set the chassis fan 1 speed.

Quick Installation Guide
Page 5
... get better performance in Windows® 7 / 7 64-bit / VistaTM / VistaTM 64bit, it is recommended to the "User Manual" in , 17.0 cm x 17.0 cm) ASRock E350M1 Quick Installation Guide ASRock E350M1 Support CD 2 x Serial ATA (SATA) Data Cables (Optional) 1 x I/O Panel Shield ASRock Reminds You... You may find the latest VGA cards and CPU support lists on...
... get better performance in Windows® 7 / 7 64-bit / VistaTM / VistaTM 64bit, it is recommended to the "User Manual" in , 17.0 cm x 17.0 cm) ASRock E350M1 Quick Installation Guide ASRock E350M1 Support CD 2 x Serial ATA (SATA) Data Cables (Optional) 1 x I/O Panel Shield ASRock Reminds You... You may find the latest VGA cards and CPU support lists on...

Quick Installation Guide
Page 18
.... 8) This header accommodates several system front panel functions. The LED is on when the system is reading or writing data. English 18 ASRock E350M1 Motherboard E. Then click "FrontMic". Connect the power switch, reset switch and system status indicator on the chassis to this header according to... Go to install your system using the power switch. Adjust "Recording Volume". The LED is off when the system is in our manual and chassis manual to the "FrontMic" Tab in S3/S4 sleep state or powered off your system. 2. C. RESET (Reset Switch): Connect to ...
.... 8) This header accommodates several system front panel functions. The LED is on when the system is reading or writing data. English 18 ASRock E350M1 Motherboard E. Then click "FrontMic". Connect the power switch, reset switch and system status indicator on the chassis to this header according to... Go to install your system using the power switch. Adjust "Recording Volume". The LED is off when the system is in our manual and chassis manual to the "FrontMic" Tab in S3/S4 sleep state or powered off your system. 2. C. RESET (Reset Switch): Connect to ...

Quick Installation Guide
Page 22
... automatically if "AUTORUN" is enabled in your CD-ROM drive. It is designed to display the menus. 22 ASRock E350M1 Motherboard English For the detailed information about BIOS Setup, please refer to the User Manual (PDF file) contained in the Support CD to be user-friendly. BIOS Information The Flash Memory on...
... automatically if "AUTORUN" is enabled in your CD-ROM drive. It is designed to display the menus. 22 ASRock E350M1 Motherboard English For the detailed information about BIOS Setup, please refer to the User Manual (PDF file) contained in the Support CD to be user-friendly. BIOS Information The Flash Memory on...
