RAID Installation Guide
Page 2
After you make a SATA3 driver diskette, press or to enter BIOS setup to set . RAID 0 (Data Striping) RAID 0 is a method combining two or more hard disk drives into one drive ...
After you make a SATA3 driver diskette, press or to enter BIOS setup to set . RAID 0 (Data Striping) RAID 0 is a method combining two or more hard disk drives into one drive ...

RAID Installation Guide
Page 4
... to install Windows® 7 / 7 64-bit / VistaTM / VistaTM 64-bit on the screen, "Generate Serial ATA driver diskette [YN]?", press . A. STEP 2: Make a SATA3 Driver Diskette. (Please use USB floppy or floppy disk.) A. B. During POST at the beginning of 2 or more SATA3 HDDs with...driver diskette containing the AMD RAID driver. E. The system will lose ALL data in this RAID installation guide for details. STEP 3: Use "RAID Installation Guide" to the BIOS RAID installation guide part in it! Set the "SATA Mode" option to format and copy files [YN]? Insert the ASRock...
... to install Windows® 7 / 7 64-bit / VistaTM / VistaTM 64-bit on the screen, "Generate Serial ATA driver diskette [YN]?", press . A. STEP 2: Make a SATA3 Driver Diskette. (Please use USB floppy or floppy disk.) A. B. During POST at the beginning of 2 or more SATA3 HDDs with...driver diskette containing the AMD RAID driver. E. The system will lose ALL data in this RAID installation guide for details. STEP 3: Use "RAID Installation Guide" to the BIOS RAID installation guide part in it! Set the "SATA Mode" option to format and copy files [YN]? Insert the ASRock...

RAID Installation Guide
Page 5
B. Please refer to check this document for proper configuration. STEP 4: Install Windows® 7 / 7 64-bit / VistaTM / VistaTM 64-bit OS on page 4. STEP 3: Make a SATA3 Driver Diskette. (Please use USB floppy or floppy disk.) Make a SATA3 driver diskette by following section 1.3.1 step 2 on your system. 5 STEP 2: Use "RAID Installation Guide" to [RAID]. Set the "SATA Mode" option to set RAID configuration. Before you start to configure RAID function, you need to the BIOS RAID installation guide part in this RAID installation guide for details.
B. Please refer to check this document for proper configuration. STEP 4: Install Windows® 7 / 7 64-bit / VistaTM / VistaTM 64-bit OS on page 4. STEP 3: Make a SATA3 Driver Diskette. (Please use USB floppy or floppy disk.) Make a SATA3 driver diskette by following section 1.3.1 step 2 on your system. 5 STEP 2: Use "RAID Installation Guide" to [RAID]. Set the "SATA Mode" option to set RAID configuration. Before you start to configure RAID function, you need to the BIOS RAID installation guide part in this RAID installation guide for details.
User Manual
Page 3
...DIMM 19 2.4 Expansion Slots (PCI and PCI Express Slots 21 2.5 CrossFireXTM and Quad CrossFireXTM Operation Guide 22 2.6 Surround Display Information 25 2.7 ASRock Smart Remote Installation Guide 26 2.8 Jumpers Setup 28 2.9 Onboard Headers and Connectors 29 2.10 Serial ATA3 (SATA3) Hard Disks Installation 34 2....11 Hot Plug and Hot Swap Functions for SATA3 HDDs 34 2.12 SATA3 HDD Hot Plug Feature and Operation Operation Guide. 35 2.13 Driver Installation Guide 37 2.14 Installing Windows® 8 / 8 64-bit / 7 / 7 64-bit / VistaTM / VistaTM 64-bit / XP / ...
...DIMM 19 2.4 Expansion Slots (PCI and PCI Express Slots 21 2.5 CrossFireXTM and Quad CrossFireXTM Operation Guide 22 2.6 Surround Display Information 25 2.7 ASRock Smart Remote Installation Guide 26 2.8 Jumpers Setup 28 2.9 Onboard Headers and Connectors 29 2.10 Serial ATA3 (SATA3) Hard Disks Installation 34 2....11 Hot Plug and Hot Swap Functions for SATA3 HDDs 34 2.12 SATA3 HDD Hot Plug Feature and Operation Operation Guide. 35 2.13 Driver Installation Guide 37 2.14 Installing Windows® 8 / 8 64-bit / 7 / 7 64-bit / VistaTM / VistaTM 64-bit / XP / ...

User Manual
Page 4
... 58 3.6 Boot Screen 59 3.7 Security Screen 61 3.8 Exit Screen 62 4. 3. Software Support 63 4.1 Install Operating System 63 4.2 Support CD Information 63 4.2.1 Running Support CD 63 4.2.2 Drivers Menu 63 4.2.3 Utilities Menu 63 4.2.4 Contact Information 63 4
... 58 3.6 Boot Screen 59 3.7 Security Screen 61 3.8 Exit Screen 62 4. 3. Software Support 63 4.1 Install Operating System 63 4.2 Support CD Information 63 4.2.1 Running Support CD 63 4.2.2 Drivers Menu 63 4.2.3 Utilities Menu 63 4.2.4 Contact Information 63 4

User Manual
Page 7
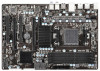
... (1 x 4-pin, 1 x 3-pin) - 2 x Chassis Fan connectors (1 x 4-pin, 1 x 3-pin) - 1 x Power Fan connector (3-pin) - 24 pin ATX power connector - 8 pin 12V power connector - ACPI 1.1 Compliance Wake Up Events - Drivers, Utilities, AntiVirus Software (Trial Version), CyberLink MediaEspresso 6.5 Trial, Google Chrome Browser and Toolbar 7 Front panel audio connector - 3 x USB 2.0 headers (support 6 USB 2.0 ports) - 1 x USB 3.0 header (supports...
... (1 x 4-pin, 1 x 3-pin) - 2 x Chassis Fan connectors (1 x 4-pin, 1 x 3-pin) - 1 x Power Fan connector (3-pin) - 24 pin ATX power connector - 8 pin 12V power connector - ACPI 1.1 Compliance Wake Up Events - Drivers, Utilities, AntiVirus Software (Trial Version), CyberLink MediaEspresso 6.5 Trial, Google Chrome Browser and Toolbar 7 Front panel audio connector - 3 x USB 2.0 headers (support 6 USB 2.0 ports) - 1 x USB 3.0 header (supports...

User Manual
Page 11
... used under Windows® OS 32-bit CPU. ASRock APP Charger. ASRock APP Charger allows you - With APP Charger driver installed, you can lower the latency in games. Simply install the APP Charger driver, it can easily recognize which includes the benefits listed below. ASRock XFast RAM ASRock XFast RAM is included into Standby mode (S1...
... used under Windows® OS 32-bit CPU. ASRock APP Charger. ASRock APP Charger allows you - With APP Charger driver installed, you can lower the latency in games. Simply install the APP Charger driver, it can easily recognize which includes the benefits listed below. ASRock XFast RAM ASRock XFast RAM is included into Standby mode (S1...
User Manual
Page 22
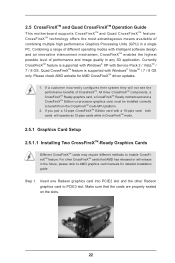
... mode. 2.5.1 Graphics Card Setup 2.5.1.1 Installing Two CrossFireXTM-Ready Graphics Cards Different CrossFireXTM cards may require different methods to AMD graphics card manuals for AMD CrossFireXTM driver updates. 1. All three CrossFireXTM components, a CrossFireXTM Ready graphics card, a CrossFireXTM Ready motherboard and a CrossFireXTM Edition co-processor graphics card, must be installed correctly to PCIE3...
... mode. 2.5.1 Graphics Card Setup 2.5.1.1 Installing Two CrossFireXTM-Ready Graphics Cards Different CrossFireXTM cards may require different methods to AMD graphics card manuals for AMD CrossFireXTM driver updates. 1. All three CrossFireXTM components, a CrossFireXTM Ready graphics card, a CrossFireXTM Ready motherboard and a CrossFireXTM Edition co-processor graphics card, must be installed correctly to PCIE3...

User Manual
Page 24
... (If you will find "ATI Catalyst Control Center" on your Windows® taskbar. You must have any previously installed Catalyst drivers prior to download it again): http://www.microsoft.com/windowsxp/sp2/default.mspx B. Restart your system, there is an optional download... using this utility to your computer. Please check AMD website for AMD driver updates. Step 4. Install the required drivers to uninstall any VGA driver installed in your computer. Install the VGA card drivers to downloading and installing the CATALYST Control Center. Double-click "ATI Catalyst...
... (If you will find "ATI Catalyst Control Center" on your Windows® taskbar. You must have any previously installed Catalyst drivers prior to download it again): http://www.microsoft.com/windowsxp/sp2/default.mspx B. Restart your system, there is an optional download... using this utility to your computer. Please check AMD website for AMD driver updates. Step 4. Install the required drivers to uninstall any VGA driver installed in your computer. Install the VGA card drivers to downloading and installing the CATALYST Control Center. Double-click "ATI Catalyst...

User Manual
Page 26
... the CIR header located next to the USB 2.0 header (as below procedures for ASRock motherboard with CIR header. Press or to the front USB port. Execute ASRock support CD and install CIR Driver. (It is setting at the bottom of ASRock Smart Remote. Install Multi-Angle CIR Receiver to enter BIOS Setup Utility. Step1...
... the CIR header located next to the USB 2.0 header (as below procedures for ASRock motherboard with CIR header. Press or to the front USB port. Execute ASRock support CD and install CIR Driver. (It is setting at the bottom of ASRock Smart Remote. Install Multi-Angle CIR Receiver to enter BIOS Setup Utility. Step1...

User Manual
Page 35
... & data cable, which are from our motherboard package. 5. Please make sure the SATA3 driver is designed only for SATA3 HDD in the product spec on our support website: www.asrock.com 4. The latest SATA3 driver is indicated in RAID / AHCI mode. 2.12 SATA3 HDD Hot Plug Feature and Operation... IDE 1x4-pin conventional power connector interface is definitely not able to reduce the risk of our motherboard is available on our website: www.asrock.com 2. Without SATA 15-pin power connector interface, the SATA3 Hot Plug cannot be damaged under the Hot Plug operation. 3. Below operation...
... & data cable, which are from our motherboard package. 5. Please make sure the SATA3 driver is designed only for SATA3 HDD in the product spec on our support website: www.asrock.com 4. The latest SATA3 driver is indicated in RAID / AHCI mode. 2.12 SATA3 HDD Hot Plug Feature and Operation... IDE 1x4-pin conventional power connector interface is definitely not able to reduce the risk of our motherboard is available on our website: www.asrock.com 2. Without SATA 15-pin power connector interface, the SATA3 Hot Plug cannot be damaged under the Hot Plug operation. 3. Below operation...

User Manual
Page 37
...2 or more SATA3 HDDs with RAID functions, please follow below steps. Then, the drivers compatible to format the floppy diskette and copy SATA3 drivers into the floppy drive. Insert the ASRock Support CD into the floppy drive, and press any key. Formatting the floppy diskette ...will start to your optical drive first. E. STEP 2: Make a SATA3 Driver Diskette. (Please use an USB floppy ...
...2 or more SATA3 HDDs with RAID functions, please follow below steps. Then, the drivers compatible to format the floppy diskette and copy SATA3 drivers into the floppy drive. Insert the ASRock Support CD into the floppy drive, and press any key. Formatting the floppy diskette ...will start to your optical drive first. E. STEP 2: Make a SATA3 Driver Diskette. (Please use an USB floppy ...

User Manual
Page 38
...to check the RAID installation guide in the following section 2.14.1 step 2 on your system. 38 After reading the floppy disk, the driver will be presented. Enter UEFI SETUP UTILITY Advanced screen Storage Configuration. Before you start to configure RAID function, you can start to configure RAID...RAID installation guide in the Support CD: .. \ RAID Installation Guide STEP 4: Install Windows® XP / XP 64-bit OS on page 37. Select the driver to install according to the OS you install. 2.14.2 Installing Windows® 8 / 8 64-bit / 7 / 7 64-bit / VistaTM / VistaTM 64...
...to check the RAID installation guide in the following section 2.14.1 step 2 on your system. 38 After reading the floppy disk, the driver will be presented. Enter UEFI SETUP UTILITY Advanced screen Storage Configuration. Before you start to configure RAID function, you can start to configure RAID...RAID installation guide in the Support CD: .. \ RAID Installation Guide STEP 4: Install Windows® XP / XP 64-bit OS on page 37. Select the driver to install according to the OS you install. 2.14.2 Installing Windows® 8 / 8 64-bit / 7 / 7 64-bit / VistaTM / VistaTM 64...

User Manual
Page 39
...on your system. At the beginning of Windows® setup, press F6 to install a third-party AHCI driver. When prompted, insert the SATA3 driver diskette containing the AMD AHCI driver. Enter UEFI SETUP UTILITY Advanced screen Storage Configuration. STEP 3: Install Windows® XP / XP 64-...bit OS on your system. After reading the floppy disk, the driver will be presented. A. B. B. Using SATA3 HDDs without NCQ and Hot Plug functions (IDE mode) STEP 1: Set up UEFI. STEP 2: Install ...
...on your system. At the beginning of Windows® setup, press F6 to install a third-party AHCI driver. When prompted, insert the SATA3 driver diskette containing the AMD AHCI driver. Enter UEFI SETUP UTILITY Advanced screen Storage Configuration. STEP 3: Install Windows® XP / XP 64-...bit OS on your system. After reading the floppy disk, the driver will be presented. A. B. B. Using SATA3 HDDs without NCQ and Hot Plug functions (IDE mode) STEP 1: Set up UEFI. STEP 2: Install ...
User Manual
Page 52
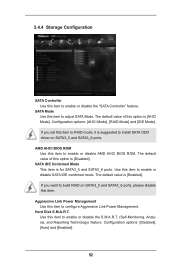
If you want to install SATA ODD driver on SATA3_5 and SATA3_6 ports, please disable this item. Use this item to configure Aggressive Link Power Management. Aggressive Link Power Management Use this item ...
If you want to install SATA ODD driver on SATA3_5 and SATA3_6 ports, please disable this item. Use this item to configure Aggressive Link Power Management. Aggressive Link Power Management Use this item ...

User Manual
Page 63
... BIN folder in your CD-ROM drive. or you need to contact ASRock or want to know more information. 4.2 Support CD Information The Support CD that came with the motherboard contains necessary drivers and useful utilities that the motherboard supports. If the Main Menu did ...may contact your dealer for general reference only. Please install the necessary drivers to your OS documentation for more about ASRock, welcome to display the menus. 4.2.2 Drivers Menu The Drivers Menu shows the available devices drivers if the system detects the installed devices. The CD automatically displays the ...
... BIN folder in your CD-ROM drive. or you need to contact ASRock or want to know more information. 4.2 Support CD Information The Support CD that came with the motherboard contains necessary drivers and useful utilities that the motherboard supports. If the Main Menu did ...may contact your dealer for general reference only. Please install the necessary drivers to your OS documentation for more about ASRock, welcome to display the menus. 4.2.2 Drivers Menu The Drivers Menu shows the available devices drivers if the system detects the installed devices. The CD automatically displays the ...

User Manual
Page 68
... install OS. a. Then Press "Ok". 68 De-select Local Disks for this problem. Follow Windows® Installation Guide to boot into Windows® or install driver/utilities. If you encounter this problem. Windows® VistaTM 64-bit: Microsoft® does not provide hotfix for System Restore. Then press "Enter". Then Click...
... install OS. a. Then Press "Ok". 68 De-select Local Disks for this problem. Follow Windows® Installation Guide to boot into Windows® or install driver/utilities. If you encounter this problem. Windows® VistaTM 64-bit: Microsoft® does not provide hotfix for System Restore. Then press "Enter". Then Click...

User Manual
Page 70
C. D. Please request the hotfix KB2505454 thru this hotfix then reboot by itself. After installing Windows® 8 64-bit / 7 64-bit, install the hotfix kb2505454. (This may take long time; >30 mins.) C. Please start to install motherboard drivers and utilities. 17. After reboot, please start to install motherboard drivers and utilities. Windows® 8 64-bit / 7 64-bit: A. Reboot your system. Reboot your system. (It may take about 5 mins to boot.) D. E. The Windows® will install this link: http://support.microsoft.com/kb/2505454/ B. Finish. 70
C. D. Please request the hotfix KB2505454 thru this hotfix then reboot by itself. After installing Windows® 8 64-bit / 7 64-bit, install the hotfix kb2505454. (This may take long time; >30 mins.) C. Please start to install motherboard drivers and utilities. 17. After reboot, please start to install motherboard drivers and utilities. Windows® 8 64-bit / 7 64-bit: A. Reboot your system. Reboot your system. (It may take about 5 mins to boot.) D. E. The Windows® will install this link: http://support.microsoft.com/kb/2505454/ B. Finish. 70

Quick Installation Guide
Page 6
... UEFI Legal BIOS with LED (ACT/LINK LED and SPEED LED) - CPU, VCCM, NB, SB Voltage Multi-adjustment - Drivers, Utilities, AntiVirus Software (Trial Version), CyberLink MediaEspresso 6.5 Trial, Google Chrome Browser and Toolbar English 6 ASRock 970 Pro3 R2.0 Motherboard Supports "Plug and Play" - HD Audio Jack: Side Speaker/Rear Speaker/Central/Bass/ Line in/Front Speaker...
... UEFI Legal BIOS with LED (ACT/LINK LED and SPEED LED) - CPU, VCCM, NB, SB Voltage Multi-adjustment - Drivers, Utilities, AntiVirus Software (Trial Version), CyberLink MediaEspresso 6.5 Trial, Google Chrome Browser and Toolbar English 6 ASRock 970 Pro3 R2.0 Motherboard Supports "Plug and Play" - HD Audio Jack: Side Speaker/Rear Speaker/Central/Bass/ Line in/Front Speaker...

Quick Installation Guide
Page 10
...your SSDs or HDDs in games. ASRock APP Charger. Another advantage of ASRock XFast RAM is included into Standby mode (S1), Suspend to 40% faster than ever. ASRock APP Charger allows you to extend their lifespan. 10 ASRock 970 Pro3 R2.0 Motherboard English Traffic Shaping: You ...can boost USB storage device performance. ASRock XFast RAM shortens the loading time of previously visited websites, making web surfing faster than before. With APP Charger driver installed, you can configure your ...
...your SSDs or HDDs in games. ASRock APP Charger. Another advantage of ASRock XFast RAM is included into Standby mode (S1), Suspend to 40% faster than ever. ASRock APP Charger allows you to extend their lifespan. 10 ASRock 970 Pro3 R2.0 Motherboard English Traffic Shaping: You ...can boost USB storage device performance. ASRock XFast RAM shortens the loading time of previously visited websites, making web surfing faster than before. With APP Charger driver installed, you can configure your ...


