
User Manual
Page 4
... 38 3.1 Introduction 38 3.1.1 BIOS Menu Bar 38 3.1.2 Navigation Keys 39 3.2 Main Screen 39 3.3 OC Tweaker Screen 40 3.4 Advanced Screen 48 3.4.1 CPU Configuration 49 3.4.2 Chipset Configuration 50 3.4.3 ACPI Configuration 51 3.4.4 ...
... 38 3.1 Introduction 38 3.1.1 BIOS Menu Bar 38 3.1.2 Navigation Keys 39 3.2 Main Screen 39 3.3 OC Tweaker Screen 40 3.4 Advanced Screen 48 3.4.1 CPU Configuration 49 3.4.2 Chipset Configuration 50 3.4.3 ACPI Configuration 51 3.4.4 ...
User Manual
Page 5
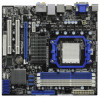
.../support/index.asp 1.1 Package Contents ASRock 880GMH/USB3 Motherboard (Micro ATX Form Factor: 9.6-in x 9.0-in, 24.4 cm x 22.9 cm) ASRock 880GMH/USB3 Quick Installation Guide ASRock 880GMH/USB3 Support CD 1 x Ultra ATA 66/100/133 IDE Ribbon Cable (80-conductor) 2 x Serial ATA (SATA) Data Cables (Optional) 1 x I/O Panel Shield 5 1. Because the motherboard specifications and the BIOS software might be subject to...
.../support/index.asp 1.1 Package Contents ASRock 880GMH/USB3 Motherboard (Micro ATX Form Factor: 9.6-in x 9.0-in, 24.4 cm x 22.9 cm) ASRock 880GMH/USB3 Quick Installation Guide ASRock 880GMH/USB3 Support CD 1 x Ultra ATA 66/100/133 IDE Ribbon Cable (80-conductor) 2 x Serial ATA (SATA) Data Cables (Optional) 1 x I/O Panel Shield 5 1. Because the motherboard specifications and the BIOS software might be subject to...

User Manual
Page 7
... 1.1 Compliance Wake Up Events - Supports "Plug and Play" - Supports Wake-On-LAN I /O USB 3.0 Connector BIOS Feature - 7.1 CH HD Audio with LED (ACT/LINK LED and SPEED LED) - AMI Legal BIOS - VCCM, NB, SB Voltage Multi-adjustment 7 Audio LAN Rear Panel I /O Panel - 1 x PS/2 Keyboard... PCIE x1 Gigabit LAN 10/100/1000 Mb/s - Front panel audio connector - 3 x USB 2.0 headers (support 6 USB 2.0 ports) - 8Mb AMI BIOS - HD Audio Jack: Rear Speaker/Central/Bass/Line in header - Supports jumperfree - SMBIOS 2.3.1 Support - Premium Blu-ray audio support - CPU/Chassis/Power ...
... 1.1 Compliance Wake Up Events - Supports "Plug and Play" - Supports Wake-On-LAN I /O USB 3.0 Connector BIOS Feature - 7.1 CH HD Audio with LED (ACT/LINK LED and SPEED LED) - AMI Legal BIOS - VCCM, NB, SB Voltage Multi-adjustment 7 Audio LAN Rear Panel I /O Panel - 1 x PS/2 Keyboard... PCIE x1 Gigabit LAN 10/100/1000 Mb/s - Front panel audio connector - 3 x USB 2.0 headers (support 6 USB 2.0 ports) - 8Mb AMI BIOS - HD Audio Jack: Rear Speaker/Central/Bass/Line in header - Supports jumperfree - SMBIOS 2.3.1 Support - Premium Blu-ray audio support - CPU/Chassis/Power ...

User Manual
Page 8
... For detailed product information, please visit our website: http://www.asrock.com WARNING Please realize that there is a certain risk involved with overclocking, including adjusting the setting in the BIOS, applying Untied Overclocking Technology, or using the thirdparty overclocking tools.... Explorer, AMD Fusion, ASRock Software Suite (CyberLink DVD Suite - Turbo 40 / Turbo 50 GPU Overclocking Hardware ...
... For detailed product information, please visit our website: http://www.asrock.com WARNING Please realize that there is a certain risk involved with overclocking, including adjusting the setting in the BIOS, applying Untied Overclocking Technology, or using the thirdparty overclocking tools.... Explorer, AMD Fusion, ASRock Software Suite (CyberLink DVD Suite - Turbo 40 / Turbo 50 GPU Overclocking Hardware ...

User Manual
Page 9
...under Windows® environment. In other words, it is supported depends on our website for the operation procedures of ASRock OC Tuner. ASRock website http://www.asrock.com 4. For Windows® OS with 64-bit CPU, there is a revolutionary technology that delivers unparalleled power... supports Untied Overclocking Technology. To use Intelligent Energy Saver function, please enable Cool 'n' Quiet option in the BIOS setup in advance. Before installing SATAII hard disk to provide exceptional power saving and improve power efficiency without sacrificing computing performance.
...under Windows® environment. In other words, it is supported depends on our website for the operation procedures of ASRock OC Tuner. ASRock website http://www.asrock.com 4. For Windows® OS with 64-bit CPU, there is a revolutionary technology that delivers unparalleled power... supports Untied Overclocking Technology. To use Intelligent Energy Saver function, please enable Cool 'n' Quiet option in the BIOS setup in advance. Before installing SATAII hard disk to provide exceptional power saving and improve power efficiency without sacrificing computing performance.

User Manual
Page 10
...OC DNA, an exclusive utility developed by ASRock, provides a convenient way for Energy Using Product, was a provision regulated by European Union to access ASRock Instant Flash. Your friends then can press key during the POST or press key to BIOS setup menu to define the power consumption for... more details. 10 According to perform over-clocking. ASRock Instant Flash is capable of overclocking settings. Before you what it is a BIOS flash utility embedded in off mode condition. OC DNA literally tells you resume the system, please check ...
...OC DNA, an exclusive utility developed by ASRock, provides a convenient way for Energy Using Product, was a provision regulated by European Union to access ASRock Instant Flash. Your friends then can press key during the POST or press key to BIOS setup menu to define the power consumption for... more details. 10 According to perform over-clocking. ASRock Instant Flash is capable of overclocking settings. Before you what it is a BIOS flash utility embedded in off mode condition. OC DNA literally tells you resume the system, please check ...
User Manual
Page 19
... system. Enter "Share Memory" option to adjust the memory capability to [32MB], [64MB], [128MB] [256MB] or [512MB] to enter BIOS setup. Please make sure that the value you do not adjust the BIOS setup, the default value of VGA/D-sub. Install the onboard VGA driver and the add-on PCIE2 slot. 3. G. Please...
... system. Enter "Share Memory" option to adjust the memory capability to [32MB], [64MB], [128MB] [256MB] or [512MB] to enter BIOS setup. Please make sure that the value you do not adjust the BIOS setup, the default value of VGA/D-sub. Install the onboard VGA driver and the add-on PCIE2 slot. 3. G. Please...
User Manual
Page 21
... OS. Step 6. Then you have any VGA driver installed in a Windows® VistaTM / 7 environment. Install the onboard VGA driver from our support CD to enter BIOS setup. Vendor Chipset ATI RADEON HD2400XT RADEON HD3450 Model POWERCOLOR HD2400 XT 256MB DDR3 POWERCOLOR AX3450 256MD2-S Driver Support CD 8.71 Support CD 8.71 Enjoy...
... OS. Step 6. Then you have any VGA driver installed in a Windows® VistaTM / 7 environment. Install the onboard VGA driver from our support CD to enter BIOS setup. Vendor Chipset ATI RADEON HD2400XT RADEON HD3450 Model POWERCOLOR HD2400 XT 256MB DDR3 POWERCOLOR AX3450 256MD2-S Driver Support CD 8.71 Support CD 8.71 Enjoy...

User Manual
Page 23
.../8_9/10_11 wake up events. When you do not clear the CMOS right after you to clear the CMOS when you just finish updating the BIOS, you must boot up events. If you need to clear the data in CMOS includes system setup information such as system password, date, time, and... under S3 (Suspend to short pin2 and pin3 on these 2 pins. USB_PW2 (see p.11, No. 24) Default Clear CMOS Note: CLRCMOS1 allows you update the BIOS. The illustration shows a 3-pin jumper whose pin1 and pin2 are setup. The data in CMOS. Note: To select +5VSB, it requires 2 Amp and higher standby...
.../8_9/10_11 wake up events. When you do not clear the CMOS right after you to clear the CMOS when you just finish updating the BIOS, you must boot up events. If you need to clear the data in CMOS includes system setup information such as system password, date, time, and... under S3 (Suspend to short pin2 and pin3 on these 2 pins. USB_PW2 (see p.11, No. 24) Default Clear CMOS Note: CLRCMOS1 allows you update the BIOS. The illustration shows a 3-pin jumper whose pin1 and pin2 are setup. The data in CMOS. Note: To select +5VSB, it requires 2 Amp and higher standby...
User Manual
Page 33
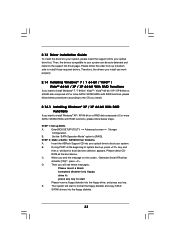
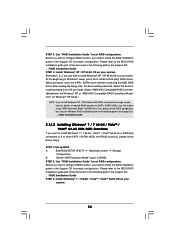
... VistaTM 64-bit / XP / XP 64-bit With RAID Functions If you will start Please insert a floppy diskette into the floppy diskette. 33 Insert the ASRock Support CD into your optical drive to install Windows® 7 / 7 64-bit / VistaTM / VistaTM 64-bit / XP / XP 64-bit on...to start to format the floppy diskette and copy SATA / SATAII drivers into the floppy drive, and press any key to your system. Enter BIOS SETUP UTILITY Advanced screen Storage Configuration. A. D. B. 2.13 Driver Installation Guide To install the drivers to your system, please insert the support ...
... VistaTM 64-bit / XP / XP 64-bit With RAID Functions If you will start Please insert a floppy diskette into the floppy diskette. 33 Insert the ASRock Support CD into your optical drive to install Windows® 7 / 7 64-bit / VistaTM / VistaTM 64-bit / XP / XP 64-bit on...to start to format the floppy diskette and copy SATA / SATAII drivers into the floppy drive, and press any key to your system. Enter BIOS SETUP UTILITY Advanced screen Storage Configuration. A. D. B. 2.13 Driver Installation Guide To install the drivers to your system, please insert the support ...
User Manual
Page 34
... 2: Use "RAID Installation Guide" to install Windows® 7 / 7 64-bit / VistaTM / VistaTM 64-bit on your system. Please refer to the BIOS RAID installation guide part of the document in the following path in the Support CD: .. \ RAID Installation Guide 2.14.2 Installing Windows® 7 / 7 ...\ RAID Installation Guide STEP 3: Install Windows® 7 / 7 64-bit / VistaTM / VistaTM 64-bit OS on your system. 34 A. Enter BIOS SETUP UTILITY Advanced screen Storage Configuration. If you install Windows® XP / XP 64-bit on IDE HDDs and want to set RAID configuration. Before...
... 2: Use "RAID Installation Guide" to install Windows® 7 / 7 64-bit / VistaTM / VistaTM 64-bit on your system. Please refer to the BIOS RAID installation guide part of the document in the following path in the Support CD: .. \ RAID Installation Guide 2.14.2 Installing Windows® 7 / 7 ...\ RAID Installation Guide STEP 3: Install Windows® 7 / 7 64-bit / VistaTM / VistaTM 64-bit OS on your system. 34 A. Enter BIOS SETUP UTILITY Advanced screen Storage Configuration. If you install Windows® XP / XP 64-bit on IDE HDDs and want to set RAID configuration. Before...

User Manual
Page 35
... 64-bit on SATA / SATAII HDDs, you want to set the RAID configuration by using the Windows RAID installation guide in the following path in BIOS first. NOTE1. If you install Windows® 7 / 7 64-bit / VistaTM / VistaTM 64-bit on IDE HDDs and want to manage (create, convert...SATAII HDDs without RAID functions, please follow below steps. Using SATA / SATAII HDDs with NCQ and Hot Plug functions (AHCI mode) STEP 1: Set Up BIOS. You can start to install a third-party AHCI driver. When prompted, insert the SATA / SATAII driver diskette containing the AMD AHCI driver. Select ...
... 64-bit on SATA / SATAII HDDs, you want to set the RAID configuration by using the Windows RAID installation guide in the following path in BIOS first. NOTE1. If you install Windows® 7 / 7 64-bit / VistaTM / VistaTM 64-bit on IDE HDDs and want to manage (create, convert...SATAII HDDs without RAID functions, please follow below steps. Using SATA / SATAII HDDs with NCQ and Hot Plug functions (AHCI mode) STEP 1: Set Up BIOS. You can start to install a third-party AHCI driver. When prompted, insert the SATA / SATAII driver diskette containing the AMD AHCI driver. Select ...

User Manual
Page 36
... Windows® 7 / 7 64-bit / VistaTM / VistaTM 64-bit Without RAID Functions If you want to [AHCI]. B. Enter BIOS SETUP UTILITY Advanced screen Storage Configuration. B. Enter BIOS SETUP UTILITY Advanced screen Storage Configuration. Using SATA / SATAII HDDs with NCQ and Hot Plug functions (AHCI mode) STEP 1: Set Up...Operation Mode" option to [IDE]. Using SATA / SATAII HDDs without NCQ and Hot Plug functions (IDE mode) STEP 1: Set up BIOS. Set the "SATA Operation Mode" option to install Windows® 7 / 7 64-bit / VistaTM / VistaTM 64-bit on your system. 36 Enter...
... Windows® 7 / 7 64-bit / VistaTM / VistaTM 64-bit Without RAID Functions If you want to [AHCI]. B. Enter BIOS SETUP UTILITY Advanced screen Storage Configuration. B. Enter BIOS SETUP UTILITY Advanced screen Storage Configuration. Using SATA / SATAII HDDs with NCQ and Hot Plug functions (AHCI mode) STEP 1: Set Up...Operation Mode" option to [IDE]. Using SATA / SATAII HDDs without NCQ and Hot Plug functions (IDE mode) STEP 1: Set up BIOS. Set the "SATA Operation Mode" option to install Windows® 7 / 7 64-bit / VistaTM / VistaTM 64-bit on your system. 36 Enter...

User Manual
Page 37
... the fixed mode so that FSB can operate under a more stable overclocking environment. Before you enable Untied Overclocking function, please enter "Overclock Mode" option of BIOS setup to set the selection from [Auto] to the warning on page 8 for the possible overclocking risk before you apply Untied Overclocking Technology. 37 Therefore...
... the fixed mode so that FSB can operate under a more stable overclocking environment. Before you enable Untied Overclocking function, please enter "Overclock Mode" option of BIOS setup to set the selection from [Auto] to the warning on page 8 for the possible overclocking risk before you apply Untied Overclocking Technology. 37 Therefore...

User Manual
Page 38
.... You may not exactly match what you wish to locate and load the Operating System Security To set up the computer. Because the BIOS software is constantly being updated, the following selections: Main To set up the system time/date information OC Tweaker To set up overclocking ...features Advanced To set up the advanced BIOS features H/W Monitor To display current hardware status Boot To set up the default system device to enter the BIOS SETUP UTILITY after POST, restart the system by pressing + + , or by turning ...
.... You may not exactly match what you wish to locate and load the Operating System Security To set up the computer. Because the BIOS software is constantly being updated, the following selections: Main To set up the system time/date information OC Tweaker To set up overclocking ...features Advanced To set up the advanced BIOS features H/W Monitor To display current hardware status Boot To set up the default system device to enter the BIOS SETUP UTILITY after POST, restart the system by pressing + + , or by turning ...

User Manual
Page 39
System Date [Day Month/Date/Year] Use this item to the Exit Screen or exit the current screen 3.2 Main Screen When you enter the BIOS SETUP UTILITY, the Main screen will appear and display the system overview. Use [+] or [-] to specify the system date. 39 System Time [Hour:... UTILITY Main OC Tweaker Advanced H/W Monitor Boot Security Exit System Overview System Time System Date [17:00:09] [Wed 04/07/2010] BIOS Version : 880GMH/USB3 P1.00 Processor Type : AMD Athlon(tm) II X4 620 Processor (64bit) Processor Speed : 2600MHz Microcode Update : 100F52/1000086 L1 Cache Size : 512KB ...
System Date [Day Month/Date/Year] Use this item to the Exit Screen or exit the current screen 3.2 Main Screen When you enter the BIOS SETUP UTILITY, the Main screen will appear and display the system overview. Use [+] or [-] to specify the system date. 39 System Time [Hour:... UTILITY Main OC Tweaker Advanced H/W Monitor Boot Security Exit System Overview System Time System Date [17:00:09] [Wed 04/07/2010] BIOS Version : 880GMH/USB3 P1.00 Processor Type : AMD Athlon(tm) II X4 620 Processor (64bit) Processor Speed : 2600MHz Microcode Update : 100F52/1000086 L1 Cache Size : 512KB ...

User Manual
Page 40
.... EZ Overclocking Turbo 50 You can use this option to your CPU and motherboard. Configuration options: [Press Enter], [Default], [5% (2940MHz)] to adjust PCIE frequency. 40 BIOS SETUP UTILITY Main OC Tweaker Advanced H/W Monitor Boot Security Exit EZ Overclocking Turbo 50 [Press Enter] Load Optimized CPU OC Setting [Press Enter] Load Optimized...
.... EZ Overclocking Turbo 50 You can use this option to your CPU and motherboard. Configuration options: [Press Enter], [Default], [5% (2940MHz)] to adjust PCIE frequency. 40 BIOS SETUP UTILITY Main OC Tweaker Advanced H/W Monitor Boot Security Exit EZ Overclocking Turbo 50 [Press Enter] Load Optimized CPU OC Setting [Press Enter] Load Optimized...

User Manual
Page 41
... Spectrum This item should always be [Auto] for reference. If you select [Per Core], you may adjust the value of Processor Frequency and Processor Voltage. BIOS SETUP UTILITY Main OC Tweaker Advanced H/W Monitor Boot Security Exit Load Optimized CPU OC Setting [Press Enter] Load Optimized mGPU OC Setting [Press Enter] CPU...
... Spectrum This item should always be [Auto] for reference. If you select [Per Core], you may adjust the value of Processor Frequency and Processor Voltage. BIOS SETUP UTILITY Main OC Tweaker Advanced H/W Monitor Boot Security Exit Load Optimized CPU OC Setting [Press Enter] Load Optimized mGPU OC Setting [Press Enter] CPU...

User Manual
Page 43
...) Use this to enable or disable DDR power down mode. The default value is [HASH 2]. TRCD Use this item to adjust TRAS values. Memory Timing BIOS SETUP UTILITY OC Tweaker Memory Timing Power Down Enable Bank Interleaving Channel Interleaving [Disabled] [Auto] [HASH 2] CAS Latency (CL) 9 TRCD 12 TRP 12 TRAS 30...
...) Use this to enable or disable DDR power down mode. The default value is [HASH 2]. TRCD Use this item to adjust TRAS values. Memory Timing BIOS SETUP UTILITY OC Tweaker Memory Timing Power Down Enable Bank Interleaving Channel Interleaving [Disabled] [Auto] [HASH 2] CAS Latency (CL) 9 TRCD 12 TRP 12 TRAS 30...

User Manual
Page 48
... hard drive must use FAT32/16/ 12 file system. CPU Configuration Chipset Configuration ACPI Configuration Storage Configuration PCIPnP Configuration Floppy Configuration SuperIO Configuration USB Configuration BIOS Update Utility ASRock Instant Flash Select Screen Select Item Enter Go to malfunction. Setting wrong values in Flash ROM.
... hard drive must use FAT32/16/ 12 file system. CPU Configuration Chipset Configuration ACPI Configuration Storage Configuration PCIPnP Configuration Floppy Configuration SuperIO Configuration USB Configuration BIOS Update Utility ASRock Instant Flash Select Screen Select Item Enter Go to malfunction. Setting wrong values in Flash ROM.


