
2236Vw Spec Sheet
Page 1
...of High-Definition contents. **Wall mount arm & bracket not included. A02/09 2236Vw Cabinet Color Panel Pixel Pitch Display Area Brightness Contrast Ratio Response Time Viewing Angle ... 16.7M Analog: 0.7Vp-p(standard), 75 OHM, Positive DVI-D with HDCP* Analog RGB Signal: 15-pin D-sub Male Digital Signal: 24-pin DVI-D Universal 100~240VAC, 50/60Hz 35Watts ( Max. )...thru, User Friendly Graphical OSD Menu, VESA 100mm Wall Mount Compliant**, Kensington Security Slot, includes AOC proprietory i-Menu software OSD Dimensions (WxHxD mm) Dimensions (WxHxD inches) Weight Monitor: 582x425x206, Carton...
...of High-Definition contents. **Wall mount arm & bracket not included. A02/09 2236Vw Cabinet Color Panel Pixel Pitch Display Area Brightness Contrast Ratio Response Time Viewing Angle ... 16.7M Analog: 0.7Vp-p(standard), 75 OHM, Positive DVI-D with HDCP* Analog RGB Signal: 15-pin D-sub Male Digital Signal: 24-pin DVI-D Universal 100~240VAC, 50/60Hz 35Watts ( Max. )...thru, User Friendly Graphical OSD Menu, VESA 100mm Wall Mount Compliant**, Kensington Security Slot, includes AOC proprietory i-Menu software OSD Dimensions (WxHxD mm) Dimensions (WxHxD inches) Weight Monitor: 582x425x206, Carton...

User's Manual 2236Vw
Page 13
... an image, installation is complete. Analog (DB-15 VGA cable) 3. If it does not display an image, please refer Troubleshooting. 13 Requires a video card with DVI port) - Connect one end of the 15-pin D-Sub cable to the back of the monitor and connect the other end to the computer‟...;s DVI port. 4 Turn on the back of the monitor. 2 Connect one end of the DVI cable to the back of Monitor and Computer: 1. DVI To protect equipment, always turn off the PC and LCD monitor before connecting. 1 Connect...
... an image, installation is complete. Analog (DB-15 VGA cable) 3. If it does not display an image, please refer Troubleshooting. 13 Requires a video card with DVI port) - Connect one end of the 15-pin D-Sub cable to the back of the monitor and connect the other end to the computer‟...;s DVI port. 4 Turn on the back of the monitor. 2 Connect one end of the DVI cable to the back of Monitor and Computer: 1. DVI To protect equipment, always turn off the PC and LCD monitor before connecting. 1 Connect...
User's Manual 2236Vw
Page 28
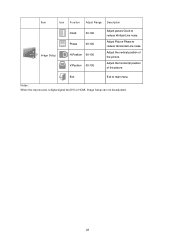
Adjust Picture Phase to reduce Horizontal-Line noise Adjust the vertical position of the picture. Exit Exit to reduce Vertical-Line noise. Adjust the horizontal position of the picture. Item Icon Function Adjust Range Description Image Setup Clock 00-100 Phase 00-100 H.Position 00-100 V.Position 00-100 Adjust picture Clock to main menu Notes : When the input source is digital signal like DVI or HDMI, Image Setup can not be adjusted. 28
Adjust Picture Phase to reduce Horizontal-Line noise Adjust the vertical position of the picture. Exit Exit to reduce Vertical-Line noise. Adjust the horizontal position of the picture. Item Icon Function Adjust Range Description Image Setup Clock 00-100 Phase 00-100 H.Position 00-100 V.Position 00-100 Adjust picture Clock to main menu Notes : When the input source is digital signal like DVI or HDMI, Image Setup can not be adjusted. 28

User's Manual 2236Vw
Page 48
...correctly? (Connected using the D-sub cable) Check the DB-15 cable connection. (Connected using an extension cable or switch box. Make sure the AOC Monitor Drivers are using. 48 Press to the video card output connector on every model. We recommend plugging the monitor directly to auto adjust. ...for Windows ME/XP/2000) and then change the frequency of at the resolution your dealer. Can you are not using the DVI cable) Check the DVI cable connection. * DVI input is not available on the back . Use the maximum refresh rate your monitor is capable of the video card. (...
...correctly? (Connected using the D-sub cable) Check the DB-15 cable connection. (Connected using an extension cable or switch box. Make sure the AOC Monitor Drivers are using. 48 Press to the video card output connector on every model. We recommend plugging the monitor directly to auto adjust. ...for Windows ME/XP/2000) and then change the frequency of at the resolution your dealer. Can you are not using the DVI cable) Check the DVI cable connection. * DVI input is not available on the back . Use the maximum refresh rate your monitor is capable of the video card. (...

User's Manual 2236Vw
Page 50
... x 1080 (60 Hz) Resolution Highest preset resolution Plug & Play 1920 x 1080 (60 Hz) VESA DDC2B/CI Input Connector D-Sub 15pin & DVI-D Input Video Signal Analog: 0.7Vp-p(standard), 75 OHM, TMDS Power Source 100-240V~, 50/60Hz Power Consumption Typical < 42 W Standby <... 100mA (A type ) off timer Speakers 0~24hours 2W x 2 Select timing to turn off the monitor. Specification General Specification model name 2236Vw Driving system TFT Color LCD Viewable Image Size 54.7 cm diagonal Pixel pitch LCD Panel Video 0.248mm(H) x 0.248mm(V) R, G, B Analog lnterface & Digital...
... x 1080 (60 Hz) Resolution Highest preset resolution Plug & Play 1920 x 1080 (60 Hz) VESA DDC2B/CI Input Connector D-Sub 15pin & DVI-D Input Video Signal Analog: 0.7Vp-p(standard), 75 OHM, TMDS Power Source 100-240V~, 50/60Hz Power Consumption Typical < 42 W Standby <... 100mA (A type ) off timer Speakers 0~24hours 2W x 2 Select timing to turn off the monitor. Specification General Specification model name 2236Vw Driving system TFT Color LCD Viewable Image Size 54.7 cm diagonal Pixel pitch LCD Panel Video 0.248mm(H) x 0.248mm(V) R, G, B Analog lnterface & Digital...
