
2236Vw Spec Sheet
Page 1
...@60Hz Color Signal Input Digital Input Connectors Power Source Power Consumption Plug & Play User Control OSD Languages Regulations Other Features 16.7M Analog: 0.7Vp-p(standard), 75 OHM, Positive DVI-D with HDCP* Analog RGB Signal: 15-pin D-sub Male Digital Signal: 24-pin DVI-D Universal 100~240VAC, 50/60Hz 35Watts ( Max. ) DDC/2B, DDC/CI Menu, Up, Down, Power 15 Languages including English, French and Spanish cULus, FCC, CE, TUV/S, ROHS, Certified for Windows Vista Logo, EPEAT Gold Touch Sensitive Controls, USB...
...@60Hz Color Signal Input Digital Input Connectors Power Source Power Consumption Plug & Play User Control OSD Languages Regulations Other Features 16.7M Analog: 0.7Vp-p(standard), 75 OHM, Positive DVI-D with HDCP* Analog RGB Signal: 15-pin D-sub Male Digital Signal: 24-pin DVI-D Universal 100~240VAC, 50/60Hz 35Watts ( Max. ) DDC/2B, DDC/CI Menu, Up, Down, Power 15 Languages including English, French and Spanish cULus, FCC, CE, TUV/S, ROHS, Certified for Windows Vista Logo, EPEAT Gold Touch Sensitive Controls, USB...

User's Manual 2236Vw
Page 2
... Setup Stand & Base...11 Adjusting Viewing Angle...12 Connecting the Monitor...13 Wall Mounting ...14 Adjusting ...15 Setting Optimal Resolution ...15 Windows Vista ...15 Windows XP ...17 Windows ME/2000...18 Hotkeys ...19 OSD Setting...20 Eco mode ...21 Color Boost...23 Luminance ...25 Image Setup ...27 Color Temperature ...29 Picture Boost ...31 Extra Setting ...33 Exit...35 LED Indicator ...36 Driver ...37 Monitor Driver ...37 Windows 2000 ...37 Windows ME...37 Windows XP ...38 Windows Vista ...41 Windows 7 ...43 i-Menu ...47 Troubleshoot ...48 Specification...50 General Specification...
... Setup Stand & Base...11 Adjusting Viewing Angle...12 Connecting the Monitor...13 Wall Mounting ...14 Adjusting ...15 Setting Optimal Resolution ...15 Windows Vista ...15 Windows XP ...17 Windows ME/2000...18 Hotkeys ...19 OSD Setting...20 Eco mode ...21 Color Boost...23 Luminance ...25 Image Setup ...27 Color Temperature ...29 Picture Boost ...31 Extra Setting ...33 Exit...35 LED Indicator ...36 Driver ...37 Monitor Driver ...37 Windows 2000 ...37 Windows ME...37 Windows XP ...38 Windows Vista ...41 Windows 7 ...43 i-Menu ...47 Troubleshoot ...48 Specification...50 General Specification...
User's Manual 2236Vw
Page 5
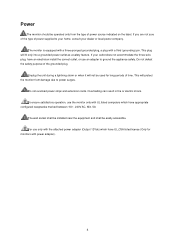
... equipped with a three-pronged grounded plug, a plug with power adapter). 5 If your dealer or local power company. For use an adapter to ground the appliance safely. To ensure satisfactory operation, use the monitor only with UL listed computers which have an electrician install the correct outlet, or use only with the attached power adapter (Output 12Vdc) which have appropriate configured receptacles marked between...
... equipped with a three-pronged grounded plug, a plug with power adapter). 5 If your dealer or local power company. For use an adapter to ground the appliance safely. To ensure satisfactory operation, use the monitor only with UL listed computers which have an electrician install the correct outlet, or use only with the attached power adapter (Output 12Vdc) which have appropriate configured receptacles marked between...

User's Manual 2236Vw
Page 13
... the monitor and connect the other end to the computer's D-Sub port. 3 (Optional - Power 2. Connect one end of the 15-pin D-Sub cable to the back of Monitor and Computer: 1. Analog (DB-15 VGA cable) 3. If it does not display an image, please refer Troubleshooting. 13 Connecting the Monitor Cable Connections On Back of the monitor and connect the other end to the computer‟s DVI port. 4 Turn on your monitor displays an image, installation is...
... the monitor and connect the other end to the computer's D-Sub port. 3 (Optional - Power 2. Connect one end of the 15-pin D-Sub cable to the back of Monitor and Computer: 1. Analog (DB-15 VGA cable) 3. If it does not display an image, please refer Troubleshooting. 13 Connecting the Monitor Cable Connections On Back of the monitor and connect the other end to the computer‟s DVI port. 4 Turn on your monitor displays an image, installation is...

User's Manual 2236Vw
Page 14
... base. 2 Follow the manufacturer's instructions to assemble the wall mounting arm. 3 Place the wall mounting arm onto the back of the monitor. 4 Insert the 4 screws into the holes and tighten. 5 Reconnect the cables. Line up the holes of the arm with the dealer or official department of AOC. Distance between the wall-mount holes : 100 x 100 mm Screw specification for instructions on attaching it to the user's manual...
... base. 2 Follow the manufacturer's instructions to assemble the wall mounting arm. 3 Place the wall mounting arm onto the back of the monitor. 4 Insert the 4 screws into the holes and tighten. 5 Reconnect the cables. Line up the holes of the arm with the dealer or official department of AOC. Distance between the wall-mount holes : 100 x 100 mm Screw specification for instructions on attaching it to the user's manual...

User's Manual 2236Vw
Page 18
6 Click SETTINGS. 7 Set the resolution SLIDE-BAR to 1920 by 1080. Windows ME/2000 For Windows ME/2000: 1 Click START. 2 Click SETTINGS. 3 Click CONTROL PANEL. 4 Double click DISPLAY. 5 Click SETTINGS. 6 Set the resolution SLIDE-BAR to 1920 by 1080. 18
6 Click SETTINGS. 7 Set the resolution SLIDE-BAR to 1920 by 1080. Windows ME/2000 For Windows ME/2000: 1 Click START. 2 Click SETTINGS. 3 Click CONTROL PANEL. 4 Double click DISPLAY. 5 Click SETTINGS. 6 Set the resolution SLIDE-BAR to 1920 by 1080. 18

User's Manual 2236Vw
Page 19
..., press the Menu button to change the setting. Once the desired function is active, the key functions as to do auto configure 19 In sub-menu, Press Up or Down to the source selected. Once the desired function is disabled. Menu / Enter Press to activate OSD, then press Up or Down to turn on or turn off the monitor. Hotkeys Power Press to navigate...
..., press the Menu button to change the setting. Once the desired function is active, the key functions as to do auto configure 19 In sub-menu, Press Up or Down to the source selected. Once the desired function is disabled. Menu / Enter Press to activate OSD, then press Up or Down to turn on or turn off the monitor. Hotkeys Power Press to navigate...
User's Manual 2236Vw
Page 20
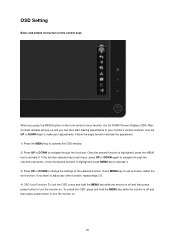
.... OSD Setting Basic and simple instruction on . 20 When you press the MENU button on . Use the UP or DOWN keys to exit and save, select the exit function. Press MENU key to make your monitor's various features. Once the desired function is off and then press power button to navigate through the sub-menu functions. If you can then start making adjustments to turn the monitor on...
.... OSD Setting Basic and simple instruction on . 20 When you press the MENU button on . Use the UP or DOWN keys to exit and save, select the exit function. Press MENU key to make your monitor's various features. Once the desired function is off and then press power button to navigate through the sub-menu functions. If you can then start making adjustments to turn the monitor on...
User's Manual 2236Vw
Page 28
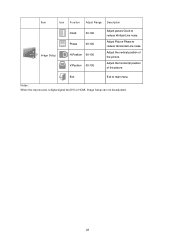
Adjust Picture Phase to reduce Horizontal-Line noise Adjust the vertical position of the picture. Adjust the horizontal position of the picture. Exit Exit to reduce Vertical-Line noise. Item Icon Function Adjust Range Description Image Setup Clock 00-100 Phase 00-100 H.Position 00-100 V.Position 00-100 Adjust picture Clock to main menu Notes : When the input source is digital signal like DVI or HDMI, Image Setup can not be adjusted. 28
Adjust Picture Phase to reduce Horizontal-Line noise Adjust the vertical position of the picture. Adjust the horizontal position of the picture. Exit Exit to reduce Vertical-Line noise. Item Icon Function Adjust Range Description Image Setup Clock 00-100 Phase 00-100 H.Position 00-100 V.Position 00-100 Adjust picture Clock to main menu Notes : When the input source is digital signal like DVI or HDMI, Image Setup can not be adjusted. 28
User's Manual 2236Vw
Page 32
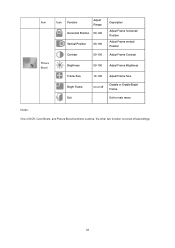
Item Picture Boost Icon Function Adjust Range Horizontal Position 00-100 Vertical Position 00-100 Contrast 00-100 Description Adjust Frame horizontal Position Adjust Frame vertical Position Adjust Frame Contrast Brightness 00-100 Adjust Frame Brightness Frame Size Bright Frame Exit 14-100 Adjust Frame Size on or off Disable or Enable Bright Frame Exit to main menu Notes : One of DCR, Color Boost, and Picture Boost functions is active, the other two function is turned off accordingly. 32
Item Picture Boost Icon Function Adjust Range Horizontal Position 00-100 Vertical Position 00-100 Contrast 00-100 Description Adjust Frame horizontal Position Adjust Frame vertical Position Adjust Frame Contrast Brightness 00-100 Adjust Frame Brightness Frame Size Bright Frame Exit 14-100 Adjust Frame Size on or off Disable or Enable Bright Frame Exit to main menu Notes : One of DCR, Color Boost, and Picture Boost functions is active, the other two function is turned off accordingly. 32
User's Manual 2236Vw
Page 34
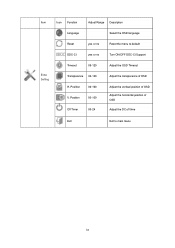
Item Icon Function Adjust Range Description Language Select the OSD language Reset yes or no Turn ON/OFF DDC-CI Support Extra Setting Timeout 05-120 Transparence 00-100 H. Position 00-100 V. Position 00-100 Off Timer 00-24 Adjust the OSD Timeout Adjust the transparence of OSD Adjust the vertical position of OSD Adjust the horizontal position of OSD Adjust the DC off time Exit Exit to default DDC-CI yes or no Reset the menu to main menu 34
Item Icon Function Adjust Range Description Language Select the OSD language Reset yes or no Turn ON/OFF DDC-CI Support Extra Setting Timeout 05-120 Transparence 00-100 H. Position 00-100 V. Position 00-100 Off Timer 00-24 Adjust the OSD Timeout Adjust the transparence of OSD Adjust the vertical position of OSD Adjust the horizontal position of OSD Adjust the DC off time Exit Exit to default DDC-CI yes or no Reset the menu to main menu 34

User's Manual 2236Vw
Page 37
... a specific driver', then click on 'Next' and then click on the 'Browse...' Start Windows® Me 2. Select 'Monitor' - Click on 'Control Panel'. 3. Driver Monitor Driver Windows 2000 1. Click on 'Driver' and then click on the 'Display' Icon. 4. Start Windows® 2000 2. Double click on 'Update Driver...' Click on 'Have disk...'. 8. Select 'Display a list of the known drivers for this device so that I can see the 'Digital Signature Not Found' window, click...
... a specific driver', then click on 'Next' and then click on the 'Browse...' Start Windows® Me 2. Select 'Monitor' - Click on 'Control Panel'. 3. Driver Monitor Driver Windows 2000 1. Click on 'Driver' and then click on the 'Display' Icon. 4. Start Windows® 2000 2. Double click on 'Update Driver...' Click on 'Have disk...'. 8. Select 'Display a list of the known drivers for this device so that I can see the 'Digital Signature Not Found' window, click...
User's Manual 2236Vw
Page 39
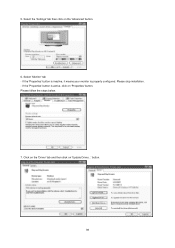
Please stop installation. - If the 'Properties' button is properly configured. button. 39 Please follow the steps below. 7. If the 'Properties' button is inactive, it means your monitor is active, click on 'Properties' button. Select the 'Settings' tab then click on 'Update Driver...' Select 'Monitor' tab - 5. Click on the 'Driver' tab and then click on the 'Advanced' button. 6.
Please stop installation. - If the 'Properties' button is properly configured. button. 39 Please follow the steps below. 7. If the 'Properties' button is inactive, it means your monitor is active, click on 'Properties' button. Select the 'Settings' tab then click on 'Update Driver...' Select 'Monitor' tab - 5. Click on the 'Driver' tab and then click on the 'Advanced' button. 6.

User's Manual 2236Vw
Page 42
... my computer for your monitor model and click on the 'Next' button. 9. If the message "Windows needs..." Click "Update Driver..." Click "Properties" in the "Driver" tab. 6. button, then click on the 'Have disk...' If the "Properties" button is deactivated, it means the configuration for driver software" checkbox and click "Let me pick from a list of device drivers on the following screens displayed in the figure...
... my computer for your monitor model and click on the 'Next' button. 9. If the message "Windows needs..." Click "Update Driver..." Click "Properties" in the "Driver" tab. 6. button, then click on the 'Have disk...' If the "Properties" button is deactivated, it means the configuration for driver software" checkbox and click "Let me pick from a list of device drivers on the following screens displayed in the figure...

User's Manual 2236Vw
Page 48
... Supported" on the screen Is the power cord connected properly? No images on the screen? Check the power cord connection and power supply. Adjust the maximum resolution and frequency that may cause electrical interference as far away from the video card exceeds the maximum resolution and frequency that the monitor can handle properly. Make sure the AOC Monitor Drivers are not using the DVI cable) Check the DVI cable connection. * DVI input is properly connected to a grounded power outlet and to see this message when the signal...
... Supported" on the screen Is the power cord connected properly? No images on the screen? Check the power cord connection and power supply. Adjust the maximum resolution and frequency that may cause electrical interference as far away from the video card exceeds the maximum resolution and frequency that the monitor can handle properly. Make sure the AOC Monitor Drivers are not using the DVI cable) Check the DVI cable connection. * DVI input is properly connected to a grounded power outlet and to see this message when the signal...
User's Manual 2236Vw
Page 49
... connected to the computer. Missing one of the primary colors (RED, GREEN, or BLUE) Inspect the monitor's video cable and make sure no pin is bent. Horizontal or vertical disturbances on the keyboard while observing the CAPS LOCK LED. The LED should either turn ON or OFF after hitting the CAPS LOCK key. or sized properly Picture has color defects (white does not look white) Adjust RGB color or select desired color temperature. Inspect the monitor's video cable...
... connected to the computer. Missing one of the primary colors (RED, GREEN, or BLUE) Inspect the monitor's video cable and make sure no pin is bent. Horizontal or vertical disturbances on the keyboard while observing the CAPS LOCK LED. The LED should either turn ON or OFF after hitting the CAPS LOCK key. or sized properly Picture has color defects (white does not look white) Adjust RGB color or select desired color temperature. Inspect the monitor's video cable...

User's Manual 2236Vw
Page 50
... resolution Plug & Play 1920 x 1080 (60 Hz) VESA DDC2B/CI Input Connector D-Sub 15pin & DVI-D Input Video Signal Analog: 0.7Vp-p(standard), 75 OHM, TMDS Power Source 100-240V~, 50/60Hz Power Consumption Typical < 42 W Standby < 1 W USB Downstream port To USB device, loading < 100mA (A type ) off timer Speakers 0~24hours 2W x 2 Select timing to turn off the monitor. Connector Type 15-pin Mini D-Sub& DVI-D Physical Signal Cable Type Characteristics Dimensions & Weight: Detachable Height (with base...
... resolution Plug & Play 1920 x 1080 (60 Hz) VESA DDC2B/CI Input Connector D-Sub 15pin & DVI-D Input Video Signal Analog: 0.7Vp-p(standard), 75 OHM, TMDS Power Source 100-240V~, 50/60Hz Power Consumption Typical < 42 W Standby < 1 W USB Downstream port To USB device, loading < 100mA (A type ) off timer Speakers 0~24hours 2W x 2 Select timing to turn off the monitor. Connector Type 15-pin Mini D-Sub& DVI-D Physical Signal Cable Type Characteristics Dimensions & Weight: Detachable Height (with base...
User's Manual 2236Vw
Page 51
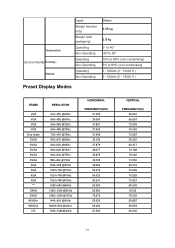
...monitor only) Weight (with packaging) Operating Non-Operating Operating Non-Operating Operating Non-Operating 206mm 4.35 kg 5.8 kg 0°to 40° -20°to 60° 10% to 85% (non-condensing) 5% to 80% (non-condensing) 0~ 3000m (0~ 10000 ft ) 0~ 5000m (0~ 15000 ft ) Preset Display Modes STAND VGA VGA VGA VGA Dos-mode... SVGA SVGA SVGA SVGA SVGA XGA XGA XGA XGA *** SXGA SXGA WXGA+ WSXGA HD RESOLUTION 640×480 ... @60Hz 1920×1080@60Hz HORIZONTAL FREQUENCY(kHZ) 31.469 35.000 ... 65.290 67.500 VERTICAL FREQUENCY(Hz) 59.940 66...
...monitor only) Weight (with packaging) Operating Non-Operating Operating Non-Operating Operating Non-Operating 206mm 4.35 kg 5.8 kg 0°to 40° -20°to 60° 10% to 85% (non-condensing) 5% to 80% (non-condensing) 0~ 3000m (0~ 10000 ft ) 0~ 5000m (0~ 15000 ft ) Preset Display Modes STAND VGA VGA VGA VGA Dos-mode... SVGA SVGA SVGA SVGA SVGA XGA XGA XGA XGA *** SXGA SXGA WXGA+ WSXGA HD RESOLUTION 640×480 ... @60Hz 1920×1080@60Hz HORIZONTAL FREQUENCY(kHZ) 31.469 35.000 ... 65.290 67.500 VERTICAL FREQUENCY(Hz) 59.940 66...

User's Manual 2236Vw
Page 55
...Connect the equipment into an outlet on , the user is connected. Consult the dealer or an experienced radio/TV technician for any , must be determined by turning the equipment off and on a circuit different from that interference will not occur in a residential installation. Shielded interface cables and AC power cord... communications. This equipment generates, uses and can be used in accordance with the instructions, may cause harmful interference to provide reasonable protection against harmful interference in a particular installation. It is not responsible for help.
...Connect the equipment into an outlet on , the user is connected. Consult the dealer or an experienced radio/TV technician for any , must be determined by turning the equipment off and on a circuit different from that interference will not occur in a residential installation. Shielded interface cables and AC power cord... communications. This equipment generates, uses and can be used in accordance with the instructions, may cause harmful interference to provide reasonable protection against harmful interference in a particular installation. It is not responsible for help.

User's Manual 2236Vw
Page 58
...Adjustment by non-authorized source Repair, modification, or installation of options or parts by anyone other than an EPI Authorized Service Center Improper environment Excessive or inadequate heating or air conditioning or electrical power failures, surges, or other irregularities This three-year limited warranty does not cover any of the product's firmware or hardware that are replaced...and liability for AOC Color Monitors Including those Sold within North America as *stated below. In the USA to obtain service under this product to your Dealer or EPI Customer Service, RMA Department at...
...Adjustment by non-authorized source Repair, modification, or installation of options or parts by anyone other than an EPI Authorized Service Center Improper environment Excessive or inadequate heating or air conditioning or electrical power failures, surges, or other irregularities This three-year limited warranty does not cover any of the product's firmware or hardware that are replaced...and liability for AOC Color Monitors Including those Sold within North America as *stated below. In the USA to obtain service under this product to your Dealer or EPI Customer Service, RMA Department at...


