
Operating Instructions
Page 12
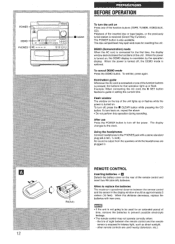
POWER .I I..
POWER .I I..

Operating Instructions
Page 24
...the desired point. To remove discs, press the 4 OPEN/CLOSE button. The power is off (Direct Play Function) Press the CD button. To check the remaining time Press the CD EDIT/CHECK button during play , press the s button. To replace discs before play of a track, press the 44 or ...W button repeatedly. @ DIRECTION/PRESET [ dm ) b @ DISCDIRECTPLAY OQO b 24 BASIC OPERATIONS LOADING DISCS + El Press the CD button, then press the 4 OPEN/CLOSE button to open the disc compartment. Place the third disc on and play , press the 4 OPEN/CLOSE button to...
...the desired point. To remove discs, press the 4 OPEN/CLOSE button. The power is off (Direct Play Function) Press the CD button. To check the remaining time Press the CD EDIT/CHECK button during play , press the s button. To replace discs before play of a track, press the 44 or ...W button repeatedly. @ DIRECTION/PRESET [ dm ) b @ DISCDIRECTPLAY OQO b 24 BASIC OPERATIONS LOADING DISCS + El Press the CD button, then press the 4 OPEN/CLOSE button to open the disc compartment. Place the third disc on and play , press the 4 OPEN/CLOSE button to...
Operating Instructions
Page 28
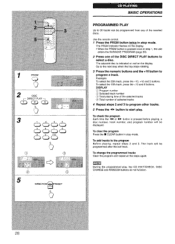
To select the 10th track, press the +1O and O buttons. Use the remote control. 1 Press the PRGM button twice in step 1, the unit enters the KARAOKE PROGRAM (page 50). 2 Press one of the DISC DIRECT PLAY buttons to 30 tracks can be programmed from any of selected tracks 4 Repeat steps 2 and 3 to program a track. Example: To select the 25th track, press the +1O, +1O and 5 buttons. The selected disc is pressed once in stop mode. Go to the next step when the tray stops rotating. 3 Press the numeric buttons and the +1 O button to program other tracks. 5 Press the DISPLAY @ ...
To select the 10th track, press the +1O and O buttons. Use the remote control. 1 Press the PRGM button twice in step 1, the unit enters the KARAOKE PROGRAM (page 50). 2 Press one of the DISC DIRECT PLAY buttons to 30 tracks can be programmed from any of selected tracks 4 Repeat steps 2 and 3 to program a track. Example: To select the 25th track, press the +1O, +1O and 5 buttons. The selected disc is pressed once in stop mode. Go to the next step when the tray stops rotating. 3 Press the numeric buttons and the +1 O button to program other tracks. 5 Press the DISPLAY @ ...
Operating Instructions
Page 34
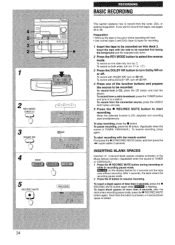
... the q REC/REC MUTE button again while _ is flashing. To record without recording. Each time the button is pressed, a 4-second blank space is CD, playback and recording start . To record with DOLBY NR, turn on => or ~=). To record from the connected source, press the VIDEO/ AUX button and... 36 to resume recording. on into deck 2. Insert the tape to start recording with the side to turn off . To record from a CD, press the CD button and load the disc(s). To insert a blank space of the Music Sensor function. (Applicable when the source is TUNER, VIDEO/AUX.) ...
... the q REC/REC MUTE button again while _ is flashing. To record without recording. Each time the button is pressed, a 4-second blank space is CD, playback and recording start . To record with DOLBY NR, turn on => or ~=). To record from the connected source, press the VIDEO/ AUX button and... 36 to resume recording. on into deck 2. Insert the tape to start recording with the side to turn off . To record from a CD, press the CD button and load the disc(s). To insert a blank space of the Music Sensor function. (Applicable when the source is TUNER, VIDEO/AUX.) ...
Operating Instructions
Page 40
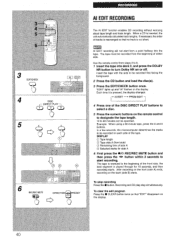
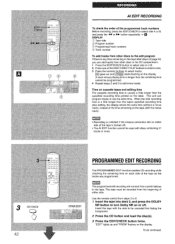
... seconds to turn Dolby NR on the back (side B) starts. 4 DISC ~ DIRECT PLAY-1 aam Al EDIT RECORDING The Al EDIT function enables CD recording without worrying about tape length and track length. Use the remote control from a point halfway into deck 2, and press the DOLBY NR button to... steps 3 to 6. 1 Insert the tape into the tape. Al EDIT - After recording on the front (side A) ends, recording on or off. When a CD is pressed, the display changes. DISPLAY 0 Tape length @ Tape side A (front side) @ Remaining time of the front side, the lead segment is rewound to...
... seconds to turn Dolby NR on the back (side B) starts. 4 DISC ~ DIRECT PLAY-1 aam Al EDIT RECORDING The Al EDIT function enables CD recording without worrying about tape length and track length. Use the remote control from a point halfway into deck 2, and press the DOLBY NR button to... steps 3 to 6. 1 Insert the tape into the tape. Al EDIT - After recording on the front (side A) ends, recording on or off. When a CD is pressed, the display changes. DISPLAY 0 Tape length @ Tape side A (front side) @ Remaining time of the front side, the lead segment is rewound to...
Operating Instructions
Page 42
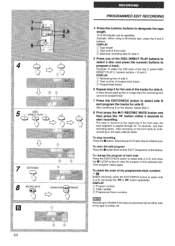
...track numbers @ Track number To add tracks from other discs in the tape. The tape must be recorded first facing the foreground. 2 Press the CD button and load the disc(s). 3 Press the EDIT/CHECK button twice. Insert the tape with the minus mark). When the total recording time is...button to be recorded from other discs to select side A or B, and press the +4 or - Use the remote control from a point halfway in the CD compartment . 1 Press the EDIT/CHECK button to add more . A track whose playing time is a little longer than the remaining time cannot be continued....
...track numbers @ Track number To add tracks from other discs in the tape. The tape must be recorded first facing the foreground. 2 Press the CD button and load the disc(s). 3 Press the EDIT/CHECK button twice. Insert the tape with the minus mark). When the total recording time is...button to be recorded from other discs to select side A or B, and press the +4 or - Use the remote control from a point halfway in the CD compartment . 1 Press the EDIT/CHECK button to add more . A track whose playing time is a little longer than the remaining time cannot be continued....
Operating Instructions
Page 44
Recording and CD play stop recording Press the s button. To check the order of the programmed track numbers -H Before recording, press the EDIT/CHECK button to clear the ...
Recording and CD play stop recording Press the s button. To check the order of the programmed track numbers -H Before recording, press the EDIT/CHECK button to clear the ...

Operating Instructions
Page 48
... the singer's voice on , the sound is output through a microphone. Those with strong echoes - Those with the vocal part recorded on the left side of CDs or tapes. - Each time it is pressed, the function can use discs or tapes as monaural. 48 In the AUTO MULTIPLEX function, the MULTIPLEX operates...
... the singer's voice on , the sound is output through a microphone. Those with strong echoes - Those with the vocal part recorded on the left side of CDs or tapes. - Each time it is pressed, the function can use discs or tapes as monaural. 48 In the AUTO MULTIPLEX function, the MULTIPLEX operates...
Operating Instructions
Page 50
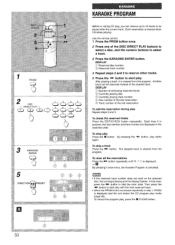
...displayed in step 1, PRGM is pressed repeatedly in the reserved order. button. q When the PRGM button is displayed and the unit enters the CD program play mode (page 28). After playing a track, it once more, the Karaoke Program is cleared from the To clear all the reservations... DISC DIRECT PLAY buttons to select a disc, and the numeric buttons to be reserved instead of the last reservation Another To add the reservation during CD play, you can be played after the current track. By pressing the 4> button, play . DISPLAY @ Number of remaining reserved tracks @ Currently ...
...displayed in step 1, PRGM is pressed repeatedly in the reserved order. button. q When the PRGM button is displayed and the unit enters the CD program play mode (page 28). After playing a track, it once more, the Karaoke Program is cleared from the To clear all the reservations... DISC DIRECT PLAY buttons to select a disc, and the numeric buttons to be reserved instead of the last reservation Another To add the reservation during CD play, you can be played after the current track. By pressing the 4> button, play . DISPLAY @ Number of remaining reserved tracks @ Currently ...
Operating Instructions
Page 52
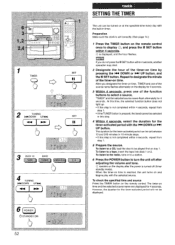
... is not completed within 4 seconds, another operation may start. 2 Designate the hour of the source name flashes alternately on the remote control. To listen to a CD, load the disc to be displayed. 52 To check the specified time and source Press the TIMER button on the display for 4 seconds. 3 Within 4 seconds...
... is not completed within 4 seconds, another operation may start. 2 Designate the hour of the source name flashes alternately on the remote control. To listen to a CD, load the disc to be displayed. 52 To check the specified time and source Press the TIMER button on the display for 4 seconds. 3 Within 4 seconds...

Operating Instructions
Page 56
Obtain the necessary connecting cords. When connecting a turntable Use an Aiwa turntable equipped with a built-in the display When the VI DEO/AUX button is pressed, VIDEO is displayed initially. CD DIGITAL OUT JACK (NSX-V72 only) This unit can input the sound signal through the jacks, Use ...Use an optical cable to connect an audio equipment with the LINE IN (analog input) jacks. q Consult your local Aiwa dealer for details. VIDEO/AUX JACKS This unit can output CD digital sound signals through the jacks, Use a cable with a built-in-amplifier to the L jack. jack is ...
Obtain the necessary connecting cords. When connecting a turntable Use an Aiwa turntable equipped with a built-in the display When the VI DEO/AUX button is pressed, VIDEO is displayed initially. CD DIGITAL OUT JACK (NSX-V72 only) This unit can input the sound signal through the jacks, Use ...Use an optical cable to connect an audio equipment with the LINE IN (analog input) jacks. q Consult your local Aiwa dealer for details. VIDEO/AUX JACKS This unit can output CD digital sound signals through the jacks, Use a cable with a built-in-amplifier to the L jack. jack is ...
Operating Instructions
Page 64
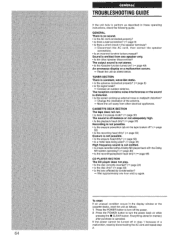
... possible. q Is a tape recorded without Dolby NR played back with the Dolby NR system operating? (+ page 30) q Is the recording/playback head dirty? (+ page 58) CD PLAYER SECTiON The CD player does not play.
... possible. q Is a tape recorded without Dolby NR played back with the Dolby NR system operating? (+ page 30) q Is the recording/playback head dirty? (+ page 58) CD PLAYER SECTiON The CD player does not play.
Operating Instructions
Page 67
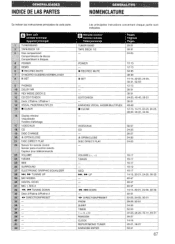
... 50-51 54-55 52-53 22-23, 26-29, 40-44, 50-51 26-27 14-15 20-21, 26-27 50-51 ~;7 CD t;$l DISC CHANGE ?D" $ OPENICLOSE ~1 DISC DIRECT PLAY 22.. ,,,, :, 23 Sensor for remote control Sensor para el control remoto Capteur pour telecommande VOLUME... :30" DIGITAL ECHO 31, " MIC 1, MIC 2 " 'q~ , -44, - TUNING DOWN :33. O REC/REC MUTE II SET - - - W REV MODE [DECK 2] '%2 . 73 .,. ,.' '%4' CD EDIT/CHECK Deck l/Platina l/Platine 1 VOCAL FADERIMULTIPLEX jj L II CLEAR ;, ,< /. .jL1 ~ Display window Visualizador F'en~tre d'affichage ,17 ' VIDEO/AUX "W! INDICE DE LAS PARTES Se...
... 50-51 54-55 52-53 22-23, 26-29, 40-44, 50-51 26-27 14-15 20-21, 26-27 50-51 ~;7 CD t;$l DISC CHANGE ?D" $ OPENICLOSE ~1 DISC DIRECT PLAY 22.. ,,,, :, 23 Sensor for remote control Sensor para el control remoto Capteur pour telecommande VOLUME... :30" DIGITAL ECHO 31, " MIC 1, MIC 2 " 'q~ , -44, - TUNING DOWN :33. O REC/REC MUTE II SET - - - W REV MODE [DECK 2] '%2 . 73 .,. ,.' '%4' CD EDIT/CHECK Deck l/Platina l/Platine 1 VOCAL FADERIMULTIPLEX jj L II CLEAR ;, ,< /. .jL1 ~ Display window Visualizador F'en~tre d'affichage ,17 ' VIDEO/AUX "W! INDICE DE LAS PARTES Se...


