
Operating Instructions
Page 2
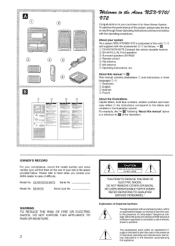
... case letters in the instructions correspond to them on your system Your system NSX-V70/NSX-V72 is composed of the units ~-~ and supplied with the operating procedures...NV72 Compact disc stereo cassette receiver @ SX-NV70 (L,R) Front speakers @ Surround speakers SX-R220 @ Remote control @ FM antenna @AM antenna Q1 Operating Instructions, etc. REFER SERVICING TO QUALIFIED SERVICE PERSONNEL...illustration column. To optimize the performance of electric shock to the presence of an Aiwa Stereo System. A l!--L!l The exclamation point within the product's enclosure that may be...
... case letters in the instructions correspond to them on your system Your system NSX-V70/NSX-V72 is composed of the units ~-~ and supplied with the operating procedures...NV72 Compact disc stereo cassette receiver @ SX-NV70 (L,R) Front speakers @ Surround speakers SX-R220 @ Remote control @ FM antenna @AM antenna Q1 Operating Instructions, etc. REFER SERVICING TO QUALIFIED SERVICE PERSONNEL...illustration column. To optimize the performance of electric shock to the presence of an Aiwa Stereo System. A l!--L!l The exclamation point within the product's enclosure that may be...
Operating Instructions
Page 12
POWER .I I..
POWER .I I..
Operating Instructions
Page 14
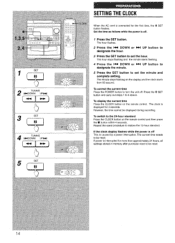
... is caused by a power interruption. To correct the current time Press the POWER button to the 24-hour standard Press the CLOCK button on the remote control and then press the W button within 4 seconds. To switch to turn the unit off. The current time needs to be reset, If power is... hour. 3 Press the SET button to set the minute and complete setting. However, the time cannot be reset. 14 The minute stops flashing on the remote control. SETTING THE CLOCK When the AC cord is connected for 4 seconds.
... is caused by a power interruption. To correct the current time Press the POWER button to the 24-hour standard Press the CLOCK button on the remote control and then press the W button within 4 seconds. To switch to turn the unit off. The current time needs to be reset, If power is... hour. 3 Press the SET button to set the minute and complete setting. However, the time cannot be reset. 14 The minute stops flashing on the remote control. SETTING THE CLOCK When the AC cord is connected for 4 seconds.
Operating Instructions
Page 16
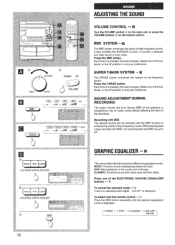
... again. Recording with BBE The desired source can be set to enhance the clarity of high-frequency sound. When playing back a tape recorded with the remote control + @ Press the GEQ button repeatedly until the desired equalization curve is pressed, the level changes. T-BASS + 1111 + 111111 + 11111111 - Press the BBE button. It... + I 1 CLASSIC - Each time it is displayed. ~ ROCK - VOLUME CONTROL -+ El Turn the VOLUME control @ on the main unit, or press the VOLUME buttons @on the remote control.
... again. Recording with BBE The desired source can be set to enhance the clarity of high-frequency sound. When playing back a tape recorded with the remote control + @ Press the GEQ button repeatedly until the desired equalization curve is pressed, the level changes. T-BASS + 1111 + 111111 + 11111111 - Press the BBE button. It... + I 1 CLASSIC - Each time it is displayed. ~ ROCK - VOLUME CONTROL -+ El Turn the VOLUME control @ on the main unit, or press the VOLUME buttons @on the remote control.
Operating Instructions
Page 22
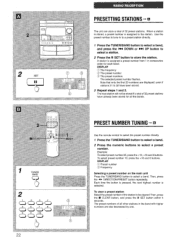
... @ The preset numbers The selected preset number' flashes, Note that only the first 20 numbers are also decreased by one. PRESET NUMBER TUNING + I= Use the remote control to select the preset number directly. 1 Press the TUNER/BAND button to select a band. 2 Press the numeric buttons to store the station. The next...
... @ The preset numbers The selected preset number' flashes, Note that only the first 20 numbers are also decreased by one. PRESET NUMBER TUNING + I= Use the remote control to select the preset number directly. 1 Press the TUNER/BAND button to select a band. 2 Press the numeric buttons to store the station. The next...
Operating Instructions
Page 26
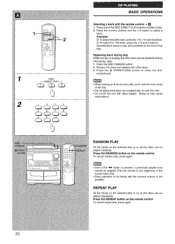
...the other discs. 3 Press the A OPEN/CLOSE button to close the disc compartment. REPEAT PLAY All the tracks on the selected disc or on the remote control. q Do not tilt the unit with the numeric buttons is not possible. Press the REPEAT button on all the discs can be played randomly.... RANDOM PLAY All the tracks on the selected disc or on the remote control. Selected track starts to play . 1 Press the DISC CHANGE button. 2 Remove the discs and replace with the remote control - To cancel repeat play , press again. q Do not place more than one compact ...
...the other discs. 3 Press the A OPEN/CLOSE button to close the disc compartment. REPEAT PLAY All the tracks on the selected disc or on the remote control. q Do not tilt the unit with the numeric buttons is not possible. Press the REPEAT button on all the discs can be played randomly.... RANDOM PLAY All the tracks on the selected disc or on the remote control. Selected track starts to play . 1 Press the DISC CHANGE button. 2 Remove the discs and replace with the remote control - To cancel repeat play , press again. q Do not place more than one compact ...
Operating Instructions
Page 28
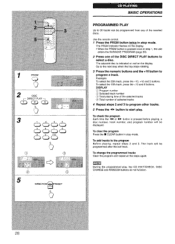
.... Go to the next step when the tray stops rotating. 3 Press the numeric buttons and the +1 O button to program other tracks. 5 Press the Use the remote control. 1 Press the PRGM button twice in step 1, the unit enters the KARAOKE PROGRAM (page 50). 2 Press one of the DISC DIRECT PLAY buttons to...
.... Go to the next step when the tray stops rotating. 3 Press the numeric buttons and the +1 O button to program other tracks. 5 Press the Use the remote control. 1 Press the PRGM button twice in step 1, the unit enters the KARAOKE PROGRAM (page 50). 2 Press one of the DISC DIRECT PLAY buttons to...
Operating Instructions
Page 34
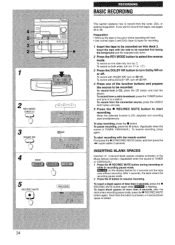
... enters recording pause mode, press the q REC/REC MUTE button again. If you want to be recorded on uU NR. Insert the tape with the remote control First press the ./0 REC/REC MUTE button, and then press the 4> button within 2 seconds. When the selected function is flashing. To record on both...
... enters recording pause mode, press the q REC/REC MUTE button again. If you want to be recorded on uU NR. Insert the tape with the remote control First press the ./0 REC/REC MUTE button, and then press the 4> button within 2 seconds. When the selected function is flashing. To record on both...
Operating Instructions
Page 40
... 4 Press one of either side. Example: When using a 60-minute tape, press the 6 and O buttons. The tape is rearranged so that "EDIT" disappears on the remote control to designate the tape length. 10 to turn Dolby NR on each side of the front side, the lead segment is cut short. Use... the remote control from a point halfway into deck 2, and press the DOLBY NR button to 99 minutes can be specified. "EDIT" lights up and "Al" flashes on...
... 4 Press one of either side. Example: When using a 60-minute tape, press the 6 and O buttons. The tape is rearranged so that "EDIT" disappears on the remote control to designate the tape length. 10 to turn Dolby NR on each side of the front side, the lead segment is cut short. Use... the remote control from a point halfway into deck 2, and press the DOLBY NR button to 99 minutes can be specified. "EDIT" lights up and "Al" flashes on...
Operating Instructions
Page 42
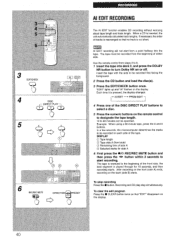
... - Al EDIT RECORDING To check the order of the tape as the tracks are programmed. Time on the tape (with the minus mark). Use the remote control from the beginning of either side of the time remaining on cassette tapes and editing time The cassette recording time is a little longer than...
... - Al EDIT RECORDING To check the order of the tape as the tracks are programmed. Time on the tape (with the minus mark). Use the remote control from the beginning of either side of the time remaining on cassette tapes and editing time The cassette recording time is a little longer than...
Operating Instructions
Page 50
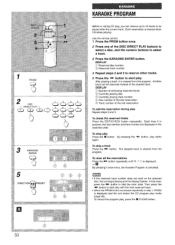
Use the remote control. 1 Press the PRGM button once. 2 Press one of the cleared track. DISPLAY @ Reserved disc number @ Reserved track number 4 Repeat steps 2 and 3 to reserve other ...
Use the remote control. 1 Press the PRGM button once. 2 Press one of the cleared track. DISPLAY @ Reserved disc number @ Reserved track number 4 Repeat steps 2 and 3 to reserve other ...
Operating Instructions
Page 52
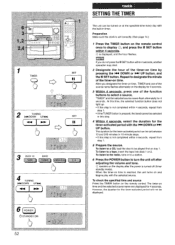
...POWER button to turn the unit off (timer standby mode). If you designate the timer-on time, TIMER and one of the timer-on the remote control once to select a source. After you do not press the II SET button within 4 seconds, another operation may start. 2 Designate the... on time and the selected source name are displayed for 4 seconds, However, the duration for the timer-activated period can be played first on the remote control. u 2 TUNING w DOWN UP* SET - ~m b b 4 TUNING L/ a- Repeat to the radio, tune in 10-minute steps. The duration for the timer-activated ...
...POWER button to turn the unit off (timer standby mode). If you designate the timer-on time, TIMER and one of the timer-on the remote control once to select a source. After you do not press the II SET button within 4 seconds, another operation may start. 2 Designate the... on time and the selected source name are displayed for 4 seconds, However, the duration for the timer-activated period can be played first on the remote control. u 2 TUNING w DOWN UP* SET - ~m b b 4 TUNING L/ a- Repeat to the radio, tune in 10-minute steps. The duration for the timer-activated ...

Operating Instructions
Page 54
... until the power is set You can be recorded into deck 2 after a specified time passes. The specified time @is turned off. on the remote control so that "SLEEP disappears. Each time the button is displayed for TUNER and VI DEO/AUX (with an external timer) sources only. To .... To check the time remaining until the power is displayed. SETTING THE TIMER To cancel timer standby mode temporarily Press the TIMER button on the remote control so that @ or R~C disappears on the display. ~ restore the timer standby mode, press again to display 0 or REC Using the unit ...
... until the power is set You can be recorded into deck 2 after a specified time passes. The specified time @is turned off. on the remote control so that "SLEEP disappears. Each time the button is displayed for TUNER and VI DEO/AUX (with an external timer) sources only. To .... To check the time remaining until the power is displayed. SETTING THE TIMER To cancel timer standby mode temporarily Press the TIMER button on the remote control so that @ or R~C disappears on the display. ~ restore the timer standby mode, press again to display 0 or REC Using the unit ...
Operating Instructions
Page 67
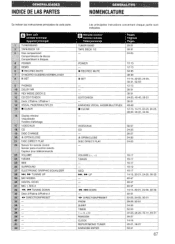
... DIRECT PLAY - 56-57 24-25 26-27 24-25 24-25 VOLUME (A, V) T-BASS - - CD t;$l DISC CHANGE ?D" $ OPENICLOSE ~1 DISC DIRECT PLAY 22.. ,,,, :, 23 Sensor for remote control Sensor para el control remoto Capteur pour telecommande VOLUME 224: T-BASS 2?, BBE :26 .g7"i ,. 28> .>. ' 29: SURROUND ELECTRONIC GRAPHIC 1%, * TUNING UP MIC MIXING EQUALIZER...
... DIRECT PLAY - 56-57 24-25 26-27 24-25 24-25 VOLUME (A, V) T-BASS - - CD t;$l DISC CHANGE ?D" $ OPENICLOSE ~1 DISC DIRECT PLAY 22.. ,,,, :, 23 Sensor for remote control Sensor para el control remoto Capteur pour telecommande VOLUME 224: T-BASS 2?, BBE :26 .g7"i ,. 28> .>. ' 29: SURROUND ELECTRONIC GRAPHIC 1%, * TUNING UP MIC MIXING EQUALIZER...


