
Operating Instructions
Page 2
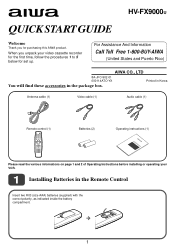
... before installing or operating your video cassette recorder for the first time, follow the procedures 1 to 5 below for purchasing this AIWA product. HV-FX9000U QUICK START GUIDE Welcome Thank you unpack your VCR. 1 Installing Batteries in the package box. For Assistance And Information Call Toll Free 1-800-BUY...-AIWA (United States and Puerto Rico) AIWA CO., LTD 8A-JFC-902-01 000114ATO-YX Printed in Korea You will ...
... before installing or operating your video cassette recorder for the first time, follow the procedures 1 to 5 below for purchasing this AIWA product. HV-FX9000U QUICK START GUIDE Welcome Thank you unpack your VCR. 1 Installing Batteries in the package box. For Assistance And Information Call Toll Free 1-800-BUY...-AIWA (United States and Puerto Rico) AIWA CO., LTD 8A-JFC-902-01 000114ATO-YX Printed in Korea You will ...

Operating Instructions
Page 3
... are complete. Important Connect the AC cord to the TV's antenna input connector. AC cord 3 If your TV has audio/video input jacks, connect the VCR and TV using only an antenna cable Set the channel selector to 3CH or 4CH, not employed for broadcasts, and select the same channel on... To select a desired TV channel on the TV Turn the TV and VCR on, and press TV/VCR to the AC outlet. 2 Connecting Antenna (or CATV)-VCR-TV Basic connections 1 Connect the TV antenna cable (not supplied) to the VCR. 2 Connect the VCR with the TV supplied antenna cable to the AC outlet after all...
... are complete. Important Connect the AC cord to the TV's antenna input connector. AC cord 3 If your TV has audio/video input jacks, connect the VCR and TV using only an antenna cable Set the channel selector to 3CH or 4CH, not employed for broadcasts, and select the same channel on... To select a desired TV channel on the TV Turn the TV and VCR on, and press TV/VCR to the AC outlet. 2 Connecting Antenna (or CATV)-VCR-TV Basic connections 1 Connect the TV antenna cable (not supplied) to the VCR. 2 Connect the VCR with the TV supplied antenna cable to the AC outlet after all...

Operating Instructions
Page 4
...using the supplied audio and video cables. To see a TV program or video program selected on the VCR Turn the TV and VCR on, and press TV/VCR to ANT IN on the VCR in the display window. VCR 3 Audio/video input jacks Antenna cable (supplied) Video cable (supplied) AC outlet AERIAL R AUDIO... OUT OUT (MONO) IN IN (VHF/UHF) RF OUT Audio cable (supplied) AC cord 5 Connect the AC cord of the VCR or the VCR to the TV's antenna input connector. CATV connections CATV System 3 Connect the VCR with a coaxial cable (not supplied). 1 Connect the cable from the CATV system to display...
...using the supplied audio and video cables. To see a TV program or video program selected on the VCR Turn the TV and VCR on, and press TV/VCR to ANT IN on the VCR in the display window. VCR 3 Audio/video input jacks Antenna cable (supplied) Video cable (supplied) AC outlet AERIAL R AUDIO... OUT OUT (MONO) IN IN (VHF/UHF) RF OUT Audio cable (supplied) AC cord 5 Connect the AC cord of the VCR or the VCR to the TV's antenna input connector. CATV connections CATV System 3 Connect the VCR with a coaxial cable (not supplied). 1 Connect the cable from the CATV system to display...
Operating Instructions
Page 5
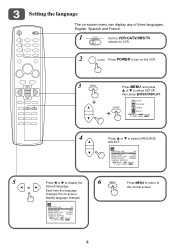
... menu can display any of three languages, English, Spanish and French. 1 VCR CATV/DBS TV Set the VCR/CATV/DBS/TV selector to VCR. 2 POWER Press POWER to turn on -screen display language changes. Each time the language changes, the on the VCR. 3 MENU Press MENU, and press i or k to display the desired language...
... menu can display any of three languages, English, Spanish and French. 1 VCR CATV/DBS TV Set the VCR/CATV/DBS/TV selector to VCR. 2 POWER Press POWER to turn on -screen display language changes. Each time the language changes, the on the VCR. 3 MENU Press MENU, and press i or k to display the desired language...
Operating Instructions
Page 6
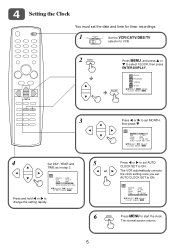
... YEAR : 2000 TIME : 12 : 00 AM AUTO CLOCK SET : OFF SELECT ADJUST TO EXIT PRESS MENU 4 Set DAY, YEAR and TIME as in step 3. The VCR automatically corrects the clock setting once you set AUTO CLOCK SET to start the clock. MONTH : JUNE DAY : 17 SAT YEAR : 2000 TIME : 10 : 30... PRESS MENU 6 MENU Press MENU to ON. 4 Setting the Clock You must set the date and time for timer recordings. 1 VCR CATV/DBS TV Set the VCR/CATV/DBS/TV selector to VCR. 2 MENU Press MENU, and press i or k to ON. MONTH : JUNE DAY : 17 SAT YEAR : 2000 TIME : 10 : 30 AM AUTO...
... YEAR : 2000 TIME : 12 : 00 AM AUTO CLOCK SET : OFF SELECT ADJUST TO EXIT PRESS MENU 4 Set DAY, YEAR and TIME as in step 3. The VCR automatically corrects the clock setting once you set AUTO CLOCK SET to start the clock. MONTH : JUNE DAY : 17 SAT YEAR : 2000 TIME : 10 : 30... PRESS MENU 6 MENU Press MENU to ON. 4 Setting the Clock You must set the date and time for timer recordings. 1 VCR CATV/DBS TV Set the VCR/CATV/DBS/TV selector to VCR. 2 MENU Press MENU, and press i or k to ON. MONTH : JUNE DAY : 17 SAT YEAR : 2000 TIME : 10 : 30 AM AUTO...
Operating Instructions
Page 7
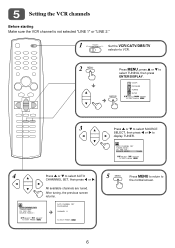
... TUNING, then press ENTER/DISPLAY. After tuning, the previous screen returns. AUTO CHANNEL SET TUNING BAND : CH. 5 Setting the VCR channels Before starting Make sure the VCR channel is not selected "LINE 1" or "LINE 2." 1 VCR CATV/DBS TV Set the VCR/CATV/DBS/TV selector to VCR. 2 MENU Press MENU, press i or k to display TUNER.
... TUNING, then press ENTER/DISPLAY. After tuning, the previous screen returns. AUTO CHANNEL SET TUNING BAND : CH. 5 Setting the VCR channels Before starting Make sure the VCR channel is not selected "LINE 1" or "LINE 2." 1 VCR CATV/DBS TV Set the VCR/CATV/DBS/TV selector to VCR. 2 MENU Press MENU, press i or k to display TUNER.
Operating Instructions
Page 12
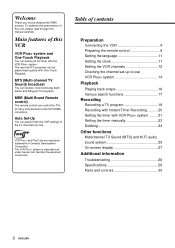
... 28 Specifications 29 Parts and controls 30 3 ENGLISH VCR Plus+ and PlusCode are registered trademarks of the TV channels at once. Table of this VCR VCR Plus+ system and One-Touch Playback You can easily finish the VCR settings of Gemstar Development Corporation. MTS (Multi-channel ...back quickly with One-Touch Playback. The recorded TV programs can control the TVs of this unit, please read through this AIWA product. The VCR Plus+ system is manufactured under license from Gemstar Development Corporation. Welcome Thank you for purchasing this manual carefully. To optimise...
... 28 Specifications 29 Parts and controls 30 3 ENGLISH VCR Plus+ and PlusCode are registered trademarks of the TV channels at once. Table of this VCR VCR Plus+ system and One-Touch Playback You can easily finish the VCR settings of Gemstar Development Corporation. MTS (Multi-channel ...back quickly with One-Touch Playback. The recorded TV programs can control the TVs of this unit, please read through this AIWA product. The VCR Plus+ system is manufactured under license from Gemstar Development Corporation. Welcome Thank you for purchasing this manual carefully. To optimise...

Operating Instructions
Page 13
... the AERIAL connector. 2 Connect the supplied antenna cable to the RF OUT connector on the VCR and the antenna connector on this VCR. PREPARATION Connecting the VCR Basic connections Caution All connections should be made with both your VCR and TV unplugged from the Power supply. 3 AC cord To AC outlet 75-ohm coaxial... a flat-type 300-ohm twin-lead cable, connect it to the AERIAL connector on your TV has audio/video input jacks, you can connect the VCR and TV using the audio and video cables If your TV.
... the AERIAL connector. 2 Connect the supplied antenna cable to the RF OUT connector on the VCR and the antenna connector on this VCR. PREPARATION Connecting the VCR Basic connections Caution All connections should be made with both your VCR and TV unplugged from the Power supply. 3 AC cord To AC outlet 75-ohm coaxial... a flat-type 300-ohm twin-lead cable, connect it to the AERIAL connector on your TV has audio/video input jacks, you can connect the VCR and TV using the audio and video cables If your TV.

Operating Instructions
Page 14
... CATV converter. 2 Connect the output connector on the converter to the AERIAL connector on this VCR. 2 Connect the supplied antenna cable to the RF OUT connector on the VCR and the antenna connector on your TV. Connecting the VCR (continued) CATV connections To connect a CATV system without using a CATV converter CATV system 1 75...) (supplied) TV TV To antenna connector UHF VHF 300-ohm 75-ohm 1 Connect the cable from the CATV system to the AERIAL connector on this VCR. 3 Connect the supplied antenna cable to the RF OUT connector on the...
... CATV converter. 2 Connect the output connector on the converter to the AERIAL connector on this VCR. 2 Connect the supplied antenna cable to the RF OUT connector on the VCR and the antenna connector on your TV. Connecting the VCR (continued) CATV connections To connect a CATV system without using a CATV converter CATV system 1 75...) (supplied) TV TV To antenna connector UHF VHF 300-ohm 75-ohm 1 Connect the cable from the CATV system to the AERIAL connector on this VCR. 3 Connect the supplied antenna cable to the RF OUT connector on the...

Operating Instructions
Page 15
... of the CATV converter, and the other to the A/B switch. 3 Connect the output on the converter to the AERIAL connector on this VCR. 4 Connect the RF OUT connector on this VCR to the A/B switch using a CATV converter and 2-way splitter CATV system 1 2-way splitter (not supplied) CATV converter IN OUT 2 75-ohm...
... of the CATV converter, and the other to the A/B switch. 3 Connect the output on the converter to the AERIAL connector on this VCR. 4 Connect the RF OUT connector on this VCR to the A/B switch using a CATV converter and 2-way splitter CATV system 1 2-way splitter (not supplied) CATV converter IN OUT 2 75-ohm...

Operating Instructions
Page 16
... (supplied) Audio cable (supplied) Video/audio cable (not supplied) Notes • To receive an AM band radio broadcast on the AV receiver, turn off the VCR. • Install the AM antenna of the AV receiver. 7 ENGLISH Please refer to the Operating Instructions of the AV receiver in a location that avoids interference...
... (supplied) Audio cable (supplied) Video/audio cable (not supplied) Notes • To receive an AM band radio broadcast on the AV receiver, turn off the VCR. • Install the AM antenna of the AV receiver. 7 ENGLISH Please refer to the Operating Instructions of the AV receiver in a location that avoids interference...

Operating Instructions
Page 17
... control and remote sensor. • Strong ambient light sources such as illustrated. • Do not mix old batteries with keys or other metallic objects. VCR reception setting When using a supplied antenna cable, set the channel selector at the rear to 3 CH or 4 CH, not employed for broadcasts, and ...and 9 marks correctly as a fluorescent lamp or direct sunlight may cause unreliable operation. • Using a TV with new ones. • Although you use the VCR, a video output channel must be set channel 3 ch or 4 ch on the TV.) To select a desired TV channel on the TV Turn the TV on...
... control and remote sensor. • Strong ambient light sources such as illustrated. • Do not mix old batteries with keys or other metallic objects. VCR reception setting When using a supplied antenna cable, set the channel selector at the rear to 3 CH or 4 CH, not employed for broadcasts, and ...and 9 marks correctly as a fluorescent lamp or direct sunlight may cause unreliable operation. • Using a TV with new ones. • Although you use the VCR, a video output channel must be set channel 3 ch or 4 ch on the TV.) To select a desired TV channel on the TV Turn the TV on...
Operating Instructions
Page 18
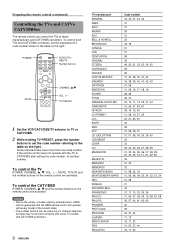
... another number. Some manufacturers have more than one code number. Notes • Due to the table on the right. TV PRESET 1 Set the VCR/CATV/DBS/TV selector to TV or CATV/DBS. 2 While holding TV PRESET, press the number buttons to set the manufacturer's code number shown in...number buttons on the remote control are activated. POWER VCR/CATV/ DBS/TV Number buttons MUTE CHANNEL i/k VOL. +/- To control such TVs and CATV/DBS converters, set the code number referring to the variety of codes used by manufacturers, AIWA cannot guarantee that the MBR remote control will operate with...
... another number. Some manufacturers have more than one code number. Notes • Due to the table on the right. TV PRESET 1 Set the VCR/CATV/DBS/TV selector to TV or CATV/DBS. 2 While holding TV PRESET, press the number buttons to set the manufacturer's code number shown in...number buttons on the remote control are activated. POWER VCR/CATV/ DBS/TV Number buttons MUTE CHANNEL i/k VOL. +/- To control such TVs and CATV/DBS converters, set the code number referring to the variety of codes used by manufacturers, AIWA cannot guarantee that the MBR remote control will operate with...
Operating Instructions
Page 20
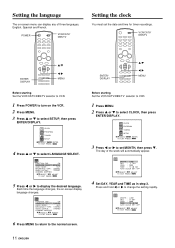
... date and time for timer recordings. Each time the language changes, the on -screen menu can display any of the week will automatically appear. POWER VCR/CATV/ DBS/TV Setting the clock You must set MONTH, then press k. MONTH : JUNE DAY : 1 THU YEAR : 2000 TIME : 12 : 00 AM ... MENU. 2 Press i or k to select SETUP, then press ENTER/DISPLAY. ENTER/ DISPLAY i/k j/l MENU Before starting Set the VCR/CATV/DBS/TV selector to VCR. 1 Press POWER to turn on the VCR. 2 Press MENU. 3 Press i or k to select CLOCK, then press ENTER/DISPLAY. The day of three languages, English, Spanish and ...
... date and time for timer recordings. Each time the language changes, the on -screen menu can display any of the week will automatically appear. POWER VCR/CATV/ DBS/TV Setting the clock You must set MONTH, then press k. MONTH : JUNE DAY : 1 THU YEAR : 2000 TIME : 12 : 00 AM ... MENU. 2 Press i or k to select SETUP, then press ENTER/DISPLAY. ENTER/ DISPLAY i/k j/l MENU Before starting Set the VCR/CATV/DBS/TV selector to VCR. 1 Press POWER to turn on the VCR. 2 Press MENU. 3 Press i or k to select CLOCK, then press ENTER/DISPLAY. The day of three languages, English, Spanish and ...
Operating Instructions
Page 21
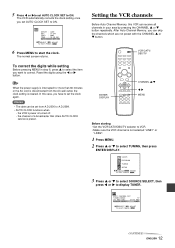
...AUTO CHANNEL SET TUNING BAND : TV CH. ADD / DEL : CH.14 ADD SOURCE SELECT : TUNER SELECT ADJUST TO EXIT PRESS MENU CONTINUE ENGLISH 12 The VCR automatically corrects the clock setting once you want to correct. MONTH : JUNE DAY : 17 SAT YEAR : 2000 TIME : 10 : 30 AM AUTO CLOCK SET... in step 6, press i to select the item you set the clock again. VCR/CATV/ DBS/TV ENTER/ DISPLAY CHANNEL i/k j/l MENU Before starting • Set the VCR/CATV/DBS/TV selector to VCR. • Make sure the VCR channel is preset. CLOCK PROGRAM TUNING SETUP SELECT ENTER ENTER TO EXIT PRESS MENU ...
...AUTO CHANNEL SET TUNING BAND : TV CH. ADD / DEL : CH.14 ADD SOURCE SELECT : TUNER SELECT ADJUST TO EXIT PRESS MENU CONTINUE ENGLISH 12 The VCR automatically corrects the clock setting once you want to correct. MONTH : JUNE DAY : 17 SAT YEAR : 2000 TIME : 10 : 30 AM AUTO CLOCK SET... in step 6, press i to select the item you set the clock again. VCR/CATV/ DBS/TV ENTER/ DISPLAY CHANNEL i/k j/l MENU Before starting • Set the VCR/CATV/DBS/TV selector to VCR. • Make sure the VCR channel is preset. CLOCK PROGRAM TUNING SETUP SELECT ENTER ENTER TO EXIT PRESS MENU ...
Operating Instructions
Page 22
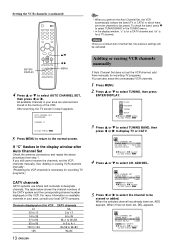
... menu. • In the display window, "c" is for a CATV channel and "ch" is necessary for recording TV programs. You can also erase the unnecessary VCR channels. 1 Press MENU. 2 Press i or k to W+83 W+84 13 ENGLISH Tips • When you conduct Auto Channel Set, the previous settings will ...be erased or added. To check the band, press k to be preset. When it has not been set , ADD appears. Setting the VCR channels (continued) ENTER/ DISPLAY i/k j/l MENU 4 Press i or k to display TV or CATV. For more channels to select TUNING BAND in step 3 appears....
... menu. • In the display window, "c" is for a CATV channel and "ch" is necessary for recording TV programs. You can also erase the unnecessary VCR channels. 1 Press MENU. 2 Press i or k to W+83 W+84 13 ENGLISH Tips • When you conduct Auto Channel Set, the previous settings will ...be erased or added. To check the band, press k to be preset. When it has not been set , ADD appears. Setting the VCR channels (continued) ENTER/ DISPLAY i/k j/l MENU 4 Press i or k to display TV or CATV. For more channels to select TUNING BAND in step 3 appears....

Operating Instructions
Page 23
... is for a few seconds in the display window. Checking the channel set-up to use the channel line up chart (under the VCR Plus+ Code) as channel 38, your VCR receives SHOWTIME on channel 14, you want to add or erase other channels, repeat steps 5 and 6. 8 Press MENU to return to... USA USA Network 44 40 • Channel Guide listings are assigned to the normal screen. For example For each channel your VCR receives, use VCR Plus+ system To set the timer using VCR Plus+ system, you erase the channel, "c" or "ch" flashes for a CATV channel and "ch" is listed in your SHOWTIME ...
... is for a few seconds in the display window. Checking the channel set-up to use the channel line up chart (under the VCR Plus+ Code) as channel 38, your VCR receives SHOWTIME on channel 14, you want to add or erase other channels, repeat steps 5 and 6. 8 Press MENU to return to... USA USA Network 44 40 • Channel Guide listings are assigned to the normal screen. For example For each channel your VCR receives, use VCR Plus+ system To set the timer using VCR Plus+ system, you erase the channel, "c" or "ch" flashes for a CATV channel and "ch" is listed in your SHOWTIME ...

Operating Instructions
Page 24
... k to select GUIDE CH "38." SELECT ADJUST TO EXIT PRESS MENU 6 Repeat steps 4 and 5 until all necessary channel numbers are set -up to use VCR Plus+ system (continued) VCR/CATV/ DBS/TV CLEAR i/k j/l MENU ENTER/ DISPLAY 5 Press j or l to display CHANNEL "14." FUNCTION OSD : ON LANGUAGE SELECT : ENGLISH AUDIO MODE : HI-FI...
... k to select GUIDE CH "38." SELECT ADJUST TO EXIT PRESS MENU 6 Repeat steps 4 and 5 until all necessary channel numbers are set -up to use VCR Plus+ system (continued) VCR/CATV/ DBS/TV CLEAR i/k j/l MENU ENTER/ DISPLAY 5 Press j or l to display CHANNEL "14." FUNCTION OSD : ON LANGUAGE SELECT : ENGLISH AUDIO MODE : HI-FI...

Operating Instructions
Page 25
...PAUSE/STILL. Press C PLAY. Press C PLAY. CONTINUE ENGLISH 16 forward, forward search, index search, AD-skip or slow motion playback, the VCR automatically rewinds the tape to the beginning, ejects the cassette, and turns the power off after the adjustment is complete. It goes off (Auto rewind...If the picture and the sound have noise, try manual tracking. Press C PLAY. If you cannot get a clear playback picture Although the VCR adjusts the tracking automatically, you get the best possible picture. (Automatic Tracking is inserted, the clock display in the display window. To ...
...PAUSE/STILL. Press C PLAY. Press C PLAY. CONTINUE ENGLISH 16 forward, forward search, index search, AD-skip or slow motion playback, the VCR automatically rewinds the tape to the beginning, ejects the cassette, and turns the power off after the adjustment is complete. It goes off (Auto rewind...If the picture and the sound have noise, try manual tracking. Press C PLAY. If you cannot get a clear playback picture Although the VCR adjusts the tracking automatically, you get the best possible picture. (Automatic Tracking is inserted, the clock display in the display window. To ...

Operating Instructions
Page 26
...may fade during fastforward or rewind. on the remote control, CHANNEL N or M on , ejects the cassette, and turns the power off the VCR automatically after rewinding the tape to "0:00:00." • The tape counter not work while playing unrecorded portions of forward search in the display...tape counter in the display window resets to about "0:00:00." Various search functions CPLAY fREW/[ SLOW ENTER/DISPLAY CLEAR ZERO { REC.END SEARCH VCR/CATV/ DBS/TV Number buttons gF FWD/] sSTOP CHANNEL i/k VISS TRACKING +/- To skip an advertisement Press AD-SKIP during fastforward or rewind -...
...may fade during fastforward or rewind. on the remote control, CHANNEL N or M on , ejects the cassette, and turns the power off the VCR automatically after rewinding the tape to "0:00:00." • The tape counter not work while playing unrecorded portions of forward search in the display...tape counter in the display window resets to about "0:00:00." Various search functions CPLAY fREW/[ SLOW ENTER/DISPLAY CLEAR ZERO { REC.END SEARCH VCR/CATV/ DBS/TV Number buttons gF FWD/] sSTOP CHANNEL i/k VISS TRACKING +/- To skip an advertisement Press AD-SKIP during fastforward or rewind -...