

Operating Instructions
Page 3
... all of the VCR to the AC outlet. Antenna input connector Antenna cable (supplied) TV antenna cable (not supplied) AC outlet AERIAL R AUDIO L VIDEO OUT OUT (MONO) IN IN LINE 1 (VHF/UHF) RF OUT Audio/video input jacks Video cable (supplied) Audio cable (supplied) 4 Connect the AC cord of the connections are complete. AC cord 3 If your TV has audio/video input jacks, connect the VCR and TV using only an antenna cable Set the channel selector to...
... all of the VCR to the AC outlet. Antenna input connector Antenna cable (supplied) TV antenna cable (not supplied) AC outlet AERIAL R AUDIO L VIDEO OUT OUT (MONO) IN IN LINE 1 (VHF/UHF) RF OUT Audio/video input jacks Video cable (supplied) Audio cable (supplied) 4 Connect the AC cord of the connections are complete. AC cord 3 If your TV has audio/video input jacks, connect the VCR and TV using only an antenna cable Set the channel selector to...
Operating Instructions
Page 11
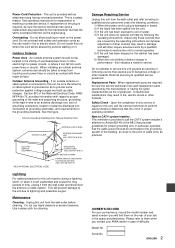
... Service Unplug this unit where the cord will find them when you to keep from the wall outlet and disconnect the antenna or cable system. Upon the completion of overhead power lines or other hazards. OWNER'S RECORD For your convenience, record the model number and serial number (you will be sure the service technician has used replacement parts specified by following conditions: 1) When the power cord or plug is connected...
... Service Unplug this unit where the cord will find them when you to keep from the wall outlet and disconnect the antenna or cable system. Upon the completion of overhead power lines or other hazards. OWNER'S RECORD For your convenience, record the model number and serial number (you will be sure the service technician has used replacement parts specified by following conditions: 1) When the power cord or plug is connected...
Operating Instructions
Page 12
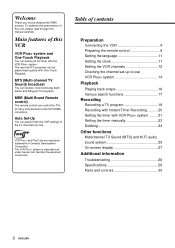
..., record and play back stereo and bilingual TV programs. MBR (Multi Brand Remote control) The remote control can easily finish the VCR settings of contents Preparation Connecting the VCR 4 Preparing the remote control 8 Setting the language 11 Setting the clock 11 Setting the VCR channels 12 Checking the channel set the timer with VCR Plus+ system .........21 Setting the timer manually 23 Dubbing 24 Other functions Multichannel TV Sound (MTS) and Hi-Fi audio sound system 25 On-screen display 27 Additional information Troubleshooting 28 Specifications 29 Parts...
..., record and play back stereo and bilingual TV programs. MBR (Multi Brand Remote control) The remote control can easily finish the VCR settings of contents Preparation Connecting the VCR 4 Preparing the remote control 8 Setting the language 11 Setting the clock 11 Setting the VCR channels 12 Checking the channel set the timer with VCR Plus+ system .........21 Setting the timer manually 23 Dubbing 24 Other functions Multichannel TV Sound (MTS) and Hi-Fi audio sound system 25 On-screen display 27 Additional information Troubleshooting 28 Specifications 29 Parts...

Operating Instructions
Page 17
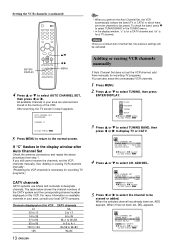
... of infrared remote control facing the same direction may not operate when there is 7 meters. TV/VCR Note Remove the batteries when they have no more power, or when you use the VCR, a video output channel must be set channel 3 ch or 4 ch on the TV.) To select a desired TV channel on the TV Turn the TV on and turn the TV and VCR on, and select the video input mode on...
... of infrared remote control facing the same direction may not operate when there is 7 meters. TV/VCR Note Remove the batteries when they have no more power, or when you use the VCR, a video output channel must be set channel 3 ch or 4 ch on the TV.) To select a desired TV channel on the TV Turn the TV on and turn the TV and VCR on, and select the video input mode on...
Operating Instructions
Page 20
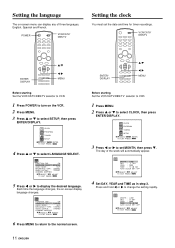
... VCR. 1 Press POWER to turn on -screen display language changes. MONTH : JUNE DAY : 1 THU YEAR : 2000 TIME : 12 : 00 AM AUTO CLOCK SET : OFF SELECT ADJUST TO EXIT PRESS MENU 4 Set DAY, YEAR and TIME as in step 3. Each time the language changes, the on the VCR. 2 Press MENU. 3 Press i or k to set the date and time for timer recordings. FUNCTION OSD : ON LANGUAGE SELECT : ENGLISH AUDIO MODE : HI-FI BROADCAST TYPE : STEREO AUDIO OUTPUT : STEREO CHANNEL MAPPING SELECT ADJUST TO EXIT PRESS MENU 6 Press MENU...
... VCR. 1 Press POWER to turn on -screen display language changes. MONTH : JUNE DAY : 1 THU YEAR : 2000 TIME : 12 : 00 AM AUTO CLOCK SET : OFF SELECT ADJUST TO EXIT PRESS MENU 4 Set DAY, YEAR and TIME as in step 3. Each time the language changes, the on the VCR. 2 Press MENU. 3 Press i or k to set the date and time for timer recordings. FUNCTION OSD : ON LANGUAGE SELECT : ENGLISH AUDIO MODE : HI-FI BROADCAST TYPE : STEREO AUDIO OUTPUT : STEREO CHANNEL MAPPING SELECT ADJUST TO EXIT PRESS MENU 6 Press MENU...
Operating Instructions
Page 21
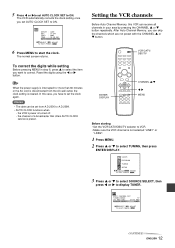
... SAT YEAR : 2000 TIME : 10 : 30 AM AUTO CLOCK SET : ON SELECT ADJUST TO EXIT PRESS MENU 6 Press MENU to display TUNER. To correct the digits while setting Before pressing MENU in your area by pressing the CHANNEL i or k button repeatedly. Tip When the power supply is interrupted for more than 60 minutes or the AC cord is disconnected from A.D.2000 to A.D.2099. • AUTO CLOCK functions when - CLOCK PROGRAM TUNING SETUP SELECT...
... SAT YEAR : 2000 TIME : 10 : 30 AM AUTO CLOCK SET : ON SELECT ADJUST TO EXIT PRESS MENU 6 Press MENU to display TUNER. To correct the digits while setting Before pressing MENU in your area by pressing the CHANNEL i or k button repeatedly. Tip When the power supply is interrupted for more than 60 minutes or the AC cord is disconnected from A.D.2000 to A.D.2099. • AUTO CLOCK functions when - CLOCK PROGRAM TUNING SETUP SELECT...
Operating Instructions
Page 22
... : TUNER SELECT ADJUST TO EXIT PRESS MENU 4 Press i or k to select TUNING, then press ENTER/DISPLAY. AUTO CHANNEL SET TUNING BAND : CATV CH. If "C" flashes in step 3 appears. See "Adding or erasing VCR channels manually". (Presetting the VCR channels is for a TV channel. The table below shows the channel numbers of the VCR. Note Once you still cannot receive the channels, set the VCR channel, add them manually for recording TV programs.) CATV channels...
... : TUNER SELECT ADJUST TO EXIT PRESS MENU 4 Press i or k to select TUNING, then press ENTER/DISPLAY. AUTO CHANNEL SET TUNING BAND : CATV CH. If "C" flashes in step 3 appears. See "Adding or erasing VCR channels manually". (Presetting the VCR channels is for a TV channel. The table below shows the channel numbers of the VCR. Note Once you still cannot receive the channels, set the VCR channel, add them manually for recording TV programs.) CATV channels...

Operating Instructions
Page 23
... channel set the timer using VCR Plus+ system, you have to check whether the VCR channel numbers match the guide channels which are available in the channel line up chart (under the VCR Plus+ Code) as channel 38, your VCR receives, use the channel line up to use VCR Plus+ system To set -up chart to check that the channel numbers match. For example For each channel your VCR receives SHOWTIME on channel 14, you need to add or erase the channel...
... channel set the timer using VCR Plus+ system, you have to check whether the VCR channel numbers match the guide channels which are available in the channel line up chart (under the VCR Plus+ Code) as channel 38, your VCR receives, use the channel line up to use VCR Plus+ system To set -up chart to check that the channel numbers match. For example For each channel your VCR receives SHOWTIME on channel 14, you need to add or erase the channel...

Operating Instructions
Page 26
... to a specific point - on the remote control, CHANNEL N or M on the tape, noise lines may appear or color may fade during playback. Playing back a tape (continued) POWER fREW/[ aPAUSE/STILL zEJECT gF FWD/] CHANNEL i/k AD-SKIP TRACKING +/- Release the button to return to "0:00:00." • The tape counter not work while playing unrecorded portions of the recorded time. Tips • If you press z EJECT while the power is reset to...
... to a specific point - on the remote control, CHANNEL N or M on the tape, noise lines may appear or color may fade during playback. Playing back a tape (continued) POWER fREW/[ aPAUSE/STILL zEJECT gF FWD/] CHANNEL i/k AD-SKIP TRACKING +/- Release the button to return to "0:00:00." • The tape counter not work while playing unrecorded portions of the recorded time. Tips • If you press z EJECT while the power is reset to...

Operating Instructions
Page 28
... TV screen when marking an index signal. "RECP" appears on the VCR, or number buttons to select the channel to select the input channel, press 0/INPUT twice. • The channel cannot be changed during playback, press a PAUSE/STILL, and w REC/ITR, then a PAUSE/STILL. If you want to record the program through the line input, press 0/INPUT,CHANNEL i, k on the remote control, CHANNEL N or M on the VCR continuously to display "LINE1" (from AUDIO/VIDEO...
... TV screen when marking an index signal. "RECP" appears on the VCR, or number buttons to select the channel to select the input channel, press 0/INPUT twice. • The channel cannot be changed during playback, press a PAUSE/STILL, and w REC/ITR, then a PAUSE/STILL. If you want to record the program through the line input, press 0/INPUT,CHANNEL i, k on the remote control, CHANNEL N or M on the VCR continuously to display "LINE1" (from AUDIO/VIDEO...
Operating Instructions
Page 29
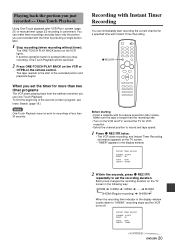
... use Index Search (page 18.) Note One-Touch Playback does not work for more than 30 seconds. The ONE-TOUCH PLAY BACK button on the TV screen in place. Make sure the tape is longer than the recording time. • Turn on the TV screen. • "TIMER" appears in the display window counts down to the start recording the current channel for VCR reception. • Select the channel...
... use Index Search (page 18.) Note One-Touch Playback does not work for more than 30 seconds. The ONE-TOUCH PLAY BACK button on the TV screen in place. Make sure the tape is longer than the recording time. • Turn on the TV screen. • "TIMER" appears in the display window counts down to the start recording the current channel for VCR reception. • Select the channel...

Operating Instructions
Page 30
... VCR clock is selected. 1 Press VCR PLUS+. 2 Enter the PlusCode of the TV program you want to record is set the TV for VCR reception. • Set the VCR/CATV/DBS/TV selector to VCR. • If the CATV converter is used for the timer recording, check that the VCR channel numbers match the guide channels which assigned to record using the number buttons. Make sure the tape is longer than the recording time. • Turn on the VCR...
... VCR clock is selected. 1 Press VCR PLUS+. 2 Enter the PlusCode of the TV program you want to record is set the TV for VCR reception. • Set the VCR/CATV/DBS/TV selector to VCR. • If the CATV converter is used for the timer recording, check that the VCR channel numbers match the guide channels which assigned to record using the number buttons. Make sure the tape is longer than the recording time. • Turn on the VCR...

Operating Instructions
Page 31
... : 7 : 30 AM CHANNEL : 41 T V SPEED : AUTO REPEAT : ONCE SELECT ADJUST TO EXIT PRESS MENU 6 If you select AUTO in step 4. • When the tape reaches the end during timer recording, "TIMER" flashes in indicator flashes, a cassette is cleared. The program which has a lower program number has priority over the succeeding as every Friday DAILY: for a weekly program such as illustrated. 3 Press ENTER/DISPLAY. • The timer information appears...
... : 7 : 30 AM CHANNEL : 41 T V SPEED : AUTO REPEAT : ONCE SELECT ADJUST TO EXIT PRESS MENU 6 If you select AUTO in step 4. • When the tape reaches the end during timer recording, "TIMER" flashes in indicator flashes, a cassette is cleared. The program which has a lower program number has priority over the succeeding as every Friday DAILY: for a weekly program such as illustrated. 3 Press ENTER/DISPLAY. • The timer information appears...
Operating Instructions
Page 32
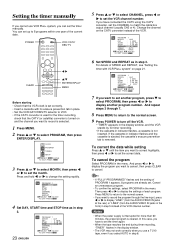
... : CHANNEL : SPEED : REPEAT : SELECT ADJUST TO EXIT PRESS MENU 4 Set DAY, START time and STOP time as in the menu. In this case, you have connected the CATV using the CATV converter, set the CHANNEL to match the cable box output channel (usually CH3 or 4). If you select AUTO in step 6. Change the channel on page 21. To cancel the program Select PROGRAM in the menu. For details of the VCR. You can set the timer manually. Setting...
... : CHANNEL : SPEED : REPEAT : SELECT ADJUST TO EXIT PRESS MENU 4 Set DAY, START time and STOP time as in the menu. In this case, you have connected the CATV using the CATV converter, set the CHANNEL to match the cable box output channel (usually CH3 or 4). If you select AUTO in step 6. Change the channel on page 21. To cancel the program Select PROGRAM in the menu. For details of the VCR. You can set the timer manually. Setting...
Operating Instructions
Page 33
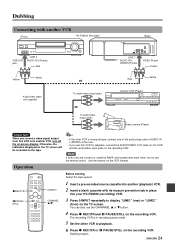
... mode. 5 Set the other , do not use the remote control. Use the buttons on the tape. You can also use this VCR for playback, connect the AUDIO/VIDEO OUT jacks on this VCR onto another VCR (Front) HV-FX9000 (Recorder) VIDEO IN jack LINE 2 AUDIO IN L/R jacks Red (Rear) AERIAL (VHF/UHF) RF OUT LINE 1 AUDIO IN L (MONO)/R jacks VIDEO IN jack Yellow White Yellow or White Red Audio/video cable (not supplied) To audio/video output jacks or To audio/video output jacks Another VCR (Player) Video camera (Player...
... mode. 5 Set the other , do not use the remote control. Use the buttons on the tape. You can also use this VCR for playback, connect the AUDIO/VIDEO OUT jacks on this VCR onto another VCR (Front) HV-FX9000 (Recorder) VIDEO IN jack LINE 2 AUDIO IN L/R jacks Red (Rear) AERIAL (VHF/UHF) RF OUT LINE 1 AUDIO IN L (MONO)/R jacks VIDEO IN jack Yellow White Yellow or White Red Audio/video cable (not supplied) To audio/video output jacks or To audio/video output jacks Another VCR (Player) Video camera (Player...
Operating Instructions
Page 34
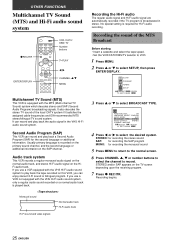
... channel. No special setting is broadcasted in the VHS Hi-Fi audio sound system. FUNCTION OSD : ON LANGUAGE SELECT : ENGLISH AUDIO MODE : HI-FI BROADCAST TYPE : STEREO AUDIO OUTPUT : STEREO CHANNEL MAPPING SELECT ADJUST TO EXIT PRESS MENU 4 Press j or l to select SETUP, then press ENTER/DISPLAY. It can record and play back a Second Audio Program (SAP) for recording the monaural sound 5 Press MENU to return to the normal screen. 6 Press CHANNEL i, k or number buttons to select the channel...
... channel. No special setting is broadcasted in the VHS Hi-Fi audio sound system. FUNCTION OSD : ON LANGUAGE SELECT : ENGLISH AUDIO MODE : HI-FI BROADCAST TYPE : STEREO AUDIO OUTPUT : STEREO CHANNEL MAPPING SELECT ADJUST TO EXIT PRESS MENU 4 Press j or l to select SETUP, then press ENTER/DISPLAY. It can record and play back a Second Audio Program (SAP) for recording the monaural sound 5 Press MENU to return to the normal screen. 6 Press CHANNEL i, k or number buttons to select the channel...

Operating Instructions
Page 36
... Operation mode Tape speed STOP HI-FI SP CH 4 STEREO Channel number Broadcast type Caution When you set FUNCTION OSD to OFF, you can check the clock, tape counter and the remaining tape length in EP mode. Each press changes the on the TV screen. 27 ENGLISH Current date JUN 17, SAT 2:15 PM Current time/tape counter/ remaining tape length Changing the on -screen display. Tips • Even if you record a video signal output...
... Operation mode Tape speed STOP HI-FI SP CH 4 STEREO Channel number Broadcast type Caution When you set FUNCTION OSD to OFF, you can check the clock, tape counter and the remaining tape length in EP mode. Each press changes the on the TV screen. 27 ENGLISH Current date JUN 17, SAT 2:15 PM Current time/tape counter/ remaining tape length Changing the on -screen display. Tips • Even if you record a video signal output...

Operating Instructions
Page 37
... internal microprocessor. The remote control does not operate. • Replace both batteries with the VCR are correct and secure. Set the TV to the TV stations. Then connect it again. The timer does not operate. • Set the VCR clock correctly. • Check that the VCR channel numbers match the guide channels which assigned to the video channel or video input. ENGLISH 28 Wait for about two hours until the unit is moved from the...
... internal microprocessor. The remote control does not operate. • Replace both batteries with the VCR are correct and secure. Set the TV to the TV stations. Then connect it again. The timer does not operate. • Set the VCR clock correctly. • Check that the VCR channel numbers match the guide channels which assigned to the video channel or video input. ENGLISH 28 Wait for about two hours until the unit is moved from the...

Operating Instructions
Page 38
... SP) Operating temperature 5°C to 35°C Power requirements Power consumption 120 V AC, 60 Hz 15 W TYP 3W (stand by mode) Dimensions Weight Supplied accessories 430 (W) × 102 (H) × 283 (D) mm (17 × 41/8 × 111/4 in.) 3.9 Kg (8.58 lbs.) Antenna cable (1) Batteries (2) Remote control (1) Audio cable (1) Video cable (1) Design and specifications are subject to change without notice for the purpose of the following measures: 29 ENGLISH - However...
... SP) Operating temperature 5°C to 35°C Power requirements Power consumption 120 V AC, 60 Hz 15 W TYP 3W (stand by mode) Dimensions Weight Supplied accessories 430 (W) × 102 (H) × 283 (D) mm (17 × 41/8 × 111/4 in.) 3.9 Kg (8.58 lbs.) Antenna cable (1) Batteries (2) Remote control (1) Audio cable (1) Video cable (1) Design and specifications are subject to change without notice for the purpose of the following measures: 29 ENGLISH - However...

Operating Instructions
Page 39
...)/[ button C PLAY button gF FWD (Fastforward)/] button = ONE-TOUCH PLAY BACK button s STOP button a PAUSE/STILL button w REC (Recording)/ITR (Instant Timer Recording) button Remote sensor Display window VCR indicator Timer indicator REC (Recording) indicator Tape speed indicator Cassette-in indicator REC TIMER VCR SP LP EP REM SAP Hi-Fi ST Remaining tape length indicator SAP (Second Audio Program) indicator Hi-Fi indicator lights up when a Hi-Fi sound is being reproduced ST (Stereo) indicator Clock/Tape counter/Tape operation indication CONTINUE ENGLISH...
...)/[ button C PLAY button gF FWD (Fastforward)/] button = ONE-TOUCH PLAY BACK button s STOP button a PAUSE/STILL button w REC (Recording)/ITR (Instant Timer Recording) button Remote sensor Display window VCR indicator Timer indicator REC (Recording) indicator Tape speed indicator Cassette-in indicator REC TIMER VCR SP LP EP REM SAP Hi-Fi ST Remaining tape length indicator SAP (Second Audio Program) indicator Hi-Fi indicator lights up when a Hi-Fi sound is being reproduced ST (Stereo) indicator Clock/Tape counter/Tape operation indication CONTINUE ENGLISH...


