
Operating Instructions
Page 2
... not in the Operating instructions and on a bed, rug, or similar surface that proper heat ventilation is cooled by the AC power plug. The heating system has just been turned on the CD pickup lens when: - Please refer to them when you contact your convenience, record the model number (you will find it in the battery compartment) in the space...
... not in the Operating instructions and on a bed, rug, or similar surface that proper heat ventilation is cooled by the AC power plug. The heating system has just been turned on the CD pickup lens when: - Please refer to them when you contact your convenience, record the model number (you will find it in the battery compartment) in the space...
Operating Instructions
Page 3
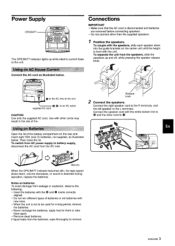
... level with the white broken line to 0 and the other than the supplied speakers. The OPE/BATT indicator lights up and off, while pressing the speaker release knob. To couple with the speakers, slide each speaker down , volume decreases, or sound is disconnected and batteries are removed before connecting speakers. ENGLISH 3 Power Supply OPE/BATl- Re I knob I Connect the speakers. Connect the speaker cord with the unit...
... level with the white broken line to 0 and the other than the supplied speakers. The OPE/BATT indicator lights up and off, while pressing the speaker release knob. To couple with the speakers, slide each speaker down , volume decreases, or sound is disconnected and batteries are removed before connecting speakers. ENGLISH 3 Power Supply OPE/BATl- Re I knob I Connect the speakers. Connect the speaker cord with the unit...

Operating Instructions
Page 4
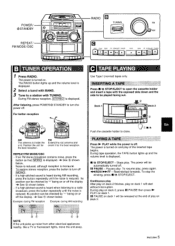
... program other tracks. 4 Press E/n to start play of tracks and total playing time are displayed. 3 Press F/n PLAY/PAUSE to open the disc compartment. q Do not touch the lens. Pauses play . Repeats a single track or all the steps again. NOTE q Do not use irregular shape CDs (example: heart-shaped, octagonal ones). Select as follows. q Do not try to start play when the power is turned on and the CD button lights up...
... program other tracks. 4 Press E/n to start play of tracks and total playing time are displayed. 3 Press F/n PLAY/PAUSE to open the disc compartment. q Do not touch the lens. Pauses play . Repeats a single track or all the steps again. NOTE q Do not use irregular shape CDs (example: heart-shaped, octagonal ones). Select as follows. q Do not try to start play when the power is turned on and the CD button lights up...
Operating Instructions
Page 5
.... REPEAT/FM MODE/OSC If an FM stereo broadcast contains noise, press the button so that ~0~ is inside the unit. To restore stereo recept"~n, press the button to turn off . If a high-pitched :jound is heard during AM recording Press * PLAY while the power is off . Rewinds/fast forwards. For better reception Use Type I (normal) tapes only. Press WA STOP/EJECT to open the cassette...
.... REPEAT/FM MODE/OSC If an FM stereo broadcast contains noise, press the button so that ~0~ is inside the unit. To restore stereo recept"~n, press the button to turn off . If a high-pitched :jound is heard during AM recording Press * PLAY while the power is off . Rewinds/fast forwards. For better reception Use Type I (normal) tapes only. Press WA STOP/EJECT to open the cassette...

Operating Instructions
Page 6
... q REC POWER/(!) STANDBY/TAPE, RADIO, CD q Use Type I (normal) tapes only. To record from the television. To stop recording, press H/A STOP/EJECT on the tape again, cover the tab openings with adhesive tape, etc. 6 ENGLISH To pause recording, press 1I PAUSE. The HIGH SPEED normal speed. Move the unit away from a CD, press CD and load the disc. To stop recording, press WA on the cassette tape with the...
... q REC POWER/(!) STANDBY/TAPE, RADIO, CD q Use Type I (normal) tapes only. To record from the television. To stop recording, press H/A STOP/EJECT on the tape again, cover the tab openings with adhesive tape, etc. 6 ENGLISH To pause recording, press 1I PAUSE. The HIGH SPEED normal speed. Move the unit away from a CD, press CD and load the disc. To stop recording, press WA on the cassette tape with the...
Operating Instructions
Page 7
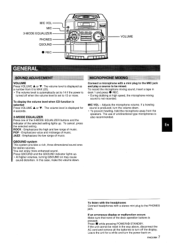
... the volume level is displayed as a number from the speakers. Leave the unit for stereo sources. If a howling sound is not recorded. To listen with the headphones Connect headphones with a mini plug to the MIC jack and play a source to turn the volume down . q The volume level is automatically set to 15 or more enhanced sound. q To prevent howling, hold the microphone away from O to the PHONES jack. Adjusts the microphone volume. ROCK...
... the volume level is displayed as a number from the speakers. Leave the unit for stereo sources. If a howling sound is not recorded. To listen with the headphones Connect headphones with a mini plug to the MIC jack and play a source to turn the volume down . q The volume level is automatically set to 15 or more enhanced sound. q To prevent howling, hold the microphone away from O to the PHONES jack. Adjusts the microphone volume. ROCK...
Operating Instructions
Page 8
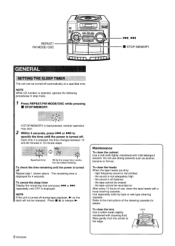
..., another operation may start. 2 Within 4 seconds, press l++ or M to the instructions of use strong solvents such as alcohol, benzine or thinner. Specified time While the sleep timer works, the dot keeps flashing. To cancel the sleep timer Display the remaining time and press W repeatedly until the power is not adequately high - the sound is turned off -balance - Use separately sold dry-type or wet-type cleaning cassette...
..., another operation may start. 2 Within 4 seconds, press l++ or M to the instructions of use strong solvents such as alcohol, benzine or thinner. Specified time While the sleep timer works, the dot keeps flashing. To cancel the sleep timer Display the remaining time and press W repeatedly until the power is not adequately high - the sound is turned off -balance - Use separately sold dry-type or wet-type cleaning cassette...
Operating Instructions
Page 9
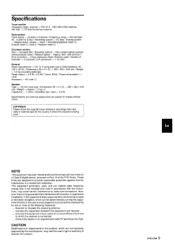
... adjustments to recordings from that interference will not occur in a residential installation. Specifications Tuner section Frequency range, antenna - Deck 1: Recording/playback head (1), Erasure head (1); However, there is connected. DC 12 V using eight size D (R20) batteries, AC 120 V, 60 Hz/ Dimensions (W x H x D) - 260 x 302x 246 mm/ Weight - 4.2 kg (excluding batteries) Power output - 2.5 W + 2.5 W (7 ohms, EIAJ) / Power consumption - 18W Accessory - Magnet erase/ Heads - Compact disc/ Scanning method - Cross interleave, Reed, Solomon code/ Number...
... adjustments to recordings from that interference will not occur in a residential installation. Specifications Tuner section Frequency range, antenna - Deck 1: Recording/playback head (1), Erasure head (1); However, there is connected. DC 12 V using eight size D (R20) batteries, AC 120 V, 60 Hz/ Dimensions (W x H x D) - 260 x 302x 246 mm/ Weight - 4.2 kg (excluding batteries) Power output - 2.5 W + 2.5 W (7 ohms, EIAJ) / Power consumption - 18W Accessory - Magnet erase/ Heads - Compact disc/ Scanning method - Cross interleave, Reed, Solomon code/ Number...

Operating Instructions
Page 28
Printed in China ," AIWA CO.,LTD.
Printed in China ," AIWA CO.,LTD.


