Product Manual
Page 2
... that you for your appliance: www.aeg.com/shop CUSTOMER CARE AND SERVICE Always use original spare parts. PROGRAMMES ...9 6. OPTIONS...14 8. CONSUMPTION VALUES 13 7. Please spend a few minutes reading to get the very best from it to change without notice. DAILY USE...15 11. PRODUCT DESCRIPTION 5 4. TROUBLESHOOTING 24 14. BEFORE FIRST USE...15 10. SAFETY INSTRUCTIONS 4 3. CONTROL PANEL...6 5. EMERGENCY DOOR OPENING 26 15. The information can...
... that you for your appliance: www.aeg.com/shop CUSTOMER CARE AND SERVICE Always use original spare parts. PROGRAMMES ...9 6. OPTIONS...14 8. CONSUMPTION VALUES 13 7. Please spend a few minutes reading to get the very best from it to change without notice. DAILY USE...15 11. PRODUCT DESCRIPTION 5 4. TROUBLESHOOTING 24 14. BEFORE FIRST USE...15 10. SAFETY INSTRUCTIONS 4 3. CONTROL PANEL...6 5. EMERGENCY DOOR OPENING 26 15. The information can...
Product Manual
Page 4
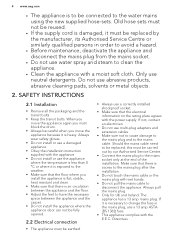
... INSTRUCTIONS 2.1 Installation • Remove all the packaging and the transit bolts. • Keep the transit bolts. Old hose sets must be reused. • If the supply cord is necessary to change the fuse in order to avoid a hazard. • Before maintenance, deactivate the appliance and disconnect the mains plug from the mains socket. • Do not use water spray and steam to clean the appliance. • Clean...
... INSTRUCTIONS 2.1 Installation • Remove all the packaging and the transit bolts. • Keep the transit bolts. Old hose sets must be reused. • If the supply cord is necessary to change the fuse in order to avoid a hazard. • Before maintenance, deactivate the appliance and disconnect the mains plug from the mains socket. • Do not use water spray and steam to clean the appliance. • Clean...
Product Manual
Page 5
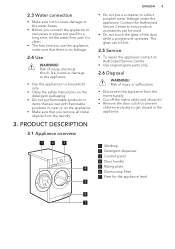
... appliance in a household only. • Obey the safety instructions on the appliance. • Make sure that you use the appliance, make sure that are wet with flammable products in the appliance. 1 2 3 1 Worktop 2 Detergent dispenser 3 Control panel 4 Door handle 4 5 Rating plate 6 Drain pump filter 7 Feet for a long time, let the water flow until it is clean. • The first time you remove all metal objects from the mains supply. •...
... appliance in a household only. • Obey the safety instructions on the appliance. • Make sure that you use the appliance, make sure that are wet with flammable products in the appliance. 1 2 3 1 Worktop 2 Detergent dispenser 3 Control panel 4 Door handle 4 5 Rating plate 6 Drain pump filter 7 Feet for a long time, let the water flow until it is clean. • The first time you remove all metal objects from the mains supply. •...
Product Manual
Page 6
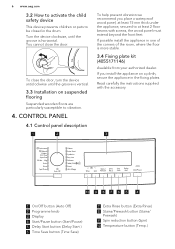
.... 3.4 Fixing plate kit (4055171146) Available from your authorized dealer. If possible install the appliance in the drum. Spin Prewash Rinse Save Start Start/Pause 10 9 8 7 6 5 4 1 On/Off button (Auto Off) 2 Programme knob 3 Display 4 Start/Pause button (Start/Pause) 5 Delay Start button (Delay Start ) 6 Time Save button (Time Save) 7 Extra Rinse button (Extra Rinse) 8 Stains/Prewash button (Stains/ Prewash) 9 Spin reduction button (Spin) 10 Temperature button (Temp.) Turn the device clockwise, until the groove is horizontal. CONTROL PANEL 4.1 Control panel description...
.... 3.4 Fixing plate kit (4055171146) Available from your authorized dealer. If possible install the appliance in the drum. Spin Prewash Rinse Save Start Start/Pause 10 9 8 7 6 5 4 1 On/Off button (Auto Off) 2 Programme knob 3 Display 4 Start/Pause button (Start/Pause) 5 Delay Start button (Delay Start ) 6 Time Save button (Time Save) 7 Extra Rinse button (Extra Rinse) 8 Stains/Prewash button (Stains/ Prewash) 9 Spin reduction button (Spin) 10 Temperature button (Temp.) Turn the device clockwise, until the groove is horizontal. CONTROL PANEL 4.1 Control panel description...
Product Manual
Page 8
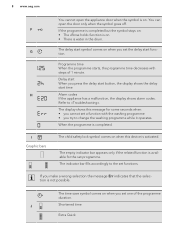
... related function is completed. J Shortened time Extra Quick 8 www.aeg.com You cannot open the door only when the symbol goes off. Refer to change the washing programme while it operates. The display shows this device is on when you make a wrong selection the message Err indicates that the selection is water in the drum. If you set programme. F If the programme is...
... related function is completed. J Shortened time Extra Quick 8 www.aeg.com You cannot open the door only when the symbol goes off. Refer to change the washing programme while it operates. The display shows this device is on when you make a wrong selection the message Err indicates that the selection is water in the drum. If you set programme. F If the programme is...

Product Manual
Page 9
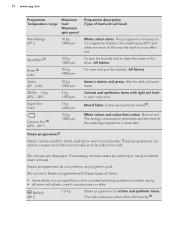
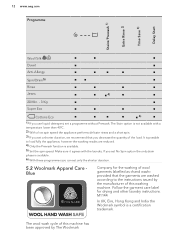
... symbol comes on . PROGRAMMES 5.1 Programme Chart Programme Temperature range Maximum load Maximum spin speed Washing programmes Cottons 95°C - Cold Wool/Silk 40° C - The indicator bar is not fully filled when you activate the function. Synthetic items or mixed fabric items. Normal soil. The programme eliminates all spinning phase to be gentle washed. The cycle stops with «hand washing» care symbol...
... symbol comes on . PROGRAMMES 5.1 Programme Chart Programme Temperature range Maximum load Maximum spin speed Washing programmes Cottons 95°C - Cold Wool/Silk 40° C - The indicator bar is not fully filled when you activate the function. Synthetic items or mixed fabric items. Normal soil. The programme eliminates all spinning phase to be gentle washed. The cycle stops with «hand washing» care symbol...
Product Manual
Page 10
... the drum. Do not use any hygienic cycle. To spin the laundry and to the washing by washing or using localized stain removal. All fabrics. Steam programmes do not perform any detergent. Refresh 40° C 1.5 kg Steam programme for dried, washed or worn once laundry. In this way the wash is more soft. To rinse and spin the laundry. Mixed fabric (cotton and synthetic items)5). Do not set a Steam programme with these types...
... the drum. Do not use any hygienic cycle. To spin the laundry and to the washing by washing or using localized stain removal. All fabrics. Steam programmes do not perform any detergent. Refresh 40° C 1.5 kg Steam programme for dried, washed or worn once laundry. In this way the wash is more soft. To rinse and spin the laundry. Mixed fabric (cotton and synthetic items)5). Do not set a Steam programme with these types...
Product Manual
Page 11
... (Type of load and soil level) Anticrease 40° C 1.5 kg Steam programme for the Energy Label consumption values. If you set No Spin option the only drain phase is better to expose the items to dewrinkle the laundry. 1) To reduce the creases of the laundry, this cycle regulates the water temperature and performs a soft wash and spin phase. With a low spin speed the appliance performs delicate rinses...
... (Type of load and soil level) Anticrease 40° C 1.5 kg Steam programme for the Energy Label consumption values. If you set No Spin option the only drain phase is better to expose the items to dewrinkle the laundry. 1) To reduce the creases of the laundry, this cycle regulates the water temperature and performs a soft wash and spin phase. With a low spin speed the appliance performs delicate rinses...
Product Manual
Page 12
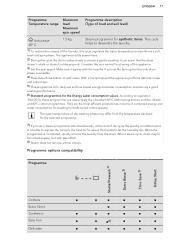
... garments labelled as «hand wash» provided that you use liquid detergent, set only the shorter duration. 5.2 Woolmark Apparel Care Blue Company for drying and other laundry instructions. M1144 In UK, Eire, Hong Kong and India the Woolmark symbol is not available with the laundry. 12 www.aeg.com Programme Stains/Prewash 1) Extra Rinse 2) Time Save 3) Delay Start Wool/Silk ■ ■...
... garments labelled as «hand wash» provided that you use liquid detergent, set only the shorter duration. 5.2 Woolmark Apparel Care Blue Company for drying and other laundry instructions. M1144 In UK, Eire, Hong Kong and India the Woolmark symbol is not available with the laundry. 12 www.aeg.com Programme Stains/Prewash 1) Extra Rinse 2) Time Save 3) Delay Start Wool/Silk ■ ■...
Product Manual
Page 14
... Start With this option for persons allergic to activate one of the programme. Use this button to a washing programme. Press this option for laundry with the set this function to remove. Press the button again and again to detergents and in the display. 8. To deactivate/activate the acoustic signals, press Stains/Prewash and Extra Rinse at the same time for items with a temperature...
... Start With this option for persons allergic to activate one of the programme. Use this button to a washing programme. Press this option for laundry with the set this function to remove. Press the button again and again to detergents and in the display. 8. To deactivate/activate the acoustic signals, press Stains/Prewash and Extra Rinse at the same time for items with a temperature...
Product Manual
Page 15
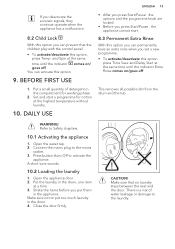
and Spin at the same time until the indicator comes on /goes off . A short tune sounds. 10.2 Loading the laundry 1. You can activate this option press Time Save and Delay Start at the same time until the indicator Extra Rinse comes on / goes off . Put a small quantity of water leakage or damage to the laundry. This removes all possible dirt from the drum and the tub. Shake...
and Spin at the same time until the indicator comes on /goes off . A short tune sounds. 10.2 Loading the laundry 1. You can activate this option press Time Save and Delay Start at the same time until the indicator Extra Rinse comes on / goes off . Put a small quantity of water leakage or damage to the laundry. This removes all possible dirt from the drum and the tub. Shake...

Product Manual
Page 16
...; Do not put more liquid detergent than the limit showed in the flap. • Do not set the prewash phase. • Do not set the delay start function. 5. A Compartment for stain remover. Carefully close the drawer. Flap for quantity of the flap 1. 16 www.aeg.com 10.3 Filling the detergent and additives 3. Maximum level for powder or liquid detergent. 4. Pull out the detergent dispenser until it stops. 2.
...; Do not put more liquid detergent than the limit showed in the flap. • Do not set the prewash phase. • Do not set the delay start function. 5. A Compartment for stain remover. Carefully close the drawer. Flap for quantity of the flap 1. 16 www.aeg.com 10.3 Filling the detergent and additives 3. Maximum level for powder or liquid detergent. 4. Pull out the detergent dispenser until it stops. 2.
Product Manual
Page 17
... to set . 3. Press button Delay Start again and again until the display shows . 3. Press button Start/Pause. The indicator of the programme: • The appliance adjusts automatically the cycle time to the laundry you have perfect washing results in the drum to activate the appliance. Before starting the new programme the appliance could drain the water. The programme continues. Change the function set the appliance to flash...
... to set . 3. Press button Delay Start again and again until the display shows . 3. Press button Start/Pause. The indicator of the programme: • The appliance adjusts automatically the cycle time to the laundry you have perfect washing results in the drum to activate the appliance. Before starting the new programme the appliance could drain the water. The programme continues. Change the function set the appliance to flash...
Product Manual
Page 18
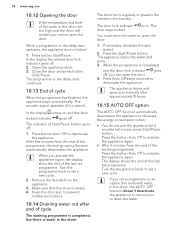
... to set a new cycle. Press Auto Off some seconds to deactivate the appliance. Keep the door ajar, to open the door . 4. The appliance drains the water and spins. 3. Press the button Auto Off to prevent the creases in the drum are too high and the drum still rotates you cannot open the door. Remove the laundry from the appliance. 3. The display shows the end of Start/Pause button goes...
... to set a new cycle. Press Auto Off some seconds to deactivate the appliance. Keep the door ajar, to open the door . 4. The appliance drains the water and spins. 3. Press the button Auto Off to prevent the creases in the drum are too high and the drum still rotates you cannot open the door. Remove the laundry from the appliance. 3. The display shows the end of Start/Pause button goes...
Product Manual
Page 19
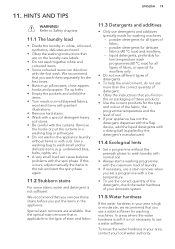
... detergent, check the water hardness of your domestic system 11.5 Water hardness If the water hardness in the tub and start a washing programme with the maximum load of laundry. • If necessary, use a stain remover when you find on the on the laundry care labels. • Do not wash together white and coloured items. • Some coloured items can cause balance problems with normal soil. • Always start the spin...
... detergent, check the water hardness of your domestic system 11.5 Water hardness If the water hardness in the tub and start a washing programme with the maximum load of laundry. • If necessary, use a stain remover when you find on the on the laundry care labels. • Do not wash together white and coloured items. • Some coloured items can cause balance problems with normal soil. • Always start the spin...
Product Manual
Page 20
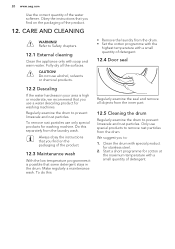
... remove rust particles use special products to prevent limescale and rust particles. Make regularly a maintenance wash. Clean the drum with a small quantity of detergent. Start a short programme for washing machines. CAUTION! Only use only special products for stainless steel. 2. We suggest you find on the packaging of the product. 12. Do not use a water descaling product for cotton at the maximum temperature with soap and warm water. Obey the instructions that...
... remove rust particles use special products to prevent limescale and rust particles. Make regularly a maintenance wash. Clean the drum with a small quantity of detergent. Start a short programme for washing machines. CAUTION! Only use only special products for stainless steel. 2. We suggest you find on the packaging of the product. 12. Do not use a water descaling product for cotton at the maximum temperature with soap and warm water. Obey the instructions that...
Product Manual
Page 23
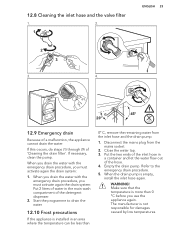
... low temperatures. WARNING! Empty the drain pump. When you drain the water with the emergency drain procedure, you use the appliance again. Disconnect the mains plug from the inlet hose and the drain pump. 1. 12.8 Cleaning the inlet hose and the valve filter 1. 2. 1 ENGLISH 23 2 3 3. 4. 45° 20° 12.9 Emergency drain Because of 'Cleaning the drain filter'. If this occurs, do steps (1) through (9) of a malfunction, the appliance cannot drain the water. Start the...
... low temperatures. WARNING! Empty the drain pump. When you drain the water with the emergency drain procedure, you use the appliance again. Disconnect the mains plug from the inlet hose and the drain pump. 1. 12.8 Cleaning the inlet hose and the valve filter 1. 2. 1 ENGLISH 23 2 3 3. 4. 45° 20° 12.9 Emergency drain Because of 'Cleaning the drain filter'. If this occurs, do steps (1) through (9) of a malfunction, the appliance cannot drain the water. Start the...

Product Manual
Page 24
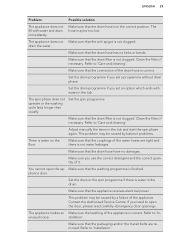
... of the valve are not clogged. Make sure that the filter of the inlet hose and the filter of countdown. If not, contact the Authorised Service Centre. With some problems, the acoustic signals operate and the display shows an alarm code: • - The mains supply is stable. • - Deactivate the appliance before you do the checks. Problem The programme does not start is not...
... of the valve are not clogged. Make sure that the filter of the inlet hose and the filter of countdown. If not, contact the Authorised Service Centre. With some problems, the acoustic signals operate and the display shows an alarm code: • - The mains supply is stable. • - Deactivate the appliance before you do the checks. Problem The programme does not start is not...
Product Manual
Page 25
... the appliance receives electrical power. Set the drain programme if you use the correct detergent and the correct quantity of the drain hose is in the tub and start the spin phase again. Clean the filter, if necessary. Make sure that the couplings of the water hoses are removed. You cannot open the door, please read carefully «Emergency door opening». Refer to 'Installation'. Make sure that the drain hose has no damages...
... the appliance receives electrical power. Set the drain programme if you use the correct detergent and the correct quantity of the drain hose is in the tub and start the spin phase again. Clean the filter, if necessary. Make sure that the couplings of the water hoses are removed. You cannot open the door, please read carefully «Emergency door opening». Refer to 'Installation'. Make sure that the drain hose has no damages...
Product Manual
Page 26
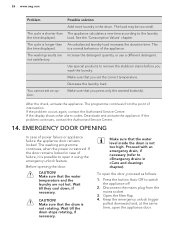
... unbalanced laundry load increases the duration time. The cycle is not too high. Make sure that the water temperature and the laundry are Increase the detergent quantity or use a different detergent. Make sure that the drum is possible to remove the stubborn stains before you wash the laundry. After the check, activate the appliance. Press the button Auto Off to «Emergency drain» in «Care and cleaning»...
... unbalanced laundry load increases the duration time. The cycle is not too high. Make sure that the water temperature and the laundry are Increase the detergent quantity or use a different detergent. Make sure that the drum is possible to remove the stubborn stains before you wash the laundry. After the check, activate the appliance. Press the button Auto Off to «Emergency drain» in «Care and cleaning»...


