
User Guide
Page 4
...Client Software 28 Disabling Web Proxy 28 4 RUNNING THE SETUP WIZARD Accessing the Wizard 29 Password 32 Time Zone 33 WAN Settings 33 LAN Settings 40 DHCP 40 Wireless Settings 41 Summary 42 5 ROUTER CONFIGURATION Navigating Through the Router Configuration Pages 45 Main Menu 45 Option Tabs 46 ...Welcome Screen 46 Notice Board 46 Password 47 Wizard 48 LAN Settings 48 Unit Configuration 48 DHCP Clients List 49 Wireless Settings 51 Configuration ...
...Client Software 28 Disabling Web Proxy 28 4 RUNNING THE SETUP WIZARD Accessing the Wizard 29 Password 32 Time Zone 33 WAN Settings 33 LAN Settings 40 DHCP 40 Wireless Settings 41 Summary 42 5 ROUTER CONFIGURATION Navigating Through the Router Configuration Pages 45 Main Menu 45 Option Tabs 46 ...Welcome Screen 46 Notice Board 46 Password 47 Wizard 48 LAN Settings 48 Unit Configuration 48 DHCP Clients List 49 Wireless Settings 51 Configuration ...
User Guide
Page 13
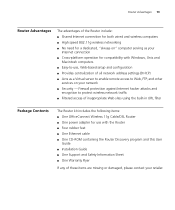
... of inappropriate Web sites using the built-in URL filter Package Contents The Router kit includes the following items: ■ One OfficeConnect Wireless 11g Cable/DSL Router ■ One power adapter for compatibility with Windows, Unix and Macintosh computers ■ Easy-to-use, Web-based setup and configuration ■ Provides centralization of all network address settings (DHCP) ■...
... of inappropriate Web sites using the built-in URL filter Package Contents The Router kit includes the following items: ■ One OfficeConnect Wireless 11g Cable/DSL Router ■ One power adapter for compatibility with Windows, Unix and Macintosh computers ■ Easy-to-use, Web-based setup and configuration ■ Provides centralization of all network address settings (DHCP) ■...

User Guide
Page 29
...your browser: http://192.168.1.1 (Figure 9). The Login screen displays. Refer to Chapter 2 for details on how to the Router. 4 RUNNING THE SETUP WIZARD Accessing the Wizard The Router setup program is Web-based, which means that you have at least one computer connected to do this. 2 Launch your Web ...browser on the computer. 3 Enter the following URL in (Figure 10). To use the Setup Wizard: 1 Ensure that it is admin) in the...
...your browser: http://192.168.1.1 (Figure 9). The Login screen displays. Refer to Chapter 2 for details on how to the Router. 4 RUNNING THE SETUP WIZARD Accessing the Wizard The Router setup program is Web-based, which means that you have at least one computer connected to do this. 2 Launch your Web ...browser on the computer. 3 Enter the following URL in (Figure 10). To use the Setup Wizard: 1 Ensure that it is admin) in the...

User Guide
Page 30
Figure 11 Country Selection Screen Select the country you wish to configure the Router for, then click Apply. (Figure 11) If your purchased your Router in the United States, you do not see this screen, as it is correct, the Country Selection screen will appear. 30 CHAPTER 4: RUNNING THE SETUP WIZARD Figure 10 Router Login Screen 5 If the password is automatically set.
Figure 11 Country Selection Screen Select the country you wish to configure the Router for, then click Apply. (Figure 11) If your purchased your Router in the United States, you do not see this screen, as it is correct, the Country Selection screen will appear. 30 CHAPTER 4: RUNNING THE SETUP WIZARD Figure 10 Router Login Screen 5 If the password is automatically set.

User Guide
Page 31
Figure 12 Welcome Screen Select the Wizard tab and click Wizard. or ■ If your Router has not been configured before, the Wizard will launch automatically (refer to Figure 13). 7 Click Next. 8 You will appear (Figure 12). Accessing the Wizard 31 6 When you have selected a country either: ■ The Welcome screen will be guided step by step through a basic setup procedure.
Figure 12 Welcome Screen Select the Wizard tab and click Wizard. or ■ If your Router has not been configured before, the Wizard will launch automatically (refer to Figure 13). 7 Click Next. 8 You will appear (Figure 12). Accessing the Wizard 31 6 When you have selected a country either: ■ The Welcome screen will be guided step by step through a basic setup procedure.

User Guide
Page 32
The Router is case sensitive. Password is shipped from the factory with a default password, admin. 1. 32 CHAPTER 4: RUNNING THE SETUP WIZARD Figure 13 Wizard Screen Password Figure 14 Change Administration Password Screen When the Change Administration Password screen (Figure 14) appears, type the Old Password, then a new password in both the New Password and Confirm Password boxes. 3Com recommends entering a new password when setting up the Router for the first time.
The Router is case sensitive. Password is shipped from the factory with a default password, admin. 1. 32 CHAPTER 4: RUNNING THE SETUP WIZARD Figure 13 Wizard Screen Password Figure 14 Change Administration Password Screen When the Change Administration Password screen (Figure 14) appears, type the Old Password, then a new password in both the New Password and Confirm Password boxes. 3Com recommends entering a new password when setting up the Router for the first time.

User Guide
Page 33
..., so that you can change your WAN Settings Figure 16 Internet Settings Screen This Internet Addressing Mode window allows you have. Before setting up the Router for daylight savings time automatically. Accessing the Wizard 33 2. Write the new password down menu, check the daylight savings option if required, and then click... in the future. It does not cause the system clock to be updated for the type of Internet connection you to display the Time Zone setup screen (Figure 15).
..., so that you can change your WAN Settings Figure 16 Internet Settings Screen This Internet Addressing Mode window allows you have. Before setting up the Router for daylight savings time automatically. Accessing the Wizard 33 2. Write the new password down menu, check the daylight savings option if required, and then click... in the future. It does not cause the system clock to be updated for the type of Internet connection you to display the Time Zone setup screen (Figure 15).

User Guide
Page 34
... your PPP over Ethernet user name in the PPPoE User Name text box. 2 Enter your ISP ready. PPPoE Mode Figure 17 PPPoE Screen To setup the Router for use with a PPP over Ethernet password in Europe) see "Internet Settings" on page 65. Select an Internet Addressing mode from your PPP over..., use the following : ■ PPPoE is required (typically DSL users only) see page 34 ■ ISP provides configuration dynamically (via DHCP) see page 35 ■ ISP has provided a static IP address see page 36 ■ PPTP is required (some DSL users in Europe) see page 37 ■ L2TP is required...
... your PPP over Ethernet user name in the PPPoE User Name text box. 2 Enter your ISP ready. PPPoE Mode Figure 17 PPPoE Screen To setup the Router for use with a PPP over Ethernet password in Europe) see "Internet Settings" on page 65. Select an Internet Addressing mode from your PPP over..., use the following : ■ PPPoE is required (typically DSL users only) see page 34 ■ ISP provides configuration dynamically (via DHCP) see page 35 ■ ISP has provided a static IP address see page 36 ■ PPTP is required (some DSL users in Europe) see page 37 ■ L2TP is required...
User Guide
Page 35
... DHCP) and then click Next. This is 1454. 5 Select an idle time from the Maximum Idle Time drop down list. Dynamic IP Address Mode To setup the Router for more information. If your ISP has this box if your ISP does not require a service name. 4 Enter the MTU value supplied by your... enter anything in this requirement, enter the host name in the Host Name text box (Figure 18) and click Next. Refer to allow before the Router ends the PPPoE session. 6 Check all of your PPP over Ethernet service name in the MTU text box. See Figure 16. Figure 18 Hostname Screen...
... DHCP) and then click Next. This is 1454. 5 Select an idle time from the Maximum Idle Time drop down list. Dynamic IP Address Mode To setup the Router for more information. If your ISP has this box if your ISP does not require a service name. 4 Enter the MTU value supplied by your... enter anything in this requirement, enter the host name in the Host Name text box (Figure 18) and click Next. Refer to allow before the Router ends the PPPoE session. 6 Check all of your PPP over Ethernet service name in the MTU text box. See Figure 16. Figure 18 Hostname Screen...

User Guide
Page 36
If the computer you are now using . Figure 20 displays. Static IP Mode To setup the Router for a MAC address if required (Figure 19). Figure 20 Static IP Mode Screen 2 Enter your IP Address in the IP Address text box. 3 Enter your ...ISP requires an assigned MAC address, select Yes, I 'm currently using is the one that was previously connected directly to the cable modem, choose Yes, please clone...
If the computer you are now using . Figure 20 displays. Static IP Mode To setup the Router for a MAC address if required (Figure 19). Figure 20 Static IP Mode Screen 2 Enter your IP Address in the IP Address text box. 3 Enter your ...ISP requires an assigned MAC address, select Yes, I 'm currently using is the one that was previously connected directly to the cable modem, choose Yes, please clone...

User Guide
Page 37
... address. 7 Check all of your ISP has not supplied an MTU value, leave this at the default value. Accessing the Wizard 37 4 Enter your ISP Router address in the Internet (ISP) Gateway Address text box. 5 Enter your primary DNS address in the Primary DNS Address text box. 6 Enter your secondary DNS... address in the appropriate text boxes. PPTP Mode Figure 21 PPTP Mode Screen To setup the Router for use with primary and secondary DNS addresses. If not, leave 0.0.0.0 in the boxes. 5 Enter the value supplied by your ISP in the PPTP...
... address. 7 Check all of your ISP has not supplied an MTU value, leave this at the default value. Accessing the Wizard 37 4 Enter your ISP Router address in the Internet (ISP) Gateway Address text box. 5 Enter your primary DNS address in the Primary DNS Address text box. 6 Enter your secondary DNS... address in the appropriate text boxes. PPTP Mode Figure 21 PPTP Mode Screen To setup the Router for use with primary and secondary DNS addresses. If not, leave 0.0.0.0 in the boxes. 5 Enter the value supplied by your ISP in the PPTP...

User Guide
Page 38
Figure 22 PPTP IP Settings 8 IP settings must be used when establishing a PPTP connection. Fill in your DSL modem, click Suggest to allow before the Router ends the PPTP session. 7 Check all of time without Internet activity that you with these settings. Alternatively, if the PPTP server is the amount of... has provided you want to select an IP address on the same subnet as the PPTP server. Figure 22 displays. 38 CHAPTER 4: RUNNING THE SETUP WIZARD 6 Select an idle time from the Maximum Idle Time drop-down list. This is located in the Initial IP Address and the Initial Subnet...
Figure 22 PPTP IP Settings 8 IP settings must be used when establishing a PPTP connection. Fill in your DSL modem, click Suggest to allow before the Router ends the PPTP session. 7 Check all of time without Internet activity that you with these settings. Alternatively, if the PPTP server is the amount of... has provided you want to select an IP address on the same subnet as the PPTP server. Figure 22 displays. 38 CHAPTER 4: RUNNING THE SETUP WIZARD 6 Select an idle time from the Maximum Idle Time drop-down list. This is located in the Initial IP Address and the Initial Subnet...

User Guide
Page 40
... Configuration (DHCP) server that can automatically configure the TCP/IP settings of the Router. Click Next when you to change the IP address and subnet mask. if this is not appropriate, make your network. 40 CHAPTER 4: RUNNING THE SETUP WIZARD LAN Settings Figure 24 LAN IP Address Screen This screen displays a suggested...
... Configuration (DHCP) server that can automatically configure the TCP/IP settings of the Router. Click Next when you to change the IP address and subnet mask. if this is not appropriate, make your network. 40 CHAPTER 4: RUNNING THE SETUP WIZARD LAN Settings Figure 24 LAN IP Address Screen This screen displays a suggested...

User Guide
Page 42
42 CHAPTER 4: RUNNING THE SETUP WIZARD channel you experience problems with your records. Summary Figure 27 Configuration Summary Screen When you complete the Setup Wizard, a configuration summary will display. 3Com recommends that you verify the configuration information of the Router and then print this may be useful if you select as this page for your clients. Click Finish to display the Wizard completed screen, shown in Figure 28
42 CHAPTER 4: RUNNING THE SETUP WIZARD channel you experience problems with your records. Summary Figure 27 Configuration Summary Screen When you complete the Setup Wizard, a configuration summary will display. 3Com recommends that you verify the configuration information of the Router and then print this may be useful if you select as this page for your clients. Click Finish to display the Wizard completed screen, shown in Figure 28

User Guide
Page 44
44 CHAPTER 4: RUNNING THE SETUP WIZARD
44 CHAPTER 4: RUNNING THE SETUP WIZARD

User Guide
Page 50
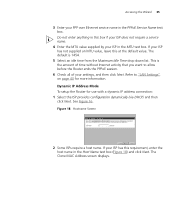
...maximum number of the client's network card. ■ Client Type - Click New to fix an association. Check the box to display the DHCP Fixed Mapping Setup screen, as shown in Figure 34 The Media Access Control (MAC) address of 253 clients. If a PC has been switched off, using the Release button...- Whether the client is set at 12 hours. Clear the check box to be available for the IP address that the Router allocates an IP address chosen by wired or wireless connection. ■ Fix - The release button allows the lease time for another device if there were no other IP addresses...
...maximum number of the client's network card. ■ Client Type - Click New to fix an association. Check the box to display the DHCP Fixed Mapping Setup screen, as shown in Figure 34 The Media Access Control (MAC) address of 253 clients. If a PC has been switched off, using the Release button...- Whether the client is set at 12 hours. Clear the check box to be available for the IP address that the Router allocates an IP address chosen by wired or wireless connection. ■ Fix - The release button allows the lease time for another device if there were no other IP addresses...
User Guide
Page 51
... the Fixed Mapping. Change the SSID from its default value - see page 60 Wireless Settings 51 Figure 34 DHCP Fixed Mapping Setup Screen You only need to create Fixed Mappings for devices that you: 1. Enable ...Encryption - Enable Connection Control - see page 53 2. To improve the security of client box. Wireless Settings The Wireless Settings menu provides options described in the MAC Address of your wireless network, 3Com recommends that need a specific IP address, the Router...
... the Fixed Mapping. Change the SSID from its default value - see page 60 Wireless Settings 51 Figure 34 DHCP Fixed Mapping Setup Screen You only need to create Fixed Mappings for devices that you: 1. Enable ...Encryption - Enable Connection Control - see page 53 2. To improve the security of client box. Wireless Settings The Wireless Settings menu provides options described in the MAC Address of your wireless network, 3Com recommends that need a specific IP address, the Router...

User Guide
Page 66
...; VPN Server address (usually your modem) When you install the Router, you will not need to use the PPPoE software on your Router" on your PC anymore. 5 L2TP (DSL or Cable) L2TP is supported before selecting this option. Check with your modem ask you to setup a dialup connection using a PPTP VPN tunnel then select this...
...; VPN Server address (usually your modem) When you install the Router, you will not need to use the PPPoE software on your Router" on your PC anymore. 5 L2TP (DSL or Cable) L2TP is supported before selecting this option. Check with your modem ask you to setup a dialup connection using a PPTP VPN tunnel then select this...

User Guide
Page 67
...with a Static IP address connection: 1 Select Static IP Address (to step 7. 3 Enter your subnet mask in the Subnet Mask text box. 4 Enter your ISP Router address in the ISP Gateway Address text box. 5 Enter your primary DNS address in the IP Allocation Mode field (Figure 47). 2 Enter your ISP. Static... IP To setup the Router for use with the rest of your secondary DNS address in the IP Address text box. This step is already entered, your ISP has pre...
...with a Static IP address connection: 1 Select Static IP Address (to step 7. 3 Enter your subnet mask in the Subnet Mask text box. 4 Enter your ISP Router address in the ISP Gateway Address text box. 5 Enter your primary DNS address in the IP Allocation Mode field (Figure 47). 2 Enter your ISP. Static... IP To setup the Router for use with the rest of your secondary DNS address in the IP Address text box. This step is already entered, your ISP has pre...

User Guide
Page 68
To setup the Router for use your ISP. Your ISP may provide you use 'Cable', your ISP may be obtained automatically from your MAC address to 'Clone' your Primary DNS Address and Secondary DNS address. Dynamic IP If this requirement, ...enter the host name in the Host Name text box. 4 If you with the MAC address of the Router. If they have...
To setup the Router for use your ISP. Your ISP may provide you use 'Cable', your ISP may be obtained automatically from your MAC address to 'Clone' your Primary DNS Address and Secondary DNS address. Dynamic IP If this requirement, ...enter the host name in the Host Name text box. 4 If you with the MAC address of the Router. If they have...
