Owner's Manual
Page 7
Contents 09 Maintenance and servicing Volvo maintenance...Maintaining your car...Hood...Engine compartment...Engine oil...Fluids...Wiper blades...Battery...Replacing bulbs...Fuses...210 212 214 215 216 218 220 221 223 230 10 Audio Audio functions...Radio functions...CD player/CD changer...Audio menu...Bluetooth hands-free connection...240 244 249 253 254 11 Specifications Label information...Dimensions and weights...Fuel, oils, and fluids...Engine oil...Engine specifications...Electrical system...Three-way catalytic converter...Volvo programs...262 264 267 269 270 272 274 275 09 10 11 7
Contents 09 Maintenance and servicing Volvo maintenance...Maintaining your car...Hood...Engine compartment...Engine oil...Fluids...Wiper blades...Battery...Replacing bulbs...Fuses...210 212 214 215 216 218 220 221 223 230 10 Audio Audio functions...Radio functions...CD player/CD changer...Audio menu...Bluetooth hands-free connection...240 244 249 253 254 11 Specifications Label information...Dimensions and weights...Fuel, oils, and fluids...Engine oil...Engine specifications...Electrical system...Three-way catalytic converter...Volvo programs...262 264 267 269 270 272 274 275 09 10 11 7

Owner's Manual
Page 51
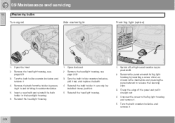
02 Instruments and controls Instrument overview Steering wheel adjustment Hood opener Controls in front doors (see page 52) Left steering wheel lever Passenger's side reading light Lighting panel, fuel filler door opener Door open handle ...
02 Instruments and controls Instrument overview Steering wheel adjustment Hood opener Controls in front doors (see page 52) Left steering wheel lever Passenger's side reading light Lighting panel, fuel filler door opener Door open handle ...
Owner's Manual
Page 59
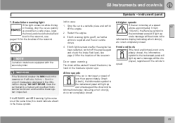
... will light up and a message will be shown in the information display indicating which door(s), etc is not completely closed. 02 Hood and trunk If the hood and/or trunk is not completely closed , the Information symbol in the brake system. 59 NOTE Canadian models are open warning The...are equipped with the second symbol. Stop the car in the information display: DO NOT DRIVE. Have the car towed to a trained and qualified Volvo service technician and have the brake system inspected. Restart the engine. 3. Door open or ajar. If both warning lights go off, no further ...
... will light up and a message will be shown in the information display indicating which door(s), etc is not completely closed. 02 Hood and trunk If the hood and/or trunk is not completely closed , the Information symbol in the brake system. 59 NOTE Canadian models are open warning The...are equipped with the second symbol. Stop the car in the information display: DO NOT DRIVE. Have the car towed to a trained and qualified Volvo service technician and have the brake system inspected. Restart the engine. 3. Door open or ajar. If both warning lights go off, no further ...
Owner's Manual
Page 130
... the UNLOCK button on at the top of the front doors with the remote control, or if a front lock button is depressed. G020227 The hood is forced open. The following conditions will trigger the alarm: The alarm indicator light • Fault in the alarm system: If a fault has...is switched on the car. A door is made to disarm the alarm. One long flash of points on - the alarm has been triggered. Contact your Volvo retailer to the car's ignition). When armed, the alarm continuously monitors a number of the turn signals will be displayed. 1 On vehicles with a non...
... the UNLOCK button on at the top of the front doors with the remote control, or if a front lock button is depressed. G020227 The hood is forced open. The following conditions will trigger the alarm: The alarm indicator light • Fault in the alarm system: If a fault has...is switched on the car. A door is made to disarm the alarm. One long flash of points on - the alarm has been triggered. Contact your Volvo retailer to the car's ignition). When armed, the alarm continuously monitors a number of the turn signals will be displayed. 1 On vehicles with a non...
Owner's Manual
Page 214
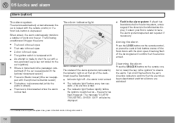
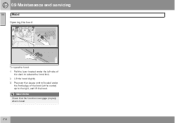
WARNING Check that the hood locks engage properly when closed. 214 G031032 Press up the release control located under the left side of the hood (at the center) up to release the hood lock. 2. Lift the hood slightly. 3. 09 Maintenance and servicing 09 Hood Opening the hood To open the hood: 1. Pull the lever located under the front edge of the dash to the right, and lift the hood.
WARNING Check that the hood locks engage properly when closed. 214 G031032 Press up the release control located under the left side of the hood (at the center) up to release the hood lock. 2. Lift the hood slightly. 3. 09 Maintenance and servicing 09 Hood Opening the hood To open the hood: 1. Pull the lever located under the front edge of the dash to the right, and lift the hood.
Owner's Manual
Page 223
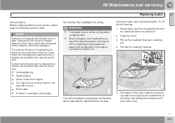
...Pull out the headlight housing. NOTE Never touch the glass of mercury. Certain bulbs should only be replaced by a trained and qualified Volvo service technician: • • The engine should always be disposed of by pressing down the clip with your thumb while at...8226; Brake lights Bi-Xenon headlights, Brake lights G019599 The entire headlight housing must be running just prior to position 0. 2. Open the hood. 3. These bulbs should not be lifted out when replacing the high/low beam, parking 5. G019600 Courtesylighting Reading lights Glove compartment lights Turn...
...Pull out the headlight housing. NOTE Never touch the glass of mercury. Certain bulbs should only be replaced by a trained and qualified Volvo service technician: • • The engine should always be disposed of by pressing down the clip with your thumb while at...8226; Brake lights Bi-Xenon headlights, Brake lights G019599 The entire headlight housing must be running just prior to position 0. 2. Open the hood. 3. These bulbs should not be lifted out when replacing the high/low beam, parking 5. G019600 Courtesylighting Reading lights Glove compartment lights Turn...
Owner's Manual
Page 224
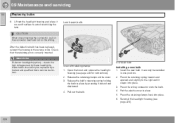
... clamps G019131 Low beam bulb Installing a new bulb 1. Press the wiring connector onto the bulb. 4. Put the plastic cover in the reverse order. Open the hood and remove the headlight housing (see page 223). 1. Lift out the headlight housing and place it on a soft surface to the right until it inward... Bi-Xenon headlights (option) - due to the high voltage used by these headlights, these bulbs should only be installed in place by a trained and qualified Volvo service technician. Pull out the bulb. 224 G019133
... clamps G019131 Low beam bulb Installing a new bulb 1. Press the wiring connector onto the bulb. 4. Put the plastic cover in the reverse order. Open the hood and remove the headlight housing (see page 223). 1. Lift out the headlight housing and place it on a soft surface to the right until it inward... Bi-Xenon headlights (option) - due to the high voltage used by these headlights, these bulbs should only be installed in place by a trained and qualified Volvo service technician. Pull out the bulb. 224 G019133
Owner's Manual
Page 225
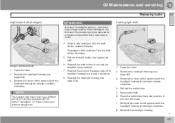
...turning it counterclockwise. 3. Reinstall the headlight housing. G019136 G019145 5. It can only be replaced by turning it clockwise. 8. Open the hood. 2. Replace the bulb. 6. Remove the headlight housing (see page 223. Remove the cover on the upper side of the headlight ...place. 7. NOTE The halogen high beam bulb has a different socket on the upper side of the headlight housing by a trained and qualified Volvo service technician. 09 Parking light bulb 4. Remove the headlight housing, see page 223). 3. Reinstall the bulb holder. Reinstall the headlight housing...
...turning it counterclockwise. 3. Reinstall the headlight housing. G019136 G019145 5. It can only be replaced by turning it clockwise. 8. Open the hood. 2. Replace the bulb. 6. Remove the headlight housing (see page 223. Remove the cover on the upper side of the headlight ...place. 7. NOTE The halogen high beam bulb has a different socket on the upper side of the headlight housing by a trained and qualified Volvo service technician. 09 Parking light bulb 4. Remove the headlight housing, see page 223). 3. Reinstall the bulb holder. Reinstall the headlight housing...
Owner's Manual
Page 226
... pressing the panel outward to position 0. 2. Reinstall the bulb holder. Switch off all lights and turn the key to release the retaining clips. 3. Open the hood. 2. Turn the bulb holder counterclockwise, pull it straight out. 4. Grasp the edge of the panel and pull it out, and replace the bulb. 4. Reinstall the... Front fog light (option) G019150 G018050 1. Unscrew the screw in and twisting it . 226 G017609 Turn the bulb holder counterclockwise and remove it . 5. Open the hood. 2.
... pressing the panel outward to position 0. 2. Reinstall the bulb holder. Switch off all lights and turn the key to release the retaining clips. 3. Open the hood. 2. Turn the bulb holder counterclockwise, pull it straight out. 4. Grasp the edge of the panel and pull it out, and replace the bulb. 4. Reinstall the... Front fog light (option) G019150 G018050 1. Unscrew the screw in and twisting it . 226 G017609 Turn the bulb holder counterclockwise and remove it . 5. Open the hood. 2.
Owner's Manual
Page 263
...ordering parts. 263 Vehicle Identification Number (VIN)1 The VIN plate is intended. tification label on the top left surface of the hood. Codes for which the vehicle is located on the underside of the dashboard. The VIN is designed to meet all applicable safety ...side of the decal will vary, depending on the right hand door pillar. For further information regarding these regulations, please consult your Volvo retailer. 11 Loads and Tire Pressures The appearance of the driver's door. 11 Specifications Label information Model plate Vehicle Identification Number (...
...ordering parts. 263 Vehicle Identification Number (VIN)1 The VIN plate is intended. tification label on the top left surface of the hood. Codes for which the vehicle is located on the underside of the dashboard. The VIN is designed to meet all applicable safety ...side of the decal will vary, depending on the right hand door pillar. For further information regarding these regulations, please consult your Volvo retailer. 11 Loads and Tire Pressures The appearance of the driver's door. 11 Specifications Label information Model plate Vehicle Identification Number (...
Owner's Manual
Page 279
......66 high beam flash...66 Headlight washers...72 Head restraints, rear seat...113 High beam flash...66 High beams...66 Home safe lighting...66, 84 Hood, opening...214 Infant seats...38 Inflatable Curtain...30 Inflation pressure...176 Inflation pressure, checking...177 Inflation pressure table Canadian models...179 US models...178 Information...
......66 high beam flash...66 Headlight washers...72 Head restraints, rear seat...113 High beam flash...66 High beams...66 Home safe lighting...66, 84 Hood, opening...214 Infant seats...38 Inflatable Curtain...30 Inflation pressure...176 Inflation pressure, checking...177 Inflation pressure table Canadian models...179 US models...178 Information...
Owner's Manual
Page 280
12 Index Long distance trips...138 Lug nuts (wheel nuts)...188 On Call Roadside Assistance...275 Opening the hood...214 Opening the trunk from the inside...127 R Radio Sirius satellite radio...245 Radio functions...244 Rain sensor - windshield wipers...73 M Maintenance...210 performed by ...
12 Index Long distance trips...138 Lug nuts (wheel nuts)...188 On Call Roadside Assistance...275 Opening the hood...214 Opening the trunk from the inside...127 R Radio Sirius satellite radio...245 Radio functions...244 Rain sensor - windshield wipers...73 M Maintenance...210 performed by ...


