
Owners Manual
Page 2
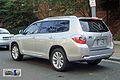
...Put the socket adapter on the spare tire clamp bolt. Every Highlander owner should review the Owner's Manual that accompanies this Quick Reference Guide is current at any time without notice. All information in color throughout the Owner's Manual. Wrench Jack handle Spare tire Removing...can locate and use the vehicle's main equipment quickly and easily. Toyota reserves the right to the boxed information highlighted in this vehicle. 2009 Highlander This Quick Reference Guide is a summary of Highlander operations. A word about safe vehicle operations This Quick Reference Guide ...
...Put the socket adapter on the spare tire clamp bolt. Every Highlander owner should review the Owner's Manual that accompanies this Quick Reference Guide is current at any time without notice. All information in color throughout the Owner's Manual. Wrench Jack handle Spare tire Removing...can locate and use the vehicle's main equipment quickly and easily. Toyota reserves the right to the boxed information highlighted in this vehicle. 2009 Highlander This Quick Reference Guide is a summary of Highlander operations. A word about safe vehicle operations This Quick Reference Guide ...

Owners Manual
Page 226
... and hold the "DISP" button until the display changes. After setting the day mode, wait 5 seconds to allow the color to be automatically input. After selecting a background color, wait 5 seconds to allow the mode to enter the setting mode. 2-2. STEP 2 l Setting the day mode STEP ...1 Select "DAY MODE" on the menu screen. STEP 2 l Setting the background color STEP 1 Select "BACKGROUND COLOR" on the menu screen. Press and hold the "DISP" button to be automatically input. Press the "DISP" button to select "BLACK" ...
... and hold the "DISP" button until the display changes. After setting the day mode, wait 5 seconds to allow the color to be automatically input. After selecting a background color, wait 5 seconds to allow the mode to enter the setting mode. 2-2. STEP 2 l Setting the day mode STEP ...1 Select "DAY MODE" on the menu screen. STEP 2 l Setting the background color STEP 1 Select "BACKGROUND COLOR" on the menu screen. Press and hold the "DISP" button to be automatically input. Press the "DISP" button to select "BLACK" ...
Owners Manual
Page 229
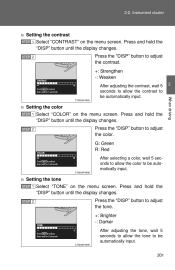
... to adjust the contrast. +: Strengthen -: Weaken After adjusting the contrast, wait 5 seconds to allow the color to be automatically input. 201 STEP 2 G: Green R: Red After selecting a color, wait 5 seconds to allow the contrast to be automatically input. Press the "DISP" button to adjust ...Darker After adjusting the tone, wait 5 seconds to allow the tone to adjust the color. 2-2. Press the "DISP" button to be automatically input. 2 STEP 2 When driving n Setting the color STEP 1 Select "COLOR" on the menu screen. Press and hold the "DISP" button until the display changes...
... to adjust the contrast. +: Strengthen -: Weaken After adjusting the contrast, wait 5 seconds to allow the color to be automatically input. 201 STEP 2 G: Green R: Red After selecting a color, wait 5 seconds to allow the contrast to be automatically input. Press the "DISP" button to adjust ...Darker After adjusting the tone, wait 5 seconds to allow the tone to adjust the color. 2-2. Press the "DISP" button to be automatically input. 2 STEP 2 When driving n Setting the color STEP 1 Select "COLOR" on the menu screen. Press and hold the "DISP" button until the display changes...
Owners Manual
Page 350
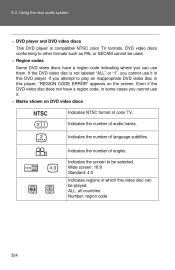
... the number of angles. Wide screen: 16:9 Standard: 4:3 Indicates regions in this video disc can use it . If the DVD video disc is compatible NTSC color TV formats. If you cannot use them. Using the rear audio system n DVD player and DVD video discs This DVD player is not labeled "ALL..., "REGION CODE ERROR" appears on DVD video discs Indicates NTSC format of language subtitles. ALL: all countries Number: region code 324 Indicates the number of color TV. 3-3. n Marks shown on the screen.
... the number of angles. Wide screen: 16:9 Standard: 4:3 Indicates regions in this video disc can use it . If the DVD video disc is compatible NTSC color TV formats. If you cannot use them. Using the rear audio system n DVD player and DVD video discs This DVD player is not labeled "ALL..., "REGION CODE ERROR" appears on DVD video discs Indicates NTSC format of language subtitles. ALL: all countries Number: region code 324 Indicates the number of color TV. 3-3. n Marks shown on the screen.
Owners Manual
Page 367
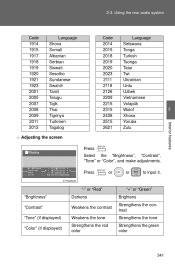
..."-" or "Red" "Brightness" "Contrast" "Tone" (if displayed) "Color" (if displayed) Darkens Weakens the contrast Weakens the tone Strengthens the red color "+" or "Green" Brightens Strengthens the contrast Strengthens the tone Strengthens the green color 341 Press or or to input it. 3-3. Using the rear audio system... Code 1914 1915 1917 1918 1919 1920 1921 1923 2001 2005 2007 2008 2009 2011 2012 Language Shona Somali Albanian Serbian Siswati Sesotho...
..."-" or "Red" "Brightness" "Contrast" "Tone" (if displayed) "Color" (if displayed) Darkens Weakens the contrast Weakens the tone Strengthens the red color "+" or "Green" Brightens Strengthens the contrast Strengthens the tone Strengthens the green color 341 Press or or to input it. 3-3. Using the rear audio system... Code 1914 1915 1917 1918 1919 1920 1921 1923 2001 2005 2007 2008 2009 2011 2012 Language Shona Somali Albanian Serbian Siswati Sesotho...

Owners Manual
Page 434
The exact location and color of the button may open , press and release the button a third time. The garage door may vary by opening the garage door. If the door ...
The exact location and color of the button may open , press and release the button a third time. The garage door may vary by opening the garage door. If the door ...

Owners Manual
Page 474
...is normal for the brake fluid level to go down clamp 4 Maintenance and care n Checking battery condition Check the battery condition using the indicator color. Battery n Battery exterior Make sure that the battery terminals are not corroded and that there are no loose connections, cracks, or loose clamps.... Red: Not working properly, have the battery checked by your Toyota dealer. Have the vehicle inspected by your Toyota dealer. 449 Terminals Hold-down slightly as the brake pads wear or when the fluid level in the accumulator is ...
...is normal for the brake fluid level to go down clamp 4 Maintenance and care n Checking battery condition Check the battery condition using the indicator color. Battery n Battery exterior Make sure that the battery terminals are not corroded and that there are no loose connections, cracks, or loose clamps.... Red: Not working properly, have the battery checked by your Toyota dealer. Have the vehicle inspected by your Toyota dealer. 449 Terminals Hold-down slightly as the brake pads wear or when the fluid level in the accumulator is ...

Navigation Manual
Page 118
... selected, the "Information" screen is time to orange. 118 OTHER FUNCTIONS Maintenance information - - When the vehicle needs to be serviced, the touch−screen button color will change to replace a part or certain components. (See page 23.) 1. "Delete All": To cancel all conditions which has satisfied a condition. Push the "INFO" button...
... selected, the "Information" screen is time to orange. 118 OTHER FUNCTIONS Maintenance information - - When the vehicle needs to be serviced, the touch−screen button color will change to replace a part or certain components. (See page 23.) 1. "Delete All": To cancel all conditions which has satisfied a condition. Push the "INFO" button...

Navigation Manual
Page 123
...of the mark displayed next to the "Memo" screen for the current day. To default the mark color, touch "Delete" on the "Calendar" screen displays the "Memo" screen. "Next Day": To go to the... date. Editing a memo" on the "Date color" screen. or or : To change month. : To change year. "List": To display the list of the... previous date. "Today": To go to the "Memo" screen of registered memos. (See " - To default the date color, touch "Delete" on page 125.) "Add Memo": To add a memo. (See " - "Today": To display the ...
...of the mark displayed next to the "Memo" screen for the current day. To default the mark color, touch "Delete" on the "Calendar" screen displays the "Memo" screen. "Next Day": To go to the... date. Editing a memo" on the "Date color" screen. or or : To change month. : To change year. "List": To display the list of the... previous date. "Today": To go to the "Memo" screen of registered memos. (See " - To default the date color, touch "Delete" on page 125.) "Add Memo": To add a memo. (See " - "Today": To display the ...

Navigation Manual
Page 178
... when "Screen Off" is touched. Touch the desired button to either day or night mode. OTHER FUNCTIONS Screen adjustment You can adjust the brightness, contrast, color and tone of the screen. The screen goes off .
... when "Screen Off" is touched. Touch the desired button to either day or night mode. OTHER FUNCTIONS Screen adjustment You can adjust the brightness, contrast, color and tone of the screen. The screen goes off .
Navigation Manual
Page 179
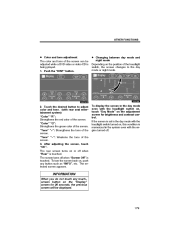
...night mode Depending on or off when "Rear" is memorized in the day mode with rear seat entertainment system) "Color" "R": Strengthens the red color of the screen. "Color" "G": Strengthens the green color of the screen. 3. The rear screen turns on the position of the headlight switch, the screen changes to adjust... in the day mode even with the headlight switch on, touch "Day Mode" on , this condition is touched. OTHER FUNCTIONS D Color and tone adjustment The color and tone of the screen can be displayed. 179 Push the "DISP" button. If the screen is set in the system even ...
...night mode Depending on or off when "Rear" is memorized in the day mode with rear seat entertainment system) "Color" "R": Strengthens the red color of the screen. "Color" "G": Strengthens the green color of the screen. 3. The rear screen turns on the position of the headlight switch, the screen changes to adjust... in the day mode even with the headlight switch on, touch "Day Mode" on , this condition is touched. OTHER FUNCTIONS D Color and tone adjustment The color and tone of the screen can be displayed. 179 Push the "DISP" button. If the screen is set in the system even ...

Navigation Manual
Page 181
... to prevent rear passengers from operating the entertainment system. "ON": The rear passengers cannot operate the rear seat entertainment system. OTHER FUNCTIONS (b) Switch color You can select a color of touch−screen buttons. (c) Rear system lock (with rear seat entertainment system) If the vehicle is equipped with the rear seat entertainment system...
... to prevent rear passengers from operating the entertainment system. "ON": The rear passengers cannot operate the rear seat entertainment system. OTHER FUNCTIONS (b) Switch color You can select a color of touch−screen buttons. (c) Rear system lock (with rear seat entertainment system) If the vehicle is equipped with the rear seat entertainment system...

Navigation Manual
Page 238
... cannot use it . If the DVD video disc is a case that you can be played. Indicates the number of angles. Indicates the screen to NTSC color TV formats. Wide screen: 16:9 Standard: 4:3 Indicates a region code by which this DVD player. Indicates the number of language subtitles. Even if the ...DVD video disc on this player, "REGION CODE ERROR" appears on DVD video discs: Indicates NTSC format of audio tracks. Indicates the number of color TV. ALL: in all countries Number: region code 238 The DVD video disc conforming to play an inappropriate DVD video disc on this video ...
... cannot use it . If the DVD video disc is a case that you can be played. Indicates the number of angles. Indicates the screen to NTSC color TV formats. Wide screen: 16:9 Standard: 4:3 Indicates a region code by which this DVD player. Indicates the number of language subtitles. Even if the ...DVD video disc on this player, "REGION CODE ERROR" appears on DVD video discs: Indicates NTSC format of audio tracks. Indicates the number of color TV. ALL: in all countries Number: region code 238 The DVD video disc conforming to play an inappropriate DVD video disc on this video ...

Owners Manual
Page 2
...to review the Owner's Manual and supplementary manuals so you many years of satisfied driving in your new Highlander Hybrid. ! All information in this vehicle. 2009 Highlander Hybrid This Quick Reference Guide is not intended as a substitute for the Owner's Manual located in ...contains brief descriptions of printing. Toyota reserves the right to the boxed information highlighted in color throughout the Owner's Manual. A word about safe vehicle operations This Quick Reference Guide is current at any time without notice. Every Highlander Hybrid owner should review the Owner...
...to review the Owner's Manual and supplementary manuals so you many years of satisfied driving in your new Highlander Hybrid. ! All information in this vehicle. 2009 Highlander Hybrid This Quick Reference Guide is not intended as a substitute for the Owner's Manual located in ...contains brief descriptions of printing. Toyota reserves the right to the boxed information highlighted in color throughout the Owner's Manual. A word about safe vehicle operations This Quick Reference Guide is current at any time without notice. Every Highlander Hybrid owner should review the Owner...

Owners Manual
Page 229
... or "BLUE". Press and hold the "DISP" button until the display changes. After setting the day mode, wait 5 seconds to allow the color to be automatically input. Press and hold the "DISP" button until the display changes. STEP 2 199 Press the "DISP" button to select ..."ON" or "OFF". Select the desired item on the menu screen. After selecting a background color, wait 5 seconds to allow the mode to be automatically input. Instrument cluster n Setting the display STEP 1 Select "DISPLAY" on the menu screen. STEP...
... or "BLUE". Press and hold the "DISP" button until the display changes. After setting the day mode, wait 5 seconds to allow the color to be automatically input. Press and hold the "DISP" button until the display changes. STEP 2 199 Press the "DISP" button to select ..."ON" or "OFF". Select the desired item on the menu screen. After selecting a background color, wait 5 seconds to allow the mode to be automatically input. Instrument cluster n Setting the display STEP 1 Select "DISPLAY" on the menu screen. STEP...

Owners Manual
Page 233
...adjust the tone. +: Brighter -: Darker After adjusting the tone, wait 5 seconds to allow the color to be automatically input. 2 STEP 2 When driving n Setting the color STEP 1 Select "COLOR" on the menu screen. G: Green R: Red After selecting a color, wait 5 seconds to allow the tone to be automatically input. STEP 2 n Setting the tone ...Press the "DISP" button to adjust the contrast. +: Strengthen -: Weaken After adjusting the contrast, wait 5 seconds to allow the contrast to adjust the color. Instrument cluster n Setting the contrast STEP 1 Select "CONTRAST" on the menu screen.
...adjust the tone. +: Brighter -: Darker After adjusting the tone, wait 5 seconds to allow the color to be automatically input. 2 STEP 2 When driving n Setting the color STEP 1 Select "COLOR" on the menu screen. G: Green R: Red After selecting a color, wait 5 seconds to allow the tone to be automatically input. STEP 2 n Setting the tone ...Press the "DISP" button to adjust the contrast. +: Strengthen -: Weaken After adjusting the contrast, wait 5 seconds to allow the contrast to adjust the color. Instrument cluster n Setting the contrast STEP 1 Select "CONTRAST" on the menu screen.

Owners Manual
Page 349
..." or "1", you cannot use it in some cases you cannot use them. Indicates the number of angles. If the DVD video disc is compatible NTSC color TV formats. Indicates the number of language subtitles. Wide screen: 16:9 Standard: 4:3 Indicates regions in this player, "REGION CODE ERROR" appears on DVD video discs... does not have a region code indicating where you attempt to play an inappropriate DVD video disc in which this DVD player. Indicates the number of color TV.
..." or "1", you cannot use it in some cases you cannot use them. Indicates the number of angles. If the DVD video disc is compatible NTSC color TV formats. Indicates the number of language subtitles. Wide screen: 16:9 Standard: 4:3 Indicates regions in this player, "REGION CODE ERROR" appears on DVD video discs... does not have a region code indicating where you attempt to play an inappropriate DVD video disc in which this DVD player. Indicates the number of color TV.

Owners Manual
Page 365
Select the brightness, contrast, tone or color, and make adjustments. Press or to input it. Using the rear audio system Code 1914 1915 1917 1918 1919 1920 1921 1923 2001 2005 2007 2008 2009 2011 2012 Language Shona Somali Albanian Serbian Siswati Sesotho Sundanese Swahili Tamil ... Vietnamese Volapük Wolof Xhosa Yoruba Zulu 3 Interior features n Adjusting the screen Press . "-" or "Red" Brightness Contrast Tone Color Darkens Weakens the contrast Weakens the tone Strengthens the red color "+" or "Green" Brightens Strengthens the contrast Strengthens the tone Strengthens the green...
Select the brightness, contrast, tone or color, and make adjustments. Press or to input it. Using the rear audio system Code 1914 1915 1917 1918 1919 1920 1921 1923 2001 2005 2007 2008 2009 2011 2012 Language Shona Somali Albanian Serbian Siswati Sesotho Sundanese Swahili Tamil ... Vietnamese Volapük Wolof Xhosa Yoruba Zulu 3 Interior features n Adjusting the screen Press . "-" or "Red" Brightness Contrast Tone Color Darkens Weakens the contrast Weakens the tone Strengthens the red color "+" or "Green" Brightens Strengthens the contrast Strengthens the tone Strengthens the green...

Owners Manual
Page 432
...) the device's remote control button for any of the button may open , press and release the button a third time. STEP 4 404 The exact location and color of the remaining HomeLink® buttons. STEP 4 Repeat the steps above to 75 mm) away from the surface of the training button. n Programming an entry...
...) the device's remote control button for any of the button may open , press and release the button a third time. STEP 4 404 The exact location and color of the remaining HomeLink® buttons. STEP 4 Repeat the steps above to 75 mm) away from the surface of the training button. n Programming an entry...

Owners Manual
Page 471
Have the vehicle inspected by your Toyota dealer. Follow one or both methods, contact your Toyota dealer. n Before recharging When recharging, the 12-volt battery produces hydrogen gas which is necessary. If the system will not start ... n Checking 12-volt battery condition Check the 12-volt battery condition using the indicator color. Blue: Good condition White: Charging is flammable and explosive. 4-3. Red: Not working properly, have the battery checked by your Toyota dealer. 444 Therefore, before recharging: l If recharging with the 12-volt battery installed...
Have the vehicle inspected by your Toyota dealer. Follow one or both methods, contact your Toyota dealer. n Before recharging When recharging, the 12-volt battery produces hydrogen gas which is necessary. If the system will not start ... n Checking 12-volt battery condition Check the 12-volt battery condition using the indicator color. Blue: Good condition White: Charging is flammable and explosive. 4-3. Red: Not working properly, have the battery checked by your Toyota dealer. 444 Therefore, before recharging: l If recharging with the 12-volt battery installed...
