
Owners Manual
Page 2
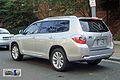
2009 Highlander This Quick Reference Guide is a summary of Toyota Motor Sales, U.S.A., Inc. Your dealership and the entire staff of basic vehicle operations. Every Highlander owner should review the Owner's Manual that accompanies this Quick Reference Guide is current at any time ... vehicle's glove box. The Quick Reference Guide is not a full description of printing. Refer to the boxed information highlighted in your new Highlander. We strongly encourage you to review the Owner's Manual and supplementary manuals so you can locate and use the vehicle's main equipment...
2009 Highlander This Quick Reference Guide is a summary of Toyota Motor Sales, U.S.A., Inc. Your dealership and the entire staff of basic vehicle operations. Every Highlander owner should review the Owner's Manual that accompanies this Quick Reference Guide is current at any time ... vehicle's glove box. The Quick Reference Guide is not a full description of printing. Refer to the boxed information highlighted in your new Highlander. We strongly encourage you to review the Owner's Manual and supplementary manuals so you can locate and use the vehicle's main equipment...

Owners Manual
Page 60
... the valet key only with the electronic key only. If the electronic key battery is lost, a new key can be pressed accidentally. Pressing a button may cause the electronic key to be made by your Toyota dealer using the mechanical key, store it in the vehicle. Carry the mechanical key together with smart...
... the valet key only with the electronic key only. If the electronic key battery is lost, a new key can be pressed accidentally. Pressing a button may cause the electronic key to be made by your Toyota dealer using the mechanical key, store it in the vehicle. Carry the mechanical key together with smart...

Owners Manual
Page 193
n Driving in your new Toyota To extend the life of water between the tires and the road surface, preventing the steering and brakes from high speeds when driving on a steep ...
n Driving in your new Toyota To extend the life of water between the tires and the road surface, preventing the steering and brakes from high speeds when driving on a steep ...

Owners Manual
Page 199
...the road, drive as slowly as possible. Doing so may be difficult to hold it there for a long time. Replace a flat tire with a new one. (→P. 526) When driving 2 NOTICE n When driving the vehicle Do not use the accelerator pedal or depress the accelerator and brake pedals together... to control your Toyota dealer as soon as possible to avoid damaging the wheels, underside of the brake discs are not replaced when needed. Hold the steering wheel ...
...the road, drive as slowly as possible. Doing so may be difficult to hold it there for a long time. Replace a flat tire with a new one. (→P. 526) When driving 2 NOTICE n When driving the vehicle Do not use the accelerator pedal or depress the accelerator and brake pedals together... to control your Toyota dealer as soon as possible to avoid damaging the wheels, underside of the brake discs are not replaced when needed. Hold the steering wheel ...

Owners Manual
Page 277
Do not drive if the vehicle is new or equipped with any new power train components (such as an engine, transmission, differential and wheel bearing), Toyota recommends that the following conditions are met: l The vehicle's tires are properly inflated. (→P. 562) l Trailer tires are inflated according to all applicable federal, state/...
Do not drive if the vehicle is new or equipped with any new power train components (such as an engine, transmission, differential and wheel bearing), Toyota recommends that the following conditions are met: l The vehicle's tires are properly inflated. (→P. 562) l Trailer tires are inflated according to all applicable federal, state/...

Owners Manual
Page 341
... 2 Remove the insulating sheet. 3 Interior features n When the remote controller battery is reduced. n When using the remote controller (for new vehicle owners) STEP 1 Remove the cover. n If the remote controller batteries are discharged The following symptoms may occur. l The rear ... according to the local laws. 315 Replace only with the same or equivalent type recommended by a Toyota dealer. l The operational range is fully depleted Remove the depleted batteries and install new 3 AA batteries. Using the rear audio system n Before using 3 AA batteries Batteries can be ...
... 2 Remove the insulating sheet. 3 Interior features n When the remote controller battery is reduced. n When using the remote controller (for new vehicle owners) STEP 1 Remove the cover. n If the remote controller batteries are discharged The following symptoms may occur. l The rear ... according to the local laws. 315 Replace only with the same or equivalent type recommended by a Toyota dealer. l The operational range is fully depleted Remove the depleted batteries and install new 3 AA batteries. Using the rear audio system n Before using 3 AA batteries Batteries can be ...
Owners Manual
Page 376
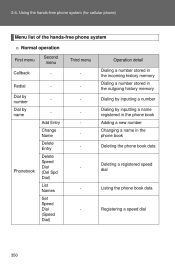
... incoming history memory Dialing a number stored in the outgoing history memory Dialing by inputting a number Dialing by inputting a name registered in the phone book Adding a new number Changing a name in the phone book Deleting the phone book data -
... incoming history memory Dialing a number stored in the outgoing history memory Dialing by inputting a number Dialing by inputting a name registered in the phone book Adding a new number Changing a name in the phone book Deleting the phone book data -

Owners Manual
Page 377
... First menu Dial "XXX (name)" Phone book add entry Phone book change name Second menu Operation detail Dialing a number registered in the phone book Adding a new number Changing a name of a phone number in the phone book 351 3-4.
... First menu Dial "XXX (name)" Phone book add entry Phone book change name Second menu Operation detail Dialing a number registered in the phone book Adding a new number Changing a name of a phone number in the phone book 351 3-4.

Owners Manual
Page 385
Pressing while a name of the registered cellular phones. Listing the registered cellular phones Selecting "List Phones" by using , and say a new name. 3-4. When listing is being read selects the cellular phone, and the following functions will be available Selecting a cellularphone: "Select Phone" Changing a registered name: "Change ...
Pressing while a name of the registered cellular phones. Listing the registered cellular phones Selecting "List Phones" by using , and say a new name. 3-4. When listing is being read selects the cellular phone, and the following functions will be available Selecting a cellularphone: "Select Phone" Changing a registered name: "Change ...

Owners Manual
Page 389
...-free phone system (for cellular phone) STEP 2 Enter the registered PIN by using Change the voice guidance volume. . STEP 3 Enter a new PIN by using , input the code 1 digit at a time. Input a new PIN by using Setting voice guidance volume STEP 1 STEP 2 Select "Guidance Vol" by using a voice command or a. To decrease the...
...-free phone system (for cellular phone) STEP 2 Enter the registered PIN by using Change the voice guidance volume. . STEP 3 Enter a new PIN by using , input the code 1 digit at a time. Input a new PIN by using Setting voice guidance volume STEP 1 STEP 2 Select "Guidance Vol" by using a voice command or a. To decrease the...

Owners Manual
Page 391
"Add Entry" l Setting speed dial 1. "Phonebook" → 2. "List Names" 3 Interior features Adding a new phone number The following methods can be used to add a new phone number: l Inputting a phone number by using a voice command l Transferring data from the cellular phone l Inputting a phone ...m (for c e llula r phone ) U sing t he phone book To enter the menu of each setting, follow the steps below: l Adding a new phone number 1. 3 -4 . "Phonebook" → 2. "Phonebook" → 2. "Change Name" l Deleting registered data 1. "Phonebook" → 2. "Phonebook" → 2.
"Add Entry" l Setting speed dial 1. "Phonebook" → 2. "List Names" 3 Interior features Adding a new phone number The following methods can be used to add a new phone number: l Inputting a phone number by using a voice command l Transferring data from the cellular phone l Inputting a phone ...m (for c e llula r phone ) U sing t he phone book To enter the menu of each setting, follow the steps below: l Adding a new phone number 1. 3 -4 . "Phonebook" → 2. "Phonebook" → 2. "Change Name" l Deleting registered data 1. "Phonebook" → 2. "Phonebook" → 2.

Owners Manual
Page 395
... the desired name by . Interior features using a voice command or c. STEP 3 STEP 4 Select "Record Name" with or . Press and hold the desired preset button. Say a new name, and select "Confirm" by using a voice command or . 369 name is read aloud, press using a voice command or b. Press , and say desired name, and...
... the desired name by . Interior features using a voice command or c. STEP 3 STEP 4 Select "Record Name" with or . Press and hold the desired preset button. Say a new name, and select "Confirm" by using a voice command or . 369 name is read aloud, press using a voice command or b. Press , and say desired name, and...

Owners Manual
Page 436
... opener or device that may operate, so ensure people and objects are out of death or serious injury. 410 Other interior features n Before programming l Install a new battery in the transmitter. A door or device without these features increases the risk of danger to federal safety standards Do not use the HomeLink®...
... opener or device that may operate, so ensure people and objects are out of death or serious injury. 410 Other interior features n Before programming l Install a new battery in the transmitter. A door or device without these features increases the risk of danger to federal safety standards Do not use the HomeLink®...
Owners Manual
Page 468
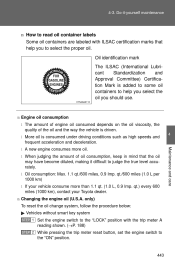
.... qt.) every 600 miles (1000 km), contact your vehicle consume more oil. qt./600 miles (1.0 L per 1000 km) l If your Toyota dealer. n Engine oil consumption l The amount of engine oil consumed depends on the oil viscosity, the quality of oil consumption, keep in mind...the amount of the oil and the way the vehicle is consumed under driving conditions such as high speeds and frequent acceleration and deceleration. 4-3. l A new engine consumes more than 1.1 qt. (1.0 L, 0.9 Imp. only) To reset the oil change system, follow the procedure below: Vehicles without smart ...
.... qt.) every 600 miles (1000 km), contact your vehicle consume more oil. qt./600 miles (1.0 L per 1000 km) l If your Toyota dealer. n Engine oil consumption l The amount of engine oil consumed depends on the oil viscosity, the quality of oil consumption, keep in mind...the amount of the oil and the way the vehicle is consumed under driving conditions such as high speeds and frequent acceleration and deceleration. 4-3. l A new engine consumes more than 1.1 qt. (1.0 L, 0.9 Imp. only) To reset the oil change system, follow the procedure below: Vehicles without smart ...

Owners Manual
Page 478
To equalize tire wear and extend tire life, Toyota recommends that tire rotation is shown by the "TWI" or " " marks, etc., molded on the sidewall of each tire. n Checking tires New tread Treadwear indicator Worn tread The location of treadwear indicators is carried out at the same interval as tire inspection. 4 Maintenance and...
To equalize tire wear and extend tire life, Toyota recommends that tire rotation is shown by the "TWI" or " " marks, etc., molded on the sidewall of each tire. n Checking tires New tread Treadwear indicator Worn tread The location of treadwear indicators is carried out at the same interval as tire inspection. 4 Maintenance and...
Owners Manual
Page 480
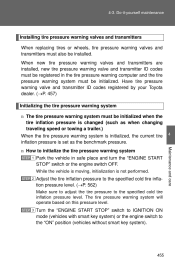
... warning system is initialized, the current tire inflation pressure is not performed. Have tire pressure warning valve and transmitter ID codes registered by your Toyota dealer. (→P. 457) Initializing the tire pressure warning system n The tire pressure warning system must be installed. STEP 2 Adjust the tire.... (→P. 562) Make sure to adjust the tire pressure to the "ON" position (vehicles without smart key system). 455 4-3. When new tire pressure warning valves and transmitters are installed, new tire pressure warning valve and transmitter ID codes must be initialized.
... warning system is initialized, the current tire inflation pressure is not performed. Have tire pressure warning valve and transmitter ID codes registered by your Toyota dealer. (→P. 457) Initializing the tire pressure warning system n The tire pressure warning system must be installed. STEP 2 Adjust the tire.... (→P. 562) Make sure to adjust the tire pressure to the "ON" position (vehicles without smart key system). 455 4-3. When new tire pressure warning valves and transmitters are installed, new tire pressure warning valve and transmitter ID codes must be initialized.

Owners Manual
Page 495
.... The "↑UP" marks shown on the filter should be clogged. Check the filter and replace if necessary. 470 4-3. In dusty areas or areas with a new one. Do-it with heavy traffic flow, replacement may be required. (For scheduled maintenance information, please refer to the maintenance schedule.
.... The "↑UP" marks shown on the filter should be clogged. Check the filter and replace if necessary. 470 4-3. In dusty areas or areas with a new one. Do-it with heavy traffic flow, replacement may be required. (For scheduled maintenance information, please refer to the maintenance schedule.

Owners Manual
Page 497
... smart key system), CR1632 (vehicles with smart key system) n Replacing the battery (vehicles without smart key system) STEP 1 Remove the cover using a coin protected with a new one if it -yourse lf m a int e na nc e Wire le ss re m ot e c ont rol/e le c t ronic ke y bat t e r y Replace the battery with tape etc...
... smart key system), CR1632 (vehicles with smart key system) n Replacing the battery (vehicles without smart key system) STEP 1 Remove the cover using a coin protected with a new one if it -yourse lf m a int e na nc e Wire le ss re m ot e c ont rol/e le c t ronic ke y bat t e r y Replace the battery with tape etc...

Owners Manual
Page 498
Do-it-yourself maintenance n Replacing the battery (vehicles with the "+" terminal facing up. 473 Insert a new battery with smart key system) STEP 1 Take out the mechanical key. STEP 2 Remove the cover. 4 Maintenance and care STEP 3 Remove the depleted battery. 4-3.
Do-it-yourself maintenance n Replacing the battery (vehicles with the "+" terminal facing up. 473 Insert a new battery with smart key system) STEP 1 Take out the mechanical key. STEP 2 Remove the cover. 4 Maintenance and care STEP 3 Remove the depleted battery. 4-3.

Owners Manual
Page 562
...wireless remote control transmitters can be purchased and programmed by your Toyota dealer. If a wireless remote control transmitter has been lost, bring the other wireless remote control transmitter when going to pick up the new transmitter. 538 For vehicles with the smart key system, ... e ps t o t a k e in a n e m e rge nc y If you lose your keys/w ireless remote control transmitter n Keys New genuine keys can be made by your Toyota dealer. n Wireless remote control transmitter (vehicles without the smart key system, bring a master key and the key number stamped on the key...
...wireless remote control transmitters can be purchased and programmed by your Toyota dealer. If a wireless remote control transmitter has been lost, bring the other wireless remote control transmitter when going to pick up the new transmitter. 538 For vehicles with the smart key system, ... e ps t o t a k e in a n e m e rge nc y If you lose your keys/w ireless remote control transmitter n Keys New genuine keys can be made by your Toyota dealer. n Wireless remote control transmitter (vehicles without the smart key system, bring a master key and the key number stamped on the key...

