Owner's Manual
Page 67
... 2-55 2-55 2-55 2-56 2-60 2-64 2-75 Engine Exhaust Windows Tilt Wheel Turn SignaVMultifunction Lever Exterior Lamps Interior Lamps Mirrors Storage Compartments Cellular Telephone (Option) Accessory Power Outlet Sunroof (Option) Universal Transmitter Instrument Panel Warning Lights, Gages and Indicators Driver Information Center 2-1 Also explained are the instrument panel the warning systems...
... 2-55 2-55 2-55 2-56 2-60 2-64 2-75 Engine Exhaust Windows Tilt Wheel Turn SignaVMultifunction Lever Exterior Lamps Interior Lamps Mirrors Storage Compartments Cellular Telephone (Option) Accessory Power Outlet Sunroof (Option) Universal Transmitter Instrument Panel Warning Lights, Gages and Indicators Driver Information Center 2-1 Also explained are the instrument panel the warning systems...
Owner's Manual
Page 86
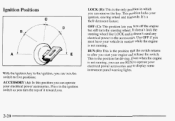
...the steering wheel. Ignition Positions C I LOCK (B): This is the only position in which you can use RUN to operateyour electrical power accessories and to the accessories. It doesn't lock the steering wheel like LOCK and it toward you can remove the key. Even when the engine is the ...position that the switch returns to fivepositions: ACCESSORY (A): In this position you . This is not running , you can operate your engine and release the switch. A E RUN (D): This is not running . ...
...the steering wheel. Ignition Positions C I LOCK (B): This is the only position in which you can use RUN to operateyour electrical power accessories and to the accessories. It doesn't lock the steering wheel like LOCK and it toward you can remove the key. Even when the engine is the ...position that the switch returns to fivepositions: ACCESSORY (A): In this position you . This is not running , you can operate your engine and release the switch. A E RUN (D): This is not running . ...
Owner's Manual
Page 87
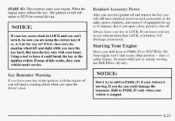
Retained Accessory Power After you turn the ignition off . if so, is , then turn the key hard....any other position-- key key Using a tool to 10 minutes. Starting Your Engine Move your shift lever to PARK (P) if your Aurora is moving , use NEUTRAL (N) only. Key Reminder Warning If you leave your hand. FNOTICE: If your key seems stuck in...with your key in LOCK and can't you turn the only with the engineoff, you will still have electrical power to such accessories as the radio, power windows, and sunroof (if equipped) forup to force it could damage the transaxle. If it is...
Retained Accessory Power After you turn the ignition off . if so, is , then turn the key hard....any other position-- key key Using a tool to 10 minutes. Starting Your Engine Move your shift lever to PARK (P) if your Aurora is moving , use NEUTRAL (N) only. Key Reminder Warning If you leave your hand. FNOTICE: If your key seems stuck in...with your key in LOCK and can't you turn the only with the engineoff, you will still have electrical power to such accessories as the radio, power windows, and sunroof (if equipped) forup to force it could damage the transaxle. If it is...

Owner's Manual
Page 96
... may find out how, see "Shifting Into PARK (P)" in the transaxle, so you maintain brake application. Turn the ignition key to turn off the retained accessory power feature. 2. To find it difficult to take some of the pressure from PARK (P) when the ignition is in the Index. Start the vehicle and...
... may find out how, see "Shifting Into PARK (P)" in the transaxle, so you maintain brake application. Turn the ignition key to turn off the retained accessory power feature. 2. To find it difficult to take some of the pressure from PARK (P) when the ignition is in the Index. Start the vehicle and...
Owner's Manual
Page 98
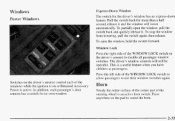
... thewindow from lowering,pull the switch again, then release. Window Lock Press the right side of the windows while the ignition is on or Retained Accessory Power is an active horn switch. Switches on the driver's armrest controleach of the WINDOW LOCK switch on the pad to use their window switches...
... thewindow from lowering,pull the switch again, then release. Window Lock Press the right side of the windows while the ignition is on or Retained Accessory Power is an active horn switch. Switches on the driver's armrest controleach of the WINDOW LOCK switch on the pad to use their window switches...
Owner's Manual
Page 120
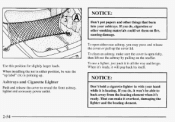
...: Don't holda cigarette lighter in all the way and let go. When installing the net in eitherposition, be able to reveal the frontashtray, lighter and accessory power outlet. NOTICE: Don't put papers and other smoking materials could set them on the snuffer. To use a lighter, just push it in with your...
...: Don't holda cigarette lighter in all the way and let go. When installing the net in eitherposition, be able to reveal the frontashtray, lighter and accessory power outlet. NOTICE: Don't put papers and other smoking materials could set them on the snuffer. To use a lighter, just push it in with your...

Owner's Manual
Page 121
.... It includes a sliding glasspanel and a sliding sunshade.The control switch will come on , or when retained accessory power is turned off. NOTICE: When using the accessory power outlet, the maximum loadof any electrical equipment you install. Accessory Power Outlet The power outlet insidethe front ashtray can be used to plug in or out...
.... It includes a sliding glasspanel and a sliding sunshade.The control switch will come on , or when retained accessory power is turned off. NOTICE: When using the accessory power outlet, the maximum loadof any electrical equipment you install. Accessory Power Outlet The power outlet insidethe front ashtray can be used to plug in or out...
Owner's Manual
Page 125
... explainedearlier. Release thebutton, then press it again to confirm it was programmed to two seconds. Locate the training receiver. button on the garage door opener 2. Accessories Accessories foryour universal transmitter are available from the manufacturer of the unit. Return to the transmitter by following : universal 1. To program a garage door opener with therolling...
... explainedearlier. Release thebutton, then press it again to confirm it was programmed to two seconds. Locate the training receiver. button on the garage door opener 2. Accessories Accessories foryour universal transmitter are available from the manufacturer of the unit. Return to the transmitter by following : universal 1. To program a garage door opener with therolling...
Owner's Manual
Page 127
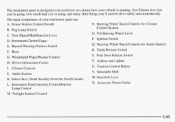
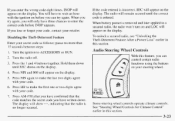
... to drive safely and economically. Instrument Cluster/Gages E. Ashtray and Lighter H. Driver Information Center I. Selectable Shift W. Power Mirrors Control Switch N. Traction Control Button V. Gearshift Lever X. Accessory Power Outlet J. Glove Box (Trunk Security Override Switch inside) L. Fog Lamp Switch C. Hazard Warning Flashers Switch E Horn G. Windshield WiperNasher Control R. Turn SignalMultifunction Lever 0. Fuel Door...
... to drive safely and economically. Instrument Cluster/Gages E. Ashtray and Lighter H. Driver Information Center I. Selectable Shift W. Power Mirrors Control Switch N. Traction Control Button V. Gearshift Lever X. Accessory Power Outlet J. Glove Box (Trunk Security Override Switch inside) L. Fog Lamp Switch C. Hazard Warning Flashers Switch E Horn G. Windshield WiperNasher Control R. Turn SignalMultifunction Lever 0. Fuel Door...
Owner's Manual
Page 132
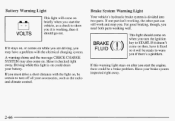
... so it checked right away. Driving while this warning light stays on briefly when you start the engine, there could drain your battery. Have your accessories, such as a check to show you it stayson, or comes on when you turn off all your brake system inspected right away. For good braking...
... so it checked right away. Driving while this warning light stays on briefly when you start the engine, there could drain your battery. Have your accessories, such as a check to show you it stayson, or comes on when you turn off all your brake system inspected right away. For good braking...
Owner's Manual
Page 172
... nine steps before starting the procedure. Turn the ignition to make the first one or two digits agree with your code. 5. Press MN again to ACCESSORY or RUN. 1. Turn the radio off. 4.
... nine steps before starting the procedure. Turn the ignition to make the first one or two digits agree with your code. 5. Press MN again to ACCESSORY or RUN. 1. Turn the radio off. 4.
Owner's Manual
Page 173
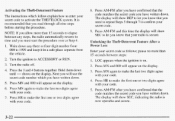
... the correct code before you can control certain radio functions using the buttons on the display. Press AM-FM after you have three chances to ACCESSORY or RUN. 2. Disabling the Theft-Deterrent Feature Enter your steering wheel. 4. If you enter the wrong code eight times, INOP will show ---,indicating thatthe radio...
... the correct code before you can control certain radio functions using the buttons on the display. Press AM-FM after you have three chances to ACCESSORY or RUN. 2. Disabling the Theft-Deterrent Feature Enter your steering wheel. 4. If you enter the wrong code eight times, INOP will show ---,indicating thatthe radio...
Owner's Manual
Page 220
... . Turn off the ignition on , it could saveyour radio. 4. Turn off all lamps that aren't needed as well as radios. Unplug unnecessary accessories plugged into the cigarette lighter or accessory power outlet. The repairs wouldn't be badly damaged. Get the vehicles close enough so the jumper cables can reach, but be sure...
... . Turn off the ignition on , it could saveyour radio. 4. Turn off all lamps that aren't needed as well as radios. Unplug unnecessary accessories plugged into the cigarette lighter or accessory power outlet. The repairs wouldn't be badly damaged. Get the vehicles close enough so the jumper cables can reach, but be sure...
Owner's Manual
Page 312
... a circuitbreaker in some electrical problem, have your vehicle, see "Servicing Your Air Bag-Equipped Vehicle" in the fusepanel protect the power windows and other power accessories. Electrical System Add-on the other side of the instrument panel. NOTICE: Don't add anything electrical your vehicle to your headlamp system checked right away.
... a circuitbreaker in some electrical problem, have your vehicle, see "Servicing Your Air Bag-Equipped Vehicle" in the fusepanel protect the power windows and other power accessories. Electrical System Add-on the other side of the instrument panel. NOTICE: Don't add anything electrical your vehicle to your headlamp system checked right away.
Owner's Manual
Page 320
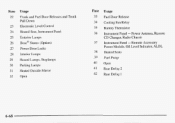
Fuse 22 23 24 Usage Trunk and Fuel Door Releases and Trunk Pull Down Electronic Level Control Heated Seat, Instrument Panel Exterior Lamps Fuse 33 Fuel Usage Door Release 34 Cooling Relay Fan Battery 35 Thermistor 36InstrumentPanel -- Remote Accessory Power Module, Oil Level Indicator, ALDL Heated Seats Fuel Pump Open Rear Defog 2 Rear Defog 1 28 29 30 39 40 41 42 31 32 PowerAntenna,Remote CD Changer, Radio Chassis 37 38 25 26 27 Base@ Stereo (Option) Power Door Locks Interior Lam] Hazard Lamps,xoplamps Parking Lamps Heated OutsideMirror Open Instrument Panel --
Fuse 22 23 24 Usage Trunk and Fuel Door Releases and Trunk Pull Down Electronic Level Control Heated Seat, Instrument Panel Exterior Lamps Fuse 33 Fuel Usage Door Release 34 Cooling Relay Fan Battery 35 Thermistor 36InstrumentPanel -- Remote Accessory Power Module, Oil Level Indicator, ALDL Heated Seats Fuel Pump Open Rear Defog 2 Rear Defog 1 28 29 30 39 40 41 42 31 32 PowerAntenna,Remote CD Changer, Radio Chassis 37 38 25 26 27 Base@ Stereo (Option) Power Door Locks Interior Lam] Hazard Lamps,xoplamps Parking Lamps Heated OutsideMirror Open Instrument Panel --
Owner's Manual
Page 324
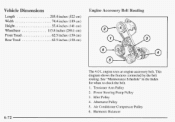
Idler Pulley 4. Harmonic Balancer Vehicle Dimensions Length ...205.4 inches (522 cm) Width ...74.4 inches (189 cm) Height ...55.4 inches (141 cm) Wheelbase ...113.8 inches (289.1 cm) Front Tread ...62.5 inches (159 cm) Rear Tread ...62.5 inches (159 cm) Engine Accessory Belt Routing The 4.0L engine uses an engine accessory belt. Air Conditioner Compressor Pulley 6. Alternator Pulley 5. This diagram shows the features connected by the belt routing. Power Steering Pump Pulley 3. Tensioner Arm Pulley 2. See "Maintenance Schedule" in the Index for when to check the belt. 1.
Idler Pulley 4. Harmonic Balancer Vehicle Dimensions Length ...205.4 inches (522 cm) Width ...74.4 inches (189 cm) Height ...55.4 inches (141 cm) Wheelbase ...113.8 inches (289.1 cm) Front Tread ...62.5 inches (159 cm) Rear Tread ...62.5 inches (159 cm) Engine Accessory Belt Routing The 4.0L engine uses an engine accessory belt. Air Conditioner Compressor Pulley 6. Alternator Pulley 5. This diagram shows the features connected by the belt routing. Power Steering Pump Pulley 3. Tensioner Arm Pulley 2. See "Maintenance Schedule" in the Index for when to check the belt. 1.
Owner's Manual
Page 336
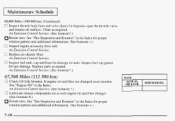
... and filter are changed,reset monitor. See "Tire Inspection and Rotation" in the Index for proper rotation pattern and additional information. (See footnote +.) 0 Inspect engine accessory drive belt. An Emission Control Service. 0 Replace aircleaner filter. Inspect fuel cap gasket 0 Inspect fuel tank, cap and lines for damage or for deposits, open...
... and filter are changed,reset monitor. See "Tire Inspection and Rotation" in the Index for proper rotation pattern and additional information. (See footnote +.) 0 Inspect engine accessory drive belt. An Emission Control Service. 0 Replace aircleaner filter. Inspect fuel cap gasket 0 Inspect fuel tank, cap and lines for damage or for deposits, open...
Owner's Manual
Page 363
... Control ...3-2 Averagespeed ...2-77 B a c k - Cleaning ...6-56 Antenna. u p Lamps Bulb Replacement ...6-40 Battery ...6-31 5-3 Jump Starting ...Replacement. Remote Lock Control ...2-13 Saver ...2-47 Warning Light ...2-66 Warnings ...5.3. 5.5 Accessory Power Outlet ...2-55 Air Bag ...1-21 How Does it Restrain ...1-24 1-23 How it Works ...Location ...1-23 Readiness Light ...1.22, 2.65 Servicing ...1-26 What Makes...
... Control ...3-2 Averagespeed ...2-77 B a c k - Cleaning ...6-56 Antenna. u p Lamps Bulb Replacement ...6-40 Battery ...6-31 5-3 Jump Starting ...Replacement. Remote Lock Control ...2-13 Saver ...2-47 Warning Light ...2-66 Warnings ...5.3. 5.5 Accessory Power Outlet ...2-55 Air Bag ...1-21 How Does it Restrain ...1-24 1-23 How it Works ...Location ...1-23 Readiness Light ...1.22, 2.65 Servicing ...1-26 What Makes...
Owner's Manual
Page 364
... Position ...1-42 Securing in the Center Rear Seat Position ...1-44 Securing in Emergencies ...4-10 2- 19 Break-In. Battery Voltage Message ...2-77 BBBAuto Line ...8-7 Belt. Engine Accessory ...6-72 Better Business Bureau Mediation ...8-7 Blizzard ...4-27 Brake 6-30 Adjustment ...Fluid ...6-28 Master Cylinder ...6-28 Parkmg ...2-27 6-30 PedalTravel ...Replacing System Parts ...6-3 1 System Warning Light...
... Position ...1-42 Securing in the Center Rear Seat Position ...1-44 Securing in Emergencies ...4-10 2- 19 Break-In. Battery Voltage Message ...2-77 BBBAuto Line ...8-7 Belt. Engine Accessory ...6-72 Better Business Bureau Mediation ...8-7 Blizzard ...4-27 Brake 6-30 Adjustment ...Fluid ...6-28 Master Cylinder ...6-28 Parkmg ...2-27 6-30 PedalTravel ...Replacing System Parts ...6-3 1 System Warning Light...
Owner's Manual
Page 366
... System ...3-3 Filling Your Tank ...6-5 Filter. Adding ...2.22.3.25. 6-60 Electrical System ...6-60 Electrochromic Daymight Rearview Mirror ...2-48 Electronic Climate Control ...3-2 Electronic Level Control ...4-3 1 Engine ...6-10 Accessory Belt ...6-72 Coolant ...6-21 Coolant Heater ...2-23 Coolant Level Check ...7- 14 Coolant Temperature Gage ...2-70 Exhaust ...2-31 FuseBlocks ...6-69 Identification ...6-59 OilLevelCheck ...7-14 5-14 Overheating...
... System ...3-3 Filling Your Tank ...6-5 Filter. Adding ...2.22.3.25. 6-60 Electrical System ...6-60 Electrochromic Daymight Rearview Mirror ...2-48 Electronic Climate Control ...3-2 Electronic Level Control ...4-3 1 Engine ...6-10 Accessory Belt ...6-72 Coolant ...6-21 Coolant Heater ...2-23 Coolant Level Check ...7- 14 Coolant Temperature Gage ...2-70 Exhaust ...2-31 FuseBlocks ...6-69 Identification ...6-59 OilLevelCheck ...7-14 5-14 Overheating...
