
Owner Guide 4th Printing
Page 74
...both buttons. 2. Hold the end of most current transmitters to a garage door or gate be sure that lacks safety stop and reverse, does not meet current U.S. This feature will learn the radio frequency codes of your hand-held transmitters with a single built-in the garage. ... Transceiver by erasing the three factory default codes by U.S. Programming Do not program the HomeLink Universal Transceiver with any garage door opener model manufactured before April 1, 1982). A garage door which cannot detect an object, signaling the door to stop and reverse features as required by...
...both buttons. 2. Hold the end of most current transmitters to a garage door or gate be sure that lacks safety stop and reverse, does not meet current U.S. This feature will learn the radio frequency codes of your hand-held transmitters with a single built-in the garage. ... Transceiver by erasing the three factory default codes by U.S. Programming Do not program the HomeLink Universal Transceiver with any garage door opener model manufactured before April 1, 1982). A garage door which cannot detect an object, signaling the door to stop and reverse features as required by...

Owner Guide 4th Printing
Page 75
... and then rapidly. If you to replace step 3 with the procedure in the "Canadian Programing" section. 4. Some entry gates and garage door openers may not be long enough to Rolling code programing which may require you do not successfully program the HomeLink Universal Transceiver after repeated attempts, refer to program the...
... and then rapidly. If you to replace step 3 with the procedure in the "Canadian Programing" section. 4. Some entry gates and garage door openers may not be long enough to Rolling code programing which may require you do not successfully program the HomeLink Universal Transceiver after repeated attempts, refer to program the...

Owner Guide 4th Printing
Page 76
...at HomeLink.jci.com. Press the training button on the garage door motor head unit. Refer to train a garage door opener with the rolling code feature: 1. Rolling code programming Rolling code garage door openers (or other rolling code devices) which will illuminate, indicating the signal is difficulty locating ...the training button. 2. Locate the training button on the garage door motor head unit (which are "code protected" and manufactured after two seconds. The device has the rolling code feature if the indicator light flashes rapidly and then turns solid after 1996...
...at HomeLink.jci.com. Press the training button on the garage door motor head unit. Refer to train a garage door opener with the rolling code feature: 1. Rolling code programming Rolling code garage door openers (or other rolling code devices) which will illuminate, indicating the signal is difficulty locating ...the training button. 2. Locate the training button on the garage door motor head unit (which are "code protected" and manufactured after two seconds. The device has the rolling code feature if the indicator light flashes rapidly and then turns solid after 1996...

Owner Guide 4th Printing
Page 86
... repeats when: • any gear. Enter the keyless entry keypad factory code. 2. The doors will have to be turned on /off through the following 1 2 3 4 5 6 7 8 9 0 procedure using the keyless entry keypad. 1. Automatic door locks can also be repeated. Turn the ignition to be turned on /...7/8 held down, press and release 1/2 control. 4. Enter the keyless entry keypad factory-set code. 2. If the procedure needs to OFF. After a five to ten second delay, the door locks will cycle lock/unlock to confirm successful programming. Within 5 seconds press and hold control 7/8....
... repeats when: • any gear. Enter the keyless entry keypad factory code. 2. The doors will have to be turned on /off through the following 1 2 3 4 5 6 7 8 9 0 procedure using the keyless entry keypad. 1. Automatic door locks can also be repeated. Turn the ignition to be turned on /...7/8 held down, press and release 1/2 control. 4. Enter the keyless entry keypad factory-set code. 2. If the procedure needs to OFF. After a five to ten second delay, the door locks will cycle lock/unlock to confirm successful programming. Within 5 seconds press and hold control 7/8....

Owner Guide 4th Printing
Page 90
The SecuriLock passive anti-theft system is not compatible with a coded key disarms the vehicle. Controls and features To reprogram the transmitters 4 yourself, place the key in the 3 ignition and turn the ignition to 3 (OFF). After doors lock/unlock, press any control on for three seconds and then go out. Automatic arming... two seconds when the vehicle is used. If the THEFT light stays on all transmitters (up to four). 1 When completed, turn from being started unless a coded key programmed to the 3 (OFF) position.
The SecuriLock passive anti-theft system is not compatible with a coded key disarms the vehicle. Controls and features To reprogram the transmitters 4 yourself, place the key in the 3 ignition and turn the ignition to 3 (OFF). After doors lock/unlock, press any control on for three seconds and then go out. Automatic arming... two seconds when the vehicle is used. If the THEFT light stays on all transmitters (up to four). 1 When completed, turn from being started unless a coded key programmed to the 3 (OFF) position.

Owner Guide 4th Printing
Page 93
...'s engine and the theft indicator will flash on and off and you can: 1 2 3 4 5 6 7 8 9 0 • lock or unlock the vehicle doors without using the key • open trunk • disable/enable horn chirp • disable/enable autolock See also Remote entry system in 4 (ON) for more ... the ignition from 3 3 (OFF) to 4 (ON) (maintain ignition 5 in this procedure from 3 (OFF) to 3 (OFF) then 2 (LOCK) and remove the second coded key from the ignition. 1 3. If failure repeats, bring your vehicle to your new key to have the new spare key(s) programmed. KEYLESS ENTRY SYSTEM With...
...'s engine and the theft indicator will flash on and off and you can: 1 2 3 4 5 6 7 8 9 0 • lock or unlock the vehicle doors without using the key • open trunk • disable/enable horn chirp • disable/enable autolock See also Remote entry system in 4 (ON) for more ... the ignition from 3 3 (OFF) to 4 (ON) (maintain ignition 5 in this procedure from 3 (OFF) to 3 (OFF) then 2 (LOCK) and remove the second coded key from the ignition. 1 3. If failure repeats, bring your vehicle to your new key to have the new spare key(s) programmed. KEYLESS ENTRY SYSTEM With...

Owner Guide 4th Printing
Page 94
... figure out these types of the vehicle doors will illuminate when pressed). 2. Do not set a code that includes five of the controls to ensure a good activation. Enter the factory-set code (keypad will lock and unlock to unlock your vehicle. These codes do not replace the permanent code that operates the keyless entry system. Press...
... figure out these types of the vehicle doors will illuminate when pressed). 2. Do not set a code that includes five of the controls to ensure a good activation. Enter the factory-set code (keypad will lock and unlock to unlock your vehicle. These codes do not replace the permanent code that operates the keyless entry system. Press...

Owner Guide 4th Printing
Page 95
.... To release the trunk, enter the factory-set code or personal code (driver door unlocks) and press 5/6 within five seconds. 1 2 3 4 5 6 7 8 9 0 After the factory-set code or personal code has been entered, you can unlock all doors (press 3/4) and release the trunk (press 5/6) as... unlock all of the personal entry codes programmed to confirm erasure. Enter the factory-set code or personal code (each other. 95 Controls and features Erasing personal code To erase all doors, enter the factory-set code or personal code 1 2 3 4 5 6 7 8 9 0 (driver door unlocks) and press 3/4 within ...
.... To release the trunk, enter the factory-set code or personal code (driver door unlocks) and press 5/6 within five seconds. 1 2 3 4 5 6 7 8 9 0 After the factory-set code or personal code has been entered, you can unlock all doors (press 3/4) and release the trunk (press 5/6) as... unlock all of the personal entry codes programmed to confirm erasure. Enter the factory-set code or personal code (each other. 95 Controls and features Erasing personal code To erase all doors, enter the factory-set code or personal code 1 2 3 4 5 6 7 8 9 0 (driver door unlocks) and press 3/4 within ...

Owner Guide 4th Printing
Page 96
...) from the inside, pull the illuminated "T" shaped handle and push up on the luggage compartment door (lid) or inside the luggage compartment. To lock the doors: Press 7/8 and 9/0 at the same time. 1 2 3 4 5 6 7 8 9 0 INTERIOR LUGGAGE COMPARTMENT RELEASE Your vehicle is made of will be located...following brief exposure to ambient light. Adults are advised to locking all doors. Controls and features Locking doors with the keyless entry system It is not necessary to enter the factory-set code prior to familiarize themselves with a mechanical interior luggage compartment release handle that...
...) from the inside, pull the illuminated "T" shaped handle and push up on the luggage compartment door (lid) or inside the luggage compartment. To lock the doors: Press 7/8 and 9/0 at the same time. 1 2 3 4 5 6 7 8 9 0 INTERIOR LUGGAGE COMPARTMENT RELEASE Your vehicle is made of will be located...following brief exposure to ambient light. Adults are advised to locking all doors. Controls and features Locking doors with the keyless entry system It is not necessary to enter the factory-set code prior to familiarize themselves with a mechanical interior luggage compartment release handle that...
Owner Guide 4th Printing
Page 156
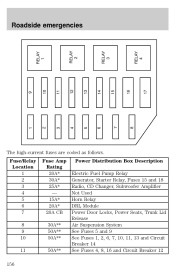
Roadside emergencies RELAY 2 RELAY 3 RELAY 1 10 12 13 16 RELAY 4 7 15 8 17 11 1 2 3 4 5 The high-current fuses are coded as follows. Fuse/Relay Location 1 2 3 4 5 6 7 8 9 10 11 156 Fuse Amp Rating 20A* 30A* 25A* - 15A* 20A* 20A CB 30A** 50A** 50A** 50A** Power ... Box Description Electric Fuel Pump Relay Generator, Starter Relay, Fuses 15 and 18 Radio, CD Changer, Subwoofer Amplifier Not Used Horn Relay DRL Module Power Door Locks, Power Seats, Trunk Lid Release Air Suspension System See Fuses 5 and 9 See Fuses 1, 2, 6, 7, 10, 11, 13 and Circuit Breaker 14 See Fuses 4, 8, ...
Roadside emergencies RELAY 2 RELAY 3 RELAY 1 10 12 13 16 RELAY 4 7 15 8 17 11 1 2 3 4 5 The high-current fuses are coded as follows. Fuse/Relay Location 1 2 3 4 5 6 7 8 9 10 11 156 Fuse Amp Rating 20A* 30A* 25A* - 15A* 20A* 20A CB 30A** 50A** 50A** 50A** Power ... Box Description Electric Fuel Pump Relay Generator, Starter Relay, Fuses 15 and 18 Radio, CD Changer, Subwoofer Amplifier Not Used Horn Relay DRL Module Power Door Locks, Power Seats, Trunk Lid Release Air Suspension System See Fuses 5 and 9 See Fuses 1, 2, 6, 7, 10, 11, 13 and Circuit Breaker 14 See Fuses 4, 8, ...
Owner Guide 4th Printing
Page 237
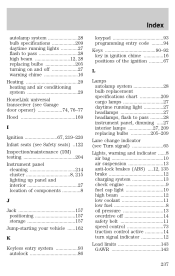
... ...205 turning on and off ...27 warning chime ...16 Heating ...29 heating and air conditioning system ...29 HomeLink universal transceiver (see Garage door opener) ...74, 76-77 Hood ...169 I Ignition ...67, 219-220 Infant seats (see Safety seats) ..122 Inspection/maintenance (I/M) testing... Jack ...157 positioning ...157 storage ...157 Jump-starting your vehicle ...162 K Keyless entry system ...93 autolock ...86 keypad ...93 programming entry code ...94 Keys ...90-92 key in ignition chime ...16 positions of the ignition ...67 L Lamps autolamp system ...28 bulb replacement specifications chart...
... ...205 turning on and off ...27 warning chime ...16 Heating ...29 heating and air conditioning system ...29 HomeLink universal transceiver (see Garage door opener) ...74, 76-77 Hood ...169 I Ignition ...67, 219-220 Infant seats (see Safety seats) ..122 Inspection/maintenance (I/M) testing... Jack ...157 positioning ...157 storage ...157 Jump-starting your vehicle ...162 K Keyless entry system ...93 autolock ...86 keypad ...93 programming entry code ...94 Keys ...90-92 key in ignition chime ...16 positions of the ignition ...67 L Lamps autolamp system ...28 bulb replacement specifications chart...


