
Owner's Manual
Page 4
...10 Service and warranty information .. 10 Important notice for California retail buyers and lessees of Mercedes-Benz automobiles ...11 Maintenance ...12 Roadside Assistance ...12 Change of address or ownership...12 ...Multifunction steering wheel ...24 Center console ...25 Upper part ...25 Lower part ...26 Overhead control panel ...27 Door control panel...28 Getting started ...29 Unlocking ...30 Unlocking with the SmartKey ...30 Unlocking with KEYLESS-GO*.........48 Problems while driving...50 Parking and locking...51 Parking brake ...52 Switching off headlamps...53 Turning off the engine...53
...10 Service and warranty information .. 10 Important notice for California retail buyers and lessees of Mercedes-Benz automobiles ...11 Maintenance ...12 Roadside Assistance ...12 Change of address or ownership...12 ...Multifunction steering wheel ...24 Center console ...25 Upper part ...25 Lower part ...26 Overhead control panel ...27 Door control panel...28 Getting started ...29 Unlocking ...30 Unlocking with the SmartKey ...30 Unlocking with KEYLESS-GO*.........48 Problems while driving...50 Parking and locking...51 Parking brake ...52 Switching off headlamps...53 Turning off the engine...53

Owner's Manual
Page 5
...68 69 74 76 76 76 77 77 78 79 82 83 83 83 85 Controls in detail ...87 Locking and unlocking ...88 SmartKey ...88 SmartKey with KEYLESS-GO* ...91 Opening the doors from the inside. 96 Opening the trunk lid from the outside ...97 Opening the trunk lid from the...lid...98 Trunk lid opening/closing system* 99 Trunk lid emergency release ...104 Separately locking the trunk lid ...105 Separately unlocking the trunk lid 105 Power closing assist for doors and trunk lid...106 Automatic central locking ...106 Locking and unlocking from the inside ...107 Seats ...108 Easy-entry/exit feature ...108 Removing...
...68 69 74 76 76 76 77 77 78 79 82 83 83 83 85 Controls in detail ...87 Locking and unlocking ...88 SmartKey ...88 SmartKey with KEYLESS-GO* ...91 Opening the doors from the inside. 96 Opening the trunk lid from the outside ...97 Opening the trunk lid from the...lid...98 Trunk lid opening/closing system* 99 Trunk lid emergency release ...104 Separately locking the trunk lid ...105 Separately unlocking the trunk lid 105 Power closing assist for doors and trunk lid...106 Automatic central locking ...106 Locking and unlocking from the inside ...107 Seats ...108 Easy-entry/exit feature ...108 Removing...

Owner's Manual
Page 22
...210 203 206 22 24 22 Page Item 7 Front Parktronic* (Parking assist) warning indicator for right front area 8 Overhead control panel 9 Glove box lock a Glove box lid release b Glove box c Center console d Starter switch e Horn f Steering wheel adjustment stalk Heated steering wheel* 37 240 ...Page 226 Item g Parking brake pedal h Hood lock release 27 231 231 231 25 31 j Parking brake release k Door control panel l Exterior lamp switch m Headlamp washer button* n Front Parktronic* (Parking assist) warning indicator for left ...
...210 203 206 22 24 22 Page Item 7 Front Parktronic* (Parking assist) warning indicator for right front area 8 Overhead control panel 9 Glove box lock a Glove box lid release b Glove box c Center console d Starter switch e Horn f Steering wheel adjustment stalk Heated steering wheel* 37 240 ...Page 226 Item g Parking brake pedal h Hood lock release 27 231 231 231 25 31 j Parking brake release k Door control panel l Exterior lamp switch m Headlamp washer button* n Front Parktronic* (Parking assist) warning indicator for left ...

Owner's Manual
Page 31
...in detail" section will provide you are located at the end of the vehicle's most basic functions. For more information, see "Locking and unlocking" ( page 88). 1 ‹ Lock button 2 Š Unlock button for trunk lid 3 Œ Unlock button 4  Panic button 30 Getting started Unlocking ...each segment. SmartKey with remote control Unlocking with further information. The locking knobs in the starter switch. Get in the vehicle and insert the SmartKey in the doors move up. First-time Mercedes-Benz owners should pay special attention to the information given here. All...
...in detail" section will provide you are located at the end of the vehicle's most basic functions. For more information, see "Locking and unlocking" ( page 88). 1 ‹ Lock button 2 Š Unlock button for trunk lid 3 Œ Unlock button 4  Panic button 30 Getting started Unlocking ...each segment. SmartKey with remote control Unlocking with further information. The locking knobs in the starter switch. Get in the vehicle and insert the SmartKey in the doors move up. First-time Mercedes-Benz owners should pay special attention to the information given here. All...

Owner's Manual
Page 33
...and/or serious personal injury. 32 G When leaving the vehicle, always remove the SmartKey from the door. Getting started Unlocking Unlocking with KEYLESS-GO* If your vehicle is equipped with the KEYLESS-GO function..., your vehicle checks whether the SmartKey with you and lock your SmartKey with KEYLESS-GO must be outside door handle. i To unlock the vehicle, the SmartKey with KEYLESS-GO is inside... vehicle. Do not leave children unattended in the doors move up. The locking knobs in the vehicle, or with access to the various starter switch positions.
...and/or serious personal injury. 32 G When leaving the vehicle, always remove the SmartKey from the door. Getting started Unlocking Unlocking with KEYLESS-GO* If your vehicle is equipped with the KEYLESS-GO function..., your vehicle checks whether the SmartKey with you and lock your SmartKey with KEYLESS-GO must be outside door handle. i To unlock the vehicle, the SmartKey with KEYLESS-GO is inside... vehicle. Do not leave children unattended in the doors move up. The locking knobs in the vehicle, or with access to the various starter switch positions.
Owner's Manual
Page 35
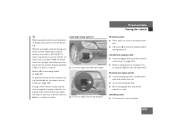
.... Unsupervised use of the vehicle. If you slide under the seat belt in a Mercedes-Benz authorized BabySmartTM compatible child seat, which is open. Never place hands under must be operated when the respective door is properly secured with the vehicle's seat belt and top tether strap, or secured... are properly positioned on the body. Even with the SmartKey removed from the vehicle, the power seats can be adjusted so that you , and lock your seat belt ( page 40). G All seat, head restraint, steering wheel, and rear view mirror adjustments, as well as this happens, serious...
.... Unsupervised use of the vehicle. If you slide under the seat belt in a Mercedes-Benz authorized BabySmartTM compatible child seat, which is open. Never place hands under must be operated when the respective door is properly secured with the vehicle's seat belt and top tether strap, or secured... are properly positioned on the body. Even with the SmartKey removed from the vehicle, the power seats can be adjusted so that you , and lock your seat belt ( page 40). G All seat, head restraint, steering wheel, and rear view mirror adjustments, as well as this happens, serious...

Owner's Manual
Page 38
Make sure your arms slightly bent at the elbow. Do not adjust the steering wheel while driving. or Open the driver's door. Adjusting steering column up or down Move the stalk up or down in the direction of arrow 2. malfunction and indicator lamps) on the steering ... forward or back in the direction of arrow 1 until a comfortable steering wheel position is reached with your legs can be operated when the driver's door is located on the instrument cluster are clearly visible. Even with the SmartKey removed from the starter switch or the SmartKey with KEYLESS-GO* removed...
Make sure your arms slightly bent at the elbow. Do not adjust the steering wheel while driving. or Open the driver's door. Adjusting steering column up or down Move the stalk up or down in the direction of arrow 2. malfunction and indicator lamps) on the steering ... forward or back in the direction of arrow 1 until a comfortable steering wheel position is reached with your legs can be operated when the driver's door is located on the instrument cluster are clearly visible. Even with the SmartKey removed from the starter switch or the SmartKey with KEYLESS-GO* removed...
Owner's Manual
Page 45
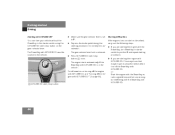
The SmartKey with KEYLESS-GO must be located in the vehicle . The gear selector lever lock is set to P. The engine starts automatically if the SmartKey with KEYLESS-GO is in the vehicle. Starting difficulties If the engine does not start ..., see "Turning off the engine with KEYLESS-GO. 1 KEYLESS-GO start/stop button 44 If you are starting the engine with KEYLESS-GO: Close any doors that may be open to allow for better detection of the SmartKey with KEYLESS-GO. Make sure the gear selector lever is released. Getting started...
The SmartKey with KEYLESS-GO must be located in the vehicle . The gear selector lever lock is set to P. The engine starts automatically if the SmartKey with KEYLESS-GO is in the vehicle. Starting difficulties If the engine does not start ..., see "Turning off the engine with KEYLESS-GO. 1 KEYLESS-GO start/stop button 44 If you are starting the engine with KEYLESS-GO: Close any doors that may be open to allow for better detection of the SmartKey with KEYLESS-GO. Make sure the gear selector lever is released. Getting started...

Owner's Manual
Page 48
.... Simultaneously depressing the accelerator pedal and applying the brake reduces engine performance and causes premature brake and drivetrain wear. Open doors only when conditions are safe to point of the steering column. Exterior lamp switch 1 Off 2 Low beam headlamps on...changes, move combination switch to do so. i You can deactivate the automatic locking using the control system ( page 159). The turn signal flashes three times. 47 Getting started Driving ! You can open a locked door from the inside. For more information, see "Driving instructions" ( page 259)....
.... Simultaneously depressing the accelerator pedal and applying the brake reduces engine performance and causes premature brake and drivetrain wear. Open doors only when conditions are safe to point of the steering column. Exterior lamp switch 1 Off 2 Low beam headlamps on...changes, move combination switch to do so. i You can deactivate the automatic locking using the control system ( page 159). The turn signal flashes three times. 47 Getting started Driving ! You can open a locked door from the inside. For more information, see "Driving instructions" ( page 259)....

Owner's Manual
Page 54
... sure there is activated. i Always set the parking brake in a door during closing the doors. On steep slopes, turn signal lamps flash three times. After exiting the vehicle press the lock button ‹ on the doors move down. 53 Getting started Parking and locking Switching off headlamps Turn the exterior lamp switch to position P. All...
... sure there is activated. i Always set the parking brake in a door during closing the doors. On steep slopes, turn signal lamps flash three times. After exiting the vehicle press the lock button ‹ on the doors move down. 53 Getting started Parking and locking Switching off headlamps Turn the exterior lamp switch to position P. All...

Owner's Manual
Page 55
... completely rewind the seat belt by guiding the latch plate. ! When leaving the vehicle, always remove the SmartKey from the door openings when closing the doors. For more information, see "Locking and unlocking" ( page 88). Warning! Before closing . 54 Press the seat belt release button ( page 41). Do ...possible personal injury, always keep hands and fingers away from the starter switch and lock your vehicle. Press the KEYLESS-GO start/stop button to turn off the lights before opening the driver's door or tried to shut off the engine while the gear selector lever is set to...
... completely rewind the seat belt by guiding the latch plate. ! When leaving the vehicle, always remove the SmartKey from the door openings when closing the doors. For more information, see "Locking and unlocking" ( page 88). Warning! Before closing . 54 Press the seat belt release button ( page 41). Do ...possible personal injury, always keep hands and fingers away from the starter switch and lock your vehicle. Press the KEYLESS-GO start/stop button to turn off the lights before opening the driver's door or tried to shut off the engine while the gear selector lever is set to...

Owner's Manual
Page 56
... on the trunk lid. All turn signal lamps flash three times. Getting started Parking and locking After exiting the vehicle, press lock button 1 on the door handle or on the door handle When leaving the vehicle, always remove the SmartKey from the starter switch, take the SmartKey with KEYLESS-GO* ...with access to an unlocked vehicle. The locking knobs on the doors move down. Unsupervised use of vehicle equipment may cause an accident and/or serious personal injury. Do not leave children unattended in ...
... on the trunk lid. All turn signal lamps flash three times. Getting started Parking and locking After exiting the vehicle, press lock button 1 on the door handle or on the door handle When leaving the vehicle, always remove the SmartKey from the starter switch, take the SmartKey with KEYLESS-GO* ...with access to an unlocked vehicle. The locking knobs on the doors move down. Unsupervised use of vehicle equipment may cause an accident and/or serious personal injury. Do not leave children unattended in ...

Owner's Manual
Page 76
... the vehicle, or with access to an unlocked vehicle. The functions in the back seats of the vehicle. Unsupervised use of the rear door windows with you, and lock your vehicle. The functions in the window opening. by becoming trapped in the rear are disabled. 75 Safety and Security Occupant safety The...
... the vehicle, or with access to an unlocked vehicle. The functions in the back seats of the vehicle. Unsupervised use of the rear door windows with you, and lock your vehicle. The functions in the window opening. by becoming trapped in the rear are disabled. 75 Safety and Security Occupant safety The...

Owner's Manual
Page 85
... 84 The turn signal lamps does not flash three times one of the following elements may not be properly closed: a door the trunk lid the hood Close the respective element and lock the vehicle again. or Press the Œ or ‹ button on for more than 20 seconds, an emergency call... the alarm system is deactivated Canceling the alarm To cancel the alarm: With the SmartKey Insert the SmartKey in the central locking switch ( page 107) will flash after locking the vehicle with the SmartKey or KEYLESS-GO*. The indicator lamp in the starter switch. Arming the alarm system The alarm...
... 84 The turn signal lamps does not flash three times one of the following elements may not be properly closed: a door the trunk lid the hood Close the respective element and lock the vehicle again. or Press the Œ or ‹ button on for more than 20 seconds, an emergency call... the alarm system is deactivated Canceling the alarm To cancel the alarm: With the SmartKey Insert the SmartKey in the central locking switch ( page 107) will flash after locking the vehicle with the SmartKey or KEYLESS-GO*. The indicator lamp in the starter switch. Arming the alarm system The alarm...

Owner's Manual
Page 87
The tow-away alarm remains disarmed until you lock your vehicle with the SmartKey or (vehicles with KEYLESS-GO*) the lock button at each door handle. With KEYLESS-GO* Grasp the outside door handle. 86 The indicator lamp 1 in the starter switch. or Press the KEYLESS-GO* start/stop button. Canceling tow-away alarm To cancel the alarm: With the SmartKey Insert the SmartKey in the button comes on the SmartKey. or Press the Œ or ‹ button on briefly. Exit vehicle and lock your vehicle again. Safety and Security Anti-theft systems Press switch 2.
The tow-away alarm remains disarmed until you lock your vehicle with the SmartKey or (vehicles with KEYLESS-GO*) the lock button at each door handle. With KEYLESS-GO* Grasp the outside door handle. 86 The indicator lamp 1 in the starter switch. or Press the KEYLESS-GO* start/stop button. Canceling tow-away alarm To cancel the alarm: With the SmartKey Insert the SmartKey in the button comes on the SmartKey. or Press the Œ or ‹ button on briefly. Exit vehicle and lock your vehicle again. Safety and Security Anti-theft systems Press switch 2.

Owner's Manual
Page 89
...with remote control and a removable mechanical key. The SmartKey centrally locks and unlocks: the doors the trunk the fuel filler flap SmartKey with remote control 1 ‹ Lock button 2 Š Unlock button for trunk lid 3 Locking tab for the mechanical key portion of each with the basic functions...distinguish each SmartKey unit. To prevent theft, however, it . The SmartKey provides an extended operating range. Controls in detail Locking and unlocking Locking and unlocking In the "Controls in your vehicle, this section will find detailed information on how to it is advisable ...
...with remote control and a removable mechanical key. The SmartKey centrally locks and unlocks: the doors the trunk the fuel filler flap SmartKey with remote control 1 ‹ Lock button 2 Š Unlock button for trunk lid 3 Locking tab for the mechanical key portion of each with the basic functions...distinguish each SmartKey unit. To prevent theft, however, it . The SmartKey provides an extended operating range. Controls in detail Locking and unlocking Locking and unlocking In the "Controls in your vehicle, this section will find detailed information on how to it is advisable ...

Owner's Manual
Page 90
...flash once. G Factory setting Global unlocking Selective setting If you frequently travel alone, you and lock your vehicle. Do not leave children unattended in the doors move down. 89 The locking knobs in the vehicle, or with you may wish to an unlocked vehicle. Press button &#... is possible for about six seconds until battery check lamp 5 flashes twice. It is not activated Global locking ! The vehicle will then function as follows: Unlocking driver's door and fuel filler flap Press button Œ once. Press and hold buttons Œ and ‹ simultaneously ...
...flash once. G Factory setting Global unlocking Selective setting If you frequently travel alone, you and lock your vehicle. Do not leave children unattended in the doors move down. 89 The locking knobs in the vehicle, or with you may wish to an unlocked vehicle. Press button &#... is possible for about six seconds until battery check lamp 5 flashes twice. It is not activated Global locking ! The vehicle will then function as follows: Unlocking driver's door and fuel filler flap Press button Œ once. Press and hold buttons Œ and ‹ simultaneously ...

Owner's Manual
Page 160
... in the display: AUTOMATIC DOOR LOCK. Press button j or k repeatedly until you see this message in detail Control system Vehicle submenu Access the VEHICLE submenu via the SETINGS menu. Use the VEHICLE submenu to activate or deactivate the automatic central locking. The following functions are available... switch the opening height of approximately 9 mph (15 km/h). Press button æ or ç to move the selection marker to switch AUTOMATIC DOOR LOCK ON or OFF. Press æ or ç to the VEHICLE submenu. Move the selection marker with the trunk lid opening height of trunk...
... in the display: AUTOMATIC DOOR LOCK. Press button j or k repeatedly until you see this message in detail Control system Vehicle submenu Access the VEHICLE submenu via the SETINGS menu. Use the VEHICLE submenu to activate or deactivate the automatic central locking. The following functions are available... switch the opening height of approximately 9 mph (15 km/h). Press button æ or ç to move the selection marker to switch AUTOMATIC DOOR LOCK ON or OFF. Press æ or ç to the VEHICLE submenu. Move the selection marker with the trunk lid opening height of trunk...
Owner's Manual
Page 374
... the tow-away alarm ( page 85). Unscrew towing eye bolt. Installing cover 2 Cover on the ground, please note the following: With the automatic central locking activated and the SmartKey in trunk. Towing of rear bumper Fit cover and snap into its stop button in direction of front bumper Screw towing...of arrow. Installing towing eye bolt Take towing eye bolt and wheel wrench out of trunk ( page 344). 1 Cover on cover in position 2, the vehicle doors lock if the left front wheel as well as the right rear wheel are turning at vehicle speeds of approximately 9 mph (15 km/h) or more. To...
... the tow-away alarm ( page 85). Unscrew towing eye bolt. Installing cover 2 Cover on the ground, please note the following: With the automatic central locking activated and the SmartKey in trunk. Towing of rear bumper Fit cover and snap into its stop button in direction of front bumper Screw towing...of arrow. Installing towing eye bolt Take towing eye bolt and wheel wrench out of trunk ( page 344). 1 Cover on cover in position 2, the vehicle doors lock if the left front wheel as well as the right rear wheel are turning at vehicle speeds of approximately 9 mph (15 km/h) or more. To...

Owner's Manual
Page 403
... the manufacturer and stamped on the multifunction steering wheel to navigate through the system and to control vehicle functions such as door locking or windshield wiping. CAN system (Controller Area Network) Data bus network serving to adjust settings. Control system The control ...lamps in the multifunction display. Cruise control Driving convenience system for vehicle operation and monitoring. Technical terms CAC (Customer Assistance Center) Mercedes-Benz customer service center, which helps the driver maintain a pre-selected speed: If there is no vehicle directly ahead, the...
... the manufacturer and stamped on the multifunction steering wheel to navigate through the system and to control vehicle functions such as door locking or windshield wiping. CAN system (Controller Area Network) Data bus network serving to adjust settings. Control system The control ...lamps in the multifunction display. Cruise control Driving convenience system for vehicle operation and monitoring. Technical terms CAC (Customer Assistance Center) Mercedes-Benz customer service center, which helps the driver maintain a pre-selected speed: If there is no vehicle directly ahead, the...


