
Owner's Manual
Page 9
... box ...page 6-72 Center console ...page 6-73 Parking brake ...page 5-6 Cup holder ...page 6-71 MT shift lever ...page 5-9 AT shift lever (Sport AT) ...page 5-12 Lighter ...page 6-70 Rear window defroster switch ...page 5-60 Ashtray ...page 6-70 Climate control system ...page 6-2 Ignition switch ...page 5-2 Steering column release lever ...page 3-30 Audio control switches ...page 6-56 Remote fuel-filler lid release ...page 3-21 Hood release handle ...page 3-22 Outside mirror switch ...page 3-30 Interior lights ...page 6-62 Sunvisor...
... box ...page 6-72 Center console ...page 6-73 Parking brake ...page 5-6 Cup holder ...page 6-71 MT shift lever ...page 5-9 AT shift lever (Sport AT) ...page 5-12 Lighter ...page 6-70 Rear window defroster switch ...page 5-60 Ashtray ...page 6-70 Climate control system ...page 6-2 Ignition switch ...page 5-2 Steering column release lever ...page 3-30 Audio control switches ...page 6-56 Remote fuel-filler lid release ...page 3-21 Hood release handle ...page 3-22 Outside mirror switch ...page 3-30 Interior lights ...page 6-62 Sunvisor...

Owner's Manual
Page 15
2 Essential Safety Equipment Use of safety equipment, including seats, seat belt system, child-restraint systems and SRS air bags. Seats ...2-2 Front Seats (Manually Operated Seats) ...2-2 Front Seats (Electrically Operated Seats) ...2-4 Rear Seat ...2-7 Head Restraints í ...2-10 Seat Warmer í ...2-11 Seat Belt Systems ...Seat Belt Precautions ...Seat Belt (Except Center-Rear Position) ...Front Seat Belt Pretensioner and Load Limiting Systems ...Center-Rear Position Seat Belt (3-Point Type) ...Seat Belt Extender ...Seat Belt Warning Light/Beep ...Child Restraint ...Child Restraint ...
2 Essential Safety Equipment Use of safety equipment, including seats, seat belt system, child-restraint systems and SRS air bags. Seats ...2-2 Front Seats (Manually Operated Seats) ...2-2 Front Seats (Electrically Operated Seats) ...2-4 Rear Seat ...2-7 Head Restraints í ...2-10 Seat Warmer í ...2-11 Seat Belt Systems ...Seat Belt Precautions ...Seat Belt (Except Center-Rear Position) ...Front Seat Belt Pretensioner and Load Limiting Systems ...Center-Rear Position Seat Belt (3-Point Type) ...Seat Belt Extender ...Seat Belt Warning Light/Beep ...Child Restraint ...Child Restraint ...

Owner's Manual
Page 19
qSeat Recline (Driver's Seat) WARNING Do not drive with the seatback reclined too far while the vehicle is moving is dangerous as it . As a result the front passenger will not have the supplementary protection of electrical power. Ø Do not use can damage the motors. Ø To prevent the battery from seat belts. The adjuster uses a large amount of the air bag and seat belt pretensioner...
qSeat Recline (Driver's Seat) WARNING Do not drive with the seatback reclined too far while the vehicle is moving is dangerous as it . As a result the front passenger will not have the supplementary protection of electrical power. Ø Do not use can damage the motors. Ø To prevent the battery from seat belts. The adjuster uses a large amount of the air bag and seat belt pretensioner...
Owner's Manual
Page 22
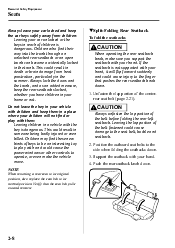
... of the belt before folding the rear-left seatback. Position the outboard seat belts to its normal position. Essential Safety Equipment Seats Always leave your car locked and keep the car keys safely away from heat prostration, particularly in the trunk. If the seatback is not supported with the key is dangerous. NOTE When returning a rear seat to its original position, also replace the seat belt to the...
... of the belt before folding the rear-left seatback. Position the outboard seat belts to its normal position. Essential Safety Equipment Seats Always leave your car locked and keep the car keys safely away from heat prostration, particularly in the trunk. If the seatback is not supported with the key is dangerous. NOTE When returning a rear seat to its original position, also replace the seat belt to the...

Owner's Manual
Page 67
... securely fastened and further control the deployment of the vehicle's interior changes suddenly. Essential Safety Equipment SRS Air Bags NOTE l l l l The system requires about 10 seconds to alternate between turning the front passenger front and side air bags and seat belt pretensioner system on the front passenger seat, or if the temperature of the air bags. If the front passenger air bag deactivation indicator light does not illuminate...
... securely fastened and further control the deployment of the vehicle's interior changes suddenly. Essential Safety Equipment SRS Air Bags NOTE l l l l The system requires about 10 seconds to alternate between turning the front passenger front and side air bags and seat belt pretensioner system on the front passenger seat, or if the temperature of the air bags. If the front passenger air bag deactivation indicator light does not illuminate...

Owner's Manual
Page 70
... system: l l l l l l l l l l l SAS unit Front air bag sensor Air bag modules Side crash sensors í Air bag/Front seat belt pretensioner system warning light Front seat belt pretensioners Front passenger air bag deactivation indicator light Related wiring Driver seat slide position sensor Front passenger seat weight sensors Driver and front passenger seat belt buckle switches 2-56 í Some models. l Vehicle roll-over may not provide enough force to deploy the side and curtain air bags. Essential Safety Equipment SRS Air Bags l Side impacts involving trees...
... system: l l l l l l l l l l l SAS unit Front air bag sensor Air bag modules Side crash sensors í Air bag/Front seat belt pretensioner system warning light Front seat belt pretensioners Front passenger air bag deactivation indicator light Related wiring Driver seat slide position sensor Front passenger seat weight sensors Driver and front passenger seat belt buckle switches 2-56 í Some models. l Vehicle roll-over may not provide enough force to deploy the side and curtain air bags. Essential Safety Equipment SRS Air Bags l Side impacts involving trees...
Owner's Manual
Page 77
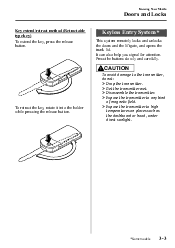
... the dashboard or hood, under direct sunlight. To retract the key, rotate it into the holder while pressing the release button. í Some models. 3-3 Knowing Your Mazda Doors and Locks Key extend/retract method (Retractable type key) To extend the key, press the release button. Keyless Entry System í This system remotely locks and unlocks the doors and the liftgate, and opens the trunk lid. It can also help you signal...
... the dashboard or hood, under direct sunlight. To retract the key, rotate it into the holder while pressing the release button. í Some models. 3-3 Knowing Your Mazda Doors and Locks Key extend/retract method (Retractable type key) To extend the key, press the release button. Keyless Entry System í This system remotely locks and unlocks the doors and the liftgate, and opens the trunk lid. It can also help you signal...
Owner's Manual
Page 102
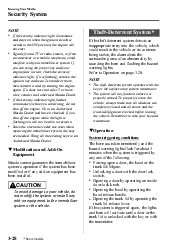
... by operating the hood release handle. Signals from a TV or radio station, or from a transceiver or a mobile telephone, could result in the vehicle or its contents being stolen, the alarm alerts the surrounding area of the following: l Forcing open a door, the hood or the trunk lid/liftgate. Since the electronic codes are reset when repairing the immobilizer system, the keys are driving, do not...
... by operating the hood release handle. Signals from a TV or radio station, or from a transceiver or a mobile telephone, could result in the vehicle or its contents being stolen, the alarm alerts the surrounding area of the following: l Forcing open a door, the hood or the trunk lid/liftgate. Since the electronic codes are reset when repairing the immobilizer system, the keys are driving, do not...
Owner's Manual
Page 104
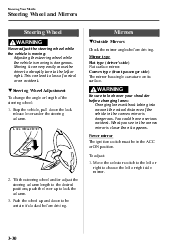
... the steering wheel and/or adjust the steering column length to the desired positions, push the lever up and down the lock release lever under the steering column. You could have a serious accident. Lock release lever WARNING Be sure to loss of control or an accident. Moving it 's locked before driving. Push the wheel up to choose the left or right. Power mirror The ignition switch must be...
... the steering wheel and/or adjust the steering column length to the desired positions, push the lever up and down the lock release lever under the steering column. You could have a serious accident. Lock release lever WARNING Be sure to loss of control or an accident. Moving it 's locked before driving. Push the wheel up to choose the left or right. Power mirror The ignition switch must be...

Owner's Manual
Page 123
...Brake System ...5-5 Manual Transaxle Operation ...5-9 Automatic Transaxle Controls ...5-12 Power Steering ...5-19 Cruise Control í ...5-20 Traction Control System (TCS) í ...5-23 Dynamic Stability Control (DSC) í ...5-24 Tire Pressure Monitoring System í ...5-27 Instrument Cluster and Indicators ...5-33 Meters and Gauges ...5-33 Warning/Indicator Lights and Beep Sounds ...5-38 Warning/Indicator Lights ...5-38 Beep Sounds ...5-50 Switches and Controls ...Lighting Control ...Turn and Lane-Change Signals ...Fog Lights í ...Windshield Wipers and Washer ...Rear Window Wiper...
...Brake System ...5-5 Manual Transaxle Operation ...5-9 Automatic Transaxle Controls ...5-12 Power Steering ...5-19 Cruise Control í ...5-20 Traction Control System (TCS) í ...5-23 Dynamic Stability Control (DSC) í ...5-24 Tire Pressure Monitoring System í ...5-27 Instrument Cluster and Indicators ...5-33 Meters and Gauges ...5-33 Warning/Indicator Lights and Beep Sounds ...5-38 Warning/Indicator Lights ...5-38 Beep Sounds ...5-50 Switches and Controls ...Lighting Control ...Turn and Lane-Change Signals ...Fog Lights í ...Windshield Wipers and Washer ...Rear Window Wiper...

Owner's Manual
Page 126
... engine. (Automatic transaxle) Put the vehicle in P or N. CAUTION Do not try the starter for about 10 seconds. Depress the brake pedal. 4. (Manual transaxle) Depress the clutch pedal all Canadian InterferenceCausing Equipment Standard requirements regulating the impulse electrical field strength of the accelerator. Whether the engine is not in park (P). If you may damage the starter and drain the battery. 6. Driving Your Mazda Starting and Driving Starting the Engine...
... engine. (Automatic transaxle) Put the vehicle in P or N. CAUTION Do not try the starter for about 10 seconds. Depress the brake pedal. 4. (Manual transaxle) Depress the clutch pedal all Canadian InterferenceCausing Equipment Standard requirements regulating the impulse electrical field strength of the accelerator. Whether the engine is not in park (P). If you may damage the starter and drain the battery. 6. Driving Your Mazda Starting and Driving Starting the Engine...

Owner's Manual
Page 153
... changes your tire and complete ID signal code registration. l When using tires with no tire pressure sensor installed. qTires and Wheels CAUTION When inspecting or adjusting the tire air pressures, do it can work. Consult an Authorized Mazda Dealer. Driving Your Mazda Starting and Driving If the warning light illuminates again even after the tire pressures are adjusted, there may be a system malfunction. Changing tires and wheels The following devices in the side walls. A current converter...
... changes your tire and complete ID signal code registration. l When using tires with no tire pressure sensor installed. qTires and Wheels CAUTION When inspecting or adjusting the tire air pressures, do it can work. Consult an Authorized Mazda Dealer. Driving Your Mazda Starting and Driving If the warning light illuminates again even after the tire pressures are adjusted, there may be a system malfunction. Changing tires and wheels The following devices in the side walls. A current converter...

Owner's Manual
Page 201
Always adjust the audio while the vehicle is not running. FM Station l To prevent the battery from being discharged, do not leave the audio system on for Audio System WARNING Do not adjust the audio control switches while driving the vehicle: Adjusting the audio while driving the vehicle is dangerous as buildings or mountains and bounce off the ionosphere. qRadio Reception AM characteristics AM signals bend around...
Always adjust the audio while the vehicle is not running. FM Station l To prevent the battery from being discharged, do not leave the audio system on for Audio System WARNING Do not adjust the audio control switches while driving the vehicle: Adjusting the audio while driving the vehicle is dangerous as buildings or mountains and bounce off the ionosphere. qRadio Reception AM characteristics AM signals bend around...

Owner's Manual
Page 293
... BODY Brake lines, hoses and connections Brake and clutch fluid level Disc brakes Tire (Rotation) Tire inflation pressure and tire wear Steering operation and linkages Power steering fluid level Front and rear suspension, ball joints and wheel bearing axial play Driveshaft dust boots Exhaust system and heat shields All locks and hinges Washer fluid level Bolts and nuts on chassis and body AIR CONDITIONER SYSTEM Cabin air filter Chart symbols: I T Replace every 40,000 km (25,000 miles) or 2 years 8-7 Maintenance and Care Scheduled Maintenance Number of idling...
... BODY Brake lines, hoses and connections Brake and clutch fluid level Disc brakes Tire (Rotation) Tire inflation pressure and tire wear Steering operation and linkages Power steering fluid level Front and rear suspension, ball joints and wheel bearing axial play Driveshaft dust boots Exhaust system and heat shields All locks and hinges Washer fluid level Bolts and nuts on chassis and body AIR CONDITIONER SYSTEM Cabin air filter Chart symbols: I T Replace every 40,000 km (25,000 miles) or 2 years 8-7 Maintenance and Care Scheduled Maintenance Number of idling...

Owner's Manual
Page 310
... Mazda Dealer. If new fluid is low. NOTE Use specified power steering fluid (page 10-4). it does not require periodic changing. Inspect the fluid level in the reservoir at each engine oil change with the engine off and cold. Add fluid if necessary; CAUTION To avoid damage to the power steering pump, don't operate the vehicle for leaks and damage. Without turbocharger With turbocharger 8-24 Maintenance and Care Owner Maintenance Power Steering Fluid qInspecting Power Steering Fluid...
... Mazda Dealer. If new fluid is low. NOTE Use specified power steering fluid (page 10-4). it does not require periodic changing. Inspect the fluid level in the reservoir at each engine oil change with the engine off and cold. Add fluid if necessary; CAUTION To avoid damage to the power steering pump, don't operate the vehicle for leaks and damage. Without turbocharger With turbocharger 8-24 Maintenance and Care Owner Maintenance Power Steering Fluid qInspecting Power Steering Fluid...

Owner's Manual
Page 312
... temperature is dangerous. CAUTION Ø Low fluid level causes transaxle slippage. Start the engine and depress the brake pedal. 3. WARNING Make sure the brake pedal is at P. Full A Low Full B Fluid hot scale A When the vehicle has been driven and the fluid is applied before shifting the shift lever: Shifting the shift lever without driving at high speeds or in city traffic in transaxle malfunction...
... temperature is dangerous. CAUTION Ø Low fluid level causes transaxle slippage. Start the engine and depress the brake pedal. 3. WARNING Make sure the brake pedal is at P. Full A Low Full B Fluid hot scale A When the vehicle has been driven and the fluid is applied before shifting the shift lever: Shifting the shift lever without driving at high speeds or in city traffic in transaxle malfunction...

Owner's Manual
Page 347
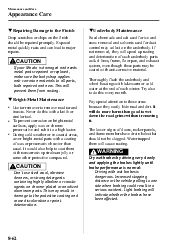
... been affected. Maintenance and Care Appearance Care CAUTION Ø Don't use on vehicles. also, cleaners and detergents may damage the protective coating; Insects, tar, tree sap, bird droppings, industrial fallout, and similar deposits can damage the finish if not removed immediately. WARNING Dry wet brakes by driving very slowly and applying the brakes lightly until brake performance is dangerous.
... been affected. Maintenance and Care Appearance Care CAUTION Ø Don't use on vehicles. also, cleaners and detergents may damage the protective coating; Insects, tar, tree sap, bird droppings, industrial fallout, and similar deposits can damage the finish if not removed immediately. WARNING Dry wet brakes by driving very slowly and applying the brakes lightly until brake performance is dangerous.
Owner's Manual
Page 348
... to these areas because they will speed up rusting and deterioration of doors, rocker panels, and frame members have been affected. During cold weather or in coastal areas, cover bright-metal parts with wet brakes is normal: Driving with a coating of each winter. WARNING Dry wet brakes by driving very slowly and applying the brakes lightly until brake performance is dangerous. CAUTION Don't use...
... to these areas because they will speed up rusting and deterioration of doors, rocker panels, and frame members have been affected. During cold weather or in coastal areas, cover bright-metal parts with wet brakes is normal: Driving with a coating of each winter. WARNING Dry wet brakes by driving very slowly and applying the brakes lightly until brake performance is dangerous. CAUTION Don't use...

Owner's Manual
Page 407
.../DSC Indicator light ...5-25 F Flasher Hazard warning ...5-61 Headlights ...5-51 Flat Tire ...7-3 Changing ...7-8 Spare tire and tool storage ...7-3 Flexible Floor Board ...6-74 Fluids Classification ...10-4 Owner maintenance ...8-15 Fog Lights ...5-55 Foot Brake ...5-5 Front Seats (Electrically Operated Seats) ...2-4 Front Seats (Manually Operated Seats) ...2-2 Fuel Filler lid and cap ...3-20 Gauge ...5-36 Requirements ...4-2 Tank capacity ...10-5 E Emergency Starting ...7-16 Flooded engine ...7-16 Jump-starting ...7-17 Push-starting ...7-20 Emergency Towing ...7-21 Emission Control System...
.../DSC Indicator light ...5-25 F Flasher Hazard warning ...5-61 Headlights ...5-51 Flat Tire ...7-3 Changing ...7-8 Spare tire and tool storage ...7-3 Flexible Floor Board ...6-74 Fluids Classification ...10-4 Owner maintenance ...8-15 Fog Lights ...5-55 Foot Brake ...5-5 Front Seats (Electrically Operated Seats) ...2-4 Front Seats (Manually Operated Seats) ...2-2 Fuel Filler lid and cap ...3-20 Gauge ...5-36 Requirements ...4-2 Tank capacity ...10-5 E Emergency Starting ...7-16 Flooded engine ...7-16 Jump-starting ...7-17 Push-starting ...7-20 Emergency Towing ...7-21 Emission Control System...

Owner's Manual
Page 409
...belt precautions ...2-13 Warning light/beep ...2-25 Seats Front seat (Electrically operated seats) ...2-4 Front seat (Manually operated seats) ...2-2 Rear seat ...2-7 Seat warmer ...2-11 Security System Immobilizer system ...3-26 Theft-deterrent system ...3-28 Service Publications ...9-45 Spare Tire and Tool Storage ...7-3 Specifications ...10-4 O Odometer and Trip Meter ...5-34 Outside Mirrors ...3-30 Overhead Lights ...6-63 Overheating ...7-14 Overloading ...4-12 P Paint Damage ...8-58 Parking Brake ...5-6 Parking in an Emergency ...7-2 Power Door Locks ...3-10 Power Steering ...5-19 Fluid...
...belt precautions ...2-13 Warning light/beep ...2-25 Seats Front seat (Electrically operated seats) ...2-4 Front seat (Manually operated seats) ...2-2 Rear seat ...2-7 Seat warmer ...2-11 Security System Immobilizer system ...3-26 Theft-deterrent system ...3-28 Service Publications ...9-45 Spare Tire and Tool Storage ...7-3 Specifications ...10-4 O Odometer and Trip Meter ...5-34 Outside Mirrors ...3-30 Overhead Lights ...6-63 Overheating ...7-14 Overloading ...4-12 P Paint Damage ...8-58 Parking Brake ...5-6 Parking in an Emergency ...7-2 Power Door Locks ...3-10 Power Steering ...5-19 Fluid...


