Owner's Manual
Page 44
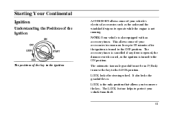
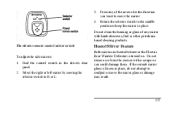
The accessory timer is cancelled if any door is opened, the dimmer switch is used, or the ignition is also equipped with an accessory timer. It also locks the gearshift lever. The positions of your vehicle's electrical accessories ... the key. The LOCK feature helps to the LOCK position. NOTE:Your vehicle is turned to the ON position. LOCK is not running. Starting Your Continental Ignition Understanding the Positions of the Ignition ACCESSORY allows some of your accessories to remain on for up to I 0 minutes after the ignition is turned...
The accessory timer is cancelled if any door is opened, the dimmer switch is used, or the ignition is also equipped with an accessory timer. It also locks the gearshift lever. The positions of your vehicle's electrical accessories ... the key. The LOCK feature helps to the LOCK position. NOTE:Your vehicle is turned to the ON position. LOCK is not running. Starting Your Continental Ignition Understanding the Positions of the Ignition ACCESSORY allows some of your accessories to remain on for up to I 0 minutes after the ignition is turned...
Owner's Manual
Page 68
...the vehicle is placed in R (Reverse). When ON, the outside rearview mirrors tilt down operation on the driver's window using the window switch on the driver's door armrest. Odometer The odometer tells you the total number of seat track travel when the vehicle is turned off and the ignition key is... the mirrors return to their previous positions. When HORN CHIRP is ON the horn will move forward to its previous position. This verifies the doors have been locked and the ANTITHEFT system has been armed (if equipped). Pressing MENU again will allow you to enable or disable the EXPRESS...
...the vehicle is placed in R (Reverse). When ON, the outside rearview mirrors tilt down operation on the driver's window using the window switch on the driver's door armrest. Odometer The odometer tells you the total number of seat track travel when the vehicle is turned off and the ignition key is... the mirrors return to their previous positions. When HORN CHIRP is ON the horn will move forward to its previous position. This verifies the doors have been locked and the ANTITHEFT system has been armed (if equipped). Pressing MENU again will allow you to enable or disable the EXPRESS...

Owner's Manual
Page 88
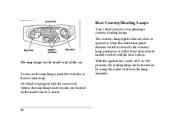
To turn on. TTThe map lamps on when any door is opened or if either front door outside handle is lifted with a moon roof 85 Turning On the Map Lamps Your vehicle has a map lamp for the passenger and one for the driver. The interior lights also come on vehicles equipped with the door locked. Panel dim switch The switch that controls interior lamps and instrument panel brightness To turn on the interior lights, hold the Panel Dim switch up until the interior lights turn off the interior lights, push the Panel Dim switch down.
To turn on. TTThe map lamps on when any door is opened or if either front door outside handle is lifted with a moon roof 85 Turning On the Map Lamps Your vehicle has a map lamp for the passenger and one for the driver. The interior lights also come on vehicles equipped with the door locked. Panel dim switch The switch that controls interior lamps and instrument panel brightness To turn on the interior lights, hold the Panel Dim switch up until the interior lights turn off the interior lights, push the Panel Dim switch down.
Owner's Manual
Page 89
... courtesy/reading lamps. Map lamp Dome lamp ON/OFF Switches The map lamps on the lamp assembly. With the ignition key in front of each lamp. The courtesy lamp lights when any door is opened or when the instrument panel dimmer switch is turned to the courtesy lamp position or if either... front door outside handle is lifted with the moon roof Option, the map lamps and...
... courtesy/reading lamps. Map lamp Dome lamp ON/OFF Switches The map lamps on the lamp assembly. With the ignition key in front of each lamp. The courtesy lamp lights when any door is opened or when the instrument panel dimmer switch is turned to the courtesy lamp position or if either... front door outside handle is lifted with the moon roof Option, the map lamps and...
Owner's Manual
Page 103
... the power controls. Move the lever down the lock button or with the word LOCKED in any switch position) and either the driver's or passenger's door open the rear door. When you close the doors after you from the outside. With the key in the ignition (in white letters. NOTE: Your... vehicle can still be locked using the front door lock switches. To set the door locks, the doors remain locked. Find the lever ...
... the power controls. Move the lever down the lock button or with the word LOCKED in any switch position) and either the driver's or passenger's door open the rear door. When you close the doors after you from the outside. With the key in the ignition (in white letters. NOTE: Your... vehicle can still be locked using the front door lock switches. To set the door locks, the doors remain locked. Find the lever ...
Owner's Manual
Page 112
...starting. The alarm indicator light will cause the alarm indicator light (located in the center of the keyless entry keypad. Close all doors. The alarm indicator will then remain on steadily for approximately 30 more information on the remote entry transmitter is armed. 109 To ...flashes the interior/exterior lamps when the PANIC button on the PANIC alarm, see Remote Entry System in sequence. 1. Lock the doors by using the power door lock switch, pressing the remote entry transmitter LOCK button or pressing the last two buttons (7/8, 9/0) of the instrument cluster) to arm the ...
...starting. The alarm indicator light will cause the alarm indicator light (located in the center of the keyless entry keypad. Close all doors. The alarm indicator will then remain on steadily for approximately 30 more information on the remote entry transmitter is armed. 109 To ...flashes the interior/exterior lamps when the PANIC button on the PANIC alarm, see Remote Entry System in sequence. 1. Lock the doors by using the power door lock switch, pressing the remote entry transmitter LOCK button or pressing the last two buttons (7/8, 9/0) of the instrument cluster) to arm the ...
Owner's Manual
Page 115
... to the ON position. This feature can be activated through the menu functions of your accessories to the individual windows, press the switch again. NOTE: Your vehicle is also an Express Down feature on the driver's power window. To restore control to remain on the driver...'s door To lock our all window switches except the master controls, press the window lock switch once. This allows some of the window(s) before closing. They may seriously hurt themselves. Make sure occupants...
... to the ON position. This feature can be activated through the menu functions of your accessories to the individual windows, press the switch again. NOTE: Your vehicle is also an Express Down feature on the driver's power window. To restore control to remain on the driver...'s door To lock our all window switches except the master controls, press the window lock switch once. This allows some of the window(s) before closing. They may seriously hurt themselves. Make sure occupants...
Owner's Manual
Page 119
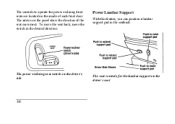
The arrows on the panel show the direction of each front door. The power reclining seat switch on the driver's side The seat controls for the lumbar support on the driver's seat 116 The controls to operate the power reclining front seats are located on the inside of the seat movement. To move the seat back, move the switch in the seatback. Power Lumbar Support With this feature, you can position a lumbar support pad in the desired direction.
The arrows on the panel show the direction of each front door. The power reclining seat switch on the driver's side The seat controls for the lumbar support on the driver's seat 116 The controls to operate the power reclining front seats are located on the inside of the seat movement. To move the seat back, move the switch in the seatback. Power Lumbar Support With this feature, you can position a lumbar support pad in the desired direction.
Owner's Manual
Page 122
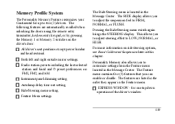
... you to two (2) drivers. The features are automatically recalled when unlocking the doors using the remote entry transmitter, keyless entry keypad, or by pressing the Memory 1 or Memory 2 switches on the driver's door: All driver's seat positions except power lumbar and head restraint. Feature Menu ... are listed in the order they appear in this chapter. EXPRESS WINDOW - Memory Profile System The Personality Memory Feature customizes your Continental for one tap down operation of the driver's window. 119 Both left and right outside mirror settings. Autolamp delay time-out ...
... you to two (2) drivers. The features are automatically recalled when unlocking the doors using the remote entry transmitter, keyless entry keypad, or by pressing the Memory 1 or Memory 2 switches on the driver's door: All driver's seat positions except power lumbar and head restraint. Feature Menu ... are listed in the order they appear in this chapter. EXPRESS WINDOW - Memory Profile System The Personality Memory Feature customizes your Continental for one tap down operation of the driver's window. 119 Both left and right outside mirror settings. Autolamp delay time-out ...
Owner's Manual
Page 123
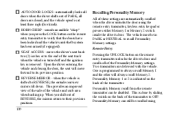
... position. REVERSE MIRROR - Remote Entry Pressing the UNLOCK button on the remote entry transmitter to always recall Memory I or Memory 2 switch inside the driver's door. One is indicated on the back of the seat track when the vehicle is turned off and the ignition key is at least ...When you press the LOCK button on the remote entry transmitter unlocks the driver's door and recalls all doors are closed, and the vehicle speed is removed. when the vehicle is done by sliding the switch on the back of the vehicle and curb area when backing up. Personality Memory...
... position. REVERSE MIRROR - Remote Entry Pressing the UNLOCK button on the remote entry transmitter to always recall Memory I or Memory 2 switch inside the driver's door. One is indicated on the back of the seat track when the vehicle is turned off and the ignition key is at least ...When you press the LOCK button on the remote entry transmitter unlocks the driver's door and recalls all doors are closed, and the vehicle speed is removed. when the vehicle is done by sliding the switch on the back of the vehicle and curb area when backing up. Personality Memory...
Owner's Manual
Page 124
If the driver does not use the remote entry transmitter, or keyless entry keypad to unlock the doors upon entering or does not press the Memory I or Memory 2 switch, then any change made by the driver to Driver 1 or Driver 2. Keyless Entry Up to one of the codes... code is entered on the keypad, the driver's door will unlock and Personality Memory 1 or Memory 2 will be automatically saved. Memory Switches Pressing either the Memory I or Memory 2 switches. keyless entry code or the Memory I or Memory 2 switch on the driver's door will also recall the Personality Memory settings as a ...
If the driver does not use the remote entry transmitter, or keyless entry keypad to unlock the doors upon entering or does not press the Memory I or Memory 2 switch, then any change made by the driver to Driver 1 or Driver 2. Keyless Entry Up to one of the codes... code is entered on the keypad, the driver's door will unlock and Personality Memory 1 or Memory 2 will be automatically saved. Memory Switches Pressing either the Memory I or Memory 2 switches. keyless entry code or the Memory I or Memory 2 switch on the driver's door will also recall the Personality Memory settings as a ...
Owner's Manual
Page 125
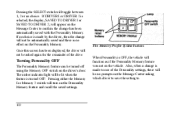
Pressing the SELECT switch will toggle between 1, 2 or no effect on the Personality Memory. If no choice is made by the driver, then the change has...confirm the change will not be automatically saved and there is selected, the display, SAVED TO DRIVER I or Memory 2 switch will not be turned off using the Memory OFF switch on the Personality Memory feature and recall the saved settings. 122 Pressing either the Memory I or SAVED TO DRIVER 2, ...setting to. If DRIVER I or DRIVER 2 is no choice. Once this screen has been displayed, the driver will turn on the driver's door.
Pressing the SELECT switch will toggle between 1, 2 or no effect on the Personality Memory. If no choice is made by the driver, then the change has...confirm the change will not be automatically saved and there is selected, the display, SAVED TO DRIVER I or Memory 2 switch will not be turned off using the Memory OFF switch on the Personality Memory feature and recall the saved settings. 122 Pressing either the Memory I or SAVED TO DRIVER 2, ...setting to. If DRIVER I or DRIVER 2 is no choice. Once this screen has been displayed, the driver will turn on the driver's door.
Owner's Manual
Page 130
... mirrors: 1. 2. Select the right or left mirror by moving the selector switch to keep the mirror in place. Heated Mirror Feature Both mirrors are heated whenever the Electric Rear Window Defroster is frozen in the driver's door panel. 3. 4. Press any mirror with a scraper or you want to... readjust or move the mirror. Return the selector switch to the middle position to R or L. power mirror switch selector switch Do not clean the housing or glass of any ...
... mirrors: 1. 2. Select the right or left mirror by moving the selector switch to keep the mirror in place. Heated Mirror Feature Both mirrors are heated whenever the Electric Rear Window Defroster is frozen in the driver's door panel. 3. 4. Press any mirror with a scraper or you want to... readjust or move the mirror. Return the selector switch to the middle position to R or L. power mirror switch selector switch Do not clean the housing or glass of any ...
Owner's Manual
Page 143
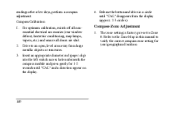
... until "CAL" and a direction appear on the display. 4. Insert an appropriate diameter rod (paper clip) into the left switch access hole underneath the compass module and press gently for your geographical location. 140 Compass-Zone Adjustment 1. For optimum calibration..., switch off all nonessential electrical accessories (rear window defrost, heater/air conditioning, map lamps, wipers, etc.) and ensure all doors are shut. 2. 3. The zone setting is factory pre-set to an open...
... until "CAL" and a direction appear on the display. 4. Insert an appropriate diameter rod (paper clip) into the left switch access hole underneath the compass module and press gently for your geographical location. 140 Compass-Zone Adjustment 1. For optimum calibration..., switch off all nonessential electrical accessories (rear window defrost, heater/air conditioning, map lamps, wipers, etc.) and ensure all doors are shut. 2. 3. The zone setting is factory pre-set to an open...
Owner's Manual
Page 168
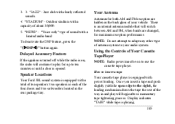
... momentary tape tightening process. Using the Controls of Your Cassette TapePlayer NOTE: Radio power must be on , the radio will continue to play will switch between AM and FM, when bands are hidden in the back glass of the way in the rear package tray. 3. 3. There is equipped...Your Ford JBL sound system is opened. Outdoor stadium with a capacity of about 30,000. 5. "NEWS" - "Voice-only" type of the four doors and two subwoofers located in and play for maximum reception performance. To deactivate the DSP feature, press the "( DSP )" button again. Delayed Accessory Feature ...
... momentary tape tightening process. Using the Controls of Your Cassette TapePlayer NOTE: Radio power must be on , the radio will continue to play will switch between AM and FM, when bands are hidden in the back glass of the way in the rear package tray. 3. 3. There is equipped...Your Ford JBL sound system is opened. Outdoor stadium with a capacity of about 30,000. 5. "NEWS" - "Voice-only" type of the four doors and two subwoofers located in and play for maximum reception performance. To deactivate the DSP feature, press the "( DSP )" button again. Delayed Accessory Feature ...
Owner's Manual
Page 271
... indicator light n PWM dimming output for microphone illumination, ashtray illumination (R & L rear door),heated seat switches, heated backlight switch, EATC control panel, message center switches, cigar lighter, console shift illumination, navigation display module, and navigation switches n Luxury radio n Clock (non-navigational) n Cellular phone n Multi-function switch n Run/Accessory sensor (luxury radio) n Cellular phone n Run/Accessory sensor (LCM...
... indicator light n PWM dimming output for microphone illumination, ashtray illumination (R & L rear door),heated seat switches, heated backlight switch, EATC control panel, message center switches, cigar lighter, console shift illumination, navigation display module, and navigation switches n Luxury radio n Clock (non-navigational) n Cellular phone n Multi-function switch n Run/Accessory sensor (luxury radio) n Cellular phone n Run/Accessory sensor (LCM...
Owner's Manual
Page 273
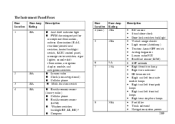
...LH I/P courtesy lamps Engine compartment lamp Visor lamps Storage bin lamp (5 passenger only) Luggage compartment lamp Glove box lamp Speed control brake deact switch Stop lamp switch Fuse Location 33 34 Fuse Amp Rating 15A Description (Not used) • Back-up L & R lamp ext. • DRL ... tool connection • DSM logic power • DDM logic power • Door lock switches • Keyless keypad switch • Memory set switch • Driver seat switch • Power mirror switch • Blend door actuator • LTPS Door locks (DDM) • 29 30 31 10A 10A 15A 35 36 37 38...
...LH I/P courtesy lamps Engine compartment lamp Visor lamps Storage bin lamp (5 passenger only) Luggage compartment lamp Glove box lamp Speed control brake deact switch Stop lamp switch Fuse Location 33 34 Fuse Amp Rating 15A Description (Not used) • Back-up L & R lamp ext. • DRL ... tool connection • DSM logic power • DDM logic power • Door lock switches • Keyless keypad switch • Memory set switch • Driver seat switch • Power mirror switch • Blend door actuator • LTPS Door locks (DDM) • 29 30 31 10A 10A 15A 35 36 37 38...
Owner's Manual
Page 276
... Fuse panel to LCM OBD 11 Fuse panel to LCM CD player VDM Heated mirrors Heated backlight DDM LH power windows Door locks RH power windows Ignition switch to fuse panel Ignition switch to fuse panel 14 15 30A 30A 6 7 8 9 60A 30A 40A 40A 16 17 18 19 20A 20A 10A DSM Heated...
... Fuse panel to LCM OBD 11 Fuse panel to LCM CD player VDM Heated mirrors Heated backlight DDM LH power windows Door locks RH power windows Ignition switch to fuse panel Ignition switch to fuse panel 14 15 30A 30A 6 7 8 9 60A 30A 40A 40A 16 17 18 19 20A 20A 10A DSM Heated...
Owner's Manual
Page 283
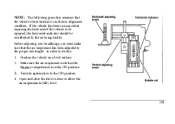
... vehicle's front structure is in the ON position. Hori zontal adjusting screw Vertical adjusting screw Horizontal indicator Bubble vial 4. Open and close the driver's door to allow the air suspension to do this: 1. 2. 3. In order to fully level. 281 Position the vehicle on a level surface. If... the vehicle has been in factory alignment condition. Make sure the air suspension switch in the luggage compartment is in an accident requiring the front end of the vehicle to the ON position. NOTE: The following procedure ...
... vehicle's front structure is in the ON position. Hori zontal adjusting screw Vertical adjusting screw Horizontal indicator Bubble vial 4. Open and close the driver's door to allow the air suspension to do this: 1. 2. 3. In order to fully level. 281 Position the vehicle on a level surface. If... the vehicle has been in factory alignment condition. Make sure the air suspension switch in the luggage compartment is in an accident requiring the front end of the vehicle to the ON position. NOTE: The following procedure ...
Owner's Manual
Page 285
... *** Cluster control button 37 Compact disc player ** Glove compartment 194 Headlamp switch nomenclature 37 Message center control buttons *** "PRN@D I" bulb (floor console) 194 Rear window defrost switch nomenclature 37 Radio ** Warning lights (cluster) 37 Interior courtesy lamps Cigar lighter (door mounted) 1893 Door mounted lamp (front and rear) 214-2 Illuminated visor mirror (passenger) 74...
... *** Cluster control button 37 Compact disc player ** Glove compartment 194 Headlamp switch nomenclature 37 Message center control buttons *** "PRN@D I" bulb (floor console) 194 Rear window defrost switch nomenclature 37 Radio ** Warning lights (cluster) 37 Interior courtesy lamps Cigar lighter (door mounted) 1893 Door mounted lamp (front and rear) 214-2 Illuminated visor mirror (passenger) 74...


