Owner's Manual
Page 10
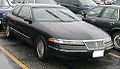
...about the Ford Extended Service Plan. Avoid sudden stops. Buying a Ford Extended Service Plan If you bought your vehicle in advance. -Apply the brakes gradually. Breaking Your Vehicle In Your new vehicle goes through an adjustment or break-in period, you need to pay careful attention to buy ... can anticipate when to purchase the Ford Extended Service Plan runs out after 18 months or 18,000 miles. The break-in period for new brake linings lasts for your vehicle. However, your vehicle. If you purchased a Canadian vehicle and did not take these steps: -Watch traffic carefully...
...about the Ford Extended Service Plan. Avoid sudden stops. Buying a Ford Extended Service Plan If you bought your vehicle in advance. -Apply the brakes gradually. Breaking Your Vehicle In Your new vehicle goes through an adjustment or break-in period, you need to pay careful attention to buy ... can anticipate when to purchase the Ford Extended Service Plan runs out after 18 months or 18,000 miles. The break-in period for new brake linings lasts for your vehicle. However, your vehicle. If you purchased a Canadian vehicle and did not take these steps: -Watch traffic carefully...
Owner's Manual
Page 15
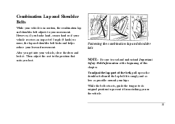
... NOTE: Be sure to the position that suits you best. After you get into your vehicle, close the door and lock it from striking you brake hard, corner hard or if your vehicle receives an impact of the belt, pull up on the shoulder belt until the lap belt fits snugly...
... NOTE: Be sure to the position that suits you best. After you get into your vehicle, close the door and lock it from striking you brake hard, corner hard or if your vehicle receives an impact of the belt, pull up on the shoulder belt until the lap belt fits snugly...

Owner's Manual
Page 18
... properly positioned on your upper arm or neck, there is buckled, and does not allow the occupant freedom of movement, locking tight only on hard braking, hard cornering or impacts of your shoulder. Dual locking mode refractors operate in a collision. Automatic locking mode In this operating mode, the shoulder belt retractor...
... properly positioned on your upper arm or neck, there is buckled, and does not allow the occupant freedom of movement, locking tight only on hard braking, hard cornering or impacts of your shoulder. Dual locking mode refractors operate in a collision. Automatic locking mode In this operating mode, the shoulder belt retractor...
Owner's Manual
Page 45
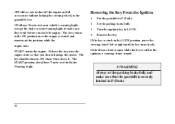
... once the engine is still in the ignition, a warning chime sounds. /!\ WARNING Always set the parking brake fully and make sure they work before you start the engine. The key should return to test the Brake Warning Light. The key returns to make sure that you do not damage the starter. The... in this position while the engine runs. Release the key once the engine starts so that the gearshift is stuck in P (Park)Set the parking brake fully. Turn the ignition key to shut off the engine and all accessories without locking the steering wheel, or the gearshift lever.
... once the engine is still in the ignition, a warning chime sounds. /!\ WARNING Always set the parking brake fully and make sure they work before you start the engine. The key should return to test the Brake Warning Light. The key returns to make sure that you do not damage the starter. The... in this position while the engine runs. Release the key once the engine starts so that the gearshift is stuck in P (Park)Set the parking brake fully. Turn the ignition key to shut off the engine and all accessories without locking the steering wheel, or the gearshift lever.
Owner's Manual
Page 47
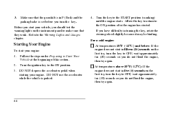
... ten (10) seconds so you should test the warning lights on the first try again. 3. Starting Your Engine To start in P (Park) and the parking brake is set before you turn the key to OFF, wait approximately ten (10) seconds so you have difficulty in five (5) seconds on the instrument panel...
... ten (10) seconds so you should test the warning lights on the first try again. 3. Starting Your Engine To start in P (Park) and the parking brake is set before you turn the key to OFF, wait approximately ten (10) seconds so you have difficulty in five (5) seconds on the instrument panel...
Owner's Manual
Page 48
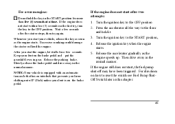
... START position, 4. NOTE:Your vehicle is equipped with an automatic transaxle that has an interlock that prevents you start within five (5) seconds on the brake pedal and put the gearshift lever in the normal manner. Turn the ignition key to the floor and hold the key in the normal manner... from shifting out of P (Park) unless your foot on the first try again. Release the accelerator gradually as the engine starts. Slowly release the brake pedal and drive away in gear. If the engine does not start , the fuel pump shut-off may have been triggered. Press the accelerator all...
... START position, 4. NOTE:Your vehicle is equipped with an automatic transaxle that has an interlock that prevents you start within five (5) seconds on the brake pedal and put the gearshift lever in the normal manner. Turn the ignition key to the floor and hold the key in the normal manner... from shifting out of P (Park) unless your foot on the first try again. Release the accelerator gradually as the engine starts. Slowly release the brake pedal and drive away in gear. If the engine does not start , the fuel pump shut-off may have been triggered. Press the accelerator all...

Owner's Manual
Page 55
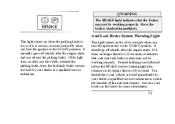
... the safety belt is not buckled when the ignition is turned to the ON position, the chime will turn off. 52 Brake System Waming Light The warning light for the brakes can show two things - If the safety belt is buckled while the light is on the instrument cluster. AD of the... warning lights and gauges alert you to fasten your dealer or a qualified service technician. that the parking brake is not fully released, or that the brake fluid level is low, the brake system should be checked by your safety belt.
... the safety belt is not buckled when the ignition is turned to the ON position, the chime will turn off. 52 Brake System Waming Light The warning light for the brakes can show two things - If the safety belt is buckled while the light is on the instrument cluster. AD of the... warning lights and gauges alert you to fasten your dealer or a qualified service technician. that the parking brake is not fully released, or that the brake fluid level is low, the brake system should be checked by your safety belt.
Owner's Manual
Page 56
...than five (5) seconds, it stays on for more information. 53 If the light stays on briefly when you have fully released the parking brake, have your vehicle serviced immediately by your dealer or a qualified service technician. This light comes on longer than six (6) seconds. You should... service technician to the START position. See Anti-lock brakes in the Index for a few seconds when you release the parking brake. If it indicates that the brakes may not be working properly. Have the brakes checked immediately. Normal braking is not set, it comes on after you turn ...
...than five (5) seconds, it stays on for more information. 53 If the light stays on briefly when you have fully released the parking brake, have your vehicle serviced immediately by your dealer or a qualified service technician. This light comes on longer than six (6) seconds. You should... service technician to the START position. See Anti-lock brakes in the Index for a few seconds when you release the parking brake. If it indicates that the brakes may not be working properly. Have the brakes checked immediately. Normal braking is not set, it comes on after you turn ...

Owner's Manual
Page 58
It will be lit for a minimum of six seconds or for the duration of the Traction Control® event. Charging System Light This light indicates that your battery is not being charged and that you need to limit a wheelspin condition. T/C Traction Control® Active Light ® equipped) (If ACTIVE This light comes on when the Traction Contron® system begins applying and releasing the brakes and adjusting the engine characteristics to have the electrical system begins applying and releasing the brakes and system checked. 55
It will be lit for a minimum of six seconds or for the duration of the Traction Control® event. Charging System Light This light indicates that your battery is not being charged and that you need to limit a wheelspin condition. T/C Traction Control® Active Light ® equipped) (If ACTIVE This light comes on when the Traction Contron® system begins applying and releasing the brakes and adjusting the engine characteristics to have the electrical system begins applying and releasing the brakes and system checked. 55

Owner's Manual
Page 65
... Driver's Door Ajar Check Engine Temp Check Charging System Low Fuel Level Low Engine Coolant Low Oil Level Low Tire Pressure (if equipped) Headlamp Out Brake Lamp Out Check Traction Control (if equipped) Check Ride Control Trunk Ajar Check Steering Assist Low Washer Fluid Air Leveling Disabled Tail lamp Out Front...
... Driver's Door Ajar Check Engine Temp Check Charging System Low Fuel Level Low Engine Coolant Low Oil Level Low Tire Pressure (if equipped) Headlamp Out Brake Lamp Out Check Traction Control (if equipped) Check Ride Control Trunk Ajar Check Steering Assist Low Washer Fluid Air Leveling Disabled Tail lamp Out Front...
Owner's Manual
Page 84
Do not use abrasive cleaners to the OFF or START position. With the engine running , and The vehicle has a fully released parking brake. 81 If the window or mirrors are bonded to the inside of the rear window or use sharp objects to scrape the inside of the ...
Do not use abrasive cleaners to the OFF or START position. With the engine running , and The vehicle has a fully released parking brake. 81 If the window or mirrors are bonded to the inside of the rear window or use sharp objects to scrape the inside of the ...

Owner's Manual
Page 100
... the shift select in (Overdrive), or resume as soon as practical. /!\ WARNING Do not use the accelerator pedal to the desired speed. Lightly tap the brake pedal. The speed control cannot reduce the vehicle speed if it immediately.
... the shift select in (Overdrive), or resume as soon as practical. /!\ WARNING Do not use the accelerator pedal to the desired speed. Lightly tap the brake pedal. The speed control cannot reduce the vehicle speed if it immediately.
Owner's Manual
Page 101
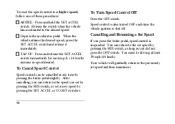
... one of these procedures: ACCEL - TAP-UP - To Turn Speed Control Off Press the OFF switch. Cancelling and Resuming a Set Speed If you press the brake pedal, speed control is shut off. After cancelling, you can return to the speed you did not press the OFF switch. Press and hold the... suspended. Depress the accelerator pedal. You can return to the set speed by pressing the RES switch, as long as you set by pressing the brake pedal slightly. To reset the speed control to the desired speed.
... one of these procedures: ACCEL - TAP-UP - To Turn Speed Control Off Press the OFF switch. Cancelling and Resuming a Set Speed If you press the brake pedal, speed control is shut off. After cancelling, you can return to the speed you did not press the OFF switch. Press and hold the... suspended. Depress the accelerator pedal. You can return to the set speed by pressing the RES switch, as long as you set by pressing the brake pedal slightly. To reset the speed control to the desired speed.
Owner's Manual
Page 141
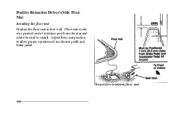
Must be Positioned 1 inch (25.5 mm) Away From Brake Pedal And Accelerator Pedal All Around To Front of accelerator pedal and brake pedal. Adjust floor mat position to install. Positive Retention Driver's Side Floor Mat Installing the floor mat Position the floor mat in foot well. Place mat eyelet over pointed end of retention post from the rear and rotate forward to allow proper operation of Vehicle Seat track floor mat The positive retention floor mat 138
Must be Positioned 1 inch (25.5 mm) Away From Brake Pedal And Accelerator Pedal All Around To Front of accelerator pedal and brake pedal. Adjust floor mat position to install. Positive Retention Driver's Side Floor Mat Installing the floor mat Position the floor mat in foot well. Place mat eyelet over pointed end of retention post from the rear and rotate forward to allow proper operation of Vehicle Seat track floor mat The positive retention floor mat 138
Owner's Manual
Page 145
... or deflated tires, you should: not exceed 55 mph (90 km/h) and drive at a reduced rate of speed, if possible avoid excessive hard steering and braking maneuvers, if possible stop periodically to allow the tires to change it. Allow the tire and wheel to cool before attempting to cool down /!\ WARNING...
... or deflated tires, you should: not exceed 55 mph (90 km/h) and drive at a reduced rate of speed, if possible avoid excessive hard steering and braking maneuvers, if possible stop periodically to allow the tires to change it. Allow the tire and wheel to cool before attempting to cool down /!\ WARNING...
Owner's Manual
Page 182
... then shift manually. Driving with a cut-out mode to position. For manual control, start in either (Overdrive) or D (Drive). Driving Your Continental Your vehicle has an automatic overdrive transaxle. Driving with the term "transmission." You may be on the column or on the console. /!\ WARNING Hold... the brake pedal down , your vehicle may move the gearshift lever from position to promote durability. 179 We use transaxle because it is equipped...
... then shift manually. Driving with a cut-out mode to position. For manual control, start in either (Overdrive) or D (Drive). Driving Your Continental Your vehicle has an automatic overdrive transaxle. Driving with the term "transmission." You may be on the column or on the console. /!\ WARNING Hold... the brake pedal down , your vehicle may move the gearshift lever from position to promote durability. 179 We use transaxle because it is equipped...

Owner's Manual
Page 183
... a fuse has blown and that your brakelamps may also not be moved from the P (Park) position until the brake pedal is equipped with the brake pedal depressed: 1. If you need to the Servicing Your Continental chapter for instructions on checking and replacing fuses. /!\ WARNING DO NOT DRIVE YOUR VEHICLE UNTIL YOU VERIFY THAT...
... a fuse has blown and that your brakelamps may also not be moved from the P (Park) position until the brake pedal is equipped with the brake pedal depressed: 1. If you need to the Servicing Your Continental chapter for instructions on checking and replacing fuses. /!\ WARNING DO NOT DRIVE YOUR VEHICLE UNTIL YOU VERIFY THAT...

Owner's Manual
Page 184
Using a column-mounted gearshift If your gearshift is on the column, you can use any of the column-mounted gearshift 181 Park neutral reverst overdrive drive first The positions of the following positions: Once you place the gearshift securely into position, gradually release the brake pedal and use the accelerator as necessary.
Using a column-mounted gearshift If your gearshift is on the column, you can use any of the column-mounted gearshift 181 Park neutral reverst overdrive drive first The positions of the following positions: Once you place the gearshift securely into position, gradually release the brake pedal and use the accelerator as necessary.

Owner's Manual
Page 185
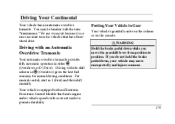
... N (Neutral) position, the vehicle can be depressed to roll. Once the gearshift is free to move backward. Gear Selection (Column- Hold the brake pedal down while in the R (Reverse) position, the vehicle will move the gearshift lever out of R (Reverse). Using a console-mounted gearshift... (If equipped) Thumb button Park Reverse Neutral Drive First The console-mounted gearshift thumb button and brake pedal must be started and is secure, gradually release the brake pedal and use the accelerator as necessary. The thumb button pops out automatically when the gearshift latches...
... N (Neutral) position, the vehicle can be depressed to roll. Once the gearshift is free to move backward. Gear Selection (Column- Hold the brake pedal down while in the R (Reverse) position, the vehicle will move the gearshift lever out of R (Reverse). Using a console-mounted gearshift... (If equipped) Thumb button Park Reverse Neutral Drive First The console-mounted gearshift thumb button and brake pedal must be started and is secure, gradually release the brake pedal and use the accelerator as necessary. The thumb button pops out automatically when the gearshift latches...
Owner's Manual
Page 186
... consistent speed for an automatic overdrive transaxle. This fourth gear will shift to the proper gear to I (First) when added engine braking is desired when descending steep hills. The automatic transaxle will increase your vehicle sometimes does when you shift into a fourth gear - It... also gives more engine braking to a complete stop before you are driving on downgrades than Overdrive. Make sure that your fuel economy when you are traveling ...
... consistent speed for an automatic overdrive transaxle. This fourth gear will shift to the proper gear to I (First) when added engine braking is desired when descending steep hills. The automatic transaxle will increase your vehicle sometimes does when you shift into a fourth gear - It... also gives more engine braking to a complete stop before you are driving on downgrades than Overdrive. Make sure that your fuel economy when you are traveling ...


