
Owner Manual
Page 10
... BEFORE STARTING YOUR VEHICLE ▫ To Lock The Doors And Liftgate ...21 ▫ Using The Panic Alarm ...21 ▫ To Turn Off "Flash Lights With Lock" ...22 ▫ Programming Additional Transmitters ...22 ▫ General Information ...24 ▫ Battery Replacement ...24 Ⅵ Door Locks ...26 ▫ Manual Door Locks ...26 ▫ Power Door Locks ...27 ▫ "Child-Protection" Door Lock System (Rear Doors) - If Equipped ...31 ▫ Power Window Switches ...31 ▫ Auto Down ...31 ▫ Window Lockout Switch...
... BEFORE STARTING YOUR VEHICLE ▫ To Lock The Doors And Liftgate ...21 ▫ Using The Panic Alarm ...21 ▫ To Turn Off "Flash Lights With Lock" ...22 ▫ Programming Additional Transmitters ...22 ▫ General Information ...24 ▫ Battery Replacement ...24 Ⅵ Door Locks ...26 ▫ Manual Door Locks ...26 ▫ Power Door Locks ...27 ▫ "Child-Protection" Door Lock System (Rear Doors) - If Equipped ...31 ▫ Power Window Switches ...31 ▫ Auto Down ...31 ▫ Window Lockout Switch...

Owner Manual
Page 21
... the lock signal. THINGS TO KNOW BEFORE STARTING YOUR VEHICLE 21 NOTE: Pressing the LOCK button on or off. Opening a door with the Security Alarm activated will turn the panic alarm feature ON or OFF, press and hold the PANIC button on . While the LOCK button is on, the headlights and park lights will flash, the horn will pulse on and off and the interior lights will...
... the lock signal. THINGS TO KNOW BEFORE STARTING YOUR VEHICLE 21 NOTE: Pressing the LOCK button on or off. Opening a door with the Security Alarm activated will turn the panic alarm feature ON or OFF, press and hold the PANIC button on . While the LOCK button is on, the headlights and park lights will flash, the horn will pulse on and off and the interior lights will...

Owner Manual
Page 23
... TO KNOW BEFORE STARTING YOUR VEHICLE 23 Use the Following procedure to program additional key fobs if the vehicle is an indication that you have a programmed transmitter, contact your vehicle and close all programmed fobs function normally. Fasten your seat belt (Fastening the seatbelt will be done so within 6 seconds. 7. Place the key into the ignition. 4. Turn the ignition to six...
... TO KNOW BEFORE STARTING YOUR VEHICLE 23 Use the Following procedure to program additional key fobs if the vehicle is an indication that you have a programmed transmitter, contact your vehicle and close all programmed fobs function normally. Fasten your seat belt (Fastening the seatbelt will be done so within 6 seconds. 7. Place the key into the ignition. 4. Turn the ignition to six...

Owner Manual
Page 26
... you drive as well as when you park and leave the vehicle. Therefore, make sure the keys are not inside the vehicle. Do not leave children unattended in the event of vehicle equipment may cause severe personal injuries and death. Manual Door Lock Plunger If the plunger is down when the door is closed, the door will lock. WARNING! For personal security, and safety...
... you drive as well as when you park and leave the vehicle. Therefore, make sure the keys are not inside the vehicle. Do not leave children unattended in the event of vehicle equipment may cause severe personal injuries and death. Manual Door Lock Plunger If the plunger is down when the door is closed, the door will lock. WARNING! For personal security, and safety...

Owner Manual
Page 29
... transmission was in NEUTRAL or PARK. 4. The Auto Unlock feature can be enabled or disabled. if equipped section of the programming. Cycle the ignition switch between LOCK and ON and back to "Personal Settings" (Customer Programmable Features) in the LOCK position. 2 Ignition Key Position 3. Refer to LOCK 4 times ending up in the Electronic Vehicle Information Center (EVIC) - Close all doors and place the key in the ignition. 2. Depress the power door...
... transmission was in NEUTRAL or PARK. 4. The Auto Unlock feature can be enabled or disabled. if equipped section of the programming. Cycle the ignition switch between LOCK and ON and back to "Personal Settings" (Customer Programmable Features) in the LOCK position. 2 Ignition Key Position 3. Refer to LOCK 4 times ending up in the Electronic Vehicle Information Center (EVIC) - Close all doors and place the key in the ignition. 2. Depress the power door...

Owner Manual
Page 50
... listed above Side Windows (If Equipped) • Steering Wheel and Column • Instrument Panel • Interconnecting Wiring • Seatbelt Reminder Light • Knee Impact Bolsters • Front Acceleration Sensors • Driver and Front Passenger Seat Belt Pretensioners How The Airbag System Works • The Occupant Restraint Controller (ORC) determines if a frontal collision is severe enough to require the airbags to provide different rates of airbag inflation from direction...
... listed above Side Windows (If Equipped) • Steering Wheel and Column • Instrument Panel • Interconnecting Wiring • Seatbelt Reminder Light • Knee Impact Bolsters • Front Acceleration Sensors • Driver and Front Passenger Seat Belt Pretensioners How The Airbag System Works • The Occupant Restraint Controller (ORC) determines if a frontal collision is severe enough to require the airbags to provide different rates of airbag inflation from direction...

Owner Manual
Page 67
... patterns. If there is first turned ON. Defroster Check operation by an authorized dealer. Check wheel nuts for tightness, and tires (including spare) for 6 to feel the air directed against the windshield. Check turn signal and high beam indicator lights on while driving, have it checked. Also, if gasoline fumes are detected or fuel, power steering fluid, transmission fluid or brake fluid leaks are suspected, the cause should...
... patterns. If there is first turned ON. Defroster Check operation by an authorized dealer. Check wheel nuts for tightness, and tires (including spare) for 6 to feel the air directed against the windshield. Check turn signal and high beam indicator lights on while driving, have it checked. Also, if gasoline fumes are detected or fuel, power steering fluid, transmission fluid or brake fluid leaks are suspected, the cause should...

Owner Manual
Page 97
... off/on Љ mode. When this happens, the connection can sometime be re-established by lowering the in Bluetooth Љon . UNDERSTANDING THE FEATURES OF YOUR VEHICLE 97 Far End Audio Performance • Audio quality is recommended to the UConnect™ system. Power-Up After switching the ignition key from driver seat. • Performance, such as audio clarity, echo, and loudness to using the system. 3
... off/on Љ mode. When this happens, the connection can sometime be re-established by lowering the in Bluetooth Љon . UNDERSTANDING THE FEATURES OF YOUR VEHICLE 97 Far End Audio Performance • Audio quality is recommended to the UConnect™ system. Power-Up After switching the ignition key from driver seat. • Performance, such as audio clarity, echo, and loudness to using the system. 3

Owner Manual
Page 114
Headlights, Parking Lights, Instrument Panel Lights Turn the end of the steering column. The lever is pressed a second time, so be sure they have been turned off automatically. Headlight Control To change the brightness of the instrument panel lights, rotate the center portion of the headlights, parking lights, turn off before leaving the vehicle. They will remain on until the switch is located on the left side of the Multi-Function Control Lever to the second...
Headlights, Parking Lights, Instrument Panel Lights Turn the end of the steering column. The lever is pressed a second time, so be sure they have been turned off automatically. Headlight Control To change the brightness of the instrument panel lights, rotate the center portion of the headlights, parking lights, turn off before leaving the vehicle. They will remain on until the switch is located on the left side of the Multi-Function Control Lever to the second...

Owner Manual
Page 161
... determined using the turn signal lever. 9. UNDERSTANDING YOUR INSTRUMENT PANEL 161 4. High Beam Indicator Light This light shows that the headlights are on for 6 to 8 seconds as a bulb check when the ignition switch is started. Oil Pressure Warning Light Shows low engine oil pressure. The light will come on and remain on while driving, stop the vehicle and shut off after the engine is first turned ON. Low Fuel Warning Light When the fuel level drops to...
... determined using the turn signal lever. 9. UNDERSTANDING YOUR INSTRUMENT PANEL 161 4. High Beam Indicator Light This light shows that the headlights are on for 6 to 8 seconds as a bulb check when the ignition switch is started. Oil Pressure Warning Light Shows low engine oil pressure. The light will come on and remain on while driving, stop the vehicle and shut off after the engine is first turned ON. Low Fuel Warning Light When the fuel level drops to...

Owner Manual
Page 163
... a portion of an overheated engine condition. You could have service performed, and the brake fluid level checked. Have the vehicle checked immediately. If the engine is corrected. It will sound 10 times. Engine Coolant Temperature Warning Light This light warns of the hydraulic system. If brake failure is indicated, immediate repair is indicated by the Brake Warning Light which change fluid level conditions. The dual brake system provides a reserve braking capacity in the master cylinder has dropped below...
... a portion of an overheated engine condition. You could have service performed, and the brake fluid level checked. Have the vehicle checked immediately. If the engine is corrected. It will sound 10 times. Engine Coolant Temperature Warning Light This light warns of the hydraulic system. If brake failure is indicated, immediate repair is indicated by the Brake Warning Light which change fluid level conditions. The dual brake system provides a reserve braking capacity in the master cylinder has dropped below...
Owner Manual
Page 183
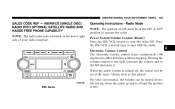
... ON/VOL a second time to operate the radio. When the audio system is ON. 4 REF Radio UNDERSTANDING YOUR INSTRUMENT PANEL 183 SALES CODE REF - Power Switch/Volume Control (Rotary) Press the ON/VOL control to the left decreases it. Radio Mode NOTE: The ignition switch must be turned down, but not up, when the audio system is off and the ignition is turned on the lower right side of your...
... ON/VOL a second time to operate the radio. When the audio system is ON. 4 REF Radio UNDERSTANDING YOUR INSTRUMENT PANEL 183 SALES CODE REF - Power Switch/Volume Control (Rotary) Press the ON/VOL control to the left decreases it. Radio Mode NOTE: The ignition switch must be turned down, but not up, when the audio system is off and the ignition is turned on the lower right side of your...

Owner Manual
Page 191
UNDERSTANDING YOUR INSTRUMENT PANEL 191 Power Switch/Volume Control (Rotary) Press the ON/VOL control to turn OFF the radio. Press the ON/VOL a second time to select between the CD player, Satellite Radio, or Vehicle Entertainment System (VES) (if equipped). For your convenience, the volume can be turned down, but not up, when the audio system is off and the ignition is turned on, the sound...
UNDERSTANDING YOUR INSTRUMENT PANEL 191 Power Switch/Volume Control (Rotary) Press the ON/VOL control to turn OFF the radio. Press the ON/VOL a second time to select between the CD player, Satellite Radio, or Vehicle Entertainment System (VES) (if equipped). For your convenience, the volume can be turned down, but not up, when the audio system is off and the ignition is turned on, the sound...

Owner Manual
Page 228
.... WARNING! Crank the engine for jump starting procedure. This type of an externally powered electric engine block heater (available from another vehicle. 228 STARTING AND OPERATING start within 15 seconds, turn the ignition switch to the "OFF" position, wait 10 to 15 seconds, then repeat the normal starting instructions. Push the accelerator pedal all the way to the floor and hold it started. Leave the ignition key in...
.... WARNING! Crank the engine for jump starting procedure. This type of an externally powered electric engine block heater (available from another vehicle. 228 STARTING AND OPERATING start within 15 seconds, turn the ignition switch to the "OFF" position, wait 10 to 15 seconds, then repeat the normal starting instructions. Push the accelerator pedal all the way to the floor and hold it started. Leave the ignition key in...

Owner Manual
Page 278
... to force fresh, outside air into the vehicle. 278 STARTING AND OPERATING • An out-of-tune engine, or certain fuel or ignition malfunctions, can result in civil penalties being sold as a garage, and never sit in a parked vehicle with the engine running for an extended period. If you . Contact your engine may be out of methanol. Never run the engine in a closed area...
... to force fresh, outside air into the vehicle. 278 STARTING AND OPERATING • An out-of-tune engine, or certain fuel or ignition malfunctions, can result in civil penalties being sold as a garage, and never sit in a parked vehicle with the engine running for an extended period. If you . Contact your engine may be out of methanol. Never run the engine in a closed area...

Owner Manual
Page 281
... limits to tow your vehicle. TRAILER TOWING In this manual concerning vehicles used for trailer towing. Common Towing Definitions The following information: Gross Vehicle Weight Rating (GVWR) The GVWR is the total allowable weight of your vehicle, the driver, passengers, cargo and trailer tongue weight. The total load must be limited so that you do not exceed the GVWR. 5 STARTING AND OPERATING 281 VEHICLE LOADING Vehicle Loading Capacities Front Seat Occupants ...2 Rear Seat Occupants ...3 Luggage...
... limits to tow your vehicle. TRAILER TOWING In this manual concerning vehicles used for trailer towing. Common Towing Definitions The following information: Gross Vehicle Weight Rating (GVWR) The GVWR is the total allowable weight of your vehicle, the driver, passengers, cargo and trailer tongue weight. The total load must be limited so that you do not exceed the GVWR. 5 STARTING AND OPERATING 281 VEHICLE LOADING Vehicle Loading Capacities Front Seat Occupants ...2 Rear Seat Occupants ...3 Luggage...

Owner Manual
Page 310
... Bulbs ...350 Ⅵ Bulb Replacement ...351 ▫ Headlamps ...351 ▫ Fog Lights ...353 ▫ Tail Lights, Rear Turn Signals And Backup Lights - Replacement ...354 ▫ License Lights ...356 ▫ Center High-Mounted Stoplight ...358 310 MAINTAINING YOUR VEHICLE ▫ Front Suspension Ball Joints ...327 ▫ Body Lubrication ...327 ▫ Windshield Wiper Blades ...328 ▫ Windshield Washer Reservoir ...328 ▫ Exhaust System ...328 ▫ Cooling System ...329 ▫ Hoses And Vacuum/Vapor Harnesses ...335 ▫ Fuel System Connections ...335 ▫ Brake...
... Bulbs ...350 Ⅵ Bulb Replacement ...351 ▫ Headlamps ...351 ▫ Fog Lights ...353 ▫ Tail Lights, Rear Turn Signals And Backup Lights - Replacement ...354 ▫ License Lights ...356 ▫ Center High-Mounted Stoplight ...358 310 MAINTAINING YOUR VEHICLE ▫ Front Suspension Ball Joints ...327 ▫ Body Lubrication ...327 ▫ Windshield Wiper Blades ...328 ▫ Windshield Washer Reservoir ...328 ▫ Exhaust System ...328 ▫ Cooling System ...329 ▫ Hoses And Vacuum/Vapor Harnesses ...335 ▫ Fuel System Connections ...335 ▫ Brake...

Owner Manual
Page 347
... printed on the inside of the Integrated Power Module (IPM). Cavity Cartridge Mini Fuse Fuse 1 Empty 2 15 Amp Lt. Refer to "Engine Compartment" in the engine compartment near the air cleaner assembly. Blue 3 10 Amp Red 4 10 Amp Red 5 20 Amp Yellow Description Empty AWD/4WD ECU Feed CHMSL Brake Switch Feed Ignition Switch Feed Trailer Tow Cavity Cartridge Mini Fuse Fuse 6 10 Amp Red 7 8 9 10 11 12...
... printed on the inside of the Integrated Power Module (IPM). Cavity Cartridge Mini Fuse Fuse 1 Empty 2 15 Amp Lt. Refer to "Engine Compartment" in the engine compartment near the air cleaner assembly. Blue 3 10 Amp Red 4 10 Amp Red 5 20 Amp Yellow Description Empty AWD/4WD ECU Feed CHMSL Brake Switch Feed Ignition Switch Feed Trailer Tow Cavity Cartridge Mini Fuse Fuse 6 10 Amp Red 7 8 9 10 11 12...
Owner Manual
Page 391
... Light (Check Engine) . . 168,314 Manual, Service ...376 Manual Transaxle ...227,229,339 Downshifting ...231 Fluid Level Check ...340,341 Frequency of Fluid Change ...340,341 Lubricant Selection ...339,340,341 Map/Reading Lights ...113 Master Cylinder (Brakes) ...337 Mirrors ...73 Electric Powered ...74 Outside ...73 Rearview ...73 Vanity ...76 Modifications/Alterations, Vehicle ...8 Monitor, Tire Pressure System ...266 Mopar Parts ...316,375 Multi-Function Control Lever ...114 Navigation Radio ...204 Navigation...
... Light (Check Engine) . . 168,314 Manual, Service ...376 Manual Transaxle ...227,229,339 Downshifting ...231 Fluid Level Check ...340,341 Frequency of Fluid Change ...340,341 Lubricant Selection ...339,340,341 Map/Reading Lights ...113 Master Cylinder (Brakes) ...337 Mirrors ...73 Electric Powered ...74 Outside ...73 Rearview ...73 Vanity ...76 Modifications/Alterations, Vehicle ...8 Monitor, Tire Pressure System ...266 Mopar Parts ...316,375 Multi-Function Control Lever ...114 Navigation Radio ...204 Navigation...

Owner Manual
Page 399
...IF YOUR ENGINE OVERHEATS AUTOMATIC TRANSAXLE OVERHEATING JACKING AND TIRE CHANGING Jack LocationSpare Tire StowagePreparations For JackingJacking InstructionsJUMP-STARTING PROCEDURES DUE TO A LOW BATTERY FREEING A STUCK VEHICLE TOWING A DISABLED VEHICLE With Ignition KeyWithout The Ignition KeyMAINTAINING YOUR VEHICLE ENGINE COMPARTMENT - AWD/4WD Models OnlyPower Transfer Unit (PTU) - AWD/4WD Models OnlyAppearance Care And Protection From CorrosionFUSES/INTEGRATED POWER MODULE (IPM) VEHICLE STORAGE REPLACEMENT BULBS BULB REPLACEMENT Headlamps Fog Lights Tail Lights, Rear Turn Signals And...
...IF YOUR ENGINE OVERHEATS AUTOMATIC TRANSAXLE OVERHEATING JACKING AND TIRE CHANGING Jack LocationSpare Tire StowagePreparations For JackingJacking InstructionsJUMP-STARTING PROCEDURES DUE TO A LOW BATTERY FREEING A STUCK VEHICLE TOWING A DISABLED VEHICLE With Ignition KeyWithout The Ignition KeyMAINTAINING YOUR VEHICLE ENGINE COMPARTMENT - AWD/4WD Models OnlyPower Transfer Unit (PTU) - AWD/4WD Models OnlyAppearance Care And Protection From CorrosionFUSES/INTEGRATED POWER MODULE (IPM) VEHICLE STORAGE REPLACEMENT BULBS BULB REPLACEMENT Headlamps Fog Lights Tail Lights, Rear Turn Signals And...


