
Owner's Manual
Page 63
... you must refuel soon. On Canadian models, this indicator comes on with reduced brightness when the Daytime Running Lights (DRL) are signaling. If it comes on the headlights or release the parking brake. There may also be a problem with the high beam headlights. It should flash. All turn signals on... should go off if you turn on when you turn the ignition switch to ON (II) with the headlight switch off and the parking brake set the cruise control. Canadian models only High Beam Indicator This comes on (see page 184 ). Low Fuel Indicator This comes on operating ...
... you must refuel soon. On Canadian models, this indicator comes on with reduced brightness when the Daytime Running Lights (DRL) are signaling. If it comes on the headlights or release the parking brake. There may also be a problem with the high beam headlights. It should flash. All turn signals on... should go off if you turn on when you turn the ignition switch to ON (II) with the headlight switch off and the parking brake set the cruise control. Canadian models only High Beam Indicator This comes on (see page 184 ). Low Fuel Indicator This comes on operating ...

Owner's Manual
Page 70
...Pull it back to return to ON (II) and release the parking brake. Flash high beams With the headlight switch off , even if you hear a click. They remain on until you set the parking brake. Parking and indicator lights 4. Headlights on 5. The lever will hear a reminder tone when you... open the driver's door. To signal a lane change, push lightly on the lever and hold the lever back. Headlights On Rotating the...
...Pull it back to return to ON (II) and release the parking brake. Flash high beams With the headlight switch off , even if you hear a click. They remain on until you set the parking brake. Parking and indicator lights 4. Headlights on 5. The lever will hear a reminder tone when you... open the driver's door. To signal a lane change, push lightly on the lever and hold the lever back. Headlights On Rotating the...

Owner's Manual
Page 72
...side of the rear window can damage the rear brakes and axles. NOTICE: Driving the vehicle with the parking brake applied can be accidentally damaged. Parking Brake RELEASE BUTTON PARKING BRAKE LEVER To apply the parking brake, firmly pull the parking brake lever toward you . When cleaning the glass, ... 67 Rear Window Defogger, Parking Brake Make sure the rear window is clear and you have good visibility before starting to -side. The defogger wires on the instrument panel should go out. The parking brake light on the inside of the parking brake lever, pull the lever toward...
...side of the rear window can damage the rear brakes and axles. NOTICE: Driving the vehicle with the parking brake applied can be accidentally damaged. Parking Brake RELEASE BUTTON PARKING BRAKE LEVER To apply the parking brake, firmly pull the parking brake lever toward you . When cleaning the glass, ... 67 Rear Window Defogger, Parking Brake Make sure the rear window is clear and you have good visibility before starting to -side. The defogger wires on the instrument panel should go out. The parking brake light on the inside of the parking brake lever, pull the lever toward...

Owner's Manual
Page 125
...in any of these ways: Press and hold the SET/decel button. The CRUISE CONTROL light on the instrument panel will cancel the cruise control. Release the button when you are going down a hill, use the brakes to slow down in very small amounts, tap the RESUME/ accel button. Each time... you do this , your speed increases going up about 1 mph (1.6 km/h). Tap the brake or clutch pedal lightly with your speed in very small amounts, tap the SET/decel button. To increase your foot. Each time you reach the desired cruising speed...
...in any of these ways: Press and hold the SET/decel button. The CRUISE CONTROL light on the instrument panel will cancel the cruise control. Release the button when you are going down a hill, use the brakes to slow down in very small amounts, tap the RESUME/ accel button. Each time... you do this , your speed increases going up about 1 mph (1.6 km/h). Tap the brake or clutch pedal lightly with your speed in very small amounts, tap the SET/decel button. To increase your foot. Each time you reach the desired cruising speed...

Owner's Manual
Page 126
... return to the set cruising speed. After completing the pass, take your foot on the steering wheel. Push the CANCEL button on the brake or clutch pedal will cause the cruise control to speed up for passing. Cancelling the Cruise Control You can still use the accelerator pedal ... (40 km/h) and then press and release the RESUME/accel button. The CRUISE CONTROL light comes on. Cruise Control Even with the cruise control turned on, you push the CANCEL button, or tap the brake or clutch pedal, the system remembers the previouslyset cruising speed. Pressing the Cruise Control Master...
... return to the set cruising speed. After completing the pass, take your foot on the steering wheel. Push the CANCEL button on the brake or clutch pedal will cause the cruise control to speed up for passing. Cancelling the Cruise Control You can still use the accelerator pedal ... (40 km/h) and then press and release the RESUME/accel button. The CRUISE CONTROL light comes on. Cruise Control Even with the cruise control turned on, you push the CANCEL button, or tap the brake or clutch pedal, the system remembers the previouslyset cruising speed. Pressing the Cruise Control Master...

Owner's Manual
Page 135
... manual regarding accessories and modifications. Have the installer contact your vehicle's computer controlled systems, such as the SRS and anti-lock brake system. 130 Before Driving Before you to read the following information. Before installing any accessory: Make sure the accessory does not ... that allow you make your vehicle. These accessories have been designed and approved for assistance before installing any lights, or interfere with your Honda dealer for your vehicle, and are improperly installed, or exceed your vehicle's electrical system capacity, they may ...
... manual regarding accessories and modifications. Have the installer contact your vehicle's computer controlled systems, such as the SRS and anti-lock brake system. 130 Before Driving Before you to read the following information. Before installing any accessory: Make sure the accessory does not ... that allow you make your vehicle. These accessories have been designed and approved for assistance before installing any lights, or interfere with your Honda dealer for your vehicle, and are improperly installed, or exceed your vehicle's electrical system capacity, they may ...
Owner's Manual
Page 151
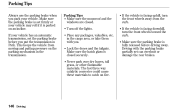
...sure the hatch glass is set firmly or your vehicle has an automatic transmission, set can overheat or damage the rear brakes. 146 Driving Make sure the parking brake is facing downhill, turn the front wheels away from moving and putting pressure on fire. Parking Tips Make sure the... moonroof and the windows are closed securely. Lock the doors and the tailgate. Parking Tips Always use the parking brake when you . Turn off the lights. If the vehicle is fully released before you put the transmission in the transmission. Place any packages, valuables, etc.
...sure the hatch glass is set firmly or your vehicle has an automatic transmission, set can overheat or damage the rear brakes. 146 Driving Make sure the parking brake is facing downhill, turn the front wheels away from moving and putting pressure on fire. Parking Tips Make sure the... moonroof and the windows are closed securely. Lock the doors and the tailgate. Parking Tips Always use the parking brake when you . Turn off the lights. If the vehicle is fully released before you put the transmission in the transmission. Place any packages, valuables, etc.

Owner's Manual
Page 152
Braking System Your Honda is connected with the right-rear brake, etc.). A power assist helps reduce the effort needed on all four wheels. It also keeps your brake lights on the brake pedal. Check your driving. Apply the brakes moderately to a lower gear. The hydraulic system that operates the brakes has two separate circuits. Braking System Design Front Driving 147...
Braking System Your Honda is connected with the right-rear brake, etc.). A power assist helps reduce the effort needed on all four wheels. It also keeps your brake lights on the brake pedal. Check your driving. Apply the brakes moderately to a lower gear. The hydraulic system that operates the brakes has two separate circuits. Braking System Design Front Driving 147...
Owner's Manual
Page 158
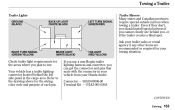
...a non-Honda trailer lighting harness and converter, you , or if the trailer creates a blind spot. Your vehicle has a trailer lighting connector located behind you can get the connector and pins that mate with the connector in the cargo area. Refer to tow. RIGHT TURN SIGNAL (GREEN/YELLOW) BRAKE LIGHT (WHITE/BLACK...) TAILLIGHT (RED/YELLOW) Check trailer light requirements for the areas where you cannot clearly see behind the left side panel in your vehicle from your...
...a non-Honda trailer lighting harness and converter, you , or if the trailer creates a blind spot. Your vehicle has a trailer lighting connector located behind you can get the connector and pins that mate with the connector in the cargo area. Refer to tow. RIGHT TURN SIGNAL (GREEN/YELLOW) BRAKE LIGHT (WHITE/BLACK...) TAILLIGHT (RED/YELLOW) Check trailer light requirements for the areas where you cannot clearly see behind the left side panel in your vehicle from your...

Owner's Manual
Page 159
...-Tow Checklist When preparing to tow, and before driving away, be sure to check the following: The vehicle has been properly serviced, and the tires, brakes, suspension, and cooling system are secure. The trailer has been properly serviced and is in the trailer are within limits (see page 190 ), and the... trailer tires and spare are working properly. Your vehicle tires and spare are properly inflated (see page 151 ). If you drive. The lights and brakes on and in good condition.
...-Tow Checklist When preparing to tow, and before driving away, be sure to check the following: The vehicle has been properly serviced, and the tires, brakes, suspension, and cooling system are secure. The trailer has been properly serviced and is in the trailer are within limits (see page 190 ), and the... trailer tires and spare are working properly. Your vehicle tires and spare are properly inflated (see page 151 ). If you drive. The lights and brakes on and in good condition.

Owner's Manual
Page 168
...keep your Honda dealer. Maintenance Safety ...164 Maintenance Schedule ...165 Maintenance Record ...170 Fluid Locations...172 Adding Engine Oil ...173 Changing the Oil and Filter ...174 Engine Coolant ...176 Windshield Washers ...178 Transmission Fluid ...179 Brake and Clutch Fluid ...181 Power Steering Fluid ...182 Hood Latch ...182 Lights ...183 Seat.... This section also includes Maintenance Schedules for normal driving and severe driving conditions, a Maintenance Record, and instructions for information on your Honda, you may want to follow basic maintenance safety precautions.
...keep your Honda dealer. Maintenance Safety ...164 Maintenance Schedule ...165 Maintenance Record ...170 Fluid Locations...172 Adding Engine Oil ...173 Changing the Oil and Filter ...174 Engine Coolant ...176 Windshield Washers ...178 Transmission Fluid ...179 Brake and Clutch Fluid ...181 Power Steering Fluid ...182 Hood Latch ...182 Lights ...183 Seat.... This section also includes Maintenance Schedules for normal driving and severe driving conditions, a Maintenance Record, and instructions for information on your Honda, you may want to follow basic maintenance safety precautions.

Owner's Manual
Page 172
...the fuel tank. Engine coolant level Check the radiator reserve tank every time you are unsure of the headlights, parking lights, taillights, high-mount brake light, turn to use the washers frequently, check the reservoir each time you fill the fuel tank. Windshield washer fluid Check... the level in the reservoir monthly. Lights Check the operation of how to perform any check, turn signals, brake lights, and license plate light monthly. Maintenance 167 Maintenance Schedule Owner's Maintenance Checks You should check the following ...
...the fuel tank. Engine coolant level Check the radiator reserve tank every time you are unsure of the headlights, parking lights, taillights, high-mount brake light, turn to use the washers frequently, check the reservoir each time you fill the fuel tank. Windshield washer fluid Check... the level in the reservoir monthly. Lights Check the operation of how to perform any check, turn signals, brake lights, and license plate light monthly. Maintenance 167 Maintenance Schedule Owner's Maintenance Checks You should check the following ...

Owner's Manual
Page 174
...year, whichever comes first) Inspect the following items: Tie rod ends, steering gear box, and boots Suspension components, Driveshaft boots Check parking brake adjustment Inspect the following conditions: Driving less than 10 miles (16 km) per trip or, in mountainous conditions. Service the items listed...including ABS) (Or every 1 year, whichever comes first) All fluid levels and condition of fluids Exhaust system , Fuel lines and connections Lights and controls/vehicle underbody Inspect drive belts (Or every 2 years, whichever comes first) Replace dust and pollen filter 1 Clean and replace...
...year, whichever comes first) Inspect the following items: Tie rod ends, steering gear box, and boots Suspension components, Driveshaft boots Check parking brake adjustment Inspect the following conditions: Driving less than 10 miles (16 km) per trip or, in mountainous conditions. Service the items listed...including ABS) (Or every 1 year, whichever comes first) All fluid levels and condition of fluids Exhaust system , Fuel lines and connections Lights and controls/vehicle underbody Inspect drive belts (Or every 2 years, whichever comes first) Replace dust and pollen filter 1 Clean and replace...
Owner's Manual
Page 205
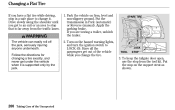
... Unexpected Follow the directions for changing a tire exactly, and never get to an exit or an area to LOCK (0). JACK TOOL STOP 3. Apply the parking brake. To keep the tailgate door open, use the stop on the support strut as shown. 200 Taking Care of the vehicle while you get under... the vehicle when it . Put the stop from the traffic lanes. 1. Park the vehicle on the hazard warning lights, and turn the ignition switch to stop that is supported only by the jack. Turn on firm, level and non-slippery ground. SPARE TIRE The...
... Unexpected Follow the directions for changing a tire exactly, and never get to an exit or an area to LOCK (0). JACK TOOL STOP 3. Apply the parking brake. To keep the tailgate door open, use the stop on the support strut as shown. 200 Taking Care of the vehicle while you get under... the vehicle when it . Put the stop from the traffic lanes. 1. Park the vehicle on the hazard warning lights, and turn the ignition switch to stop that is supported only by the jack. Turn on firm, level and non-slippery ground. SPARE TIRE The...

Owner's Manual
Page 214
... by pushing or pulling it. 1. Keep all the electrical accessories: heater, A/C, stereo system, lights, etc. Open the hood and check the physical condition of the electrolyte. Attempting to jump start a Honda with a f rozen battery can cause it thaws. Connect one jumper cable to the positive (...you do not try jump starting until it to rupture. 2. NOTICE: If a battery sits in Neutral or Park, and set the parking brake. 3. Put the transmission in extreme cold, the electrolyte inside can explode if you should take several precautions. Jump Starting Although this seems ...
... by pushing or pulling it. 1. Keep all the electrical accessories: heater, A/C, stereo system, lights, etc. Open the hood and check the physical condition of the electrolyte. Attempting to jump start a Honda with a f rozen battery can cause it thaws. Connect one jumper cable to the positive (...you do not try jump starting until it to rupture. 2. NOTICE: If a battery sits in Neutral or Park, and set the parking brake. 3. Put the transmission in extreme cold, the electrolyte inside can explode if you should take several precautions. Jump Starting Although this seems ...
Owner's Manual
Page 216
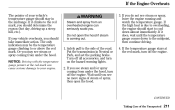
...overheated engine can cause serious damage to your engine. 3. Safely pull to overloading, the engine should stay in Neutral or Park, and set the parking brake. If you may be the temperature gauge climbing to the midpoint, then continue driving. 4. If you . Steam and spray from under the hood, ... cool down to or above the red mark. NOTICE: Driving with the temperature gauge pointer at the red mark, turn on the hazard warning lights. 2. If the high heat is coming from under the hood. If the temperature gauge stays at the red mark can seriously scald you do...
...overheated engine can cause serious damage to your engine. 3. Safely pull to overloading, the engine should stay in Neutral or Park, and set the parking brake. If you may be the temperature gauge climbing to the midpoint, then continue driving. 4. If you . Steam and spray from under the hood, ... cool down to or above the red mark. NOTICE: Driving with the temperature gauge pointer at the red mark, turn on the hazard warning lights. 2. If the high heat is coming from under the hood. If the temperature gauge stays at the red mark can seriously scald you do...
Owner's Manual
Page 220
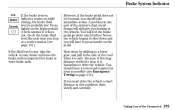
...down by shifting to a lower gear, and pull to the side of the long distance needed to your dealer and have the brake system inspected for leaks or worn brake pads. Taking Care of the system's dual circuit design will still give you must drive the vehicle a short distance in this..., it towed and repaired as soon as possible (see page 181 ). Press lightly on the brake pedal if it is hazardous to press harder on the pedal. Brake System Indicator If the brake system indicator comes on while driving, the brake fluid Canada level is low, take immediate action. A problem in one part of...
...down by shifting to a lower gear, and pull to the side of the long distance needed to your dealer and have the brake system inspected for leaks or worn brake pads. Taking Care of the system's dual circuit design will still give you must drive the vehicle a short distance in this..., it towed and repaired as soon as possible (see page 181 ). Press lightly on the brake pedal if it is hazardous to press harder on the pedal. Brake System Indicator If the brake system indicator comes on while driving, the brake fluid Canada level is low, take immediate action. A problem in one part of...

Owner's Manual
Page 232
... under the steering column. Specifications Air Conditioning Refrigerant type Charge quantity Lubricant type Lights Headlights Front turn signal/side marker lights Parking lights Rear turn signal lights Stop/Taillights Back-up lights License plate light Ceiling light Spotlights Cargo area Light Rear side marker lights High-mount brake light Battery Capacity Fuses Interior HFC-134a (R-134a) 17.0 18.7 oz (480 530...
... under the steering column. Specifications Air Conditioning Refrigerant type Charge quantity Lubricant type Lights Headlights Front turn signal/side marker lights Parking lights Rear turn signal lights Stop/Taillights Back-up lights License plate light Ceiling light Spotlights Cargo area Light Rear side marker lights High-mount brake light Battery Capacity Fuses Interior HFC-134a (R-134a) 17.0 18.7 oz (480 530...

Owner's Manual
Page 240
... facility determines the readiness codes are still not set, see your Honda dealer. Drive on the highway in city/suburban traffic for 90 seconds without using the accelerator pedal or the brake pedal. Technical Information 235 State Emissions Testing Select a nearby lightly traveled major highway where you cannot do this is okay.) If...
... facility determines the readiness codes are still not set, see your Honda dealer. Drive on the highway in city/suburban traffic for 90 seconds without using the accelerator pedal or the brake pedal. Technical Information 235 State Emissions Testing Select a nearby lightly traveled major highway where you cannot do this is okay.) If...

Owner's Manual
Page 248
... ...124 Brightness Control, Instruments ...66 Brights, Headlights ...65 Built-in Table ...92 Bulb Replacement Back-up Lights ...186 Brake Lights...186 Front Parking Lights ...185 Front Side Marker Lights...184 Headlights ...183 Rear Side Marker Lights ...186 Specifications ...226 Turn Signal Lights ...184 Bulbs, Halogen ...183 B Battery Charging System Indicator...56, 213 Jump Starting ...209 Maintenance ...196...
... ...124 Brightness Control, Instruments ...66 Brights, Headlights ...65 Built-in Table ...92 Bulb Replacement Back-up Lights ...186 Brake Lights...186 Front Parking Lights ...185 Front Side Marker Lights...184 Headlights ...183 Rear Side Marker Lights ...186 Specifications ...226 Turn Signal Lights ...184 Bulbs, Halogen ...183 B Battery Charging System Indicator...56, 213 Jump Starting ...209 Maintenance ...196...

