Owner's Manual
Page 86
... lower mark, see Adding Coolant on page 120 for information on adding the proper coolant. It should be between the MAX and MIN lines. MAX MIN Look at the coolant level in your Honda. Make sure it is between the upper and lower marks. 5. If it is near or below the MIN... line, see page 115 for information on the proper oil and how to Periodic Checks on page 113 for information on checking other items in...
... lower mark, see Adding Coolant on page 120 for information on adding the proper coolant. It should be between the MAX and MIN lines. MAX MIN Look at the coolant level in your Honda. Make sure it is between the upper and lower marks. 5. If it is near or below the MIN... line, see page 115 for information on the proper oil and how to Periodic Checks on page 113 for information on checking other items in...
Owner's Manual
Page 118
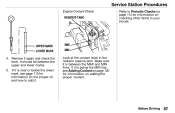
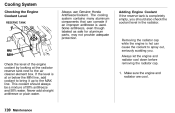
...the engine and radiator cool down before removing the radiator cap. 1. Cooling System Checking the Engine Coolant Level RESERVE TANK Always use Genuine Honda Antifreeze/Coolant. Some antifreeze, even though labeled as safe for aluminum parts, may not provide adequate protection. Never add straight antifreeze or plain... Engine Coolant If the reserve tank is hot can corrode if an improper antifreeze is at the radiator reserve tank next to the MAX line. Removing the radiator cap while the engine is completely empty, you . Maintenance MAX MIN Check the level of 50% antifreeze and 50...
...the engine and radiator cool down before removing the radiator cap. 1. Cooling System Checking the Engine Coolant Level RESERVE TANK Always use Genuine Honda Antifreeze/Coolant. Some antifreeze, even though labeled as safe for aluminum parts, may not provide adequate protection. Never add straight antifreeze or plain... Engine Coolant If the reserve tank is hot can corrode if an improper antifreeze is at the radiator reserve tank next to the MAX line. Removing the radiator cap while the engine is completely empty, you . Maintenance MAX MIN Check the level of 50% antifreeze and 50...
Owner's Manual
Page 129
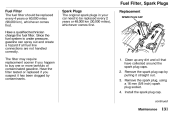
... by pulling it has been clogged by contaminants. 1. Since the fuel system is under pressure, gasoline can spray out and create a hazard if all fuel line connections are not handled correctly. Fuel Filter, Spark Plugs Fuel Filter The fuel filter should be replaced every 2 years or 48,000 km (30,000...
... by pulling it has been clogged by contaminants. 1. Since the fuel system is under pressure, gasoline can spray out and create a hazard if all fuel line connections are not handled correctly. Fuel Filter, Spark Plugs Fuel Filter The fuel filter should be replaced every 2 years or 48,000 km (30,000...
Owner's Manual
Page 142
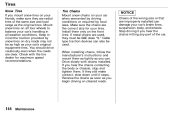
... tires. Stop driving if you hear the chains hitting any part of the same size and load range as you can damage your car's brake lines, suspension, body, and wheels. Tire Chains Mount snow chains on the front tires. Check with chains installed. Mount snow tires on your... Honda, make sure they still make contact, slow down until it stops. NOTICE Chains of the wrong size or that are improperly installed can . If metal ...
... tires. Stop driving if you hear the chains hitting any part of the same size and load range as you can damage your car's brake lines, suspension, body, and wheels. Tire Chains Mount snow chains on the front tires. Check with chains installed. Mount snow tires on your... Honda, make sure they still make contact, slow down until it stops. NOTICE Chains of the wrong size or that are improperly installed can . If metal ...
Owner's Manual
Page 145
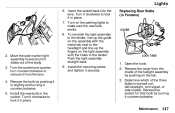
LOCK TABS 1. Turn it clockwise to lock it counterclockwise. 5. Turn on the parking lights to the headlight and line up the fingers on the light assembly with the holes in place. 7. Remove the bulb by pushing it in slightly and turning it in the ... it securely. To reinstall the light assembly in place. Replacing Rear Bulbs (in the socket. Install the mounting screw and tighten it in the fender, line up the guide on the tab. 3. Lights 6. Turn the socket one-quarter turn signal, or side marker.
LOCK TABS 1. Turn it clockwise to lock it counterclockwise. 5. Turn on the parking lights to the headlight and line up the fingers on the light assembly with the holes in place. 7. Remove the bulb by pushing it in slightly and turning it in the ... it securely. To reinstall the light assembly in place. Replacing Rear Bulbs (in the socket. Install the mounting screw and tighten it in the fender, line up the guide on the tab. 3. Lights 6. Turn the socket one-quarter turn signal, or side marker.
Owner's Manual
Page 184
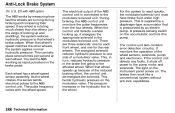
... speed sensor assembly. During braking, the ABS control unit monitors the pulse frequencies from the four wheels. The pressure increases in the brake line going to the ABS control unit. The control unit also contains error detection circuitry. Anti-Lock Brake System On U.S. This, in turn,... reduces hydraulic pressure in the hydraulic line to react quickly, the modulator/solenoid unit must have brake fluid under high pressure. This is pressurized by an electric pump. The light...
... speed sensor assembly. During braking, the ABS control unit monitors the pulse frequencies from the four wheels. The pressure increases in the brake line going to the ABS control unit. The control unit also contains error detection circuitry. Anti-Lock Brake System On U.S. This, in turn,... reduces hydraulic pressure in the hydraulic line to react quickly, the modulator/solenoid unit must have brake fluid under high pressure. This is pressurized by an electric pump. The light...