Owner's Manual
Page 28
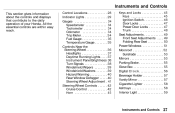
... Lights ...29 Gauges ...34 Speedometer ...34 Tachometer ...34 Odometer ...34 Trip Meter ...34 Fuel Gauge ...35 Temperature Gauge ...35 Controls Near the Steering Wheel ...36 Headlights ...37 Daytime Running Lights ...37 Instrument Panel Brightness 38 Turn Signals ...38 Windshield Wipers ...39 Windshield Washers ...39 Hazard Warning ...40 Rear Window Defogger ...40...Light ...59 Instruments and Controls Instruments and Controls This section gives information about the controls and displays that contribute to the daily operation of your Honda. All the essential controls are within easy reach.
... Lights ...29 Gauges ...34 Speedometer ...34 Tachometer ...34 Odometer ...34 Trip Meter ...34 Fuel Gauge ...35 Temperature Gauge ...35 Controls Near the Steering Wheel ...36 Headlights ...37 Daytime Running Lights ...37 Instrument Panel Brightness 38 Turn Signals ...38 Windshield Wipers ...39 Windshield Washers ...39 Hazard Warning ...40 Rear Window Defogger ...40...Light ...59 Instruments and Controls Instruments and Controls This section gives information about the controls and displays that contribute to the daily operation of your Honda. All the essential controls are within easy reach.
Owner's Manual
Page 34
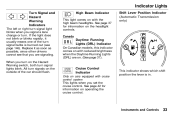
...system This lights when you set the cruise control. Canada Daytime Running Lights (DRL) Indicator On Canadian models, this indicator comes on the headlight controls. Instruments and Controls High Beam Indicator This light comes on . (See page 37). CRUISE CONTROL This indicator shows which shift position... the lever is burned out (see that you are on with the high beam headlights. If the light does not blink or blinks rapidly, it as soon as possible, since other drivers cannot see page 146). Indicator ...
...system This lights when you set the cruise control. Canada Daytime Running Lights (DRL) Indicator On Canadian models, this indicator comes on the headlight controls. Instruments and Controls High Beam Indicator This light comes on . (See page 37). CRUISE CONTROL This indicator shows which shift position... the lever is burned out (see that you are on with the high beam headlights. If the light does not blink or blinks rapidly, it as soon as possible, since other drivers cannot see page 146). Indicator ...
Owner's Manual
Page 37
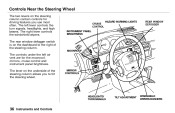
... instrument panel brightness. MOONROOF HAZARD WARNING LIGHTS REAR WINDOW DEFOGGER CRUISE CONTROL INSTRUMENT PANEL BRIGHTNESS The controls under the left lever controls the turn signals, headlights, and high beams. The right lever controls the windshield wipers. The left air vent are for driving features you to the right of the steering...
... instrument panel brightness. MOONROOF HAZARD WARNING LIGHTS REAR WINDOW DEFOGGER CRUISE CONTROL INSTRUMENT PANEL BRIGHTNESS The controls under the left lever controls the turn signals, headlights, and high beams. The right lever controls the windshield wipers. The left air vent are for driving features you to the right of the steering...
Owner's Manual
Page 38
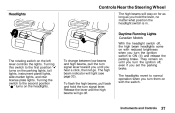
...rotating switch on the parking lights, tail lights, instrument panel lights, side-marker lights, and rear license plate lights. Controls Near the Steering Wheel Headlights The high beams will stay on for as long as you hold the turn signal lever. They remain on until you turn the ignition off...a click, then let go off. Instruments and Controls Turning the switch to the first position " " turns on the left lever controls the lights. The headlights revert to ON (II) and release the parking brake. To flash the high beams, pull back and hold the lever, no matter what position the...
...rotating switch on the parking lights, tail lights, instrument panel lights, side-marker lights, and rear license plate lights. Controls Near the Steering Wheel Headlights The high beams will stay on for as long as you hold the turn signal lever. They remain on until you turn the ignition off...a click, then let go off. Instruments and Controls Turning the switch to the first position " " turns on the left lever controls the lights. The headlights revert to ON (II) and release the parking brake. To flash the high beams, pull back and hold the lever, no matter what position the...
Owner's Manual
Page 54
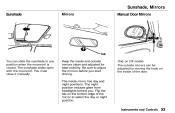
... on the inside of the mirror to any position when the moonroof is closed. You must close it manually. The night position reduces glare from headlights behind you start driving. Keep the inside mirror has day and night positions. Only on DX models The outside mirrors clean and adjusted for best...
... on the inside of the mirror to any position when the moonroof is closed. You must close it manually. The night position reduces glare from headlights behind you start driving. Keep the inside mirror has day and night positions. Only on DX models The outside mirrors clean and adjusted for best...
Owner's Manual
Page 103
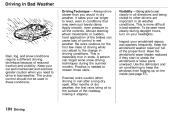
It takes your headlights. Practice is more clearly during the summer months. Being able to see page 67). Use the defrosters and air conditioning to keep the windows from ...
It takes your headlights. Practice is more clearly during the summer months. Being able to see page 67). Use the defrosters and air conditioning to keep the windows from ...
Owner's Manual
Page 111
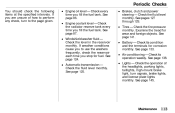
Engine coolant level - See page 87. Examine the tread for fuel. See page 133. If you are unsure of the headlights, parking lights, taillights, high-mount brake light, turn to use the washers frequently, check the reservoir each time you to the page given. Windshield washer ...
Engine coolant level - See page 87. Examine the tread for fuel. See page 133. If you are unsure of the headlights, parking lights, taillights, high-mount brake light, turn to use the washers frequently, check the reservoir each time you to the page given. Windshield washer ...
Owner's Manual
Page 122
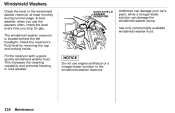
The windshield washer reservoir is located behind the left headlight. Fill the reservoir with a goodquality windshield washer fluid. Maintenance This increases the cleaning capability and prevents freezing in the windshield washer reservoir at least monthly ...
The windshield washer reservoir is located behind the left headlight. Fill the reservoir with a goodquality windshield washer fluid. Maintenance This increases the cleaning capability and prevents freezing in the windshield washer reservoir at least monthly ...
Owner's Manual
Page 143
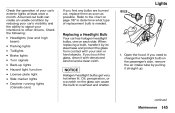
..., remove the air intake tube by pulling it by reducing your car's visibility and the ability to signal your skin or hard objects. NOTICE Halogen headlight bulbs get very hot when lit. Open the hood. If you need to determine what type of your car's exterior lights at least once a month.... Oil, perspiration, or a scratch on page 187 to change the headlight bulb on each side. If you find any bulbs are burned out, replace them as soon as possible. A burned out bulb can cause the bulb...
..., remove the air intake tube by pulling it by reducing your car's visibility and the ability to signal your skin or hard objects. NOTICE Halogen headlight bulbs get very hot when lit. Open the hood. If you need to determine what type of your car's exterior lights at least once a month.... Oil, perspiration, or a scratch on page 187 to change the headlight bulb on each side. If you find any bulbs are burned out, replace them as soon as possible. A burned out bulb can cause the bulb...

Owner's Manual
Page 144
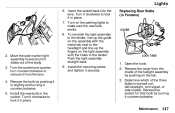
... straight back. 3. Make sure the tab is on the tab. 4. Remove the rubber weather seal by squeezing the connector to unlock the tab on the headlights to remove the screw from the top of the hold -down wire from the bulb by pulling on the top. 7. Replacing the Front Side Marker...
... straight back. 3. Make sure the tab is on the tab. 4. Remove the rubber weather seal by squeezing the connector to unlock the tab on the headlights to remove the screw from the top of the hold -down wire from the bulb by pulling on the top. 7. Replacing the Front Side Marker...
Owner's Manual
Page 145
... the assembly with the holes in place. Move the side marker light assembly forward until it counterclockwise. Open the trunk. 2. Turn it clockwise to the headlight and line up the guide on the light assembly with the metal tab next to lock it in the socket. Determine which of the taillight...
... the assembly with the holes in place. Move the side marker light assembly forward until it counterclockwise. Open the trunk. 2. Turn it clockwise to the headlight and line up the guide on the light assembly with the metal tab next to lock it in the socket. Determine which of the taillight...
Owner's Manual
Page 164
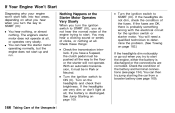
... clicking sound or series of clicks, or nothing . If you try jump starting the car from a booster battery (see page 134). If the headlights are corroded. Check the condition of the fuses. Check these things: Check the transmission interlock. Turn the ignition switch to START (III). You can... motor operating normally, but the engine does not start up and run. You will not operate. See Jump Starting on page 182.) If the headlights dim noticeably or go out when you have a 5-speed, the clutch pedal must be pushed all , the battery is discharged. With an automatic...
... clicking sound or series of clicks, or nothing . If you try jump starting the car from a booster battery (see page 134). If the headlights are corroded. Check the condition of the fuses. Check these things: Check the transmission interlock. Turn the ignition switch to START (III). You can... motor operating normally, but the engine does not start up and run. You will not operate. See Jump Starting on page 182.) If the headlights dim noticeably or go out when you have a 5-speed, the clutch pedal must be pushed all , the battery is discharged. With an automatic...
Owner's Manual
Page 174
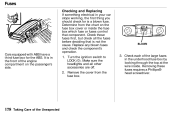
... top at the wire inside the fuse box which fuse or fuses control that is a blown fuse. Determine from the fuse box. Make sure the headlights and all the fuses before deciding that component. Check those fuses first, but check all other accessories are off. 2. Turn the ignition switch to LOCK...
... top at the wire inside the fuse box which fuse or fuses control that is a blown fuse. Determine from the fuse box. Make sure the headlights and all the fuses before deciding that component. Check those fuses first, but check all other accessories are off. 2. Turn the ignition switch to LOCK...
Owner's Manual
Page 199
......82 Fluid ...127 Light, Burned out ...145 Parking ...55 System Indicator ...31 Wear Indicators ...101 Braking System ...102 Break-in, New Car ...82 Brights, Headlights ...37 Bulb Replacement Back-up Lights ...147 Brake Lights ...147, 148 Front Parking Lights ...146 Front Side Marker Lights .. 146... Headlights ...145 High-Mount Brake Light ...149 License Plate Lights ...149 Rear Side Marker Lights ...147 Specifications ...187 Turn Signal Lights ...146 Bulbs, Halogen ...145...
......82 Fluid ...127 Light, Burned out ...145 Parking ...55 System Indicator ...31 Wear Indicators ...101 Braking System ...102 Break-in, New Car ...82 Brights, Headlights ...37 Bulb Replacement Back-up Lights ...147 Brake Lights ...147, 148 Front Parking Lights ...146 Front Side Marker Lights .. 146... Headlights ...145 High-Mount Brake Light ...149 License Plate Lights ...149 Rear Side Marker Lights ...147 Specifications ...187 Turn Signal Lights ...146 Bulbs, Halogen ...145...
Owner's Manual
Page 200
..., Starting in ...94 Compact Spare ...162 Consumer Information ...199 Control Locations ...28 Controls Near the Steering Wheel ...36 Daytime Running Lights ...37 Hazard Warning ...40 Headlights ...37 Instrument Panel Brightness ...38 Rear Window Defogger ...40 Steering Wheel Adjustment ...41 Turn Signals ...38 Windshield Washers ...39 Windshield Wipers ...39 Controls, Instruments and...
..., Starting in ...94 Compact Spare ...162 Consumer Information ...199 Control Locations ...28 Controls Near the Steering Wheel ...36 Daytime Running Lights ...37 Hazard Warning ...40 Headlights ...37 Instrument Panel Brightness ...38 Rear Window Defogger ...40 Steering Wheel Adjustment ...41 Turn Signals ...38 Windshield Washers ...39 Windshield Wipers ...39 Controls, Instruments and...
Owner's Manual
Page 201
... to Do ...169 Defects, Reporting Safety ...200 Defogger, Rear Window ...40 Defrosting the Windows ...68 DEXRON II Automatic Transmission Fluid ...125 Dimensions ...186 Dimming the Headlights ...37 Dipstick Automatic Transmission .. 125 Engine Oil ...115 Directional Signals ...33 Economy, Fuel ...88 Emergencies on the Road ...161 Battery, Jump Starting ...169 Changing a Flat...
... to Do ...169 Defects, Reporting Safety ...200 Defogger, Rear Window ...40 Defrosting the Windows ...68 DEXRON II Automatic Transmission Fluid ...125 Dimensions ...186 Dimming the Headlights ...37 Dipstick Automatic Transmission .. 125 Engine Oil ...115 Directional Signals ...33 Economy, Fuel ...88 Emergencies on the Road ...161 Battery, Jump Starting ...169 Changing a Flat...
Owner's Manual
Page 203
..., Tire ...139 Instrument Panel ...28 Instrument Panel Brightness .. 38 Interior Cleaning ...157 Interior Light ...59 Introduction ...Preface i Identification Number Vehicle ...184 Halogen Headlight Bulbs ...145 Hazard Warning Flashers ...40 Headlights ...37 Daytime Running Lights ...37 If Your Car Has to Be Towed ...182 Ignition Keys ...45 Jack, Tire ...163 Jacking up the...
..., Tire ...139 Instrument Panel ...28 Instrument Panel Brightness .. 38 Interior Cleaning ...157 Interior Light ...59 Introduction ...Preface i Identification Number Vehicle ...184 Halogen Headlight Bulbs ...145 Hazard Warning Flashers ...40 Headlights ...37 Daytime Running Lights ...37 If Your Car Has to Be Towed ...182 Ignition Keys ...45 Jack, Tire ...163 Jacking up the...


