
Owner's Manual
Page 34
...Supplemental S R S Restraint System Indicator The SRS light normally comes on for diagnosis and service. Indicator Lights Charging System Light This light indicates the battery is low if it stays on after the engine starts, something is ON (II), and go out after the engine starts. Have your dealer ...promptly for a few seconds when you see any of serious engine damage. Instruments and Controls If this light comes on while driving, the battery is normally due to do. This is not being charged. If this light comes on when the engine is running, there is ON (II...
...Supplemental S R S Restraint System Indicator The SRS light normally comes on for diagnosis and service. Indicator Lights Charging System Light This light indicates the battery is low if it stays on after the engine starts, something is ON (II), and go out after the engine starts. Have your dealer ...promptly for a few seconds when you see any of serious engine damage. Instruments and Controls If this light comes on while driving, the battery is normally due to do. This is not being charged. If this light comes on when the engine is running, there is ON (II...

Owner's Manual
Page 73
... can then use the Preset buttons in the normal manner to it. The AUTO SELECT function allows you to find enough stations to your car's battery goes dead or is disconnected. You can then select the stations you have a station stored. AUTO SELECT LIGHT STEREO INDICATOR AUTO SELECT BUTTON If you...
... can then use the Preset buttons in the normal manner to it. The AUTO SELECT function allows you to find enough stations to your car's battery goes dead or is disconnected. You can then select the stations you have a station stored. AUTO SELECT LIGHT STEREO INDICATOR AUTO SELECT BUTTON If you...
Owner's Manual
Page 91
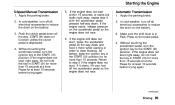
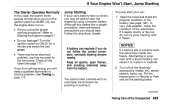
...off the accelerator pedal so the engine does not race. Make sure the shift lever is depressed. 4. Return to reduce the drain on the battery. 3. Automatic Transmission 1. Pause for more than 15 seconds. If the engine does not start right away, do not hold the key in Park...way down all electrical accessories to the START (III) position. Without touching the accelerator pedal, turn the ignition key to reduce the drain on the battery. 3. Apply the parking brake. 2. Pause for more than 15 seconds at least 10 seconds before trying again. 5. If the engine starts, ...
...off the accelerator pedal so the engine does not race. Make sure the shift lever is depressed. 4. Return to reduce the drain on the battery. 3. Automatic Transmission 1. Pause for more than 15 seconds. If the engine does not start right away, do not hold the key in Park...way down all electrical accessories to the START (III) position. Without touching the accelerator pedal, turn the ignition key to reduce the drain on the battery. 3. Apply the parking brake. 2. Pause for more than 15 seconds at least 10 seconds before trying again. 5. If the engine starts, ...

Owner's Manual
Page 92
.... When the engine starts, release the accelerator pedal gradually as the engine speeds up and smooths out. 3. If the engine starts, release pressure on the battery. 2. Turn off the accelerator pedal so the engine does not race. Do not hold it starts, lift your foot off all the way down . If...
.... When the engine starts, release the accelerator pedal gradually as the engine speeds up and smooths out. 3. If the engine starts, release pressure on the battery. 2. Turn off the accelerator pedal so the engine does not race. Do not hold it starts, lift your foot off all the way down . If...
Owner's Manual
Page 103
...Brake System ...122 Clutch System ...123 Power Steering ...124 Air Cleaner Element ...NO TAG Fuel Filter ...126 Spark Plugs ...Replacement ...Specifications ...Battery ...Windshield Wipers ...Air Conditioning ...Engine Belts ...Tires ...Inflation ...Inspection ...Maintenance ...Tire Rotation ...Replacing Tires ...Wheels and Tires ...DOT Tire Quality... lists items that need to obtain a copy, or see your investment. The maintenance schedules for information on your Honda, you when these things need to be rewarded with safer, more complex maintenance on how to be done. If...
...Brake System ...122 Clutch System ...123 Power Steering ...124 Air Cleaner Element ...NO TAG Fuel Filter ...126 Spark Plugs ...Replacement ...Specifications ...Battery ...Windshield Wipers ...Air Conditioning ...Engine Belts ...Tires ...Inflation ...Inspection ...Maintenance ...Tire Rotation ...Replacing Tires ...Wheels and Tires ...DOT Tire Quality... lists items that need to obtain a copy, or see your investment. The maintenance schedules for information on your Honda, you when these things need to be rewarded with safer, more complex maintenance on how to be done. If...
Owner's Manual
Page 109
... license plate lights monthly. Check the tire pressure monthly. See page 133. See page 140. Check the fluid level monthly. Brakes, clutch and power steering - Battery - Maintenance See page 84. Check the level in the reservoir monthly. See page 135. Check every time you fill the fuel tank. Engine coolant level...
... license plate lights monthly. Check the tire pressure monthly. See page 133. See page 140. Check the fluid level monthly. Brakes, clutch and power steering - Battery - Maintenance See page 84. Check the level in the reservoir monthly. See page 135. Check every time you fill the fuel tank. Engine coolant level...

Owner's Manual
Page 128
...hurt you. A spark or open flame can cause fatal poisoning if immediate action is not taken. Maintenance Swallowing electrolyte can cause the battery to explode with option package Canada: Si Normal driving conditions NGK: ZFR5J-11 Nippondenso: KJ16CR-L11 Hot climates, or continuous high speed ...driving NGK: ZFR6J-11 Nippondenso: KJ20CR-L11 Battery Check the condition of your skin can cause serious burns. KEEP OUT OF THE REACH OF CHILDREN. Wear protective clothing and a face ...
...hurt you. A spark or open flame can cause fatal poisoning if immediate action is not taken. Maintenance Swallowing electrolyte can cause the battery to explode with option package Canada: Si Normal driving conditions NGK: ZFR5J-11 Nippondenso: KJ16CR-L11 Hot climates, or continuous high speed ...driving NGK: ZFR6J-11 Nippondenso: KJ20CR-L11 Battery Check the condition of your skin can cause serious burns. KEEP OUT OF THE REACH OF CHILDREN. Wear protective clothing and a face ...

Owner's Manual
Page 129
...with a cloth or paper towel. It will bubble up and turn brown. Maintenance Battery Emergency Procedures Eyes - Call a physician immediately. Call your local Poison Control Center or a physician immediately. Check the battery condition by looking at least 15 minutes. (Water under pressure can damage the ... water or milk. Remove contaminated clothing. Skin - Flush with a solution of water. TEST INDICATOR WINDOW Check the battery terminals for at the test indicator window on the battery. To remove it off the battery with large quantities of baking soda and water.
...with a cloth or paper towel. It will bubble up and turn brown. Maintenance Battery Emergency Procedures Eyes - Call a physician immediately. Call your local Poison Control Center or a physician immediately. Check the battery condition by looking at least 15 minutes. (Water under pressure can damage the ... water or milk. Remove contaminated clothing. Skin - Flush with a solution of water. TEST INDICATOR WINDOW Check the battery terminals for at the test indicator window on the battery. To remove it off the battery with large quantities of baking soda and water.

Owner's Manual
Page 130
... the terminals are severely corroded, clean them with a terminal cleaning tool or wire brush. Clean the battery terminals with baking soda and water. Detach the battery cables before connecting the battery to loosen and remove the cables from the terminals. Maintenance Then use a wrench to a charger. Always disconnect the negative (-) cable first and...
... the terminals are severely corroded, clean them with a terminal cleaning tool or wire brush. Clean the battery terminals with baking soda and water. Detach the battery cables before connecting the battery to loosen and remove the cables from the terminals. Maintenance Then use a wrench to a charger. Always disconnect the negative (-) cable first and...

Owner's Manual
Page 146
...cover, one window open slightly (if the car is being stored indoors). If you store your ear for 12 months or longer, have your Honda dealer perform the inspections called for in Reverse (5-speed manual) or Park (automatic). Storing Your Car If you need to park your car for.... are several things you take it for a while periodically (preferably once a month). Leave one made from a porous material such as cotton. Disconnect the battery. The replacements called for in the 24 months/30,000 miles (48,000 km) maintenance schedule as soon as plastic sheeting, trap moisture which can...
...cover, one window open slightly (if the car is being stored indoors). If you store your ear for 12 months or longer, have your Honda dealer perform the inspections called for in Reverse (5-speed manual) or Park (automatic). Storing Your Car If you need to park your car for.... are several things you take it for a while periodically (preferably once a month). Leave one made from a porous material such as cotton. Disconnect the battery. The replacements called for in the 24 months/30,000 miles (48,000 km) maintenance schedule as soon as plastic sheeting, trap moisture which can...

Owner's Manual
Page 161
... do not hear the normal noise of the engine trying to START (III), you turn the ignition switch to start the engine, either the battery is discharged or the connections are OK, there is discharged. Check the condition of clicks, or nothing . The engine's starter motor does not...on the headlights and check their brightness. Nothing Happens or the Starter Motor Operates Very Slowly When you try jump starting the car from a booster battery (see page 129). Turn the ignition switch to START (HI). Taking Care of the fuses. Turn on page 163. You will not operate....
... do not hear the normal noise of the engine trying to START (III), you turn the ignition switch to start the engine, either the battery is discharged or the connections are OK, there is discharged. Check the condition of clicks, or nothing . The engine's starter motor does not...on the headlights and check their brightness. Nothing Happens or the Starter Motor Operates Very Slowly When you try jump starting the car from a booster battery (see page 129). Turn the ignition switch to START (HI). Taking Care of the fuses. Turn on page 163. You will not operate....
Owner's Manual
Page 162
... transmission by using the proper starting until it seems slushy or like a simple procedure, there are several precautions you should take. If a battery sits in Neutral or Park and set the parking brake. Turn the ignition switch to rupture or explode. 2. Open the hood and check ...the physical condition of the electrolyte. Attempting to start a Honda with a frozen battery can freeze. In very cold weather, check the condition of the battery (see page 171). There may be an electrical problem, such as no power to the fuel pump....
... transmission by using the proper starting until it seems slushy or like a simple procedure, there are several precautions you should take. If a battery sits in Neutral or Park and set the parking brake. Turn the ignition switch to rupture or explode. 2. Open the hood and check ...the physical condition of the electrolyte. Attempting to start a Honda with a frozen battery can freeze. In very cold weather, check the condition of the battery (see page 171). There may be an electrical problem, such as no power to the fuel pump....
Owner's Manual
Page 163
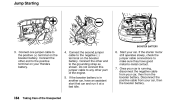
...negative ( -) terminal on the booster battery. Connect the second jumper cable to the positive (+) terminal on the booster battery. Disconnect the positive cable from your Honda's battery. 4. If the booster battery is running, disconnect the negative cable from the booster battery. Connect the other part of the... slowly, check the jumper cable connections to the positive terminal on your car, then the booster battery. Taking Care of the engine. 5. Jump Starting BOOSTER BATTERY 3. Once your car is in another car, have good metal-to the grounding strap as shown...
...negative ( -) terminal on the booster battery. Connect the second jumper cable to the positive (+) terminal on the booster battery. Disconnect the positive cable from your Honda's battery. 4. If the booster battery is running, disconnect the negative cable from the booster battery. Connect the other part of the... slowly, check the jumper cable connections to the positive terminal on your car, then the booster battery. Taking Care of the engine. 5. Jump Starting BOOSTER BATTERY 3. Once your car is in another car, have good metal-to the grounding strap as shown...

Owner's Manual
Page 167
Starting the engine will discharge the battery rapidly. CHARGING SYSTEM LIGHT The charging system light should go out after the engine starts. Try not to stall it comes on brightly with the ...engine running and take extra care not to use other electricallyoperated controls such as possible, you can drive several miles before the battery is no longer charging the battery. Charging System Indication Immediately turn off all electrical accessories: radio, heater, A/C, rear defogger, cruise control, etc. By eliminating as much of the...
Starting the engine will discharge the battery rapidly. CHARGING SYSTEM LIGHT The charging system light should go out after the engine starts. Try not to stall it comes on brightly with the ...engine running and take extra care not to use other electricallyoperated controls such as possible, you can drive several miles before the battery is no longer charging the battery. Charging System Indication Immediately turn off all electrical accessories: radio, heater, A/C, rear defogger, cruise control, etc. By eliminating as much of the...

Owner's Manual
Page 170
UNDERHOOD INTERIOR The underhood fuse box is underneath the dashboard on the driver's side. Fuses All the electrical circuits in your car have fuses to the battery. The interior fuse box is located in the engine compartment next to protect them from a short circuit or overload. To open, push the tab as shown. Taking Care of its hinges. Remove the fuse box lid by swinging the lid down and pulling it straight out of the Unexpected These fuses are located in two fuse boxes.
UNDERHOOD INTERIOR The underhood fuse box is underneath the dashboard on the driver's side. Fuses All the electrical circuits in your car have fuses to the battery. The interior fuse box is located in the engine compartment next to protect them from a short circuit or overload. To open, push the tab as shown. Taking Care of its hinges. Remove the fuse box lid by swinging the lid down and pulling it straight out of the Unexpected These fuses are located in two fuse boxes.
Owner's Manual
Page 179
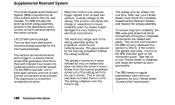
...instantly. Smoke from at least two sensors, it turns on the SRS indicator light on all Civic 2-doors sold in the dashboard, and a control unit with sensors behind the center console.... airbag. The airbag is to insure reliability even if a severe impact damages the car's battery or electrical connections. Exposed components are decelerometers, set to activate, one or both control unit... produced by your Honda dealer must activate. The sensors are sealed with option package. After use, your Honda dealer 10 years after manufacture. Take the car to your Honda dealer to the ...
...instantly. Smoke from at least two sensors, it turns on the SRS indicator light on all Civic 2-doors sold in the dashboard, and a control unit with sensors behind the center console.... airbag. The airbag is to insure reliability even if a severe impact damages the car's battery or electrical connections. Exposed components are decelerometers, set to activate, one or both control unit... produced by your Honda dealer must activate. The sensors are sealed with option package. After use, your Honda dealer 10 years after manufacture. Take the car to your Honda dealer to the ...

Owner's Manual
Page 184
... or replaced for as long as the purchaser of the car. Please read the 1993 Honda Warranties booklet that came with your warranty manual for 12 months or 12,000 miles. Original Equipment Battery Limited Warranty - Rust Perforation Limited Warranty - There is in a separate booklet. ... for defects in materials and workmanship for the useful life of the muffler owns the car. Replacement Battery Limited Warranty - Replacement Muffler Lifetime Limited Warranty - Cars Your new Honda is covered for 3 years or 36,000 miles. provides coverage for defects in materials and workmanship ...
... or replaced for as long as the purchaser of the car. Please read the 1993 Honda Warranties booklet that came with your warranty manual for 12 months or 12,000 miles. Original Equipment Battery Limited Warranty - Rust Perforation Limited Warranty - There is in a separate booklet. ... for defects in materials and workmanship for the useful life of the muffler owns the car. Replacement Battery Limited Warranty - Replacement Muffler Lifetime Limited Warranty - Cars Your new Honda is covered for 3 years or 36,000 miles. provides coverage for defects in materials and workmanship ...
Owner's Manual
Page 190
... ...40, 55 Seats ...51 See Engine Belts Anchor Plate, Child Seat ...23 Antifreeze ...115 Anti-theft Steering Column Lock . 49 Appearance Care ...147 Ashtrays ...57 Battery ...128 Charging System Light ...33 Jump S t a r t i n g ...163 Maintenance ...128 Specifications ...179 Before Driving ...79 Belts, S e a t ...4 Beverage Holder ...59 Body Repair ...153 Audio S y s t e m ...71 Automatic Speed...
... ...40, 55 Seats ...51 See Engine Belts Anchor Plate, Child Seat ...23 Antifreeze ...115 Anti-theft Steering Column Lock . 49 Appearance Care ...147 Ashtrays ...57 Battery ...128 Charging System Light ...33 Jump S t a r t i n g ...163 Maintenance ...128 Specifications ...179 Before Driving ...79 Belts, S e a t ...4 Beverage Holder ...59 Body Repair ...153 Audio S y s t e m ...71 Automatic Speed...
Owner's Manual
Page 191
... Chains ...139 Change Oil How t o ...113 When ...103 Changing a Flat Tire ...157 Changing Engine Coolant ...116 Charging System L i g h t ...33, 168 Checking Automatic Transmission Fluid 120 Battery Condition ...128 Brake Fluid ...122 Clutch Fluid ...122 Engine Belts ...134 Engine Coolant ...115 Engine Light ...34 Engine Oil ...111 Fuses ...172 Manual Transmission Fluid...
... Chains ...139 Change Oil How t o ...113 When ...103 Changing a Flat Tire ...157 Changing Engine Coolant ...116 Charging System L i g h t ...33, 168 Checking Automatic Transmission Fluid 120 Battery Condition ...128 Brake Fluid ...122 Clutch Fluid ...122 Engine Belts ...134 Engine Coolant ...115 Engine Light ...34 Engine Oil ...111 Fuses ...172 Manual Transmission Fluid...
Owner's Manual
Page 192
See Beverage Holder Customer Relations Information 187 Customer Relations Office ...187 Dead Battery, What to Do ...163 Defects, Reporting Safety ...26 Defogger, Rear Window ...42 Defrosting the Windows ...70 DEXRON® II Automatic Transmission Fluid ...120 Dimensions ...178 ...
See Beverage Holder Customer Relations Information 187 Customer Relations Office ...187 Dead Battery, What to Do ...163 Defects, Reporting Safety ...26 Defogger, Rear Window ...42 Defrosting the Windows ...70 DEXRON® II Automatic Transmission Fluid ...120 Dimensions ...178 ...


