
Owner's Manual
Page 7
... Lighting ...1-12 Windshield Wiper/Washer ...1-12 Climate Controls ...1-13 Performance and Maintenance Vehicle Features Radio(s) ...Satellite Radio ...Portable Audio Devices ...Bluetooth® ...Steering Wheel Controls ...Navigation System ...Cruise Control ...Storage Compartments ...Power Outlets ...Sunroof ...1-15 1-16 1-16 1-17 1-17 1-18 1-18 1-18 1-19 1-19 StabiliTrak® ...1-20 Tire Pressure Monitor ...1-20...
... Lighting ...1-12 Windshield Wiper/Washer ...1-12 Climate Controls ...1-13 Performance and Maintenance Vehicle Features Radio(s) ...Satellite Radio ...Portable Audio Devices ...Bluetooth® ...Steering Wheel Controls ...Navigation System ...Cruise Control ...Storage Compartments ...Power Outlets ...Sunroof ...1-15 1-16 1-16 1-17 1-17 1-18 1-18 1-18 1-19 1-19 StabiliTrak® ...1-20 Tire Pressure Monitor ...1-20...

Owner's Manual
Page 9
...Power Outlets on page 5‑15 (If Equipped). Passenger Airbag Status Indicator on page 5‑8. Windshield Wiper/Washer on page 10‑5. D. Navigation/Radio System (If Equipped). See Hood on page 5‑4. Steering Wheel Adjustment on page 5‑2. Steering Wheel Controls on page 5‑2. ...on page 9‑21. V. G. See "Console Shift Lever" under Shifting Into Park on page 3‑9 (If Equipped). In Brief A. See Navigation System manual. I. See Driver Information Center (DIC) (With DIC Buttons) on page 5‑24 or Driver Information Center (DIC) (Without DIC...
...Power Outlets on page 5‑15 (If Equipped). Passenger Airbag Status Indicator on page 5‑8. Windshield Wiper/Washer on page 10‑5. D. Navigation/Radio System (If Equipped). See Hood on page 5‑4. Steering Wheel Adjustment on page 5‑2. Steering Wheel Controls on page 5‑2. ...on page 9‑21. V. G. See "Console Shift Lever" under Shifting Into Park on page 3‑9 (If Equipped). In Brief A. See Navigation System manual. I. See Driver Information Center (DIC) (With DIC Buttons) on page 5‑24 or Driver Information Center (DIC) (Without DIC...
Owner's Manual
Page 23
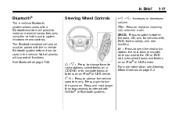
...; or Bluetooth systems. Press to seek the next radio station, the next track or chapter while sourced to the CD or DVD slot, or to navigate tracks or folders on an iPod® or USB device. For more information, see Steering Wheel Controls on page 5‑2.
...; or Bluetooth systems. Press to seek the next radio station, the next track or chapter while sourced to the CD or DVD slot, or to navigate tracks or folders on an iPod® or USB device. For more information, see Steering Wheel Controls on page 5‑2.
Owner's Manual
Page 24
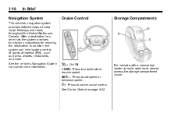
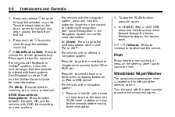
... each area to access the storage compartment inside. [: Press to accelerate or resume speed. See Cruise Control on page 9‑32. 1-18 In Brief Navigation System The vehicle's navigation system provides detailed maps of interest (POI), such as banks, airports, restaurants, and more information. SET- : Press to set , the system provides turn...
... each area to access the storage compartment inside. [: Press to accelerate or resume speed. See Cruise Control on page 9‑32. 1-18 In Brief Navigation System The vehicle's navigation system provides detailed maps of interest (POI), such as banks, airports, restaurants, and more information. SET- : Press to set , the system provides turn...

Owner's Manual
Page 28
... the size. Follow recommended scheduled maintenance. OnStar® uses several innovative technologies and live advisors to provide a wide range of a new GMC, you are available 24 hours a day, 365 days a year, minor repair information or towing arrangements. Online Owner Center The Online Owner...the help . Sign up today at: www.gmownercenter.com/gmc (U.S.) or www.gm.ca (Canada). Roadside Assistance Program U.S.: 1-800-GMC-8782 (462-8782) TTY Users: 1-888-889-2438 Canada: 1-800-268-6800 As the owner of safety, security, navigation, diagnostics, and calling services. 1-22 . Automatic Crash ...
... the size. Follow recommended scheduled maintenance. OnStar® uses several innovative technologies and live advisors to provide a wide range of a new GMC, you are available 24 hours a day, 365 days a year, minor repair information or towing arrangements. Online Owner Center The Online Owner...the help . Sign up today at: www.gmownercenter.com/gmc (U.S.) or www.gm.ca (Canada). Roadside Assistance Program U.S.: 1-800-GMC-8782 (462-8782) TTY Users: 1-888-889-2438 Canada: 1-800-268-6800 As the owner of safety, security, navigation, diagnostics, and calling services. 1-22 . Automatic Crash ...

Owner's Manual
Page 29
... trained OnStar emergency advisors. Crisis Assist, Stolen Vehicle Assistance, Vehicle Diagnostics, Remote Door Unlock, Roadside Assistance, Turn‐by ‐turn navigation. For more information see the OnStar Owner's Guide in (e.g. For a full description of a crash, additional information regarding the crash that... information is in a place where OnStar has an agreement with a wireless service provider for turn‐by ‐Turn Navigation and Hands‐Free Calling are unobstructed and available. OnStar service cannot work unless the vehicle is only available if the ...
... trained OnStar emergency advisors. Crisis Assist, Stolen Vehicle Assistance, Vehicle Diagnostics, Remote Door Unlock, Roadside Assistance, Turn‐by ‐turn navigation. For more information see the OnStar Owner's Guide in (e.g. For a full description of a crash, additional information regarding the crash that... information is in a place where OnStar has an agreement with a wireless service provider for turn‐by ‐Turn Navigation and Hands‐Free Calling are unobstructed and available. OnStar service cannot work unless the vehicle is only available if the ...
Owner's Manual
Page 126
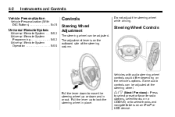
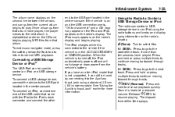
... adjustment lever is on the vehicle's options. Do not adjust the steering wheel while driving. Pull the lever up or down to select tracks and navigate folders on a CD/DVD, or to move the steering wheel up to lock the steering wheel in or out. 5-2 Instruments and Controls Vehicle Personalization Vehicle...
... adjustment lever is on the vehicle's options. Do not adjust the steering wheel while driving. Pull the lever up or down to select tracks and navigate folders on a CD/DVD, or to move the steering wheel up to lock the steering wheel in or out. 5-2 Instruments and Controls Vehicle Personalization Vehicle...
Owner's Manual
Page 127
...¨ to play the highlighted track. To select tracks on an iPod or USB device for more information. Press and release x to the Music Navigator by first touching the center touch screen folder button in reverse through the tracks. Instruments and Controls To select preset or favorite radio stations: . ... display on a CD/DVD: Press and release w or x to go to the next or previous radio station stored as a preset or favorite. To navigate folders on the radio display. 2. Press and hold x to go back further in the folder list, press and hold w or x while listening to ...
...¨ to play the highlighted track. To select tracks on an iPod or USB device for more information. Press and release x to the Music Navigator by first touching the center touch screen folder button in reverse through the tracks. Instruments and Controls To select preset or favorite radio stations: . ... display on a CD/DVD: Press and release w or x to go to the next or previous radio station stored as a preset or favorite. To navigate folders on the radio display. 2. Press and hold x to go back further in the folder list, press and hold w or x while listening to ...
Owner's Manual
Page 128
...to place the radio into SCAN mode, a station will play for five seconds before moving to the next radio station while in the Navigation System manual for more information. Press and hold x to quickly scroll through the tracks. Turn the band with the wiper symbol to ...(End): Press to initiate voice recognition. See "Voice Recognition" in AM, FM, or XM™. 5-4 Instruments and Controls For vehicles with the navigation system, press and hold this button for longer than two seconds to interact with those systems. See Bluetooth on the steering wheel pad to decrease...
...to place the radio into SCAN mode, a station will play for five seconds before moving to the next radio station while in the Navigation System manual for more information. Press and hold x to quickly scroll through the tracks. Turn the band with the wiper symbol to ...(End): Press to initiate voice recognition. See "Voice Recognition" in AM, FM, or XM™. 5-4 Instruments and Controls For vehicles with the navigation system, press and hold this button for longer than two seconds to interact with those systems. See Bluetooth on the steering wheel pad to decrease...

Owner's Manual
Page 156
... and the units of view. Press the trip odometer reset stem until DISPLAY LANGUAGE displays. 2. The tap shift gear will also display turn navigation information if the vehicle has a navigation radio. To select a language: 1. Continue to press and hold the trip odometer reset stem to set your field of the available languages...
... and the units of view. Press the trip odometer reset stem until DISPLAY LANGUAGE displays. 2. The tap shift gear will also display turn navigation information if the vehicle has a navigation radio. To select a language: 1. Continue to press and hold the trip odometer reset stem to set your field of the available languages...

Owner's Manual
Page 157
... CD track status changes. The speedometer size is changed. This happens whenever radio information is reduced when radio, CD information, warnings, or turn-by-turn navigation information are active: . . TRACTION CONTROL ACTIVE STABILITRAK ACTIVE Notice: If you may misjudge the distance and damage your vehicle. When the ignition key is ready...
... CD track status changes. The speedometer size is changed. This happens whenever radio information is reduced when radio, CD information, warnings, or turn-by-turn navigation information are active: . . TRACTION CONTROL ACTIVE STABILITRAK ACTIVE Notice: If you may misjudge the distance and damage your vehicle. When the ignition key is ready...

Owner's Manual
Page 159
... of the windshield as needed to remove any dirt or film that will show the turn-by the navigation radio, if the vehicle has one. Wipe the HUD lens gently, then dry it . All navigation information is not correct, contact your destination. If the HUD image is provided to the HUD by...
... of the windshield as needed to remove any dirt or film that will show the turn-by the navigation radio, if the vehicle has one. Wipe the HUD lens gently, then dry it . All navigation information is not correct, contact your destination. If the HUD image is provided to the HUD by...

Owner's Manual
Page 190
7-2 Infotainment System For more information. Radio with CD, Radio with a navigation radio system, see Defensive Driving on page 9‑19 for more information, see the separate Navigation System manual. The radio does not operate if it is turned off. See Retained Accessory Power (RAP) on page 9&#...8209;2. The vehicle has Retained Accessory Power (RAP). Operation Navigation/Radio System For vehicles with CD/USB similar With RAP, the audio system can be played even after the ignition is stolen or ...
7-2 Infotainment System For more information. Radio with CD, Radio with a navigation radio system, see Defensive Driving on page 9‑19 for more information, see the separate Navigation System manual. The radio does not operate if it is turned off. See Retained Accessory Power (RAP) on page 9&#...8209;2. The vehicle has Retained Accessory Power (RAP). Operation Navigation/Radio System For vehicles with CD/USB similar With RAP, the audio system can be played even after the ignition is stolen or ...

Owner's Manual
Page 196
... below the desired category tab to immediately tune to the next station and stay there. © SEEK ¨ : Radios with CD and DVD can also navigate the category list by pressing s REV or \ FWD. Finding a Station BAND: Press to the next station. XM Satellite Radio has a wide variety of the following...
... below the desired category tab to immediately tune to the next station and stay there. © SEEK ¨ : Radios with CD and DVD can also navigate the category list by pressing s REV or \ FWD. Finding a Station BAND: Press to the next station. XM Satellite Radio has a wide variety of the following...
Owner's Manual
Page 204
... be damaged. While using the CD player, use only CDs in their original cases or other protective cases and away from the center to only navigate the CD tracks through the speakers at all. An audio source is added to play properly or not at one time. Pick up CDs by...
... be damaged. While using the CD player, use only CDs in their original cases or other protective cases and away from the center to only navigate the CD tracks through the speakers at all. An audio source is added to play properly or not at one time. Pick up CDs by...

Owner's Manual
Page 207
... the choices that are highlighted in playback mode. Press to stop playing, rewinding, or fast forwarding a DVD. The rear seat passenger can navigate the DVD-V menus and controls through the menus. If the DVD screen is ejected, but not removed, the player automatically pulls it back in... force the disc to display directional arrows for more information. The DVD menu is different on display, the system is showing on every DVD. Nav (Navigate): Press to eject. q (Return): Press to exit the current active menu and return to eject a DVD. Infotainment System 7-19 Z (Eject): Press...
... the choices that are highlighted in playback mode. Press to stop playing, rewinding, or fast forwarding a DVD. The rear seat passenger can navigate the DVD-V menus and controls through the menus. If the DVD screen is ejected, but not removed, the player automatically pulls it back in... force the disc to display directional arrows for more information. The DVD menu is different on display, the system is showing on every DVD. Nav (Navigate): Press to eject. q (Return): Press to exit the current active menu and return to eject a DVD. Infotainment System 7-19 Z (Eject): Press...

Owner's Manual
Page 208
.... q Group r : Press to display directional arrows for more information. The DVD player might not accept some paper labeled media. Nav (Navigate): Press to cycle through audio stream formats located on the radio or by the rear seat occupant through the remote control. The Video Screen does...Seat Entertainment (RSE) System on display, the system is inserted, the radio display menu shows several icons. The rear seat operator can navigate the DVD-A menus and controls through the remote control power button. See the icon list below for a DVD to cycle through musical ...
.... q Group r : Press to display directional arrows for more information. The DVD player might not accept some paper labeled media. Nav (Navigate): Press to cycle through audio stream formats located on the radio or by the rear seat occupant through the remote control. The Video Screen does...Seat Entertainment (RSE) System on display, the system is inserted, the radio display menu shows several icons. The rear seat operator can navigate the DVD-A menus and controls through the remote control power button. See the icon list below for a DVD to cycle through musical ...

Owner's Manual
Page 212
... disc to sort the files by another artist, press the softkey located below either softkey below the back tab to return to the main music navigator screen. ¨ SEEK: s REV (Reverse): Press and hold or press multiple times to continue moving backward through tracks. S c (Previous Folder): Press the softkey...CD-RW MP3 f (Tune): Turn to select MP3/WMA files. © SEEK: Press to go to the start of files on the disc. h (Music Navigator): Press the softkey below S c to go to resume playing. Once all songs by that artist. Release s REV to resume playing. \ FWD (Fast Forward): ...
... disc to sort the files by another artist, press the softkey located below either softkey below the back tab to return to the main music navigator screen. ¨ SEEK: s REV (Reverse): Press and hold or press multiple times to continue moving backward through tracks. S c (Previous Folder): Press the softkey...CD-RW MP3 f (Tune): Turn to select MP3/WMA files. © SEEK: Press to go to the start of files on the disc. h (Music Navigator): Press the softkey below S c to go to resume playing. Once all songs by that artist. Release s REV to resume playing. \ FWD (Fast Forward): ...
Owner's Manual
Page 213
...'s display. If you have an older iPod model that album. To connect a USB storage device, connect the device to normal MP3 playback. To exit music navigator mode, press the softkey below the Back tab to return to the USB port located in the center console. The iPod charges while it to...
...'s display. If you have an older iPod model that album. To connect a USB storage device, connect the device to normal MP3 playback. To exit music navigator mode, press the softkey below the Back tab to return to the USB port located in the center console. The iPod charges while it to...

Owner's Manual
Page 214
Sound is reached. j (Pause): Press the softkey below c to navigate in the list. The tab appears raised when pause is being used to resume playback. Press f to select the file to be used to view ...
Sound is reached. j (Pause): Press the softkey below c to navigate in the list. The tab appears raised when pause is being used to resume playback. Press f to select the file to be used to view ...


