
Owner's Manual
Page 296
Sealed Beam Headlights 1. Halogen Bulbs 6-50 Unplug and remove the headlight. 4. Plug in the new headlight and put it in place. 5 . Bulb Replacement Before you replace any bulbs, be sure that all the lights are off and the engine isn't running. Pull the headlight out and remove the retainer. 3. Install the retainer to the headlight and tighten the screws. Remove the four screws from the headlight retainer. 2 .
Sealed Beam Headlights 1. Halogen Bulbs 6-50 Unplug and remove the headlight. 4. Plug in the new headlight and put it in place. 5 . Bulb Replacement Before you replace any bulbs, be sure that all the lights are off and the engine isn't running. Pull the headlight out and remove the retainer. 3. Install the retainer to the headlight and tighten the screws. Remove the four screws from the headlight retainer. 2 .
Owner's Manual
Page 297
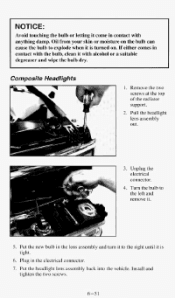
Pull the headlight lens assembly out. s 1 : I NOTICE: Avoid touching the bulb or letting it is turned If either comes in contact with alcohol a suitable or degreaser andwipe the bulb dry. Oilfrom your skin or moisture on the bulb can cause the bulb explode when it come in to on. Composite Headlights 1. Remove the two screws at the top of the radiator support. 2. contact with the bulb, clean it with anything damp.
Pull the headlight lens assembly out. s 1 : I NOTICE: Avoid touching the bulb or letting it is turned If either comes in contact with alcohol a suitable or degreaser andwipe the bulb dry. Oilfrom your skin or moisture on the bulb can cause the bulb explode when it come in to on. Composite Headlights 1. Remove the two screws at the top of the radiator support. 2. contact with the bulb, clean it with anything damp.

Owner's Manual
Page 298
... back into the light assembly and turn signal light assembly back into the vehicle and tighten the screws. Front Parkingflurn Signal Lights with Composite Headlights 7 1. Remove the screws and take out the parkingkurn signal light assembly. 2. Pull the socket out of the light socket while turning ... press in gently on the bulb and turn it to the right until it from the inside edge of the light socket while turning the socket to the left. -7 6-52 Put the parking/turn it is tight. 7. Front Parkingflurn Signal Lights with Sealed Beam Headlights I . Squeeze the tab ...
... back into the light assembly and turn signal light assembly back into the vehicle and tighten the screws. Front Parkingflurn Signal Lights with Composite Headlights 7 1. Remove the screws and take out the parkingkurn signal light assembly. 2. Pull the socket out of the light socket while turning ... press in gently on the bulb and turn it to the right until it from the inside edge of the light socket while turning the socket to the left. -7 6-52 Put the parking/turn it is tight. 7. Front Parkingflurn Signal Lights with Sealed Beam Headlights I . Squeeze the tab ...

Owner's Manual
Page 299
...it to the left and remove it from the socket. 5. Side Marker Lights with Sealed Beam and Composite Headlights 1. Put the socket back into the vehicleand tighten the screws. Push in on the bulb, turn it locks. 7. Remove the screws and pull out the parkinghrn signal light assembly. 2. Pull ...the socket out of the light assembly. 4. Put the parkinghrn signal lightassembly back into the light assembly and turn the side marker bulb socket to the leftand remove it . 6-53 Reach through the opening and turn it socket to the right until it to the right until ...
...it to the left and remove it from the socket. 5. Side Marker Lights with Sealed Beam and Composite Headlights 1. Put the socket back into the vehicleand tighten the screws. Push in on the bulb, turn it locks. 7. Remove the screws and pull out the parkinghrn signal light assembly. 2. Pull ...the socket out of the light assembly. 4. Put the parkinghrn signal lightassembly back into the light assembly and turn the side marker bulb socket to the leftand remove it . 6-53 Reach through the opening and turn it socket to the right until it to the right until ...

Owner's Manual
Page 302
...for more information. If the overload is protected from the windshield before using the windshield wipers. Put in a new bulb and push it in your headlight wiring checked right away. Fuses and Circuit Breakers The wiring circuits in until the motor cools. Although the circuit is...protected by a combination of the light assembly. 5. Remove the screws from short circuits by a circuit breaker in the wiring itself. Headlights The headlight wiring is protected by some cases to get it is tight. 7. You may cause wiper linkage damage. An electrical overload will stop...
...for more information. If the overload is protected from the windshield before using the windshield wipers. Put in a new bulb and push it in your headlight wiring checked right away. Fuses and Circuit Breakers The wiring circuits in until the motor cools. Although the circuit is...protected by a combination of the light assembly. 5. Remove the screws from short circuits by a circuit breaker in the wiring itself. Headlights The headlight wiring is protected by some cases to get it is tight. 7. You may cause wiper linkage damage. An electrical overload will stop...

Owner's Manual
Page 381
... 6 Underbody ...When Towing a Trailer ...Master Cylinder (See "Brakes") Mirrors ...Electric Outside . L Lights ...2-47 Brake System Warning ...2-67 Bulb Replacement ...6-86 Charging System Light ...2-70 2-71 CheckGagesLight ...Dome ...2-49 Front Parking/Turn Signal ...6-52 Headlights (See "Headlights") Indicator ...2-66 Operation ...2-37 Reading ...2-49 Service Engine Soon ...2.71, 6-59 Rear ...6-55 Replacement Chart ...6-86 SideMarker...
... 6 Underbody ...When Towing a Trailer ...Master Cylinder (See "Brakes") Mirrors ...Electric Outside . L Lights ...2-47 Brake System Warning ...2-67 Bulb Replacement ...6-86 Charging System Light ...2-70 2-71 CheckGagesLight ...Dome ...2-49 Front Parking/Turn Signal ...6-52 Headlights (See "Headlights") Indicator ...2-66 Operation ...2-37 Reading ...2-49 Service Engine Soon ...2.71, 6-59 Rear ...6-55 Replacement Chart ...6-86 SideMarker...


