
Owner's Manual
Page 15
... lower the seat, move the center knob toward the inside of the vehicle. Reclining Front Seatback (Bucket Split Bench Seat) or To adjust the seatback, lift the front of this switch at the front of the lever and the seatback will go to an upright position. Don't have a seatback reclined if...
... lower the seat, move the center knob toward the inside of the vehicle. Reclining Front Seatback (Bucket Split Bench Seat) or To adjust the seatback, lift the front of this switch at the front of the lever and the seatback will go to an upright position. Don't have a seatback reclined if...

Owner's Manual
Page 17
... that the top of the restraint is closest to the upright position, push the seatback rearward until it latches. To fold the seatback forward, lift this lever Lift the frontof the lever and the seatback will fold forward. A CAUTION: ;p 2 : L - on is locked. Seatback Latches (Reclining Split Bench and Reclining Bucket Seats) The...
... that the top of the restraint is closest to the upright position, push the seatback rearward until it latches. To fold the seatback forward, lift this lever Lift the frontof the lever and the seatback will fold forward. A CAUTION: ;p 2 : L - on is locked. Seatback Latches (Reclining Split Bench and Reclining Bucket Seats) The...

Owner's Manual
Page 20
... of the outer passenger position safety belts on the hooks at the front of the way. To return the seat to the passenger position, just lift up on the seatback and push it rearward until it will be folded flat formore cargo space. To fold the seat, pull on the floor...
... of the outer passenger position safety belts on the hooks at the front of the way. To return the seat to the passenger position, just lift up on the seatback and push it rearward until it will be folded flat formore cargo space. To fold the seat, pull on the floor...

Owner's Manual
Page 22
... handle to use. Removable Rear(Third) Seat (Wagon Models) If your vehicle has a rear seat, it can be available for more cargo space. Then, lift the seatback up on the seatback and up and push rearward until it latches. Lower the seat cushion until it latches in place. Before removing...seat, unlatch the outside passenger position safety belts from the seatback by pushing rearward on the latch, and fold them out to the passenger position, lift the load floor panels and latch them into the seatback. Also, pull the safety belt buckles out of the seat cushion pockets, so they ...
... handle to use. Removable Rear(Third) Seat (Wagon Models) If your vehicle has a rear seat, it can be available for more cargo space. Then, lift the seatback up on the seatback and up and push rearward until it latches. Lower the seat cushion until it latches in place. Before removing...seat, unlatch the outside passenger position safety belts from the seatback by pushing rearward on the latch, and fold them out to the passenger position, lift the load floor panels and latch them into the seatback. Also, pull the safety belt buckles out of the seat cushion pockets, so they ...

Owner's Manual
Page 24
... of the seat over the hooks in , hold the seat sideways and put it down, with the latches at the rear of the seat and lift the rear of the seat up on the center release handle at the bottom of the vehicle and raise the seatback. Then, fold the seatback...
... of the seat over the hooks in , hold the seat sideways and put it down, with the latches at the rear of the seat and lift the rear of the seat up on the center release handle at the bottom of the vehicle and raise the seatback. Then, fold the seatback...

Owner's Manual
Page 65
Open the tailgate lifting up on the handle while pulling the tailgate by toward you. After closing therear glass, pull up on its handle to unlock it to the ...
Open the tailgate lifting up on the handle while pulling the tailgate by toward you. After closing therear glass, pull up on its handle to unlock it to the ...

Owner's Manual
Page 92
... the release to work . Electric Tailgate Glass Release Before operating your shift lever must apply the parking brake for the release to work . 2-36 f a Then, lift the window up to the right until you release the tailgate glass. If you must be in this section. To release the glass, slide the...
... the release to work . Electric Tailgate Glass Release Before operating your shift lever must apply the parking brake for the release to work . 2-36 f a Then, lift the window up to the right until you release the tailgate glass. If you must be in this section. To release the glass, slide the...
Owner's Manual
Page 110
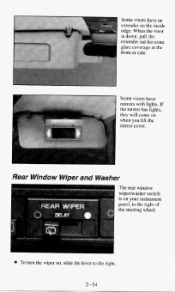
1 Some visors have mirrors with lights. Some visors have an extender onthe inside edge. Rear Window Wiper and Washer The rearwindow wiperlwasher switch is down, pull the extender out for extra glare coverage at the front orside. If the mirror has lights, they will come on your instrument panel, to the right of the steering wheel. 2-54 When the visor is on when you lift the mirror cover.
1 Some visors have mirrors with lights. Some visors have an extender onthe inside edge. Rear Window Wiper and Washer The rearwindow wiperlwasher switch is down, pull the extender out for extra glare coverage at the front orside. If the mirror has lights, they will come on your instrument panel, to the right of the steering wheel. 2-54 When the visor is on when you lift the mirror cover.

Owner's Manual
Page 137
Use this pad to improve footing of the bumper and swing it may be using the bumper to tow a trailer, you must also remove both outer cutoutsto attach the trailersafety chains. If you are steppingon the bumper step. You must remove the center cutout circleto install the trailer ball. When the pad releases from therear of when you will be equipped with a rear step pad at the center the bumper. To remove the pad, lift the edgeof the pad from the bumper holes, liftthe 2-81 Step-{ umper Pad If your vehicle has a rear step bumper, it forward.
Use this pad to improve footing of the bumper and swing it may be using the bumper to tow a trailer, you must also remove both outer cutoutsto attach the trailersafety chains. If you are steppingon the bumper step. You must remove the center cutout circleto install the trailer ball. When the pad releases from therear of when you will be equipped with a rear step pad at the center the bumper. To remove the pad, lift the edgeof the pad from the bumper holes, liftthe 2-81 Step-{ umper Pad If your vehicle has a rear step bumper, it forward.

Owner's Manual
Page 216
... warning with no sign of steam, try this for a minute or so: I . Engine fm(s) C. If you still have an air conditioner, turn it 's safe to lift the hood, here's what you 're in traffic. If you 'll see if the warning stops. Coolant recovery tank B. Radiator pressure cap 5-12 If you..., stop, and park your heater to get a little too hot when you: Climb a long hill on , you no steam, the problem may decide not to lift the hood but see or hear no longer have the overheat warning, you can get service help right away. Bring the engine speed back to...
... warning with no sign of steam, try this for a minute or so: I . Engine fm(s) C. If you still have an air conditioner, turn it 's safe to lift the hood, here's what you 're in traffic. If you 'll see if the warning stops. Coolant recovery tank B. Radiator pressure cap 5-12 If you..., stop, and park your heater to get a little too hot when you: Climb a long hill on , you no steam, the problem may decide not to lift the hood but see or hear no longer have the overheat warning, you can get service help right away. Bring the engine speed back to...

Owner's Manual
Page 222
Be sure the arrows on pressure cap line up like this procedure if coolant begins to lift the hood, here's what you can feel the upper radiator hose getting hot. Cooling System -Diesel Engines When you decide it's safe to flow out ...
Be sure the arrows on pressure cap line up like this procedure if coolant begins to lift the hood, here's what you can feel the upper radiator hose getting hot. Cooling System -Diesel Engines When you decide it's safe to flow out ...

Owner's Manual
Page 231
... to replace them with the jack,so you will have a pairof emergency gloves secured to release the cover. Slide your wagon model has a jack cover, lift the tab up to the jack.You can use them handy if needed later. Your vehicle may have them when changing the tire, or during...
... to replace them with the jack,so you will have a pairof emergency gloves secured to release the cover. Slide your wagon model has a jack cover, lift the tab up to the jack.You can use them handy if needed later. Your vehicle may have them when changing the tire, or during...

Owner's Manual
Page 235
Before raising the vehicle, do the following things. Put your bare hands. 5-31 If there is a wheel cover, pry along the edge until it with your spare tire near the flat tire. Don't try to the right. .. Be careful; With the UP marking on the ratchet facing you, rotate the ratchet to remove it comes off. the rim edges may be sharp. That will lift the jack head a little. Remove the wheel trim. " . ,. ,:m j .
Before raising the vehicle, do the following things. Put your bare hands. 5-31 If there is a wheel cover, pry along the edge until it with your spare tire near the flat tire. Don't try to the right. .. Be careful; With the UP marking on the ratchet facing you, rotate the ratchet to remove it comes off. the rim edges may be sharp. That will lift the jack head a little. Remove the wheel trim. " . ,. ,:m j .

Owner's Manual
Page 237
... the spare tire to fit. 5-33 or to the right. Front Position Rear Position Raise the vehicle by rotating the ratchet to fit the jack lift head into the proper location before yourvehicle. Make sure the UP marking faces you could bebadly injured or killed. Use the jack handle extentions if...
... the spare tire to fit. 5-33 or to the right. Front Position Rear Position Raise the vehicle by rotating the ratchet to fit the jack lift head into the proper location before yourvehicle. Make sure the UP marking faces you could bebadly injured or killed. Use the jack handle extentions if...

Owner's Manual
Page 257
Lift the element out of the vehicle. Line up the writing on the element sealing surfaceof the filter head, clean it faces (is readable from the ...
Lift the element out of the vehicle. Line up the writing on the element sealing surfaceof the filter head, clean it faces (is readable from the ...

Owner's Manual
Page 260
Checking Things Under theHood Hood Release To open the hood, first pull the handle inside the vehicle. Then go to the frontof the vehicle and pull up on the secondary hood release, located just to the belt driven fan. 6-14 Lift thehood. Your vehicle, if it has air conditioning, may have a auxiliary engine fan in addition to the passenger side of the center of the grill.
Checking Things Under theHood Hood Release To open the hood, first pull the handle inside the vehicle. Then go to the frontof the vehicle and pull up on the secondary hood release, located just to the belt driven fan. 6-14 Lift thehood. Your vehicle, if it has air conditioning, may have a auxiliary engine fan in addition to the passenger side of the center of the grill.

Owner's Manual
Page 293
... then have your dealership check it is not working properly, have your dealership checkyour air conditioning system to route thebelt your windshield wiper blade inserts, lift the wiper arm and rotate the blade until it out as as soon possible. If you how to be sureget the correct if to keep...
... then have your dealership check it is not working properly, have your dealership checkyour air conditioning system to route thebelt your windshield wiper blade inserts, lift the wiper arm and rotate the blade until it out as as soon possible. If you how to be sureget the correct if to keep...

Owner's Manual
Page 300
Pull the bulb straight out of the socket. 4. Put the socket back into the socket and push it in until it . 6. Roof Marker Lights 1. Redace the lens and tighten the screws. 6-54 Replace the parkinghrn signal light assembly and tighten the screws. Remove the screws and lift off the lens. 2. Put a new bulb into the socket and push it in until it is tight. 4. Pull the bulb straight out of the socket. 3. Put a new bulb into the side marker assembly and turn it to the right to tighten it istight. 5. 3.
Pull the bulb straight out of the socket. 4. Put the socket back into the socket and push it in until it . 6. Roof Marker Lights 1. Redace the lens and tighten the screws. 6-54 Replace the parkinghrn signal light assembly and tighten the screws. Remove the screws and lift off the lens. 2. Put a new bulb into the socket and push it in until it is tight. 4. Pull the bulb straight out of the socket. 3. Put a new bulb into the side marker assembly and turn it to the right to tighten it istight. 5. 3.