
Owner's Manual
Page 47
... to the abdomen, not to the stronger hip bones. Sit back and erect in the event of the seat belt by the front airbag control module (see Front Airbag Section). Pretensioners are designed to work for proper seat belt placement by the occupant. These devices improve the performance of a collision. Wear...
... to the abdomen, not to the stronger hip bones. Sit back and erect in the event of the seat belt by the front airbag control module (see Front Airbag Section). Pretensioners are designed to work for proper seat belt placement by the occupant. These devices improve the performance of a collision. Wear...

Owner's Manual
Page 52
... steering wheel or instrument panel during front airbag deployment could lead to more severe injuries in the center of the following: • Front Airbag Control Module (with your seat belts even though you have airbags. • Being too close to restrain you properly. if equipped) • AIRBAG Readiness Light • Driver...
... steering wheel or instrument panel during front airbag deployment could lead to more severe injuries in the center of the following: • Front Airbag Control Module (with your seat belts even though you have airbags. • Being too close to restrain you properly. if equipped) • AIRBAG Readiness Light • Driver...
Owner's Manual
Page 53
...knee bolster, instrument panel and the steering wheel and column. The front airbag inflators are not on and will not inflate. The front airbag control module will turn on either momentarily or continuously. 2 WARNING! If the key is severe enough to require the front airbags to inflate. The front ..., then turns the light off. THINGS TO KNOW BEFORE STARTING YOUR VEHICLE 53 How The Front Airbag System Works • The front airbag control module determines if a frontal impact is in the OFF position, in the ACC position, or not in the ignition switch, the front airbags are designed...
...knee bolster, instrument panel and the steering wheel and column. The front airbag inflators are not on and will not inflate. The front airbag control module will turn on either momentarily or continuously. 2 WARNING! If the key is severe enough to require the front airbags to inflate. The front ..., then turns the light off. THINGS TO KNOW BEFORE STARTING YOUR VEHICLE 53 How The Front Airbag System Works • The front airbag control module determines if a frontal impact is in the OFF position, in the ACC position, or not in the ignition switch, the front airbags are designed...

Owner's Manual
Page 54
... and position you to inflate the front airbags. if equipped) • Interconnecting Wiring How The Side Airbag System Works The front airbag control modules determine if a side collision is generated to blink your control of the following: • AIRBAG Readiness Light (shared with the front airbag ... restrain the driver and front passenger. The front airbags fully inflate in the passenger's seat • Front Airbag Control Module (with integrated side impact sensor - The driver's and passenger's front airbag gas is only about 50 milliseconds. The front airbag control...
... and position you to inflate the front airbags. if equipped) • Interconnecting Wiring How The Side Airbag System Works The front airbag control modules determine if a side collision is generated to blink your control of the following: • AIRBAG Readiness Light (shared with the front airbag ... restrain the driver and front passenger. The front airbags fully inflate in the passenger's seat • Front Airbag Control Module (with integrated side impact sensor - The driver's and passenger's front airbag gas is only about 50 milliseconds. The front airbag control...
Owner's Manual
Page 55
The abrasions are designed to deploy when the airbag control modules detect a moderate-to-severe collision, to severe side collisions, the side airbag inflator on and will not activate the system. In moderate to help restrain ... through the seat seam into the space between the occupant and the door. THINGS TO KNOW BEFORE STARTING YOUR VEHICLE 55 The front airbag control module also monitors the readiness of the electronic parts of the system whenever the ignition switch is in the OFF position, in the ACC position, or...
The abrasions are designed to deploy when the airbag control modules detect a moderate-to-severe collision, to severe side collisions, the side airbag inflator on and will not activate the system. In moderate to help restrain ... through the seat seam into the space between the occupant and the door. THINGS TO KNOW BEFORE STARTING YOUR VEHICLE 55 The front airbag control module also monitors the readiness of the electronic parts of the system whenever the ignition switch is in the OFF position, in the ACC position, or...

Owner's Manual
Page 160
... carry the FM signal. Using the tip of radio signals. Two Types of Signals There are two basic types of radio signals...AM or Amplitude Modulation, in which the transmitted sound causes the amplitude, or height, of the radio waves to vary...and FM or Frequency... Modulation, in which might lead you press a button. They mainly affect the wave amplitude, and thus remain a part of the wave is varied to believe your ...
... carry the FM signal. Using the tip of radio signals. Two Types of Signals There are two basic types of radio signals...AM or Amplitude Modulation, in which the transmitted sound causes the amplitude, or height, of the radio waves to vary...and FM or Frequency... Modulation, in which might lead you press a button. They mainly affect the wave amplitude, and thus remain a part of the wave is varied to believe your ...
Owner's Manual
Page 230
... released. To prevent damage to 15 seconds before trying again. The engine block heater cord is located on the driver side of the Integrated Power Module. It has a removable cap that is routed under the hood on the driver side of the vehicle. If the engine has been flooded, it may...
... released. To prevent damage to 15 seconds before trying again. The engine block heater cord is located on the driver side of the Integrated Power Module. It has a removable cap that is routed under the hood on the driver side of the vehicle. If the engine has been flooded, it may...
Owner's Manual
Page 296
... And Rear Wheel Bearings ...330 ▫ Appearance Care And Protection From Corrosion ...330 ▫ Cleaning The Instrument Panel And Underseat Cup Holders ...334 Integrated Power Module (IPM) ...336 Vehicle Storage ...337 Replacement Light Bulbs ...338 Bulb Replacement ...339 ▫ Headlights ...339
... And Rear Wheel Bearings ...330 ▫ Appearance Care And Protection From Corrosion ...330 ▫ Cleaning The Instrument Panel And Underseat Cup Holders ...334 Integrated Power Module (IPM) ...336 Vehicle Storage ...337 Replacement Light Bulbs ...338 Bulb Replacement ...339 ▫ Headlights ...339
Owner's Manual
Page 336
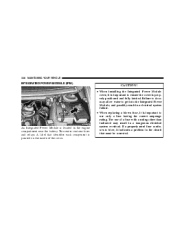
... properly positioned and fully latched. A label that must be corrected. 336 MAINTAINING YOUR VEHICLE INTEGRATED POWER MODULE (IPM) CAUTION! • When installing the Integrated Power Module cover, it indicates a problem in a dangerous electrical system overload. The use only a fuse having the correct amperage... rating. Failure to do so may allow water to get into the Integrated Power Module, and possibly result in a electrical system failure. • When replacing a blown fuse, it is printed on the inside of a ...
... properly positioned and fully latched. A label that must be corrected. 336 MAINTAINING YOUR VEHICLE INTEGRATED POWER MODULE (IPM) CAUTION! • When installing the Integrated Power Module cover, it indicates a problem in a dangerous electrical system overload. The use only a fuse having the correct amperage... rating. Failure to do so may allow water to get into the Integrated Power Module, and possibly result in a electrical system failure. • When replacing a blown fuse, it is printed on the inside of a ...
Owner's Manual
Page 337
... near the steering column. MAINTAINING YOUR VEHICLE 337 The Heated Mirrors, Lower Instrument Panel Power Outlet and Removable Floor Console, when in the Integrated Power Module labeled Ignition-Off Draw (IOD). • Or, disconnect the negative cable from the battery. • Anytime you store your vehicle, or keep it out of...
... near the steering column. MAINTAINING YOUR VEHICLE 337 The Heated Mirrors, Lower Instrument Panel Power Outlet and Removable Floor Console, when in the Integrated Power Module labeled Ignition-Off Draw (IOD). • Or, disconnect the negative cable from the battery. • Anytime you store your vehicle, or keep it out of...
Owner's Manual
Page 339
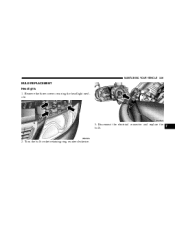
Turn the bulb socket retaining ring counterclockwise. Disconnect the electrical connector and replace the bulb. 7 2. Remove the three screws securing the headlight module. 3. MAINTAINING YOUR VEHICLE 339 BULB REPLACEMENT Headlights 1.
Turn the bulb socket retaining ring counterclockwise. Disconnect the electrical connector and replace the bulb. 7 2. Remove the three screws securing the headlight module. 3. MAINTAINING YOUR VEHICLE 339 BULB REPLACEMENT Headlights 1.
Owner's Manual
Page 340
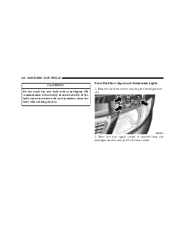
If the bulb comes in contact with an oily surface, clean the bulb with your fingers. Front Park/Turn Signal and Sidemarker Lights 1. Remove the three screws securing the headlight module. 2. Oil contamination will severely shorten bulb life. Twist the turn signal socket to remove from the headlight module and pull bulb from socket. 340 MAINTAINING YOUR VEHICLE CAUTION! Do not touch the new bulb with rubbing alcohol.
If the bulb comes in contact with an oily surface, clean the bulb with your fingers. Front Park/Turn Signal and Sidemarker Lights 1. Remove the three screws securing the headlight module. 2. Oil contamination will severely shorten bulb life. Twist the turn signal socket to remove from the headlight module and pull bulb from socket. 340 MAINTAINING YOUR VEHICLE CAUTION! Do not touch the new bulb with rubbing alcohol.
Owner's Manual
Page 341
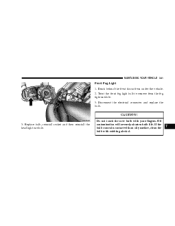
CAUTION! 3. Do not touch the new bulb with rubbing alcohol. 7 Twist the front fog light bulb to remove from under the vehicle. 2. If the bulb comes in contact with an oily surface, clean the bulb with your fingers. Reach behind the front fascia from the fog light module. 3. MAINTAINING YOUR VEHICLE 341 Front Fog Light 1. Disconnect the electrical connector and replace the bulb. Oil contamination will severely shorten bulb life. Replace bulb, reinstall socket and then reinstall the headlight module.
CAUTION! 3. Do not touch the new bulb with rubbing alcohol. 7 Twist the front fog light bulb to remove from under the vehicle. 2. If the bulb comes in contact with an oily surface, clean the bulb with your fingers. Reach behind the front fascia from the fog light module. 3. MAINTAINING YOUR VEHICLE 341 Front Fog Light 1. Disconnect the electrical connector and replace the bulb. Oil contamination will severely shorten bulb life. Replace bulb, reinstall socket and then reinstall the headlight module.
Owner's Manual
Page 388
... Inside Rearview Mirror ...77 Instrument Cluster ...149,150,151 Instrument Panel and Controls ...148 Instrument Panel Lens Cleaning ...334 Integrated Child Seat ...58 Integrated Power Module ...336 Interior Appearance Care ...333 Interior Fuses ...336 Interior Lights ...98,99 Intermittent Wipers ...104,219,220 Introduction ...4 Jack Location ...283 Jack Operation ...282,285...
... Inside Rearview Mirror ...77 Instrument Cluster ...149,150,151 Instrument Panel and Controls ...148 Instrument Panel Lens Cleaning ...334 Integrated Child Seat ...58 Integrated Power Module ...336 Interior Appearance Care ...333 Interior Fuses ...336 Interior Lights ...98,99 Intermittent Wipers ...104,219,220 Introduction ...4 Jack Location ...283 Jack Operation ...282,285...
