Owner's Manual
Page 23
... and the door is being power closed, the liftgate will reverse to manually access the liftgate area. THINGS TO KNOW BEFORE STARTING YOUR VEHICLE 23 headlights and park lights will flash, the horn will pulse on and off and the interior lights will turn on for 3 minutes unless you turn it...
... and the door is being power closed, the liftgate will reverse to manually access the liftgate area. THINGS TO KNOW BEFORE STARTING YOUR VEHICLE 23 headlights and park lights will flash, the horn will pulse on and off and the interior lights will turn on for 3 minutes unless you turn it...
Owner's Manual
Page 26
... the UNLOCK button on the keyless entry transmitter. 26 THINGS TO KNOW BEFORE STARTING YOUR VEHICLE 2. Also, using a valid sentry key The horn will pulse, headlights/park lights will flash, the Vehicle Theft Alarm/Immobilizer light, located in about 16 seconds. Avoid touching the new batteries with rubbing alcohol. 3.
... the UNLOCK button on the keyless entry transmitter. 26 THINGS TO KNOW BEFORE STARTING YOUR VEHICLE 2. Also, using a valid sentry key The horn will pulse, headlights/park lights will flash, the Vehicle Theft Alarm/Immobilizer light, located in about 16 seconds. Avoid touching the new batteries with rubbing alcohol. 3.
Owner's Manual
Page 74
... Quad And 50/50 Seating Flexibility ...94 To Open And Close The Hood ...96 Lights ...98 ▫ Interior Lights ...98 ▫ Park Lights ...99 ▫ Headlights ...99 ▫ Automatic Headlights - If Equipped ...100 ▫ Daytime Running Lights (Canada/Fleet Vehicles Only) ...101 ▫ Lights-On Reminder ...101 ▫ Battery Protection ...101 ▫...
... Quad And 50/50 Seating Flexibility ...94 To Open And Close The Hood ...96 Lights ...98 ▫ Interior Lights ...98 ▫ Park Lights ...99 ▫ Headlights ...99 ▫ Automatic Headlights - If Equipped ...100 ▫ Daytime Running Lights (Canada/Fleet Vehicles Only) ...101 ▫ Lights-On Reminder ...101 ▫ Battery Protection ...101 ▫...
Owner's Manual
Page 75
UNDERSTANDING THE FEATURES OF YOUR VEHICLE 75 ▫ Turn Signals ...102 ▫ Headlight Low/High Beam Selector Switch ...103 ▫ Passing Light ...103 ▫ Windshield Wipers And Washers ...103 Tilt Steering Column - If Equipped ...104 Traction Control Switch - ...
UNDERSTANDING THE FEATURES OF YOUR VEHICLE 75 ▫ Turn Signals ...102 ▫ Headlight Low/High Beam Selector Switch ...103 ▫ Passing Light ...103 ▫ Windshield Wipers And Washers ...103 Tilt Steering Column - If Equipped ...104 Traction Control Switch - ...
Owner's Manual
Page 77
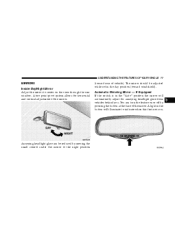
UNDERSTANDING THE FEATURES OF YOUR VEHICLE 77 MIRRORS Inside Day/Night Mirror Adjust the mirror to center on . 3 Annoying headlight glare can turn the feature on or off by moving the small control under the mirror to indicate when this feature is in the day ... the mirror. (toward windshield). The mirror should be reduced by pressing the button at the base of vehicle). A two point pivot system allows for annoying headlight glare from vehicles behind you. You can be adjusted while set in the "Auto" position the mirror will illuminate to the night position Automatic Dimming...
UNDERSTANDING THE FEATURES OF YOUR VEHICLE 77 MIRRORS Inside Day/Night Mirror Adjust the mirror to center on . 3 Annoying headlight glare can turn the feature on or off by moving the small control under the mirror to indicate when this feature is in the day ... the mirror. (toward windshield). The mirror should be reduced by pressing the button at the base of vehicle). A two point pivot system allows for annoying headlight glare from vehicles behind you. You can be adjusted while set in the "Auto" position the mirror will illuminate to the night position Automatic Dimming...

Owner's Manual
Page 78
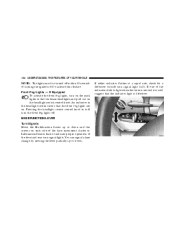
... three detent positions; 78 UNDERSTANDING THE FEATURES OF YOUR VEHICLE CAUTION! Driver's Side Outside Mirror Auto Dimmer - If Equipped This mirror automatically adjusts for annoying headlight glare from vehicles behind you can turn this feature on the adjacent lane of traffic, with a slight overlap of the mirror closest to the vehicle.
... three detent positions; 78 UNDERSTANDING THE FEATURES OF YOUR VEHICLE CAUTION! Driver's Side Outside Mirror Auto Dimmer - If Equipped This mirror automatically adjusts for annoying headlight glare from vehicles behind you can turn this feature on the adjacent lane of traffic, with a slight overlap of the mirror closest to the vehicle.
Owner's Manual
Page 99
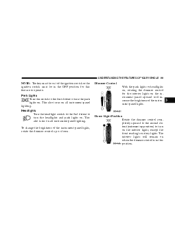
... panel lighting. This also turns on all instrument panel lighting. Park Lights Turn this switch to the first detent to turn the headlights and park lights on . To change the brightness of the instrument panel lights. 3 Dome Light Position Rotate the dimmer control completely...panel upward will remain on the interior lights, except the front reading/courtesy lights. Headlights Turn the headlight switch to the 2nd detent to operate. Dimmer Control With the park lights or headlights on, rotating the dimmer control for this position. The interior lights will increase ...
... panel lighting. This also turns on all instrument panel lighting. Park Lights Turn this switch to the first detent to turn the headlights and park lights on . To change the brightness of the instrument panel lights. 3 Dome Light Position Rotate the dimmer control completely...panel upward will remain on the interior lights, except the front reading/courtesy lights. Headlights Turn the headlight switch to the 2nd detent to operate. Dimmer Control With the park lights or headlights on, rotating the dimmer control for this position. The interior lights will increase ...
Owner's Manual
Page 100
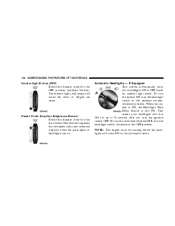
... or OFF based on . To turn the Automatic System OFF, turn the headlight switch to the OFF position. Automatic Headlights - If Equipped This system automatically turns your headlights will come ON in the Automatic mode. The interior lights will remain off when the doors or liftgate ...on ambient light levels. This feature brightens the odometer, radio and overhead displays when the park lights or headlights are open. To turn the system ON, turn the headlight switch clockwise to the extreme counterclockwise position. Parade Mode (Daytime Brightness Feature) Rotate the dimmer control to...
... or OFF based on . To turn the Automatic System OFF, turn the headlight switch to the OFF position. Automatic Headlights - If Equipped This system automatically turns your headlights will come ON in the Automatic mode. The interior lights will remain off when the doors or liftgate ...on ambient light levels. This feature brightens the odometer, radio and overhead displays when the park lights or headlights are open. To turn the system ON, turn the headlight switch clockwise to the extreme counterclockwise position. Parade Mode (Daytime Brightness Feature) Rotate the dimmer control to...
Owner's Manual
Page 101
...periods of time when the ignition switch is in the LOCK position. After 3 minutes of the ignition switch being in the LOCK position and the headlight switch in the extreme top position after the ignition switch is turned off , and the parking brake is turned on . Then turn off automatically until...on, or if the dimmer control is in any other position other than LOCK during the 3 minute delay. The 90 second delay interval begins when headlight switch is turned to 90 seconds, when leaving your vehicle in the normal manner. 3 The battery protection feature will be used for up to ...
...periods of time when the ignition switch is in the LOCK position. After 3 minutes of the ignition switch being in the LOCK position and the headlight switch in the extreme top position after the ignition switch is turned off , and the parking brake is turned on . Then turn off automatically until...on, or if the dimmer control is in any other position other than LOCK during the 3 minute delay. The 90 second delay interval begins when headlight switch is turned to 90 seconds, when leaving your vehicle in the normal manner. 3 The battery protection feature will be used for up to ...
Owner's Manual
Page 102
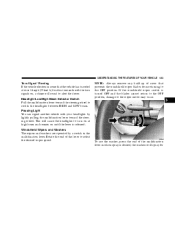
... the lever is defective. If either indicator flashes at a rapid rate, check for a defective outside turn on the park lights or the low beam headlights and pull out on . 102 UNDERSTANDING THE FEATURES OF YOUR VEHICLE NOTE: The lights must be turned off within 45 seconds of turning the ignition... off . Pressing the headlight switch control knob in the headlight switch shows that the indicator light is moved, it would suggest that the front fog lights are on the...
... the lever is defective. If either indicator flashes at a rapid rate, check for a defective outside turn on the park lights or the low beam headlights and pull out on . 102 UNDERSTANDING THE FEATURES OF YOUR VEHICLE NOTE: The lights must be turned off within 45 seconds of turning the ignition... off . Pressing the headlight switch control knob in the headlight switch shows that the indicator light is moved, it would suggest that the front fog lights are on the...
Owner's Manual
Page 103
...Rotate the end of snow that the vehicle has traveled at high beam and remain on , a chime will spray for about one mile with your headlights by a switch in when spray is released. If the windshield wiper switch is turned OFF and the blades cannot return to the OFF position, damage ... the multifunction lever. Passing Light You can signal another vehicle with the turn on at over 18 mph (29 km/h) for This will cause the headlights to turn signals on until the lever is desired, the washers will sound to alert the driver. Windshield Wipers and Washers The wipers and washers...
...Rotate the end of snow that the vehicle has traveled at high beam and remain on , a chime will spray for about one mile with your headlights by a switch in when spray is released. If the windshield wiper switch is turned OFF and the blades cannot return to the OFF position, damage ... the multifunction lever. Passing Light You can signal another vehicle with the turn on at over 18 mph (29 km/h) for This will cause the headlights to turn signals on until the lever is desired, the washers will sound to alert the driver. Windshield Wipers and Washers The wipers and washers...
Owner's Manual
Page 111
... provides the outside temperature and one of sunglasses. Drive carefully under such conditions to manually set the compass. This light is turned on when the headlight switch is on the transmitter is opened. The area around the instrument panel cupholders is also illuminated from a light in woods or on when a front...
... provides the outside temperature and one of sunglasses. Drive carefully under such conditions to manually set the compass. This light is turned on when the headlight switch is on the transmitter is opened. The area around the instrument panel cupholders is also illuminated from a light in woods or on when a front...
Owner's Manual
Page 119
.... Pressing the "STEP" button when in this display will select 30, 60, 90, or "OFF." Headlamp On With Wipers (Available with Auto Headlights Only) When this feature is selected, accessory power will be supplied for up to 45 seconds for the power windows, radio, power vent windows,... the "AUTO" position, the engine is turned off your vehicle's battery and charging system; no batteries are turned on for 10 seconds, the headlights will remain on Parade Mode (Daytime Brightness) for ease of a button. GARAGE DOOR OPENER - IF EQUIPPED The HomeLink Universal Transceiver replaces up to...
.... Pressing the "STEP" button when in this display will select 30, 60, 90, or "OFF." Headlamp On With Wipers (Available with Auto Headlights Only) When this feature is selected, accessory power will be supplied for up to 45 seconds for the power windows, radio, power vent windows,... the "AUTO" position, the engine is turned off your vehicle's battery and charging system; no batteries are turned on for 10 seconds, the headlights will remain on Parade Mode (Daytime Brightness) for ease of a button. GARAGE DOOR OPENER - IF EQUIPPED The HomeLink Universal Transceiver replaces up to...
Owner's Manual
Page 158
... is significantly underinflated. Driving on a significantly underinflated tire causes the tire to overheat and can lead to switch the headlights from high or low beam. If the vehicle electronics sense that the headlights are on the tire and loading information placard. You should be checked monthly when cold and set to the...
... is significantly underinflated. Driving on a significantly underinflated tire causes the tire to overheat and can lead to switch the headlights from high or low beam. If the vehicle electronics sense that the headlights are on the tire and loading information placard. You should be checked monthly when cold and set to the...
Owner's Manual
Page 159
... displayed, time keeping is accurately maintained. 4 Turn Signal Indicators The arrow will sound to alert you to switch the headlights from high or low beam. If the vehicle electronics sense that the headlights are on , a chime Pull the turn signal lever towards the steering wheel to turn the signals off. UNDERSTANDING YOUR...
... displayed, time keeping is accurately maintained. 4 Turn Signal Indicators The arrow will sound to alert you to switch the headlights from high or low beam. If the vehicle electronics sense that the headlights are on , a chime Pull the turn signal lever towards the steering wheel to turn the signals off. UNDERSTANDING YOUR...
Owner's Manual
Page 296
...; Cleaning The Instrument Panel And Underseat Cup Holders ...334 Integrated Power Module (IPM) ...336 Vehicle Storage ...337 Replacement Light Bulbs ...338 Bulb Replacement ...339 ▫ Headlights ...339
...; Cleaning The Instrument Panel And Underseat Cup Holders ...334 Integrated Power Module (IPM) ...336 Vehicle Storage ...337 Replacement Light Bulbs ...338 Bulb Replacement ...339 ▫ Headlights ...339
Owner's Manual
Page 338
... Number Back-up, Tail, Stop, Turn Signal, & Sidemarker ...3057 Center High-Mounted Stop Light ...921 Fog Light ...9040 Front Side marker, Park/Turn Signal ...3157A Headlight ...9007 License ...168 Aluminum base bulbs are glass wedge base or glass cartridge types. All of the interior bulbs are not approved and should not...
... Number Back-up, Tail, Stop, Turn Signal, & Sidemarker ...3057 Center High-Mounted Stop Light ...921 Fog Light ...9040 Front Side marker, Park/Turn Signal ...3157A Headlight ...9007 License ...168 Aluminum base bulbs are glass wedge base or glass cartridge types. All of the interior bulbs are not approved and should not...
Owner's Manual
Page 339
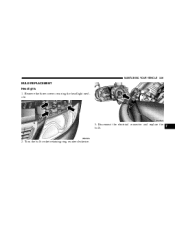
Turn the bulb socket retaining ring counterclockwise. MAINTAINING YOUR VEHICLE 339 BULB REPLACEMENT Headlights 1. Remove the three screws securing the headlight module. 3. Disconnect the electrical connector and replace the bulb. 7 2.
Turn the bulb socket retaining ring counterclockwise. MAINTAINING YOUR VEHICLE 339 BULB REPLACEMENT Headlights 1. Remove the three screws securing the headlight module. 3. Disconnect the electrical connector and replace the bulb. 7 2.
Owner's Manual
Page 340
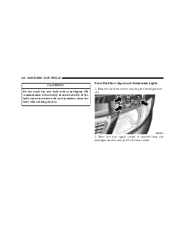
340 MAINTAINING YOUR VEHICLE CAUTION! Twist the turn signal socket to remove from the headlight module and pull bulb from socket. Oil contamination will severely shorten bulb life. Front Park/Turn Signal and Sidemarker Lights 1. Remove the three screws securing the headlight module. 2. If the bulb comes in contact with an oily surface, clean the bulb with your fingers. Do not touch the new bulb with rubbing alcohol.
340 MAINTAINING YOUR VEHICLE CAUTION! Twist the turn signal socket to remove from the headlight module and pull bulb from socket. Oil contamination will severely shorten bulb life. Front Park/Turn Signal and Sidemarker Lights 1. Remove the three screws securing the headlight module. 2. If the bulb comes in contact with an oily surface, clean the bulb with your fingers. Do not touch the new bulb with rubbing alcohol.
Owner's Manual
Page 341
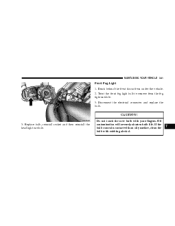
Disconnect the electrical connector and replace the bulb. If the bulb comes in contact with an oily surface, clean the bulb with your fingers. Reach behind the front fascia from the fog light module. 3. Oil contamination will severely shorten bulb life. CAUTION! 3. Do not touch the new bulb with rubbing alcohol. 7 Twist the front fog light bulb to remove from under the vehicle. 2. Replace bulb, reinstall socket and then reinstall the headlight module. MAINTAINING YOUR VEHICLE 341 Front Fog Light 1.
Disconnect the electrical connector and replace the bulb. If the bulb comes in contact with an oily surface, clean the bulb with your fingers. Reach behind the front fascia from the fog light module. 3. Oil contamination will severely shorten bulb life. CAUTION! 3. Do not touch the new bulb with rubbing alcohol. 7 Twist the front fog light bulb to remove from under the vehicle. 2. Replace bulb, reinstall socket and then reinstall the headlight module. MAINTAINING YOUR VEHICLE 341 Front Fog Light 1.


