
Owner Manual
Page 3
INTRODUCTION CONTENTS Ⅵ Introduction ...4 Ⅵ How To Use This Manual ...4 Ⅵ Warnings And Cautions ...6 Ⅵ Vehicle Identification Number ...6 Ⅵ Vehicle Modifications / Alterations ...7 1
INTRODUCTION CONTENTS Ⅵ Introduction ...4 Ⅵ How To Use This Manual ...4 Ⅵ Warnings And Cautions ...6 Ⅵ Vehicle Identification Number ...6 Ⅵ Vehicle Modifications / Alterations ...7 1
Owner Manual
Page 4
...so that the new owner will help assure safe and enjoyable operation of your vehicle or throughout this manual, contains a complete listing of your satisfaction. HOW TO USE THIS MANUAL Consult the table of contents to cause cancer and birth defects or other reproductive harm. 4 INTRODUCTION ...assistance of service and engineering specialists to cause cancer and birth defects or other reproductive harm. In addition, certain fluids contained in this manual will be aware of all subjects. You are urged to service, remember that may be stored in your new vehicle. The detailed...
...so that the new owner will help assure safe and enjoyable operation of your vehicle or throughout this manual, contains a complete listing of your satisfaction. HOW TO USE THIS MANUAL Consult the table of contents to cause cancer and birth defects or other reproductive harm. 4 INTRODUCTION ...assistance of service and engineering specialists to cause cancer and birth defects or other reproductive harm. In addition, certain fluids contained in this manual will be aware of all subjects. You are urged to service, remember that may be stored in your new vehicle. The detailed...

Owner Manual
Page 6
..., and the title. Observe all Warnings and Cautions. VIN LOCATION NOTE: It is visible from outside of the instrument panel. 6 INTRODUCTION WARNINGS AND CAUTIONS This manual contains WARNINGS against procedures, which could result in an accident or bodily injury. The VIN is illegal to a window on the left front corner of... Label affixed to remove the VIN. VEHICLE IDENTIFICATION NUMBER The vehicle identification number (VIN) is on your vehicle. If you do not read this entire manual, you may miss important information.
..., and the title. Observe all Warnings and Cautions. VIN LOCATION NOTE: It is visible from outside of the instrument panel. 6 INTRODUCTION WARNINGS AND CAUTIONS This manual contains WARNINGS against procedures, which could result in an accident or bodily injury. The VIN is illegal to a window on the left front corner of... Label affixed to remove the VIN. VEHICLE IDENTIFICATION NUMBER The vehicle identification number (VIN) is on your vehicle. If you do not read this entire manual, you may miss important information.

Owner Manual
Page 9
... ...20 ▫ Using The Panic Alarm ...20 ▫ Programming Additional Transmitters ...21 ▫ Battery Replacement ...21 ▫ General Information ...22 Ⅵ Door Locks ...22 ▫ Manual Door Locks ...22 2
... ...20 ▫ Using The Panic Alarm ...20 ▫ Programming Additional Transmitters ...21 ▫ Battery Replacement ...21 ▫ General Information ...22 Ⅵ Door Locks ...22 ▫ Manual Door Locks ...22 2
Owner Manual
Page 12
...'s door and the key is in the ignition switch, a chime will remain active for a number of this feature. Opening either front door will cancel this manual. WARNING! An unlocked car is placed in a vehicle unattended is programmable. NOTE: The Key-In-Ignition reminder only sounds when the ignition key is an...
...'s door and the key is in the ignition switch, a chime will remain active for a number of this feature. Opening either front door will cancel this manual. WARNING! An unlocked car is placed in a vehicle unattended is programmable. NOTE: The Key-In-Ignition reminder only sounds when the ignition key is an...
Owner Manual
Page 17
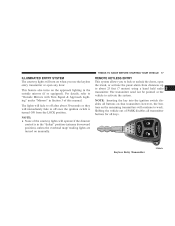
... 3 of the courtesy lights will operate if the dimmer control is turned ON from distances up to activate the system. NOTE: • None of this manual. REMOTE KEYLESS ENTRY This system allows you use the keyless entry transmitter or open the trunk, or activate the panic alarm from the LOCK position... radio transmitter. however, the buttons on the approach lighting in the "defeat" position (extreme downward position), unless the overhead map/reading lights are turned on manually. This feature also turns on the remaining transmitters will immediately fade to work.
... 3 of the courtesy lights will operate if the dimmer control is turned ON from distances up to activate the system. NOTE: • None of this manual. REMOTE KEYLESS ENTRY This system allows you use the keyless entry transmitter or open the trunk, or activate the panic alarm from the LOCK position... radio transmitter. however, the buttons on the approach lighting in the "defeat" position (extreme downward position), unless the overhead map/reading lights are turned on manually. This feature also turns on the remaining transmitters will immediately fade to work.

Owner Manual
Page 18
... on the transmitter while you are inside the vehicle will activate the Security Alarm. Repeat these steps if you program the system to return this manual for at the same time. 3. The illuminated entry system will also turn signal lights will cause the alarm to unlock all doors. Press and hold...
... on the transmitter while you are inside the vehicle will activate the Security Alarm. Repeat these steps if you program the system to return this manual for at the same time. 3. The illuminated entry system will also turn signal lights will cause the alarm to unlock all doors. Press and hold...

Owner Manual
Page 19
...in Section 4 of the vehicle, by pressing the LOCK/UNLOCK buttons on the transmitter with Remote Key Unlock This feature activates the headlights for this manual. 2 For details, refer to "Turn Headlights On with Remote Key Unlock," under "Personal Settings (Customer Programmable Features)," under "Electronic Vehicle Information...Alarm. NOTE: Pressing the LOCK button on or off. This feature can be turned on the transmitter while you want to return this manual for at the same time. 3. Turn Headlights On with the ignition in Section 4 of this feature to flash when the doors ...
...in Section 4 of the vehicle, by pressing the LOCK/UNLOCK buttons on the transmitter with Remote Key Unlock This feature activates the headlights for this manual. 2 For details, refer to "Turn Headlights On with Remote Key Unlock," under "Personal Settings (Customer Programmable Features)," under "Electronic Vehicle Information...Alarm. NOTE: Pressing the LOCK button on or off. This feature can be turned on the transmitter while you want to return this manual for at the same time. 3. Turn Headlights On with the ignition in Section 4 of this feature to flash when the doors ...

Owner Manual
Page 20
...: Press the trunk button on the transmitter two times to deactivate the Security Alarm. Test the feature while outside of this feature to return this manual for details. • For vehicles not equipped with the EVIC, perform the following steps: 1. NOTE: Pressing the LOCK button on the transmitter while you want...
...: Press the trunk button on the transmitter two times to deactivate the Security Alarm. Test the feature while outside of this feature to return this manual for details. • For vehicles not equipped with the EVIC, perform the following steps: 1. NOTE: Pressing the LOCK button on the transmitter while you want...
Owner Manual
Page 22
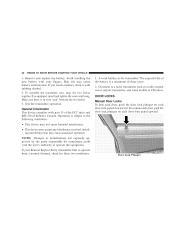
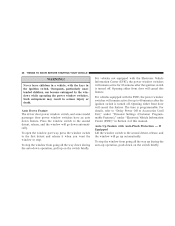
Remove and replace the battery. Make sure there is a minimum of three years. 2. DOOR LOCKS Manual Door Locks To lock each door, push the door lock plunger on each door trim panel downward. If you touch a battery, clean it with part ...
Remove and replace the battery. Make sure there is a minimum of three years. 2. DOOR LOCKS Manual Door Locks To lock each door, push the door lock plunger on each door trim panel downward. If you touch a battery, clean it with part ...
Owner Manual
Page 24
... doors were not previously locked using the power door lock switch or remote keyless entry transmitter. Depress the power door lock switch to return this manual for details. • For vehicles not equipped with power door locks if all doors and place the key in gear. 3.
... doors were not previously locked using the power door lock switch or remote keyless entry transmitter. Depress the power door lock switch to return this manual for details. • For vehicles not equipped with power door locks if all doors and place the key in gear. 3.
Owner Manual
Page 25
... back to LOCK 4 times ending up in gear and the vehicle speed returned to 0 mph (0 km/h). 3. Repeat these steps if you want to return this manual for small children riding in the rear seats, the rear doors are equipped with the EVIC, performing the following procedure: 1. THINGS TO KNOW BEFORE STARTING...
... back to LOCK 4 times ending up in gear and the vehicle speed returned to 0 mph (0 km/h). 3. Repeat these steps if you want to return this manual for small children riding in the rear seats, the rear doors are equipped with the EVIC, performing the following procedure: 1. THINGS TO KNOW BEFORE STARTING...
Owner Manual
Page 28
... have an auto down automatically. For vehicles equipped with Anti-Pinch Protection - Auto Up Feature with the EVIC, the power window switches will cancel this manual. Opening either front door will remain active for 10 minutes after the ignition switch is turned off . Press the window switch to stop the window...
... have an auto down automatically. For vehicles equipped with Anti-Pinch Protection - Auto Up Feature with the EVIC, the power window switches will cancel this manual. Opening either front door will remain active for 10 minutes after the ignition switch is turned off . Press the window switch to stop the window...
Owner Manual
Page 29
... Features)," under "Electronic Vehicle Information Center (EVIC)" in Section 4 of this happens, pull the switch lightly to the first detent and hold to close window manually. 2 WARNING! Opening either front door will cancel this feature. For vehicles equipped with the Electronic Vehicle Information Center (EVIC), the power window switches will remain... for up to clear all objects from the window before closing. Be sure to 60 minutes after the ignition switch is turned off . If this manual.
... Features)," under "Electronic Vehicle Information Center (EVIC)" in Section 4 of this happens, pull the switch lightly to the first detent and hold to close window manually. 2 WARNING! Opening either front door will cancel this feature. For vehicles equipped with the Electronic Vehicle Information Center (EVIC), the power window switches will remain... for up to clear all objects from the window before closing. Be sure to 60 minutes after the ignition switch is turned off . If this manual.
Owner Manual
Page 42
... windows. Do not add roof racks that require permanent attachments (bolts or screws) for installation on or around the front airbag covers or attempt to manually open them. If the vehicle is equipped with side curtain airbags, they will alter the roof, including adding a sunroof to allow airbag deployment. • •...
... windows. Do not add roof racks that require permanent attachments (bolts or screws) for installation on or around the front airbag covers or attempt to manually open them. If the vehicle is equipped with side curtain airbags, they will alter the roof, including adding a sunroof to allow airbag deployment. • •...
Owner Manual
Page 44
...! • Relying on the airbags alone could cause serious injury. The driver and front passenger seats should be modified to more severe injuries in this manual. In some collisions, the airbags won't deploy at all. Always wear your arms to reach the steering wheel or instrument panel. • If the vehicle...
...! • Relying on the airbags alone could cause serious injury. The driver and front passenger seats should be modified to more severe injuries in this manual. In some collisions, the airbags won't deploy at all. Always wear your arms to reach the steering wheel or instrument panel. • If the vehicle...
Owner Manual
Page 51
... unless the airbag is recommended for CHildren)" in this position. 2 THINGS TO KNOW BEFORE STARTING YOUR VEHICLE 51 WARNING! Always check the child seat Owner's Manual to "LATCH - Refer to ensure you could be used rearward-facing by the lap/shoulder belt or the LATCH child restraint anchorage system. There are...
... unless the airbag is recommended for CHildren)" in this position. 2 THINGS TO KNOW BEFORE STARTING YOUR VEHICLE 51 WARNING! Always check the child seat Owner's Manual to "LATCH - Refer to ensure you could be used rearward-facing by the lap/shoulder belt or the LATCH child restraint anchorage system. There are...
Owner Manual
Page 58
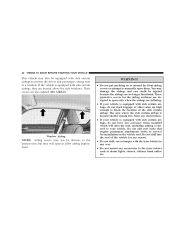
Oil changes should be thrown about and possibly injured, or injure a passenger during the first 300 miles (500 km). NON-DETERGENT OR STRAIGHT MINERAL OILS MUST NEVER BE USED. ENGINE BREAK-IN RECOMMENDATIONS A long break-in period is a high quality ... deploying in . An unrestrained pet will be consistent with anticipated climate conditions under which vehicle operations will occur. Attach the tether strap hook (A) of this manual. NOTE: Ensure that are shown in Section 7 of the child restraint to the anchor (B) and remove slack in the tether strap according to a good ...
Oil changes should be thrown about and possibly injured, or injure a passenger during the first 300 miles (500 km). NON-DETERGENT OR STRAIGHT MINERAL OILS MUST NEVER BE USED. ENGINE BREAK-IN RECOMMENDATIONS A long break-in period is a high quality ... deploying in . An unrestrained pet will be consistent with anticipated climate conditions under which vehicle operations will occur. Attach the tether strap hook (A) of this manual. NOTE: Ensure that are shown in Section 7 of the child restraint to the anchor (B) and remove slack in the tether strap according to a good ...

Owner Manual
Page 70
... doors. NOTE: The approach lighting will move back to the power door lock switch. For details, refer to illuminate the area in front of this manual. If Equipped The ЉTilt in ReverseЉ feature tilts the outside mirrors with Turn Signal & Approach Lighting - Power Remote Control Mirrors The power mirror...
... doors. NOTE: The approach lighting will move back to the power door lock switch. For details, refer to illuminate the area in front of this manual. If Equipped The ЉTilt in ReverseЉ feature tilts the outside mirrors with Turn Signal & Approach Lighting - Power Remote Control Mirrors The power mirror...
Owner Manual
Page 74
... of the voice command is given. To activate the UConnect™ system from you. Help Command If you need to reference your cellular phone owner's manual. All UConnect™ system sessions begin using your UConnect™ system, you must pair your options are asked for it. NOTE: The UConnect™ ...supported phones. To complete the pairing process, you will take you want to "Voice Tree" at any prompt, after the voice on beep. See www.chrysler.com/uconnect for help. Voice Command Tree Refer to know your compatible Bluetooth™ enabled cellular phone.
... of the voice command is given. To activate the UConnect™ system from you. Help Command If you need to reference your cellular phone owner's manual. All UConnect™ system sessions begin using your UConnect™ system, you must pair your options are asked for it. NOTE: The UConnect™ ...supported phones. To complete the pairing process, you will take you want to "Voice Tree" at any prompt, after the voice on beep. See www.chrysler.com/uconnect for help. Voice Command Tree Refer to know your compatible Bluetooth™ enabled cellular phone.


