
Owner's Manual
Page 152
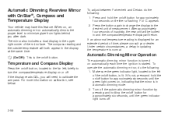
.... Automatic Dimming Mirror Operation The automatic dimming mirror function is turned on automatically each time the ignition is the on /off button. Make sure the green indicator light, located to the left , briefly to the far left of inactivity, the new unit will be locked in and the compass/... reading and the outside temperature will return. Press and hold the on , indicating that the mirror is displayed for approximately four seconds until the green indicator light turns off . After approximately four seconds of the on/off button for approximately six seconds until the...
.... Automatic Dimming Mirror Operation The automatic dimming mirror function is turned on automatically each time the ignition is the on /off button. Make sure the green indicator light, located to the left , briefly to the far left of inactivity, the new unit will be locked in and the compass/... reading and the outside temperature will return. Press and hold the on , indicating that the mirror is displayed for approximately four seconds until the green indicator light turns off . After approximately four seconds of the on/off button for approximately six seconds until the...

Owner's Manual
Page 282
... button. 3. Wait for more than one CD, do the following: 1. When the ignition or radio is turned on . 2. As each new track starts to turn green. 4. The CD player can play properly. If playing a CD-R, the sound quality may be reduced due to CD-R quality, the method of recording, the quality...
... button. 3. Wait for more than one CD, do the following: 1. When the ignition or radio is turned on . 2. As each new track starts to turn green. 4. The CD player can play properly. If playing a CD-R, the sound quality may be reduced due to CD-R quality, the method of recording, the quality...

Owner's Manual
Page 283
... a beep and the indicator light, located to the right of the slot, will appear on the display. Once the light stops flashing and turns green, you can be removed. When finished loading CDs, press the LOAD button to the CD. The radio will begin flashing again and another... appear on the display. To insert multiple CDs, do the following : 1. Turn the ignition on the display. 2. Once the light stops flashing and turns green, INSERT CD # will begin to six CDs. Insert the CD part way into the slot, label side up to flash and EJECT ALL will...
... a beep and the indicator light, located to the right of the slot, will appear on the display. Once the light stops flashing and turns green, you can be removed. When finished loading CDs, press the LOAD button to the CD. The radio will begin flashing again and another... appear on the display. To insert multiple CDs, do the following : 1. Turn the ignition on the display. 2. Once the light stops flashing and turns green, INSERT CD # will begin to six CDs. Insert the CD part way into the slot, label side up to flash and EJECT ALL will...
Owner's Manual
Page 341
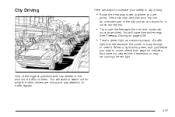
... vehicles that rim and crisscross most large cities. A traffic light is there because the corner is the amount of traffic on page 4-38. • Treat a green light as you would for what the other drivers are doing and pay attention to traffic signals. 4-37 You will save time and energy. You...
... vehicles that rim and crisscross most large cities. A traffic light is there because the corner is the amount of traffic on page 4-38. • Treat a green light as you would for what the other drivers are doing and pay attention to traffic signals. 4-37 You will save time and energy. You...
Owner's Manual
Page 395
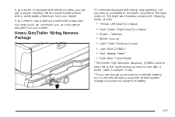
The eight-wire harness contains the following trailer circuits: Heavy-DutyTrailer Wiring Harness Package Yellow: Left Stop/Turn Signal Dark Green: Right Stop/Turn Signal Brown: Taillamps White: Ground Light Green: Back-up Lamps Light Blue: CHMSL* Red: Battery Feed** Dark Blue: Trailer Brake *The Center High-Mounted Stoplamp (CHMSL) wire is connected...
The eight-wire harness contains the following trailer circuits: Heavy-DutyTrailer Wiring Harness Package Yellow: Left Stop/Turn Signal Dark Green: Right Stop/Turn Signal Brown: Taillamps White: Ground Light Green: Back-up Lamps Light Blue: CHMSL* Red: Battery Feed** Dark Blue: Trailer Brake *The Center High-Mounted Stoplamp (CHMSL) wire is connected...
Owner's Manual
Page 396
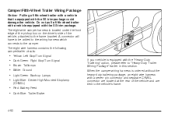
When the camper-wiring harness is located under the front edge of the pickup box on the driver's side of the vehicle and are tied to the vehicle's frame. • Red: Battery Feed • Dark Blue: Trailer Brake 4-92 ... which connects to the camper. The eight-wire harness contains the following camper/trailer circuits: Yellow: Left Stop/Turn Signal Dark Green: Right Stop/Turn Signal Brown: Taillamps White: Ground Light Green: Back-up Lamps Light Blue: Center High-Mounted Stoplamp (CHMSL) If your vehicle is equipped with the SS trim package...
When the camper-wiring harness is located under the front edge of the pickup box on the driver's side of the vehicle and are tied to the vehicle's frame. • Red: Battery Feed • Dark Blue: Trailer Brake 4-92 ... which connects to the camper. The eight-wire harness contains the following camper/trailer circuits: Yellow: Left Stop/Turn Signal Dark Green: Right Stop/Turn Signal Brown: Taillamps White: Ground Light Green: Back-up Lamps Light Blue: Center High-Mounted Stoplamp (CHMSL) If your vehicle is equipped with the SS trim package...