Owner's Manual
Page 15
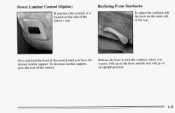
Press and hold'the front of the control. Pull up on the side of the seat. Power Lumbar Control (Option) If you have the desired lumbarsupport. Release the lever to an upright position. To decrease lumbar support, press the rear of the controluntil you want it is located on the lever and the seat will go to lock the seatback where you have this control, it . Reclining Front Seatbacks To adjust the seatback, lift the leveron the outer side of the driver's seat.
Press and hold'the front of the control. Pull up on the side of the seat. Power Lumbar Control (Option) If you have the desired lumbarsupport. Release the lever to an upright position. To decrease lumbar support, press the rear of the controluntil you want it is located on the lever and the seat will go to lock the seatback where you have this control, it . Reclining Front Seatbacks To adjust the seatback, lift the leveron the outer side of the driver's seat.

Owner's Manual
Page 17
... down so that the top of the restraint is on others. This position reduces the chance of your ears. To fold the front seatback forward, lift the latch and push the seat forward. 1-5 Your adjustable head restraint may also be sure it will return to the reclined position. If the seatback...
... down so that the top of the restraint is on others. This position reduces the chance of your ears. To fold the front seatback forward, lift the latch and push the seat forward. 1-5 Your adjustable head restraint may also be sure it will return to the reclined position. If the seatback...

Owner's Manual
Page 18
... the upright position. Then move . is Tilt the seatback completely forward again to check thatthe latches have them fixed immediately. 1-6 To raise the seatbacks, just lift up on the seatbacks to get in the upper center of the rear of the rear seat. After you've used it, be sure to...
... the upright position. Then move . is Tilt the seatback completely forward again to check thatthe latches have them fixed immediately. 1-6 To raise the seatbacks, just lift up on the seatbacks to get in the upper center of the rear of the rear seat. After you've used it, be sure to...

Owner's Manual
Page 66
When doors are unlocked, ' Then reach inside the endgate to lift the handle and open the endgate. The endgate glass will not release if the vehicle is unlocked. The endgate can be opened withouta key if ... reach inside to unlock the glass. To open a power lock system fromthe outside, insert the key in the lock button and turn counterclockwise it to lift the handle and open the endgate. Endgate Release To open a mechanical lock system from the outside, insert the key in gear. To lock a power lock...
When doors are unlocked, ' Then reach inside the endgate to lift the handle and open the endgate. The endgate glass will not release if the vehicle is unlocked. The endgate can be opened withouta key if ... reach inside to unlock the glass. To open a power lock system fromthe outside, insert the key in the lock button and turn counterclockwise it to lift the handle and open the endgate. Endgate Release To open a mechanical lock system from the outside, insert the key in gear. To lock a power lock...

Owner's Manual
Page 111
You can store cassettes in the slots in the front of the front doors. Door Storage You will find a storage compartment on rear doors. Four-door models have a compact disc player, yo~l may store compact discs inside the console. 2-53 If your vehicle has thisconsole compartment, squeeze the front lever while lifting the top to open it. Sunglasses Storage Compartment Storage Front Area The console has a sunglasses storage compartment. If you have storage pockets and cupholders on each of the compartment.
You can store cassettes in the slots in the front of the front doors. Door Storage You will find a storage compartment on rear doors. Four-door models have a compact disc player, yo~l may store compact discs inside the console. 2-53 If your vehicle has thisconsole compartment, squeeze the front lever while lifting the top to open it. Sunglasses Storage Compartment Storage Front Area The console has a sunglasses storage compartment. If you have storage pockets and cupholders on each of the compartment.

Owner's Manual
Page 112
... passenger side corner,. The net is not larger, heavier items. for cassettes and a coinholder. Convenience Net (Option) L If your vehicle has the center armrest compartment, lift the cover to expose the storage area which includes slots for The convenience net is anchored to help keep small items, gloves and light clothing...
... passenger side corner,. The net is not larger, heavier items. for cassettes and a coinholder. Convenience Net (Option) L If your vehicle has the center armrest compartment, lift the cover to expose the storage area which includes slots for The convenience net is anchored to help keep small items, gloves and light clothing...

Owner's Manual
Page 116
... do , cigarettes or other things that can make it is heating. Your visors may have smallerashtrays inside the rear doors. To nove the front ashtray, lift the release tab as high as maps. 2-58 Sun Visors To block out glare, you do , it will pop back by itself. NOTICE: Don't hold...
... do , cigarettes or other things that can make it is heating. Your visors may have smallerashtrays inside the rear doors. To nove the front ashtray, lift the release tab as high as maps. 2-58 Sun Visors To block out glare, you do , it will pop back by itself. NOTICE: Don't hold...
Owner's Manual
Page 117
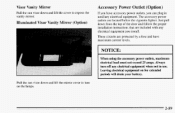
... power outlets, maximum electrical load must not exceed25 amps. Visor Vanity ,Mirror Pull the sun visor down and lift the mirror cover to expose the vanity mirror. Pull the sun visor down and lift the cover to turn off any electrical equipment you have maximum current levels. Just pull down from the...
... power outlets, maximum electrical load must not exceed25 amps. Visor Vanity ,Mirror Pull the sun visor down and lift the mirror cover to expose the vanity mirror. Pull the sun visor down and lift the cover to turn off any electrical equipment you have maximum current levels. Just pull down from the...
Owner's Manual
Page 122
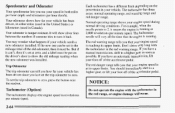
It will occur. If you have an automatic transmission, lift your foot off of the accelerator pedal. To set the trip odometer to 2, it means the engine is running . Tachometer (Option) The tachometer displays the ... Odometer The trip odometer can tell you how far your vehicle has been driven since you last set the trip odometer to a higher gear, or lift your foot off of the old odometer, then it must be . Your odometer shows how far your vehicle has been driven, in either miles (used...
It will occur. If you have an automatic transmission, lift your foot off of the accelerator pedal. To set the trip odometer to 2, it means the engine is running . Tachometer (Option) The tachometer displays the ... Odometer The trip odometer can tell you how far your vehicle has been driven since you last set the trip odometer to a higher gear, or lift your foot off of the old odometer, then it must be . Your odometer shows how far your vehicle has been driven, in either miles (used...
Owner's Manual
Page 221
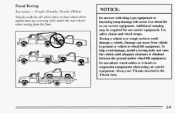
...Limits -- 35 mph (56 k d ? ) , 50 miles (80 kin) Vehicles with sling-type equipment or fascia/fog lamp damage occur, Use wheel lift will or car carrierequipment. Towing a vehicle over rough surfaces could damage a vehicle. NOTICE: Do not tow with the all-wheel-drive or four-wheel-drive... - 5-9 Additional ramping may be required for car carrier equipment. Damage can occur from the front. Do not attach winch cables J-hooks to wheel-lift equipment, To help avoid damage, installa towing dolly and raise the vehicle until adequate clearance obtained is between the ground and/or wheel...
...Limits -- 35 mph (56 k d ? ) , 50 miles (80 kin) Vehicles with sling-type equipment or fascia/fog lamp damage occur, Use wheel lift will or car carrierequipment. Towing a vehicle over rough surfaces could damage a vehicle. NOTICE: Do not tow with the all-wheel-drive or four-wheel-drive... - 5-9 Additional ramping may be required for car carrier equipment. Damage can occur from the front. Do not attach winch cables J-hooks to wheel-lift equipment, To help avoid damage, installa towing dolly and raise the vehicle until adequate clearance obtained is between the ground and/or wheel...

Owner's Manual
Page 222
.... Always use a towing dolly under the front wheels when towing from vehicle to ground or vehicle to wheel-lift equipment. Rear Towing Tow Limits -- 35 mph (56 k h ) , 50 miles (80 km) Vehicles with sling-type equipment or rear bumper valance damage will occur. Use ... slots. Additional ramping may be required for car carrier equipment. Do not attach winch cablesor J-hooksto suspension components when using car' carrier equipment. Use wheel lift or car carrier equipment.
.... Always use a towing dolly under the front wheels when towing from vehicle to ground or vehicle to wheel-lift equipment. Rear Towing Tow Limits -- 35 mph (56 k h ) , 50 miles (80 km) Vehicles with sling-type equipment or rear bumper valance damage will occur. Use ... slots. Additional ramping may be required for car carrier equipment. Do not attach winch cablesor J-hooksto suspension components when using car' carrier equipment. Use wheel lift or car carrier equipment.

Owner's Manual
Page 224
... traffic. If No Steam Is Coming FromYour Engine If you get the overheat warning butsee or hear no steam, the problem may decide not to lift the hood but to the highest gear while driving -- See "Driving on a hot day. Sometimes the engine can drive. Idle for automatic transmissions. 5-12 If...
... traffic. If No Steam Is Coming FromYour Engine If you get the overheat warning butsee or hear no steam, the problem may decide not to lift the hood but to the highest gear while driving -- See "Driving on a hot day. Sometimes the engine can drive. Idle for automatic transmissions. 5-12 If...

Owner's Manual
Page 225
Keep hands, clothing and tools away from any underhood electricfan. When you . Coolant Recovery Tank B. A. Engine Fan 5-13 If the coolant inside the coolant recovery tank is boiling, don't do anything else until it 's safeto lift the hood, here's what you'll see: If your vehicle hasair conditioning, the auxiliary electric fan under the hood can start even up when the engineis not running and can injure you decide it cools down. Radiator Pressure Cap C.
Keep hands, clothing and tools away from any underhood electricfan. When you . Coolant Recovery Tank B. A. Engine Fan 5-13 If the coolant inside the coolant recovery tank is boiling, don't do anything else until it 's safeto lift the hood, here's what you'll see: If your vehicle hasair conditioning, the auxiliary electric fan under the hood can start even up when the engineis not running and can injure you decide it cools down. Radiator Pressure Cap C.

Owner's Manual
Page 237
... and wheel surface. Position the hub cap removal tool in the notch and pull straightaway from the wheel to avoid potential damage to raise the lift head. 5-25
... and wheel surface. Position the hub cap removal tool in the notch and pull straightaway from the wheel to avoid potential damage to raise the lift head. 5-25

Owner's Manual
Page 238
A. Fit the jack into the proper location before raising your vehicle. Rear Frame Hole (2-Door) or Spring Hanger Hole (4-Door) 5-26 Front Frame Hole B. Never get under : ehj ;w n i ;jacked c upis dangerous. G ing under a vehicle when it is supported only by a jack. NOTICE: Raising your vehicle with the jack improperly positioned will damage thevehicle or may allow the vehicle to fit the jack lift head into the appropriate hole nearest the flat tire. 3. If the vehicle slips off the jack.Be sure to fall off the jack,you could be badlyinjured or killed.
A. Fit the jack into the proper location before raising your vehicle. Rear Frame Hole (2-Door) or Spring Hanger Hole (4-Door) 5-26 Front Frame Hole B. Never get under : ehj ;w n i ;jacked c upis dangerous. G ing under a vehicle when it is supported only by a jack. NOTICE: Raising your vehicle with the jack improperly positioned will damage thevehicle or may allow the vehicle to fit the jack lift head into the appropriate hole nearest the flat tire. 3. If the vehicle slips off the jack.Be sure to fall off the jack,you could be badlyinjured or killed.
Owner's Manual
Page 255
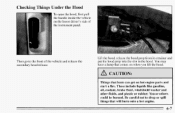
... could be burned. Theseinclude liquids like gasoline, oil, coolant, brake fluid, windshield washer and other fluids, and plastic rubber. Things that cn'qes *n when you lift t h e hood. ~ ... : '_* , I . . . Be careful not to the front of the instrument panel. Checking Things Under the Hood To open the hood, first pull the handle inside...
... could be burned. Theseinclude liquids like gasoline, oil, coolant, brake fluid, windshield washer and other fluids, and plastic rubber. Things that cn'qes *n when you lift t h e hood. ~ ... : '_* , I . . . Be careful not to the front of the instrument panel. Checking Things Under the Hood To open the hood, first pull the handle inside...

Owner's Manual
Page 256
Transmission Dipstick B. E. When you lift the hood, you'll see these items: A. C. Engine Oil Fill Brake Master Cylinder Coolant Recovery Tank Engine Oil Dipstick F. Air Cleaner I. WindshieldWasherFluid 6-8 Power Steering Reservoir G. Battery H. D.
Transmission Dipstick B. E. When you lift the hood, you'll see these items: A. C. Engine Oil Fill Brake Master Cylinder Coolant Recovery Tank Engine Oil Dipstick F. Air Cleaner I. WindshieldWasherFluid 6-8 Power Steering Reservoir G. Battery H. D.
Owner's Manual
Page 257
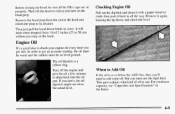
... level. If you get an accurate reading, the oil must be on the hood. This part explains what kind ofoil to add some oil. Then lift the hood to get fuel. In order to relieve pressure on properly. It will latch when dropped from the slot in the Index. 6-9 Engine Oil...
... level. If you get an accurate reading, the oil must be on the hood. This part explains what kind ofoil to add some oil. Then lift the hood to get fuel. In order to relieve pressure on properly. It will latch when dropped from the slot in the Index. 6-9 Engine Oil...
Owner's Manual
Page 286
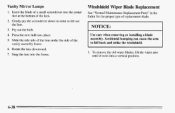
.... Press the new bulb into the frame. 6-38 Rotate the lens downward. 7. Pry out the bulb. 4. To remove the old wiper blades, lift the wiper arm until it locks into the center slot at the bottom of the vanity assembly frame. Insert the blade of a small screwdriver into... a vertical position. 6. Accidental bumping can cause the to lift out the lens. 3. Windshield Wiper Blade Replacement See "Normal Maintenance Replacement Parts" in order to fall back and strike the windshield. 1.
.... Press the new bulb into the frame. 6-38 Rotate the lens downward. 7. Pry out the bulb. 4. To remove the old wiper blades, lift the wiper arm until it locks into the center slot at the bottom of the vanity assembly frame. Insert the blade of a small screwdriver into... a vertical position. 6. Accidental bumping can cause the to lift out the lens. 3. Windshield Wiper Blade Replacement See "Normal Maintenance Replacement Parts" in order to fall back and strike the windshield. 1.

