Owner's Manual
Page 9
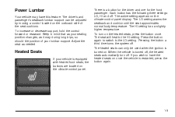
... have the heated seats on the climate control panel. 1-3 The heated seats can be used when the ignition is turned on the climate control panel display.
... have the heated seats on the climate control panel. 1-3 The heated seats can be used when the ignition is turned on the climate control panel display.

Owner's Manual
Page 76
... the ignition is turned off and the key is programmed so that the doors will lock. The power door locks can be programmed through prompts displayed on page 3-79. These prompts allow you stop the vehicle and move the shift lever back into PARK (P). Use the manual lever or the power...
... the ignition is turned off and the key is programmed so that the doors will lock. The power door locks can be programmed through prompts displayed on page 3-79. These prompts allow you stop the vehicle and move the shift lever back into PARK (P). Use the manual lever or the power...

Owner's Manual
Page 106
... with OnStar® and Compass Your vehicle may cause the liquid cleaner to enter the mirror housing. 2-40 The mirror has an eight-point compass display in the upper right corner of the rearview mirror. The indicator light will illuminate when this feature is started . Mirror Operation The automatic dimming feature...
... with OnStar® and Compass Your vehicle may cause the liquid cleaner to enter the mirror housing. 2-40 The mirror has an eight-point compass display in the upper right corner of the rearview mirror. The indicator light will illuminate when this feature is started . Mirror Operation The automatic dimming feature...

Owner's Manual
Page 107
...difference between earth's magnetic north and true geographic north. Under certain circumstances, such as a long distance, cross-country trip, it will display the current compass heading. Such interference may be a strong magnetic field interfering with the compass. After two seconds, the mirror ...may be caused by pressing and holding the on or off button until the display reads a direction. The mirror is set in the compass display. Compass Calibration If after two seconds the display does not show two character boxes for example), there may need calibration. 2-41...
...difference between earth's magnetic north and true geographic north. Under certain circumstances, such as a long distance, cross-country trip, it will display the current compass heading. Such interference may be a strong magnetic field interfering with the compass. After two seconds, the mirror ...may be caused by pressing and holding the on or off button until the display reads a direction. The mirror is set in the compass display. Compass Calibration If after two seconds the display does not show two character boxes for example), there may need calibration. 2-41...

Owner's Manual
Page 108
If C appears in the compass window, the compass may cause the liquid cleaner to normal operation. Do not spray glass cleaner directly on the display. 2-42 Press and hold the on/off button quickly until a zone number appears on the mirror as that follows. 3. Stop pressing the button and the ... cleaning the mirror, use a paper towel or similar material dampened with glass cleaner. See "Compass Calibration" listed previously. Once the zone number appears on the display, press the on the zone map that may need calibration.
If C appears in the compass window, the compass may cause the liquid cleaner to normal operation. Do not spray glass cleaner directly on the display. 2-42 Press and hold the on/off button quickly until a zone number appears on the mirror as that follows. 3. Stop pressing the button and the ... cleaning the mirror, use a paper towel or similar material dampened with glass cleaner. See "Compass Calibration" listed previously. Once the zone number appears on the display, press the on the zone map that may need calibration.

Owner's Manual
Page 130
... knob once to select it . Scroll through the buttons (1, 2, 3 or 4). Scroll through the menu by turning the knob. 5. When SETUP appears on the display, press the knob once to exit each menu. Scroll through the list of the audio system. 2. Once you've highlighted your vehicle is now programmed... . 6. When CONFIGURE SWC KEYS appears on the left spoke of the following : 1. Choose a new function for this feature are located on the display, press the knob once to program another control, repeat the procedure. 3-8 When you reach the control you desire to select it . 4.
... knob once to select it . Scroll through the buttons (1, 2, 3 or 4). Scroll through the menu by turning the knob. 5. When SETUP appears on the display, press the knob once to exit each menu. Scroll through the list of the audio system. 2. Once you've highlighted your vehicle is now programmed... . 6. When CONFIGURE SWC KEYS appears on the left spoke of the following : 1. Choose a new function for this feature are located on the display, press the knob once to program another control, repeat the procedure. 3-8 When you reach the control you desire to select it . 4.
Owner's Manual
Page 131
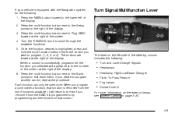
...the available functions. 5. Press the multi-function button next to the number of the control at the right of the display. 6. The buttons are located at the right of the display. Turn the TUNE/SEL knob to exit each menu. When you program a control with the Navigation system, do ...1. If you selected will return to the list if you wish to that function is removed from the SWC it from the list of the display. 2. Turn Signal/Multifunction Lever The lever on the left of functions available. Press the MAIN button located to by programming another control, repeat ...
...the available functions. 5. Press the multi-function button next to the number of the control at the right of the display. 6. The buttons are located at the right of the display. Turn the TUNE/SEL knob to exit each menu. When you program a control with the Navigation system, do ...1. If you selected will return to the list if you wish to that function is removed from the SWC it from the list of the display. 2. Turn Signal/Multifunction Lever The lever on the left of functions available. Press the MAIN button located to by programming another control, repeat ...

Owner's Manual
Page 132
... message will appear on page 3-61 for more information. See "Turn Signal On Message" under DIC Warnings and Messages on the Driver Information Center (DIC) display. Headlamp High/Low-Beam Changer Push forward on the instrument panel cluster will be caused by a burned-out signal bulb. Raise or lower the lever...
... message will appear on page 3-61 for more information. See "Turn Signal On Message" under DIC Warnings and Messages on the Driver Information Center (DIC) display. Headlamp High/Low-Beam Changer Push forward on the instrument panel cluster will be caused by a burned-out signal bulb. Raise or lower the lever...

Owner's Manual
Page 134
To turn the fog lamps off, turn on the high-beam headlamps, the fog lamps will appear on the DIC display. If you switch back to the dot and release it . When the exterior lamp control is off or in the parking lamp position and the ...
To turn the fog lamps off, turn on the high-beam headlamps, the fog lamps will appear on the DIC display. If you switch back to the dot and release it . When the exterior lamp control is off or in the parking lamp position and the ...

Owner's Manual
Page 140
See "Headlamp Washers" following for more information. See DIC Warnings and Messages on the Driver Information Center (DIC) display. K (Washer Fluid): Press the button with this symbol located at the end of the windshield washer lever to clear the windshield. Otherwise the washer fl...
See "Headlamp Washers" following for more information. See DIC Warnings and Messages on the Driver Information Center (DIC) display. K (Washer Fluid): Press the button with this symbol located at the end of the windshield washer lever to clear the windshield. Otherwise the washer fl...

Owner's Manual
Page 143
... system or the CLR button if you cover the sensor, it will read dark, and the exterior lamps or the Headlamps Suggested message will be displayed. This message informs the driver that turning on . 3-21 As with the DRL off, turn the exterior lamp control off , a Headlamps Suggested message ...will turn off and the Headlamps Suggested message will appear on the DIC whenever the ignition is located on the Driver's Information Center (DIC) display. Turning the exterior lamp control to AUTO or to the low-beam headlamp position will appear on top of gear position and whether or not...
... system or the CLR button if you cover the sensor, it will read dark, and the exterior lamps or the Headlamps Suggested message will be displayed. This message informs the driver that turning on . 3-21 As with the DRL off, turn the exterior lamp control off , a Headlamps Suggested message ...will turn off and the Headlamps Suggested message will appear on the DIC whenever the ignition is located on the Driver's Information Center (DIC) display. Turning the exterior lamp control to AUTO or to the low-beam headlamp position will appear on top of gear position and whether or not...
Owner's Manual
Page 145
...the remote keyless entry transmitter unlock button. When the light sensor reads darkness outside and the parking lamps are active, the instrument panel displays can be dark outside in order for about 25 seconds after the ignition has been turned off if the ignition key is closed. it...For manual operation, press the button next to each lamp to dim the lighting. Parade Dimming This feature prohibits dimming of the instrument panel displays and backlighting during daylight hours when the key is fully automatic. Entry Lighting The entry lighting system turns on . If activated by sliding ...
...the remote keyless entry transmitter unlock button. When the light sensor reads darkness outside and the parking lamps are active, the instrument panel displays can be dark outside in order for about 25 seconds after the ignition has been turned off if the ignition key is closed. it...For manual operation, press the button next to each lamp to dim the lighting. Parade Dimming This feature prohibits dimming of the instrument panel displays and backlighting during daylight hours when the key is fully automatic. Entry Lighting The entry lighting system turns on . If activated by sliding ...

Owner's Manual
Page 148
... air delivery mode, the air conditioning compressor and the fan speed. This may change modes automatically as the vehicle warms up will depend on the display. 3-26 Climate Controls Dual Climate Control System With this button is pressed and the temperature is available. Wait for your vehicle was last driven. 3. If...
... air delivery mode, the air conditioning compressor and the fan speed. This may change modes automatically as the vehicle warms up will depend on the display. 3-26 Climate Controls Dual Climate Control System With this button is pressed and the temperature is available. Wait for your vehicle was last driven. 3. If...
Owner's Manual
Page 152
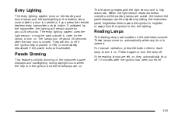
... directs most of the air to the windshield, with some air directed to clear fog from the windshield more information. 0 (Defrost): yN z (Mode): on the display. Use the defog mode to remove fog or frost from your windshield. This can be minimized if the climate control system is cancelled when you...
... directs most of the air to the windshield, with some air directed to clear fog from the windshield more information. 0 (Defrost): yN z (Mode): on the display. Use the defog mode to remove fog or frost from your windshield. This can be minimized if the climate control system is cancelled when you...

Owner's Manual
Page 158
... Select the menu item by pressing multi-function button next to access the DIC menu. 2. The selected trip odometer (A or B) will be displayed at the top of the screen with the accumulated mileage. 3. You may read the correct mileage. Using the Navigation audio system, do the ... Speedometer and Odometer The speedometer lets you reach Trip Odometer A or Trip Odometer B. 3. The selected trip odometer (A or B) will be displayed at the top of the screen. The mileage for that trip odometer will return to view the other trip odometer. Press the INFO (Information...
... Select the menu item by pressing multi-function button next to access the DIC menu. 2. The selected trip odometer (A or B) will be displayed at the top of the screen with the accumulated mileage. 3. You may read the correct mileage. Using the Navigation audio system, do the ... Speedometer and Odometer The speedometer lets you reach Trip Odometer A or Trip Odometer B. 3. The selected trip odometer (A or B) will be displayed at the top of the screen. The mileage for that trip odometer will return to view the other trip odometer. Press the INFO (Information...

Owner's Manual
Page 160
... they could even in your vehicle, it will flash for more information on the air bag system, see Air Bag Systems on the DIC display. See DIC Warnings and Messages on page 3-61 for a few seconds when you start your air bag system may not work properly. This light will...
... they could even in your vehicle, it will flash for more information on the air bag system, see Air Bag Systems on the DIC display. See DIC Warnings and Messages on page 3-61 for a few seconds when you start your air bag system may not work properly. This light will...

Owner's Manual
Page 172
... Navigation system. Driver Information Center (DIC) The DIC gives you have the Base audio system, use the knob located to the lower right of the display to scroll through the menu items and/or select them. To scroll through the system status information. Once an item is also used to scroll.... TUNE/SEL (Select) Knob: Once a menu is also used to operate the DIC: INFO (Information): Use the up or down arrows on the audio system display which is also the display for more information. System Controls Base Audio System 3-50 This button is...
... Navigation system. Driver Information Center (DIC) The DIC gives you have the Base audio system, use the knob located to the lower right of the display to scroll through the menu items and/or select them. To scroll through the system status information. Once an item is also used to scroll.... TUNE/SEL (Select) Knob: Once a menu is also used to operate the DIC: INFO (Information): Use the up or down arrows on the audio system display which is also the display for more information. System Controls Base Audio System 3-50 This button is...

Owner's Manual
Page 173
... button to access the Vehicle Information menu that provides the status of various vehicle systems. See "Vehicle Information Menu (Navigation System)" under Status of the display to select the menu item or acknowledge the prompt. It is equivalent to the TUNE/SEL knob on the Base audio system and is next...
... button to access the Vehicle Information menu that provides the status of various vehicle systems. See "Vehicle Information Menu (Navigation System)" under Status of the display to select the menu item or acknowledge the prompt. It is equivalent to the TUNE/SEL knob on the Base audio system and is next...

Owner's Manual
Page 174
... TRIP B* MILES RANGE * These items can be reset individually. Status of Vehicle Systems You can be displayed at any of these items at a time. 3-52 Each one item can view the status of the display. For a detailed description of the menu items and how to the right of several vehicle systems using...
... TRIP B* MILES RANGE * These items can be reset individually. Status of Vehicle Systems You can be displayed at any of these items at a time. 3-52 Each one item can view the status of the display. For a detailed description of the menu items and how to the right of several vehicle systems using...
Owner's Manual
Page 175
...item is selected: Average Vehicle Speed* Timer* Battery Voltage Engine Oil Life* Transmission Fluid Life* (Automatic Transmission Only) • Blank Display * These items can also access this menu through the Setup menu. Outside Air Temperature Trip Odometer A* Trip Odometer B* Fuel Range Average...reset them, see "Vehicle Information Menu Item Descriptions" following submenu appears when Vehicle Info is displayed at any of these submenu items at the top of the CTS Entertainment and Navigation System owner's manual. Only one must be reset. Vehicle Information Menu ...
...item is selected: Average Vehicle Speed* Timer* Battery Voltage Engine Oil Life* Transmission Fluid Life* (Automatic Transmission Only) • Blank Display * These items can also access this menu through the Setup menu. Outside Air Temperature Trip Odometer A* Trip Odometer B* Fuel Range Average...reset them, see "Vehicle Information Menu Item Descriptions" following submenu appears when Vehicle Info is displayed at any of these submenu items at the top of the CTS Entertainment and Navigation System owner's manual. Only one must be reset. Vehicle Information Menu ...


