Owner's Manual
Page 1
2005 Buick Century Owner Manual Seats and Restraint Systems ...1-1 Front Seats ...1-2 Rear Seats ...1-6 Safety Belts ...1-6 Child Restraints ...1-27 Airbag System ...1-49 Restraint System Check ...1-58 Features and Controls ...2-1 Keys ...2-2 Doors and Locks ...2-10 Windows ...2-14 Theft-Deterrent Systems ...2-16 Starting and Operating Your Vehicle ...2-17 Mirrors ...2-29 OnStar® System ...2-31 Storage Areas ...2-33 Instrument Panel ...3-1 Instrument Panel Overview ...3-4 Climate Controls ...3-18 Warning Lights, Gages, and Indicators ...3-28 Audio System(s) ...3-44 M Driving Your ...
2005 Buick Century Owner Manual Seats and Restraint Systems ...1-1 Front Seats ...1-2 Rear Seats ...1-6 Safety Belts ...1-6 Child Restraints ...1-27 Airbag System ...1-49 Restraint System Check ...1-58 Features and Controls ...2-1 Keys ...2-2 Doors and Locks ...2-10 Windows ...2-14 Theft-Deterrent Systems ...2-16 Starting and Operating Your Vehicle ...2-17 Mirrors ...2-29 OnStar® System ...2-31 Storage Areas ...2-33 Instrument Panel ...3-1 Instrument Panel Overview ...3-4 Climate Controls ...3-18 Warning Lights, Gages, and Indicators ...3-28 Audio System(s) ...3-44 M Driving Your ...
Owner's Manual
Page 8
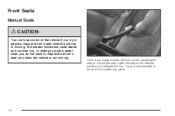
Front Seats Manual Seats {CAUTION: You can lose control of the passenger's seat to unlock the seat. Try to move the seat to adjust a manual driver's seat while the vehicle is moving . Lift the bar located under the front of the vehicle if you do not want to the desired position and release the bar. Slide the seat to . The sudden movement could startle and confuse you, or make you push a pedal when you try to be sure it is not moving . Adjust the driver's seat only when the vehicle is locked into place. 1-2
Front Seats Manual Seats {CAUTION: You can lose control of the passenger's seat to unlock the seat. Try to move the seat to adjust a manual driver's seat while the vehicle is moving . Lift the bar located under the front of the vehicle if you do not want to the desired position and release the bar. Slide the seat to . The sudden movement could startle and confuse you, or make you push a pedal when you try to be sure it is not moving . Adjust the driver's seat only when the vehicle is locked into place. 1-2

Owner's Manual
Page 67
... Engine Exhaust ...2-27 Running Your Engine While You Are Parked ...2-28 Mirrors ...2-29 Manual Rearview Mirror ...2-29 Manual Rearview Mirror with OnStar® ...2-29 Outside Power Mirrors ...2-30 Outside Convex Mirror ...2-30 OnStar® System ...2-31 Storage Areas ...2-33 Glove Box ...2-33 Front Storage Area ...2-33 Convenience Net ...2-33 Keys ...2-2 Remote Keyless Entry System ...2-4 Remote Keyless Entry System Operation ...2-5 Doors and Locks ...2-10 Door Locks ...2-10 Power Door Locks ...2-11 Programmable Automatic Door Locks ...2-11 Lockout Protection ...2-12 Leaving Your Vehicle...
... Engine Exhaust ...2-27 Running Your Engine While You Are Parked ...2-28 Mirrors ...2-29 Manual Rearview Mirror ...2-29 Manual Rearview Mirror with OnStar® ...2-29 Outside Power Mirrors ...2-30 Outside Convex Mirror ...2-30 OnStar® System ...2-31 Storage Areas ...2-33 Glove Box ...2-33 Front Storage Area ...2-33 Convenience Net ...2-33 Keys ...2-2 Remote Keyless Entry System ...2-4 Remote Keyless Entry System Operation ...2-5 Doors and Locks ...2-10 Door Locks ...2-10 Power Door Locks ...2-11 Programmable Automatic Door Locks ...2-11 Lockout Protection ...2-12 Leaving Your Vehicle...
Owner's Manual
Page 71
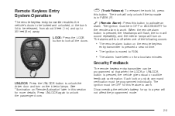
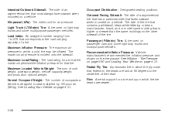
... or ACCESSORY for more details. Remote Keyless Entry System Operation The remote keyless entry transmitter enables the vehicle's doors to be locked and unlocked, or the trunk lid to be programmed individually. UNLOCK: Press the UNLOCK button to unlock the driver door and turn on Remote Activation" later in PARK (P). F (Trunk Release): To release the trunk lid, press this feature to RUN. • The alarms have been on the interior lamps. When the remote alarm button...
... or ACCESSORY for more details. Remote Keyless Entry System Operation The remote keyless entry transmitter enables the vehicle's doors to be locked and unlocked, or the trunk lid to be programmed individually. UNLOCK: Press the UNLOCK button to unlock the driver door and turn on Remote Activation" later in PARK (P). F (Trunk Release): To release the trunk lid, press this feature to RUN. • The alarms have been on the interior lamps. When the remote alarm button...
Owner's Manual
Page 78
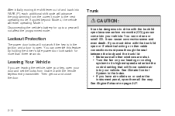
... the instrument panel, open them all other cable connections must drive with the trunk lid open because carbon monoxide (CO) gas can override this feature by holding the driver's side power door lock switch for up to the next operating mode. See Engine Exhaust on your heating or cooling system to drive with the trunk lid open or if electrical wiring or other windows are leaving the vehicle, take your key, open...
... the instrument panel, open them all other cable connections must drive with the trunk lid open because carbon monoxide (CO) gas can override this feature by holding the driver's side power door lock switch for up to the next operating mode. See Engine Exhaust on your heating or cooling system to drive with the trunk lid open or if electrical wiring or other windows are leaving the vehicle, take your key, open...
Owner's Manual
Page 90
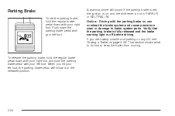
Notice: Driving with your left foot. Verify that the parking brake is fully released and the brake warning light is not in PARK (P) or NEUTRAL (N). Push down with your right foot and push the parking brake pedal with your right foot. If you lift your left foot. To release the parking brake, hold the regular brake pedal down with your left foot, the parking brake pedal will sound if...
Notice: Driving with your left foot. Verify that the parking brake is fully released and the brake warning light is not in PARK (P) or NEUTRAL (N). Push down with your right foot and push the parking brake pedal with your right foot. If you lift your left foot. To release the parking brake, hold the regular brake pedal down with your left foot, the parking brake pedal will sound if...
Owner's Manual
Page 101
...Temperature Warning Light ...3-35 Engine Coolant Temperature Gage ...3-35 Tire Pressure Light ...3-36 Instrument Panel Overview ...3-4 Hazard Warning Flashers ...3-6 Other Warning Devices ...3-6 Horn ...3-6 Tilt Wheel ...3-6 Turn Signal/Multifunction Lever ...3-7 Turn and Lane-Change Signals ...3-7 Headlamp High/Low-Beam Changer ...3-8 Flash-to-Pass ...3-8 Windshield Wipers ...3-8 Windshield Washer ...3-9 Cruise Control ...3-10 Exterior Lamps ...3-13 Headlamps on Reminder ...3-13 Delayed Headlamps ...3-13 Daytime Running Lamps/Automatic Headlamp System ...3-14 Cornering Lamps ...3-15 Interior...
...Temperature Warning Light ...3-35 Engine Coolant Temperature Gage ...3-35 Tire Pressure Light ...3-36 Instrument Panel Overview ...3-4 Hazard Warning Flashers ...3-6 Other Warning Devices ...3-6 Horn ...3-6 Tilt Wheel ...3-6 Turn Signal/Multifunction Lever ...3-7 Turn and Lane-Change Signals ...3-7 Headlamp High/Low-Beam Changer ...3-8 Flash-to-Pass ...3-8 Windshield Wipers ...3-8 Windshield Washer ...3-9 Cruise Control ...3-10 Exterior Lamps ...3-13 Headlamps on Reminder ...3-13 Delayed Headlamps ...3-13 Daytime Running Lamps/Automatic Headlamp System ...3-14 Cornering Lamps ...3-15 Interior...

Owner's Manual
Page 122
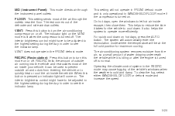
... Passenger Compartment Air Filter on page 3-26 and Scheduled Maintenance on , this section. 9 FAN: Manual Operation During daylight hours, the instrument panel brightness control might need to decrease fan speed. For more information see the indicator lights for the driver. If the airflow seems low when the fan is not on, this setting unless the outside temperature will show the selection for the entire cabin...
... Passenger Compartment Air Filter on page 3-26 and Scheduled Maintenance on , this section. 9 FAN: Manual Operation During daylight hours, the instrument panel brightness control might need to decrease fan speed. For more information see the indicator lights for the driver. If the airflow seems low when the fan is not on, this setting unless the outside temperature will show the selection for the entire cabin...
Owner's Manual
Page 123
... to turn the air-conditioning compressor on . On hot days, open the windows to operate more efficiently. The rest comes out of the air through the instrument panel outlets. The system will automatically enter the recirculation mode where the temperature will come on or off . The interior brightness control might have to be at the full cold position for the vehicle to cool down...
... to turn the air-conditioning compressor on . On hot days, open the windows to operate more efficiently. The rest comes out of the air through the instrument panel outlets. The system will automatically enter the recirculation mode where the temperature will come on or off . The interior brightness control might have to be at the full cold position for the vehicle to cool down...
Owner's Manual
Page 140
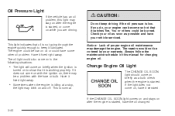
... some other oil problem. If the CHANGE OIL SOON light comes on and stays on after the engine is started . The oil light could have it serviced. • Sometimes when the engine is idling at a stop, the light may damage the engine. Always follow the maintenance schedule in the following situations: • The light will come on while you do, your warranty. The engine could be covered by your engine can...
... some other oil problem. If the CHANGE OIL SOON light comes on and stays on after the engine is started . The oil light could have it serviced. • Sometimes when the engine is idling at a stop, the light may damage the engine. Always follow the maintenance schedule in the following situations: • The light will come on while you do, your warranty. The engine could be covered by your engine can...
Owner's Manual
Page 143
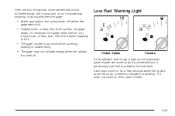
... vehicle's fuel is low, a light on the instrument panel cluster will come on and a chime will also come on as a check to the fuel tank. All these things are four things that anything is wrong with the fuel gage: Low Fuel Warning Light • At the gas station, the pump shuts off . If it does not come on for a few seconds when the ignition is turned...
... vehicle's fuel is low, a light on the instrument panel cluster will come on and a chime will also come on as a check to the fuel tank. All these things are four things that anything is wrong with the fuel gage: Low Fuel Warning Light • At the gas station, the pump shuts off . If it does not come on for a few seconds when the ignition is turned...
Owner's Manual
Page 219
... the fuel cap too quickly. Clean fuel from painted surfaces as soon as possible. See Malfunction Indicator Lamp on you if you get one for any hiss noise to evaporate into the atmosphere. Notice: If you are refueling, do not remove the nozzle. Then unscrew the cap all the way. When replacing the fuel cap, turn it to spill fuel. The...
... the fuel cap too quickly. Clean fuel from painted surfaces as soon as possible. See Malfunction Indicator Lamp on you if you get one for any hiss noise to evaporate into the atmosphere. Notice: If you are refueling, do not remove the nozzle. Then unscrew the cap all the way. When replacing the fuel cap, turn it to spill fuel. The...
Owner's Manual
Page 262
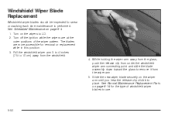
... windshield. 4. The blades are at the outer positions of windshield wiper blades to LO. 2. See Normal Maintenance Replacement Parts on the wipers to use. 5-52 See Scheduled Maintenance on the wiper arm until you hear the release clip click into place. Windshield Wiper Blade Replacement Windshield wiper blades should be inspected for the type of the wiper pattern. Turn on page 6-14 for wear or cracking each time maintenance is performed...
... windshield. 4. The blades are at the outer positions of windshield wiper blades to LO. 2. See Normal Maintenance Replacement Parts on the wipers to use. 5-52 See Scheduled Maintenance on the wiper arm until you hear the release clip click into place. Windshield Wiper Blade Replacement Windshield wiper blades should be inspected for the type of the wiper pattern. Turn on page 6-14 for wear or cracking each time maintenance is performed...

Owner's Manual
Page 267
... Vehicle Weight Rating, see Loading Your Vehicle on each square inch of the tire. The DOT code includes the Tire Identification Number (TIN), an alphanumeric designator which the plies are , automatic transmission, power steering, power brakes, power windows, power seats, and air conditioning. Tire Terminology and Definitions Air Pressure: The amount of air inside the tire pressing outward on page 4-31. Cords may be made from driving. Tire Pressure on page 4-31. 5-57 Air pressure...
... Vehicle Weight Rating, see Loading Your Vehicle on each square inch of the tire. The DOT code includes the Tire Identification Number (TIN), an alphanumeric designator which the plies are , automatic transmission, power steering, power brakes, power windows, power seats, and air conditioning. Tire Terminology and Definitions Air Pressure: The amount of air inside the tire pressing outward on page 4-31. Cords may be made from driving. Tire Pressure on page 4-31. 5-57 Air pressure...
Owner's Manual
Page 268
... when mounted on light duty trucks and some light duty trucks and multipurpose vehicles. Normal Occupant Weight: The number of curb weight; Light Truck (LT-Metric) Tire: A tire used on page 4-31. Load Index: An assigned number ranging from 1 to 279 that extend to seat multiplied by 150 pounds (68 kg). See Loading Your Vehicle on passenger cars and some multipurpose passenger vehicles. Rim: A metal support for air pressure. Passenger (P-Metric) Tire: A tire used on a vehicle. Tire Pressure on...
... when mounted on light duty trucks and some light duty trucks and multipurpose vehicles. Normal Occupant Weight: The number of curb weight; Light Truck (LT-Metric) Tire: A tire used on page 4-31. Load Index: An assigned number ranging from 1 to 279 that extend to seat multiplied by 150 pounds (68 kg). See Loading Your Vehicle on passenger cars and some multipurpose passenger vehicles. Rim: A metal support for air pressure. Passenger (P-Metric) Tire: A tire used on a vehicle. Tire Pressure on...
Owner's Manual
Page 304
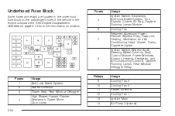
... passenger's side of the vehicle in the engine compartment. Underhood Fuse Block Some fuses and relays are located in the underhood fuse block on location. Fuses 5 6 Usage Ignition Switch, Stoplamps, Anti-Lock Brake System, Turn Signals, Cluster, Air Bag, Daytime Running Lamps Module Cooling Fan Retained Accessory Power, Remote Keyless Entry, Data Link, Heating, Ventilation, and Air Conditioning Head; Cluster, Radio, Cigarette Lighter Ignition Switch, Wipers, Audio Steering Wheel Controls, Body Control Module, Power Windows, Sunroof, Heating, Ventilation, and Air Conditioning Controls;
... passenger's side of the vehicle in the engine compartment. Underhood Fuse Block Some fuses and relays are located in the underhood fuse block on location. Fuses 5 6 Usage Ignition Switch, Stoplamps, Anti-Lock Brake System, Turn Signals, Cluster, Air Bag, Daytime Running Lamps Module Cooling Fan Retained Accessory Power, Remote Keyless Entry, Data Link, Heating, Ventilation, and Air Conditioning Head; Cluster, Radio, Cigarette Lighter Ignition Switch, Wipers, Audio Steering Wheel Controls, Body Control Module, Power Windows, Sunroof, Heating, Ventilation, and Air Conditioning Controls;
Owner's Manual
Page 335
..., Ontario K1A 0N5 Service Publications Ordering Information Service Manuals Service Manuals have the diagnosis and repair information on engines, transmission, axle, suspension, brakes, electrical, steering, body, etc. However, NHTSA cannot become involved in individual problems between you may either call us at 1-800-424-9393 (or 366-0123 in the Washington, D.C. Box 33136 Detroit, MI 48232-5136 In Canada, please call the Auto Safety Hotline toll-free...
..., Ontario K1A 0N5 Service Publications Ordering Information Service Manuals Service Manuals have the diagnosis and repair information on engines, transmission, axle, suspension, brakes, electrical, steering, body, etc. However, NHTSA cannot become involved in individual problems between you may either call us at 1-800-424-9393 (or 366-0123 in the Washington, D.C. Box 33136 Detroit, MI 48232-5136 In Canada, please call the Auto Safety Hotline toll-free...
Owner's Manual
Page 337
....) Instrument Panel ...Interior Plastic Components ...Leather ...Sheet Metal Damage ...Tires ...Underbody Maintenance ...Vehicle Care/Appearance Materials ...Vinyl ...Washing Your Vehicle ...Weatherstrips ...Windshield and Wiper Blades ...Ashtrays ...Audio System(s) ...Audio Steering Wheel Controls ...Care of Your Cassette Tape Player ...Care of Your CD Player ...Care of Your CDs ...Chime Level Adjustment ...Fixed Mast Antenna ...Radio with Cassette and CD ...Radio with CD ...Setting the Time ...Theft-Deterrent Feature ...Understanding Radio Reception ...Automatic Transaxle Fluid ...Operation...
....) Instrument Panel ...Interior Plastic Components ...Leather ...Sheet Metal Damage ...Tires ...Underbody Maintenance ...Vehicle Care/Appearance Materials ...Vinyl ...Washing Your Vehicle ...Weatherstrips ...Windshield and Wiper Blades ...Ashtrays ...Audio System(s) ...Audio Steering Wheel Controls ...Care of Your Cassette Tape Player ...Care of Your CD Player ...Care of Your CDs ...Chime Level Adjustment ...Fixed Mast Antenna ...Radio with Cassette and CD ...Radio with CD ...Setting the Time ...Theft-Deterrent Feature ...Understanding Radio Reception ...Automatic Transaxle Fluid ...Operation...
Owner's Manual
Page 345
... Radio with CD ...3-45 Setting the Time ...3-44 Theft-Deterrent ...3-63 Understanding Reception ...3-64 Reading Lamps ...3-17 Rear Safety Belt Comfort Guides ...1-24 Rear Seat Passengers, Safety Belts ...1-21 Rearview Mirror with OnStar® ...2-29 Rearview Mirrors ...2-29 Reclining Seatbacks ...1-4 Recommended Fluids and Lubricants ...6-13 Recreational Vehicle Towing ...4-36 Remote Keyless Entry System ...2-4 Remote Keyless Entry System, Operation ...2-5 Removing the Flat Tire and Installing the Spare Tire ...5-73 Removing the Spare Tire and Tools ...5-71 Replacement Bulbs...
... Radio with CD ...3-45 Setting the Time ...3-44 Theft-Deterrent ...3-63 Understanding Reception ...3-64 Reading Lamps ...3-17 Rear Safety Belt Comfort Guides ...1-24 Rear Seat Passengers, Safety Belts ...1-21 Rearview Mirror with OnStar® ...2-29 Rearview Mirrors ...2-29 Reclining Seatbacks ...1-4 Recommended Fluids and Lubricants ...6-13 Recreational Vehicle Towing ...4-36 Remote Keyless Entry System ...2-4 Remote Keyless Entry System, Operation ...2-5 Removing the Flat Tire and Installing the Spare Tire ...5-73 Removing the Spare Tire and Tools ...5-71 Replacement Bulbs...
Owner's Manual
Page 346
... Engine Soon Light ...3-36 Publications Ordering Information ...7-11 Vehicle Soon Light ...3-42 Servicing Your Airbag-Equipped Vehicle ...1-58 Setting the Time ...3-44 Sheet Metal Damage ...5-88 Shifting Into Park (P) ...2-25 Shifting Out of Park (P) ...2-26 Shoulder Belt Height Adjuster ...1-18 Signals, Turn and Lane-Change ...3-7 Spare Tire Installing ...5-73 Removing ...5-71 Storing ...5-79 Specifications, Capacities ...5-96 Speedometer ...3-30 Split Folding Rear Seat ...1-6 Starting Your Engine ...2-19 Steering ...4-11 Steering Wheel Controls, Audio ...3-63 Steering Wheel, Tilt Wheel...
... Engine Soon Light ...3-36 Publications Ordering Information ...7-11 Vehicle Soon Light ...3-42 Servicing Your Airbag-Equipped Vehicle ...1-58 Setting the Time ...3-44 Sheet Metal Damage ...5-88 Shifting Into Park (P) ...2-25 Shifting Out of Park (P) ...2-26 Shoulder Belt Height Adjuster ...1-18 Signals, Turn and Lane-Change ...3-7 Spare Tire Installing ...5-73 Removing ...5-71 Storing ...5-79 Specifications, Capacities ...5-96 Speedometer ...3-30 Split Folding Rear Seat ...1-6 Starting Your Engine ...2-19 Steering ...4-11 Steering Wheel Controls, Audio ...3-63 Steering Wheel, Tilt Wheel...


