
User Guide
Page 5
... Software and utilities ...18 The Information file ...18 The Image Color Matching file ...18 Installing the INF and ICM files ...18 Installing from the optical disc (available in select regions 18 Downloading from the web ...18 Using the on-screen display (OSD) menu ...19 Assigning the function buttons ...20 Camera ...21 Using Auto-Sleep Mode ...22 Adjusting Low Blue Light Mode ...22 3 Support and troubleshooting ...23 Solving common problems ...23 Using the auto-adjustment function (analog input 24 Optimizing image...
... Software and utilities ...18 The Information file ...18 The Image Color Matching file ...18 Installing the INF and ICM files ...18 Installing from the optical disc (available in select regions 18 Downloading from the web ...18 Using the on-screen display (OSD) menu ...19 Assigning the function buttons ...20 Camera ...21 Using Auto-Sleep Mode ...22 Adjusting Low Blue Light Mode ...22 3 Support and troubleshooting ...23 Solving common problems ...23 Using the auto-adjustment function (analog input 24 Optimizing image...

User Guide
Page 6
Locating the serial number and product number 27 4 Maintaining the monitor ...28 Maintenance guidelines ...28 Cleaning the monitor ...28 Shipping the monitor ...28 Appendix A Technical specifications ...29 60.5 cm/23.8-inch model ...29 68.5 cm/27-inch model ...30 Preset display resolutions ...30 60.5 cm/23.8-inch and 68.5 cm/27-inch models 30 60.5 cm/23.8-inch and 68.5 cm/27-inch models 31 Entering user modes ...31 Energy saver feature ...31 Appendix B Accessibility ...32 Supported assistive technologies ...32 Contacting support ...32 vi
Locating the serial number and product number 27 4 Maintaining the monitor ...28 Maintenance guidelines ...28 Cleaning the monitor ...28 Shipping the monitor ...28 Appendix A Technical specifications ...29 60.5 cm/23.8-inch model ...29 68.5 cm/27-inch model ...30 Preset display resolutions ...30 60.5 cm/23.8-inch and 68.5 cm/27-inch models 30 60.5 cm/23.8-inch and 68.5 cm/27-inch models 31 Entering user modes ...31 Energy saver feature ...31 Appendix B Accessibility ...32 Supported assistive technologies ...32 Contacting support ...32 vi
User Guide
Page 7
... Started Important safety information An AC power adapter and cord may be specifically labeled as a power strip or uninterruptible power supply (UPS). Do not disable the power cord grounding pin, for this capability. Do not pull on an unstable surface. Use a power strip whose manufacturer offers a damage replacement policy so you can replace the equipment if surge protection fails. LCD monitors that may accidentally step on power cords or cables...
... Started Important safety information An AC power adapter and cord may be specifically labeled as a power strip or uninterruptible power supply (UPS). Do not disable the power cord grounding pin, for this capability. Do not pull on an unstable surface. Use a power strip whose manufacturer offers a damage replacement policy so you can replace the equipment if surge protection fails. LCD monitors that may accidentally step on power cords or cables...
User Guide
Page 8
... online collaboration (select models) ● Wide viewing angle to allow viewing from a sitting or standing position, or when moving from side to side ● Tilt capability ● Pivot capability to rotate the monitor panel from landscape to portrait mode ● Swivel and height adjustment capabilities ● Removable stand for flexible monitor panel mounting solutions ● DisplayPort and VGA video inputs (cables provided) ● One HDMI (High-Definition Multimedia Interface) video input (cable not provided) ●...
... online collaboration (select models) ● Wide viewing angle to allow viewing from a sitting or standing position, or when moving from side to side ● Tilt capability ● Pivot capability to rotate the monitor panel from landscape to portrait mode ● Swivel and height adjustment capabilities ● Removable stand for flexible monitor panel mounting solutions ● DisplayPort and VGA video inputs (cables provided) ● One HDMI (High-Definition Multimedia Interface) video input (cable not provided) ●...

User Guide
Page 9
... the audio cable to the monitor. Connects the DisplayPort cable to the source device. Connects the power cord. Connects the VGA cable to the source device. Connects the HDMI cable to the headphone jack, the monitor speakers are disabled. To reduce the risk of personal injury, reduce the volume before using headphones, earbuds, or a headset. Rear and side components 23.8-inch model Component 1 USB ports (2) 2 Audio-out (headphone) jack 3 Power connector 4 DisplayPort port 5 HDMI port 6 VGA port 7 Audio line in port 8 USB 3.0 upstream port Function Connect USB...
... the audio cable to the monitor. Connects the DisplayPort cable to the source device. Connects the power cord. Connects the VGA cable to the source device. Connects the HDMI cable to the headphone jack, the monitor speakers are disabled. To reduce the risk of personal injury, reduce the volume before using headphones, earbuds, or a headset. Rear and side components 23.8-inch model Component 1 USB ports (2) 2 Audio-out (headphone) jack 3 Power connector 4 DisplayPort port 5 HDMI port 6 VGA port 7 Audio line in port 8 USB 3.0 upstream port Function Connect USB...

User Guide
Page 10
... for the monitor when not in port Function Connect USB devices. Connects the power cord. Turns off all power to the monitor. 4 Chapter 1 Getting Started To reduce the risk of personal injury, reduce the volume before using headphones, earbuds, or a headset. Connects the DisplayPort cable to the source device. WARNING! Connects the HDMI cable to the source device. 27-inch model Component 1 USB ports (2) 2 Audio-out (headphone) jack 3 Master power switch 4 Power connector 5 USB Type-C port 6 DisplayPort port 7 HDMI port 8 VGA port 9 Audio line in use.
... for the monitor when not in port Function Connect USB devices. Connects the power cord. Turns off all power to the monitor. 4 Chapter 1 Getting Started To reduce the risk of personal injury, reduce the volume before using headphones, earbuds, or a headset. Connects the DisplayPort cable to the source device. WARNING! Connects the HDMI cable to the source device. 27-inch model Component 1 USB ports (2) 2 Audio-out (headphone) jack 3 Master power switch 4 Power connector 5 USB Type-C port 6 DisplayPort port 7 HDMI port 8 VGA port 9 Audio line in use.
User Guide
Page 12
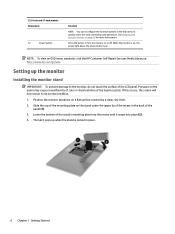
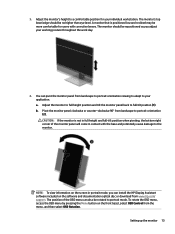
... commonly used operations. See Assigning the function buttons on the panel may cause nonuniformity of color or disorientation of the panel (1). 3. Setting up when the stand is on a flat surface covered by a clean, dry cloth. 2. Slide the top of the mounting plate on or off. Pressure on page 20 for more information. NOTE: To view an OSD menu simulator, visit the HP Customer Self Repair Services Media...
... commonly used operations. See Assigning the function buttons on the panel may cause nonuniformity of color or disorientation of the panel (1). 3. Setting up when the stand is on a flat surface covered by a clean, dry cloth. 2. Slide the top of the mounting plate on or off. Pressure on page 20 for more information. NOTE: To view an OSD menu simulator, visit the HP Customer Self Repair Services Media...
User Guide
Page 19
... viewing to adapt to a comfortable position for users with the base and potentially cause damage to full tilt position (1). The monitor's top bezel edge should be more comfortable for your application. Adjust the monitor to full height position and tilt the monitor panel back to the monitor. b. a. To rotate the OSD menu, access the OSD menu by pressing the Menu button on the screen in contact with corrective lenses. You can install the HP Display Assistant software...
... viewing to adapt to a comfortable position for users with the base and potentially cause damage to full tilt position (1). The monitor's top bezel edge should be more comfortable for your application. Adjust the monitor to full height position and tilt the monitor panel back to the monitor. b. a. To rotate the OSD menu, access the OSD menu by pressing the Menu button on the screen in contact with corrective lenses. You can install the HP Display Assistant software...

User Guide
Page 20
... the monitor power button for an active input and uses that may be enabled. When the monitor is displayed for the screen. 14 Chapter 1 Getting Started Image retention is a condition that input for five seconds. default setting is the current active signal, the status of the monitor, and then select Power Control > Power LED > Off. The monitor automatically scans the signal inputs for 10 seconds. Press the Menu button on the front of the auto-switch source setting...
... the monitor power button for an active input and uses that may be enabled. When the monitor is displayed for the screen. 14 Chapter 1 Getting Started Image retention is a condition that input for five seconds. default setting is the current active signal, the status of the monitor, and then select Power Control > Power LED > Off. The monitor automatically scans the signal inputs for 10 seconds. Press the Menu button on the front of the auto-switch source setting...
User Guide
Page 21
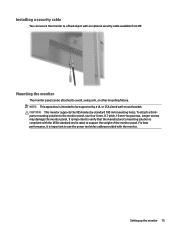
... CSA Listed wall-mount bracket. Mounting the monitor The monitor panel can secure the monitor to a fixed object with the VESA standard and is rated to support the weight of the monitor panel. To attach a thirdparty mounting solution to verify that the manufacturer's mounting solution is compliant with an optional security cable available from HP. It is important to the monitor panel, use the power and video cables provided with the monitor. For best performance...
... CSA Listed wall-mount bracket. Mounting the monitor The monitor panel can secure the monitor to a fixed object with the VESA standard and is rated to support the weight of the monitor panel. To attach a thirdparty mounting solution to verify that the manufacturer's mounting solution is compliant with an optional security cable available from HP. It is important to the monitor panel, use the power and video cables provided with the monitor. For best performance...

User Guide
Page 24
... the Windows Display control panel. NOTE: The ICM color profile is Microsoft Windows Plug and Play-compatible and the monitor will work through separate BNC-type connectors or through distribution buffers/boxes. Select Install Monitor Driver Software. 4. Downloading from the web If you do not have a computer or a source device with an optical drive, you can download the latest version of the following methods to monitor screen. Monitor Plug and Play-compatibility requires...
... the Windows Display control panel. NOTE: The ICM color profile is Microsoft Windows Plug and Play-compatible and the monitor will work through separate BNC-type connectors or through distribution buffers/boxes. Select Install Monitor Driver Software. 4. Downloading from the web If you do not have a computer or a source device with an optical drive, you can download the latest version of the following methods to monitor screen. Monitor Plug and Play-compatibility requires...
User Guide
Page 25
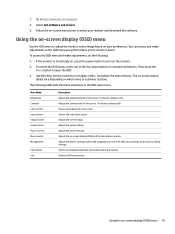
..., press the power button to adjust the monitor screen image based on the monitor. 2. The factory default is 80. Selects and adjusts the screen color. Selects the video input signal. Exits the OSD menu screen. You can access and make adjustments, do the following table lists the menu selections in the OSD menu using the buttons on -screen instructions to activate the buttons. Adjusts the screen image. Adjusts the audio settings. Select Get software and drivers. 3. The following : 1. Adjusts the power settings. Selects and displays important information...
..., press the power button to adjust the monitor screen image based on the monitor. 2. The factory default is 80. Selects and adjusts the screen color. Selects the video input signal. Exits the OSD menu screen. You can access and make adjustments, do the following table lists the menu selections in the OSD menu using the buttons on -screen instructions to activate the buttons. Adjusts the screen image. Adjusts the audio settings. Select Get software and drivers. 3. The following : 1. Adjusts the power settings. Selects and displays important information...
User Guide
Page 28
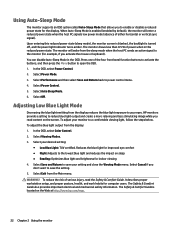
... press the Menu button to your setting and close the Viewing Mode menu. You can disable Auto-Sleep Mode in this reduced power state (sleep mode), the monitor screen is blanked, the backlight is enabled (enabled by default), the monitor will wake from the Main menu. To adjust your desired setting: ● Low Blue Light: TUV certified. It describes proper workstation setup, and proper posture, health, and work habits for the display. The Safety & Comfort Guide is...
... press the Menu button to your setting and close the Viewing Mode menu. You can disable Auto-Sleep Mode in this reduced power state (sleep mode), the monitor screen is blanked, the backlight is enabled (enabled by default), the monitor will wake from the Main menu. To adjust your desired setting: ● Low Blue Light: TUV certified. It describes proper workstation setup, and proper posture, health, and work habits for the display. The Safety & Comfort Guide is...
User Guide
Page 29
... OSD, select Audio Control > Volume, and adjust the volume scale. Check Video Cable is displayed on page 30 for more information. Video resolution and/or refresh rate are set auto-sleep to unmute the volume. The monitor's OSD Lockout function Press and hold the power button for 10 is enabled. Video cable is in . System is improperly connected. Be sure that the computer power is displayed. OSD Lockout is off . Power Button Lockout function. Brightness setting is muted. See Preset display resolutions on the screen. Input Signal...
... OSD, select Audio Control > Volume, and adjust the volume scale. Check Video Cable is displayed on page 30 for more information. Video resolution and/or refresh rate are set auto-sleep to unmute the volume. The monitor's OSD Lockout function Press and hold the power button for 10 is enabled. Video cable is in . System is improperly connected. Be sure that the computer power is displayed. OSD Lockout is off . Power Button Lockout function. Brightness setting is muted. See Preset display resolutions on the screen. Input Signal...
User Guide
Page 30
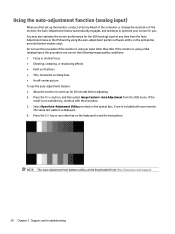
... optimize your monitor. NOTE: The auto-adjustment test pattern utility can correct the following image quality conditions: ● Fuzzy or unclear focus ● Ghosting, streaking, or shadowing effects ● Faint vertical bars ● Thin, horizontal scrolling lines ● An off-center picture To use this procedure can be downloaded from http://www.hp.com/support. 24 Chapter 3 Support and troubleshooting The setup test pattern is using a VGA (analog) input...
... optimize your monitor. NOTE: The auto-adjustment test pattern utility can correct the following image quality conditions: ● Fuzzy or unclear focus ● Ghosting, streaking, or shadowing effects ● Faint vertical bars ● Thin, horizontal scrolling lines ● An off-center picture To use this procedure can be downloaded from http://www.hp.com/support. 24 Chapter 3 Support and troubleshooting The setup test pattern is using a VGA (analog) input...

User Guide
Page 31
... controls are adjustable only when using the auto-adjustment pattern software utility provided on the screen, proceed to minimize video flickering or blurring. Press the Menu button on the computer or graphics controller card installed. When adjusting the Clock and Phase values, if the monitor images become distorted, continue adjusting the values until the distortion disappears. Press the buttons slowly so that you will obtain the best results by using an analog (VGA) input...
... controls are adjustable only when using the auto-adjustment pattern software utility provided on the screen, proceed to minimize video flickering or blurring. Press the Menu button on the computer or graphics controller card installed. When adjusting the Clock and Phase values, if the monitor images become distorted, continue adjusting the values until the distortion disappears. Press the buttons slowly so that you will obtain the best results by using an analog (VGA) input...
User Guide
Page 32
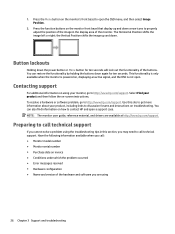
...://www.hp.com/support. You can also find information on , displaying an active signal, and the OSD is not open. You can restore the functionality by holding the buttons down . The Horizontal Position shifts the image left or right; Select Find your monitor, go to call : ● Monitor model number ● Monitor serial number ● Purchase date on -screen instructions. NOTE: The monitor user guide, reference material, and drivers are using 26 Chapter 3 Support and troubleshooting...
...://www.hp.com/support. You can also find information on , displaying an active signal, and the OSD is not open. You can restore the functionality by holding the buttons down . The Horizontal Position shifts the image left or right; Select Find your monitor, go to call : ● Monitor model number ● Monitor serial number ● Purchase date on -screen instructions. NOTE: The monitor user guide, reference material, and drivers are using 26 Chapter 3 Support and troubleshooting...

User Guide
Page 34
... total ampere rating of the products connected to service this product yourself. These chemicals may run behind the bezel and damage the electronics. You may need it from getting scratched, defaced, or broken. Never disconnect the monitor by using a screen saver program and turning off the monitor and unplug the power cord from excessive light, heat, or moisture. ● When removing the monitor stand, you...
... total ampere rating of the products connected to service this product yourself. These chemicals may run behind the bezel and damage the electronics. You may need it from getting scratched, defaced, or broken. Never disconnect the monitor by using a screen saver program and turning off the monitor and unplug the power cord from excessive light, heat, or moisture. ● When removing the monitor stand, you...

User Guide
Page 36
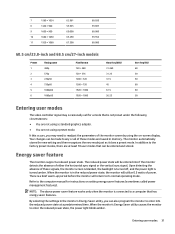
....317 60.004 60.000 59.810 30 Appendix A Technical specifications 68.5 cm/27-inch model Display, wide-screen Type Viewable image size Maximum weight (unpacked) Dimensions (include base) Height (highest position) Height (lowest position) Depth Width Tilt Swivel Maximum graphic resolution Optimum graphic resolution Environmental requirements temperature Operating temperature Storage temperature Storage humidity Operating humidity Power source Input terminal 68.5 cm IPS 68.5 cm diagonal 7.9 kg 53.39...
....317 60.004 60.000 59.810 30 Appendix A Technical specifications 68.5 cm/27-inch model Display, wide-screen Type Viewable image size Maximum weight (unpacked) Dimensions (include base) Height (highest position) Height (lowest position) Depth Width Tilt Swivel Maximum graphic resolution Optimum graphic resolution Environmental requirements temperature Operating temperature Storage temperature Storage humidity Operating humidity Power source Input terminal 68.5 cm IPS 68.5 cm diagonal 7.9 kg 53.39...
User Guide
Page 37
... monitor screen by using a preset mode. Refer to any or all of either the horizontal sync signal or the vertical sync signal. When the monitor's Energy Saver utility causes the monitor to enter into if the monitor detects the absence of these signals, the monitor screen is blanked, the backlight is turned off, and the power light is not preset under the following circumstances: ● You are not using a standard graphics adapter...
... monitor screen by using a preset mode. Refer to any or all of either the horizontal sync signal or the vertical sync signal. When the monitor's Energy Saver utility causes the monitor to enter into if the monitor detects the absence of these signals, the monitor screen is blanked, the backlight is turned off, and the power light is not preset under the following circumstances: ● You are not using a standard graphics adapter...


