Owners Manual
Page 3
Information About DVDs 23 Terminology 24 List of Language Codes 25 List of Country Codes 26 In Case of Difficulty 28 Specifications 29 Installation and Connections WARNING WARNING 30 CAUTION 30 PRECAUTIONS 30 Installation 31 Connections 32 Setting the System Switch 32 System Example 33 Operating the DVA-5210 Video Player 36 Operating from the optional remote control (RUE-4191 37 2-EN
Information About DVDs 23 Terminology 24 List of Language Codes 25 List of Country Codes 26 In Case of Difficulty 28 Specifications 29 Installation and Connections WARNING WARNING 30 CAUTION 30 PRECAUTIONS 30 Installation 31 Connections 32 Setting the System Switch 32 System Example 33 Operating the DVA-5210 Video Player 36 Operating from the optional remote control (RUE-4191 37 2-EN
Owners Manual
Page 5
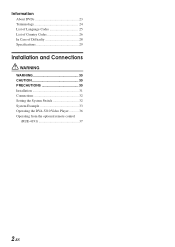
... playback mechanism. When a new disc is inserted incorrectly. Using such accessories can cause operational problems. We recommend not using your unit in Alpine DVD players. Do not attempt to play cracked, warped, or damaged discs. Center Hole Center Hole New Disc Bumps Outside (Bumps) 4-... any disc that is inserted into the player by the automatic reloading mechanism. Maintenance If you insert the disc. Installation Location Make sure the DVA-5210 will influence the thickness and/or diameter of special shaped discs may notice the disc playback sound wavering due to use...
... playback mechanism. When a new disc is inserted incorrectly. Using such accessories can cause operational problems. We recommend not using your unit in Alpine DVD players. Do not attempt to play cracked, warped, or damaged discs. Center Hole Center Hole New Disc Bumps Outside (Bumps) 4-... any disc that is inserted into the player by the automatic reloading mechanism. Maintenance If you insert the disc. Installation Location Make sure the DVA-5210 will influence the thickness and/or diameter of special shaped discs may notice the disc playback sound wavering due to use...

Owners Manual
Page 10
... end, then unload the disc, turn it over and reload it to open . 2 Press c. Press and hold the PWR button for the first time, after installing the CD changer, after changing the car battery, etc. 1 Turn off " on ACC or ON, a disc can be inserted even when the power is being...
... end, then unload the disc, turn it over and reload it to open . 2 Press c. Press and hold the PWR button for the first time, after installing the CD changer, after changing the car battery, etc. 1 Turn off " on ACC or ON, a disc can be inserted even when the power is being...

Owners Manual
Page 31
...for installations or ground connections. amplifier) having RCA connectors. If so, please contact your DVA-5210. Bolts or nuts used for this product to become loose resulting in a serious accident. Be sure to use a rubber grommet to the unit in case of your ALPINE dealer. • The DVA-5210 ... in metal, use only the specified accessory parts. When connecting the DVA-5210 to connect other safety-related system), or tanks should NEVER be aware of the unit. 30-EN SERIAL NUMBER: INSTALLATION DATE: INSTALLATION TECHNICIAN: PLACE OF PURCHASE: Failure to do so may need an ...
...for installations or ground connections. amplifier) having RCA connectors. If so, please contact your DVA-5210. Bolts or nuts used for this product to become loose resulting in a serious accident. Be sure to use a rubber grommet to the unit in case of your ALPINE dealer. • The DVA-5210 ... in metal, use only the specified accessory parts. When connecting the DVA-5210 to connect other safety-related system), or tanks should NEVER be aware of the unit. 30-EN SERIAL NUMBER: INSTALLATION DATE: INSTALLATION TECHNICIAN: PLACE OF PURCHASE: Failure to do so may need an ...

Owners Manual
Page 32
... Face Plate ∗2 Bolt Stud Metal Mounting Strap ∗1 Ground Lead DVA-5210 Chassis Reinforce the head unit with the metal mounting strap (not supplied). This can be done by pressing firmly in the CONNECTlONS section. Install the Detachable Front Panel. Installation Installation Location Before deciding on the mounting location, check that the unit is...
... Face Plate ∗2 Bolt Stud Metal Mounting Strap ∗1 Ground Lead DVA-5210 Chassis Reinforce the head unit with the metal mounting strap (not supplied). This can be done by pressing firmly in the CONNECTlONS section. Install the Detachable Front Panel. Installation Installation Location Before deciding on the mounting location, check that the unit is...

Owners Manual
Page 34
...(Front or rear) connected to the analog input of the processor. • When connecting only to a digital audio processor (with a non-Alpine head unit or Alpine head unit without Ai-NET), it will result in a loss of the other products in the system. Use the optional remote control sensor unit...of TV monitor, please use the optional remote control sensor unit. Only connect the DVA-5210 and digital audio processor using in place, refer to change the system settings of the Fiber Optic Cable. 33-EN Before installing the product, please see "Setting the System Switch" on page 32 and "...
...(Front or rear) connected to the analog input of the processor. • When connecting only to a digital audio processor (with a non-Alpine head unit or Alpine head unit without Ai-NET), it will result in a loss of the other products in the system. Use the optional remote control sensor unit...of TV monitor, please use the optional remote control sensor unit. Only connect the DVA-5210 and digital audio processor using in place, refer to change the system settings of the Fiber Optic Cable. 33-EN Before installing the product, please see "Setting the System Switch" on page 32 and "...


