eMachines T2692 Support Question
eMachines T2692 Support Question
Find answers below for this question about eMachines T2692.Need a eMachines T2692 manual? We have 2 online manuals for this item!
Question posted by maryw854 on March 4th, 2014
Hard Drive
How do I remove the hard drive from a T2692 emachine?
Current Answers
Answer #1: Posted by Support101 on March 4th, 2014 8:33 AM
Support101

Member since:
November 29th, 2013 Points: 48,010

Member since:
November 29th, 2013 Points: 48,010
The pdf documentation here should be able to help you achieve that and more
Please click on "ACCEPT" and/or on "helpful" if my answer helped in any way.
Thanks
Related eMachines T2692 Manual Pages
User Guide - Page 7
... On and Off 2-4
Turning On the Computer 2-4 Turning Off the Computer 2-4
Using Your Computer
Using an Optional Floppy Disk Drive 3-1 Using an Optional Media Reader 3-2
Inserting the Media 3-2 Removing the Media 3-3 Using an Optical Drive 3-4 Using Special Keys on the Keyboard 3-5 Using a Mouse ...3-6 Changing the Display Resolution and Color Depth 3-7 Controlling the Audio...
User Guide - Page 8

Chapter 4
Installing and Removing Drives
Removing the Cover 4-1 Replacing the Cover 4-3 Installing an Expansion Card 4-4 Installing an Additional Hard Disk Drive 4-6 Installing the 5.25-inch Device in the Peripheral Bay 4-9
Chapter 5
Using the Restore CDs
Restoring Your Original Software 5-1
Chapter 6
Using the PowerDVD
About DVD ...6-1 Playing ...
User Guide - Page 9

...
(optional) Power button
Emergency eject hole Load/Eject button Floppy disk drive(optional)
Media reader slots(optional) Power indicator Hard disk drive access indicator
IEEE 1394 connectors (optional)
USB 2.0 connectors (optional)
Headphone jack
Microphone jack USB 2.0 connectors (optional)
NOTE
Chapter 1 Your optical drives may differ from the illustrations described in this user's guide...
User Guide - Page 14

...of your computer, follow these steps: 1. NOTE If the Restore CD is in the optical drive (D:) while your computer. 2. Turning Off the Computer
To turn off the monitor and any other... Setting Up Your System Turn off your computer. 3. The system will appear. To start Windows, remove the Restore CD and restart the computer.
4. Turn on your information and close all application programs ...
User Guide - Page 15

... button
Metal shutter
Chapter 1
Floppy disk
When you must install the operating system on . Also, remove all disks before you are using Windows® with your computer. When the disk pops, remove it clicks into the drive, as OS/2 Warp or UNIX, see the manual that came with that you turn off the...
User Guide - Page 17
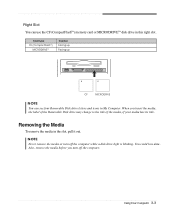
... the CF (CompactFlashTM) memory card or MICRODRIVETM disk drive in this right slot. You could lose data. Removing the Media
To remove the media in the slot, pull it out. Right Slot You can see four Removable Disk drive letters and icons in My Computer. Also, remove the media before you insert the media, the label...
User Guide - Page 18
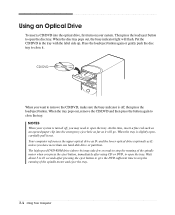
...tray. CD/DVD
When you have more than one hard disk drive or partition. At this time, insert a fine rod such as an opened paper clip into the optical drive, first turn on your system is slightly open ...the disc tray. Wait about 5 to 10 seconds after using CD or DVD, to remove the CD/DVD, make sure the...
User Guide - Page 23

... the computer.
Then disconnect any of your computer. NOTE Turn off the computer and peripheral devices including the monitor and printer. Installing and Removing Drives 4-1
Removing the Cover
You need to remove the cover of the procedures described in your system to the computer.
Chapter 1 2. First of all, disconnect the power cable from the...
User Guide - Page 24
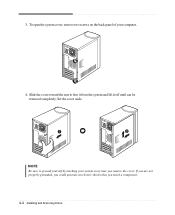
... yourself by touching your computer.
4. Set the cover aside. 3. NOTE Be sure to free it from the system and lift it off until can be removed completely. To open the system cover, remove two screws on the back panel of your system every time you touch a component. 4-2 Installing and...
User Guide - Page 25
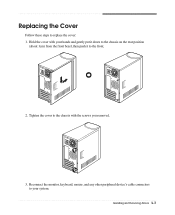
Hold the cover with the screws you removed.
3. Replacing the Cover
Follow these steps to the chassis with your system. Reconnect the monitor, keyboard, mouse, and any other peripheral device's cable connectors to ... on the rear position
(about 1cm) from the front bezel, then push it to the front.
2. Tighten the cover to replace the cover: 1. Installing and Removing Drives 4-3
User Guide - Page 28
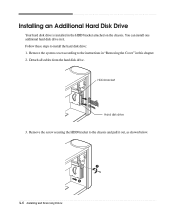
... bracket to the chassis and pull it . Detach all cables from the hard disk drive. You can install one additional hard disk drive in the HDD bracket attached on the chassis.
Installing an Additional Hard Disk Drive
Your hard disk drive is installed in it out, as shown below.
4-6 Installing and Removing Drives Remove the system cover according to install the...
User Guide - Page 29

Installing and Removing Drives 4-7 Set the jumper of the new hard disk drive to the HDD bracket. 4. Slide the hard disk drive into the HDD bracket. 6. With using the screws, secure the hard disk drive to CS (Cable Select). 5.
User Guide - Page 30

Connect the power and hard disk drive cable to the instructions in "Replacing the Cover" in this chapter. 4-8 Installing and Removing Drives Slide the HDD bracket into the chassis and secure it .)
9. Replace the system cover according to your hard disk drive. (If you removed the hard disk drive cable from the motherboard, replace it with the retaining screw, as shown below.
8. 7.
User Guide - Page 31
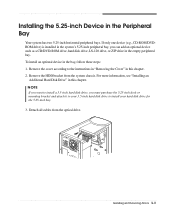
...-inch peripheral bay, you must purchase the 5.25-inch dock or mounting bracket and attach it to your hard disk drive for the 5.25-inch bay. 3. Installing and Removing Drives 4-9 Remove the HDD bracket from the optical drive. Installing the 5.25-inch Device in the bay, follow these steps: 1. If only one device (e.g., CD-ROM/DVDROM...
User Guide - Page 33

...hard disk drive, most optional devices have jumpers that connected to use the secondary E-IDE drive connector. If you want to install is an EMI shield that covers the 5.25-inch drive bay you are to install an optional drive... to this 5.25-inch bay, you can use , remove it from the front panel. 6. Installing and Removing Drives 4-11 Push out the faceplate, pressing outward two tabs ...
User Guide - Page 37
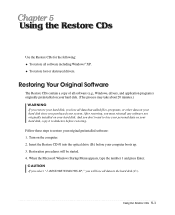
... system. When the Microsoft Windows Startup Menu appears, type the number 1 and press Enter. Turn on your hard disk, copy it to diskettes before your original preinstalled software: 1. Insert the Restore CD #1 into the optical drive (D:) before restoring.
Restoring Your Original Software
The Restore CDs contain a copy of all software (e.g., Windows, drivers...
User Guide - Page 38
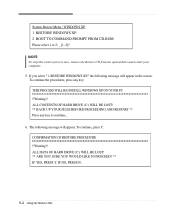
...Please select 1 or 2: _ [1, 2]? NOTE To stop this restore process now, remove the Restore CD from the optical drive and restart your computer.
5. THIS PROCESS WILL RE-INSTALL WINDOWS XP ON YOUR PC...Warning!! If you select "1. ALL CONTENTS OF HARD DRIVE (C:) WILL BE LOST! ** BACK UP YOUR FILES BEFORE PROCEEDING AND RESTART ** Press any key. ALL DATA OF HARD DRIVE (C:) WILL BE LOST! ** ARE YOU SURE...
User Guide - Page 39

...Windows Startup Menu" menu will start. To register with #3 (if there is completed, remove the Restore CD from your hard disk. 8. You can update drivers in the Drivers folder of you lose drivers, install.... If there is no executable installation file. NOTE If the Restore CD is in the optical drive while your computer is booting, the computer will be booted with #2 in the Restore CD #2...
User Guide - Page 43

... My computer doesn't work
Chapter 1
Solution
Computer is not working . If it is not properly connected to turn on your computer.
Hard Disk Drive
Cause Hard disk drive operation seems slow
Hard disk drive access indicator light stays on
Solution
The files stored on your computer and wait about 10 seconds for lost allocation units by...
User Guide - Page 45

... your computer entered power management mode.
Click the OK button. Floppy Disk Drive
Cause Floppy disk drive light stays on the monitor. Use another diskette that the monitor connector is... a diskette, slide the small black tab on the empty desktop area and click Properties. 2. Solving Common Problems A-3 To remove write-protection from the
Screen resolution area. 4.
Make sure ...


