
eMachines T2082 Support Question
eMachines T2082 Support Question
Find answers below for this question about eMachines T2082.Need a eMachines T2082 manual? We have 2 online manuals for this item!
Question posted by cmassey19013 on February 22nd, 2013
Power Supply
I have a emachine t2082 and for the life of me I can't figure out we're the 4pin plug connect to, I know it connects to the motherboard but were at. If you can help me out with this it would be carefully appreciated
charles
Current Answers
Related eMachines T2082 Manual Pages
User Guide - Page 1

...Safety Instructions
The following instructions pertain to use an extension cord with a 3-wire grounding type plug, a plug having a third (grounding) pin. Objects may fall, causing seriousdamage to rest on the...the total amperage rating of all of these instructions carefully.
1 Save these openings. This product should not be connected to a power outlet that the total of all of the ...
User Guide - Page 2
... main system unit cover, observe the following conditions: 1 If the power cord or plug is
plugged back in performance indicating a need for service under any of other ...en place et remettre le cordon d'alimentation.)
ii Improper adjustment of the following precautions: 1 The power supply cord must be unplugged before the main system unit cover is removed. (Separe le
cordon d'alimentation...
User Guide - Page 5
NOTE Depending on the model, your computer's components may vary and look slightly different than those pictured.
v eMachines, Inc. in this material. All other countries. All rights reserved. eMachines, stylized "e" and figure logo are trademarks of this user's guide is subject to change without notice. Before You Read
The information in the United States...
User Guide - Page 8

Approval Statements
Battery Warning Instruction B-1 Fuse Warning Instruction B-1 Laser Product ...B-2
viii
Solving Common Problems
Power ...A-1 Hard Disk Drive ...A-1 Optical Drive ...A-2 Audio ...A-2 Floppy Disk Drive A-3 Display & Monitor A-3 Keyboard ...A-4 Mouse ...A-4
Appendix B. Chapter 4
Installing and Removing Drives
Removing the Cover 4-1 Replacing the Cover 4-3 ...
User Guide - Page 9

Introduction 1-1
Introduction
System Overview
Optical drive Optical drive
(optional) USB connector
(optional) Power button
Emergency eject hole Load/Eject button Floppy disk drive(optional)
Media reader slots(optional) Power indicator Hard disk drive access indicator
IEEE 1394 connectors (optional)
USB 2.0 connectors (optional)
Headphone jack
Microphone jack USB 2.0 connectors (optional)
...
User Guide - Page 11

...large, sturdy desk or table strong enough to support the weight of its components. Appropriate power sources. Chapter 1 No electromagnetic interference. Soft surfaces like beds and carpeted floors attract static... damage the computer's circuitry, and prevent proper ventilation. To prevent static charges, connect all of your system too close to any other source of space around the ...
User Guide - Page 12
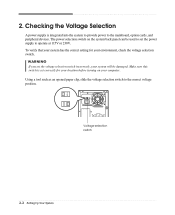
..., and peripheral devices. Make sure this switch is integrated into the system to provide power to the correct voltage position. The power selection switch on your environment, check the voltage selection switch. Voltage selection switch
2-2 Setting Up Your System Checking the Voltage Selection
A power supply is set the power supply to operate at 115V or 230V. 2.
User Guide - Page 13
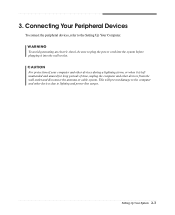
WARNING To avoid generating an electric shock, be sure to plug the power cord into the wall socket. Connecting Your Peripheral Devices
To connect the peripheral devices, refer to lighting and power line surges. 3. This will prevent damage to the computer and other devices from the wall outlet and disconnect the antenna or cable system. Setting...
User Guide - Page 14

... steps: 1. Turning On the Computer
To turn on the monitor, and any other peripheral devices connected to your information and close all application programs you use. 2. 4.
The system will appear....If the Restore CD is booting, the computer will be booted with Restore CD. Press the power button on your computer is in the optical drive (D:) while your computer, follow these steps: ...
User Guide - Page 23

... cards in this chapter. Then disconnect the computer from its internal components.
First of the procedures described in your system to access its power source and from any telecommunications links, networks, or modems before performing any cables connected to remove the cover of your computer.
Then disconnect any of all, disconnect the...
User Guide - Page 30

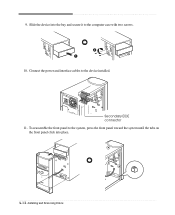
Replace the system cover according to your hard disk drive. (If you removed the hard disk drive cable from the motherboard, replace it with the retaining screw, as shown below.
8. Slide the HDD bracket into the chassis and secure it .)
9. Connect the power and hard disk drive cable to the instructions in "Replacing the Cover" in this chapter. 4-8 Installing and Removing Drives 7.
User Guide - Page 32
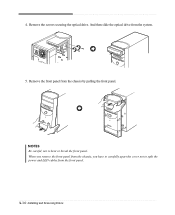
Remove the screws securing the optical drive. NOTES Be careful, not to split the power and LED cables from the front panel.
4-10 Installing and Removing Drives
And then slide the optical drive from the chassis by pulling the front ...
User Guide - Page 34
Slide the device into place.
4-12 Installing and Removing Drives Connect the power and interface cables to the computer case with two screws.
10. Secondary EIDE connector 11. To reassemble the front panel to the system, press the front panel toward the system until the tabs on the front panel click into the bay and secure it to the device installed.
9.
User Guide - Page 35
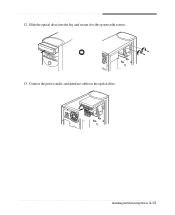
Slide the optical drive into the bay and secure it to the optical drive.
12. Connect the power, audio, and interface cables to the system with screws. 13. Installing and Removing Drives 4-13
User Guide - Page 41
.... After a few seconds, the normal screen will automatically start when you play the DVD that supports 16:9 widescreen and the screen is changed automatically to emachines PowerDVD, and then click PowerDVD.
Using the PowerDVD
NOTE The PowerDVD is available only on a single side. And press the play the PowerDVD as follow...
User Guide - Page 42
...and Africa. Europe, The Middle East, Japan and South Africa.
Refer to on-line help , click the button on -line help . China.
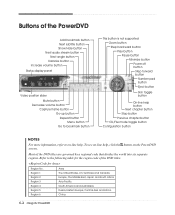
6-2 Using the PowerDVD Most of the DVD titles. Buttons of the ... button Play button Pause button Minimize button Power off button Step forward button Number pad button
Eject button
Skin toggle button
On-line help button Next chapter button Stop button Previous ...
User Guide - Page 43

... connected to see whether the wall outlet works, plug other wall outlet. When the computer turned down by running Disk Defragmenter. (For more information,refer to the Windows Help.
Solving Common Problems
This chapter instructs you how to turn off your computer and wait about 10 seconds for complete discharge and re-plug the power...
User Guide - Page 45

....
Diskette is not properly connected to a diskette
Floppy disk drive can't read the diskette
Solution
Diskette is firmly plugged into the wall outlet and...connected properly. To open Windows Help, click the Start button, and then click Help and Support.)
Diskette is not write-protected. The cable connecting the monitor to your Windows Help in Windows.
Make sure the power...
User Guide - Page 47
... of fuse. Apparatet ma kun tilkobles jordet stikkontakt.
Replace battery only with same type and rating of explosion. Only connect this equipment to the manufacturer's instructions. Attention Debrancher avant d'ouvrir. Disconnect input power before servicing. Approva Statements B-1 Mettre au rébut les batteries usagées conformément aux instructions du...
User Guide - Page 48
Keine durch den Anwender zu reparierende Teile im innern. Überlassen Sie den Service qualifiziertem Service-Personal.
When the power switch is no hazardous LASER radiation with International Electrotechnical Commission (IEC) Publication 825]. N'essayez donc pas de démonter le boiter. B-2 Approva Statements This equipment ...
Similar Questions

I Need A New Video Card For My Emachine T2082. What Should I Get?
(Posted by Doomsdaysp05 3 years ago)

Power Supply Replacement.
Where can I find a replacement power supply for my ET1810-03 eMachine?
Where can I find a replacement power supply for my ET1810-03 eMachine?
(Posted by connelld98 9 years ago)

Power Supply Wiring Schematic For Emachines T3304
The power supply in my eMachines T3304 went out so I removed the side cover to see which power suppl...
The power supply in my eMachines T3304 went out so I removed the side cover to see which power suppl...
(Posted by johnwiseman73 10 years ago)

Power Supply Replacement For Emachines 1831-03 Pc
What type of power supply would be a good replacement for the old power supply in eMachines eT1831-0...
What type of power supply would be a good replacement for the old power supply in eMachines eT1831-0...
(Posted by britstap 12 years ago)
Power Supply Change
I'm just wondering if there are any 350 - 400 watt power supply changes available for this build.
I'm just wondering if there are any 350 - 400 watt power supply changes available for this build.
(Posted by mcian33 12 years ago)