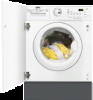
Zanussi ZWT71201WA Support Question
Zanussi ZWT71201WA Support Question
Find answers below for this question about Zanussi ZWT71201WA.Need a Zanussi ZWT71201WA manual? We have 1 online manual for this item!
Question posted by trevormountford on April 28th, 2014
Zwi 71201 Wa. Rear Feet Adjusters, Cannot Adjust / Align / Level.
the allthread seems to be seized in the plastic insert, Wickes claim there are locking "pins" involved, where are they??????
Current Answers
Related Zanussi ZWT71201WA Manual Pages
Product Manaul - Page 3

... and electrical shock.
• The appliance must be replaced by a carpet. • The appliance is air circulation between the appliance and the floor.
• Adjust the feet to
www.zanussi.com
3
Safety instructions
Installation
• Remove all the packaging and the transit bolts.
• Keep the transit bolts. Risk of the installation...
Product Manaul - Page 4

...is no gas lighters or matches have washed your laundry with a stain remover start an extra rinse cycle before you remove all metal objects from the laundry. • The final part of the drying ...ance. • Do not put flammable products or items that you start the appliance.
• Plastic items are wet with an extra amount of detergent.
• Do not dry items if industrial chemicals...
Product Manaul - Page 5

... door catch to prevent children and pets to get closed in the appliance.
1 Detergent dispenser drawer 2 Control panel 3 Door opening handle 4 Rating plate 5 Drain pump 6 Adjustable feet
1
2
3 4
5
6
Child safety
Make sure that children or pets do not climb into the drum. until the groove button anti-clockwise
is
sary use a coin. Warning...
Product Manaul - Page 6

...
7
8
1 Programme selector dial 2 SPIN reduction button 3 OPTION button 4 EXTRA RINSE button 5 DRYING TIME button
6
10
9
6 EASY IRON button 7 START/PAUSE button 8 DELAY START button 9 DOOR LOCKED pilot light 10 Display
www.zanussi.com If using liquid detergent pour it just before starting the programme.
Compartment for liquid additives (fabric softener, starch...
Product Manaul - Page 7

...light off and/ or to select a programme.
1-8 Programme selector dial, spin speed button, drying level and time, and available options
Programme Selector Dial
It allows you to switch the appliance on : the...you can use this button. On cotton programmes the maximum spin speed is recommended for laundry which needs only freshening up to save energy.
Eco
Only for cottons and synthetic ...
Product Manaul - Page 8
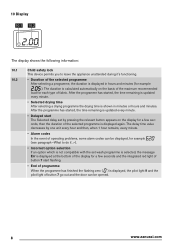
10 Display
10.1 10.2
The display shows the following information:
10.1
Child safety lock
This device permits you to do if...»).
• Incorrect option selection If an option which is not compatible with the set by one unit ...
Product Manaul - Page 9
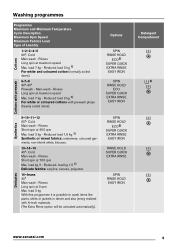
... Extra Rinse option will be activated automatically). Cottons
Washing programmes
Programme Maximum and Minimum Temperature Cycle Description Maximum Spin Speed Maximum Fabrics Load Type of Laundry
1-2-3-4-5 90°- Rinses Short spin at maximum speed Max.
Rinses Long spin at 900 rpm Max. Rinses Long spin at 3 rpm Max...
Product Manaul - Page 11

... structure will already have been damaged and the fabric tends to washing.
Sort the laundry as above, then treat stains with bleach.
1) do not use acetone on each...stain; Grass: soap lightly and treat with the fingertips and a cotton cloth. Before loading the laundry
Never wash whites and coloureds together. Rub particularly soiled areas with bleach, rinse well (whites and ...
Product Manaul - Page 13

...note of the duration drying time of the concentrated detergent.
Do not over dry the laundry in order to avoid creasing of fabrics or garment's shrinking.
• Ensure that...cycle again.
Child safety lock This device permits you to leave the appliance unattended so you to dry your laundry in the machine, to remove any
Personalisation
laundry in a more suitable...
Product Manaul - Page 14

...not working , the red pilot light of water leakage or damage to the laundry. Close the drawer gently.
Turn the selector dial to position to reset the programme/to...to position , to indicate a wrong selection. to another programme when the machine is working . Load the laundry
Open the door by pressing button 2
When selecting a programme, the appliance proposes automatically the maximum spin ...
Product Manaul - Page 15

... machine will start after choosing the desired programme and before you want your laundry to change the spin speed, if you start the programme. Cancelling the ...can cancel or modify the delay time at a different speed. Important! Changing a running programme
It is locked. Important!
Press button 7 again to select the desired delay.
"Washing programmes" for a few seconds...
Product Manaul - Page 16

...dial to the drain pipe.
1. Leave the door open ! The door pilot light 9 is locked to the water level and temperature!). If you cannot open the door but - At the end of the programme, ...to dry up to remove any residual moisture and obtain the best drying performances.
3. Remove the laundry from the drum and carefully check that the drum is updated every minute.
6. Caution! The ...
Product Manaul - Page 17

... clean the empty drum, the gasket and the door with technical fabrics.
Remove the laundry from the drum. The lowest values you set a washing programme and only 10 minutes...or any programme position (except ).
7. Washing and Timed Drying The recommended load size is locked. Load the laundry and add detergent and fabric softener.
2.
If you washed and dried light colored fabrics ...
Product Manaul - Page 18

...out any cleaning or maintenance work.
Replace the drawer and run the rinse programme without any laundry washing, and according to objects such as follows: • Unplug the appliance. •...cleaned regularly. out under a tap, to periodically use normally contains lime. Proceed as safety pins, coins etc. Care and cleaning
Warning! Before opening the pump door, switch the appliance...
Product Manaul - Page 22

...feet have not been removed.
• Check the correct installation of the appliance. The electronic unbalance detection device has cut in because the laundry is not evenly distributed in the drum.
• Redistribute the laundry. The door lock...bolts and packing have not been adjusted
• Check the correct levelling of washing cycle.
The laundry is redistributed by reverse rotation of...
Product Manaul - Page 25

... the machine does not touch the wall or other kitchen units.
Caution!
Any necessary adjustment can be level and stable. Check that air circulation around the machine is more stable.
The feet may be tight to adjust as they incorporate a self locking nut, but the machine MUST be made with screws, the wood panel must...
Product Manaul - Page 26

... be connected to a cold water supply. The inlet hose is no more than 90 cm (35.4'') and no less than 60 cm (23.6'') above floor level.
26
www.zanussi.com The appliance must be connected
to a cold water supply.
• Before connecting up the appliance to new pipework or to pipework...
Product Manaul - Page 28

...
3
B
2
8
28
www.zanussi.com The recess should have the dimensions shown in the hinges (1) and the counter-magnet (6) provided with the appliance, at the right level (Fig. In this case it is originally prearranged for the assembly of the appliance.
Building in
This appliance has been designed to be built into...
Product Manaul - Page 29

...-598 mm - thickness 16-22 mm The height (C-Fig. The hinges can be raised. To align the door perfectly it is necessary to drill two holes (dia. 35 mm, depth 12.5-14 ...mm depending on the depth of door furniture) on the adjacent furniture's dimensions. B), adjust the door and tighten the screw again.
4 6
8
Caution! To enable a correct operation of this device, ...
Product Manaul - Page 30

... to the floor using four appropriate countersunk screws (see Fig. With the appliance installed adjust all four feet ensuring the machine is stable, and a clearance of approximately 5 mm is not possible... should be one solid piece, due to the additional height required, ensure that any further fine adjustment to back
Hardwood strip 5 mm x 25 mm
Where the appliance has been raised by mounting ...
Similar Questions

Press Power On And All Seems Ok But No Buttons Respond To Any Adjustment Or Star
Start button
Start button
(Posted by zarifmirza 1 month ago)

Rear Drum Seal, Zdc37200w,
Need instructions on how to fit new seal, old one fell off, tried glueing back on but has not worked...
Need instructions on how to fit new seal, old one fell off, tried glueing back on but has not worked...
(Posted by sgbell 3 years ago)
Feet Unbalanced On Washer Unsure Which Size Spanner
Hi, Would you know which spanner size you need to adjust the feet as been unbalanced since I purchas...
Hi, Would you know which spanner size you need to adjust the feet as been unbalanced since I purchas...
(Posted by riverstream100 7 years ago)

Zanussi Zwt 71201 Wa
The machine is not rinsing, spinning and taking conditioner from compartment operating under a progr...
The machine is not rinsing, spinning and taking conditioner from compartment operating under a progr...
(Posted by sjmjgm 10 years ago)

Ovens
Does the flame inthe ovens go up or down when you adjust the oven temperature
Does the flame inthe ovens go up or down when you adjust the oven temperature
(Posted by Anonymous-130417 10 years ago)